
 House Foundation Layout & Construction
Chapter 7 of How to Build Your Dream Home © 2020 InspectApedia.com

- POST a QUESTION or COMMENT about how to identify the architectural style of buildings and building components
How to lay out & build the foundation of an owner-built home.
This article series provides an updated version of Hubbard Cobb's Your Dream Home, illustrated by Sigman-Ward, first published by Wm. H. Wise & Co. New York, 1950.
InspectAPedia tolerates no conflicts of interest. We have no relationship with advertisers, products, or services discussed at this website.
- Daniel Friedman, Publisher/Editor/Author - See WHO ARE WE?
Chapter 7 The Foundation of the House
 This is Chapter 7 of BUILD YOUR DREAM HOME at InspectApedia.com - online encyclopedia of building & environmental inspection, testing, diagnosis, repair, & problem prevention advice.
This web page is also available as THE FOUNDATION of the HOUSE [eBook] Foundation Layout and Construction, or as a PDF image at THE FOUNDATION of the HOUSE [PDF] original page images.
Once the exact location for the house has been decided, the next job is to clear the land of brush and trees. Give some thought to which trees you remove. There is no point in going in with an ax and taking down all forms of vegetation only to have to replace some from a nursery when the house has been finished.
Save as many good shade trees as vou can, but be sure to allow yourself ample working room. You should also provide enough room for trucks to come in with materials for the house and for temporary storage of these materials.
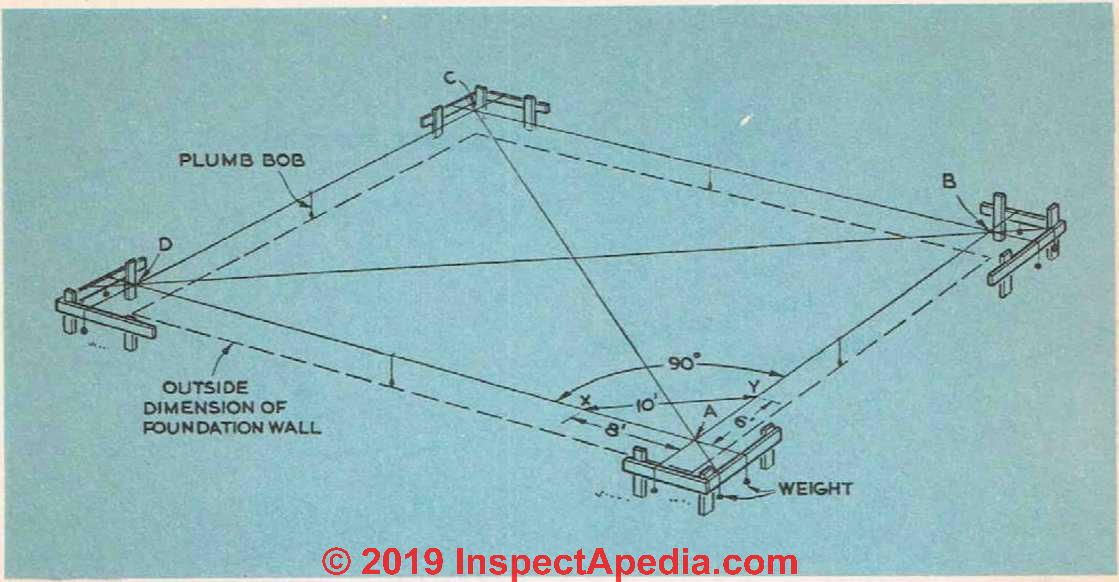
Fig. 1. How lines and batter boards are side dimensions have been set, additional used to lay out the four corners and dimsnsions of the building. After the outlside dimensions have been set, additional lines can be strung to show the outside limits of the excavation.
[Click to enlarge any image]
Clearing the Land
If you have a wooded lot and there are a great many trees that must be removed, the most painless way to get rid of them is to get hold of a local dealer in fireplace and cord wood. He will probably be only too glad to take down the larger trees for you and may even pay you a few dollars per cord to boot. All in all, you may make enough out of this to pay the cost of a man and bulldozer to rip out a few of the stumps.
Clear the land around the site of the house of all dead wood and stumps.
ny wood left in the ground will attract termites, which may in time get to the house. Get rid of all underbrush surrounding the building site as tools and materials have a bad habit of getting lost in tall grass and much time can be wasted looking for them.
Laying Out the Building
Once you have the site cleared you are ready to lay out the building. If it has been necessary to have the plot surveyed, the four corners of the building can be located and marked by the surveyor. This is probably the best way to take care of the job, but it can be done by the home builder him-self without any special equipment.
Before you pick exact location of vour house, check to be sure that there are no local codes that govern how far a house must be set back from the road or whether or not the house must line up with the others on adjoining lots. Fig. 1 shows how a building can be laid out by means of lines, posts and batter boards.
First of all, take four wood stakes and drive nails or tacks into their tops at the center. If the house must be set a certain number of feet from the road or sidewalk, measure off this distance and then drive one of the stakes into the ground, marking off one corner of the building. Measure off from the first stake the length of the side of the building that is to face the road and drive in a second stake. This stake should be the same distance from the road or sidewalk as the first stake. The next job is to measure off the width of the house from these two base stakes and drive in your second set of stakes at their approximate position. See Fig. 2.
What you must do now is check to be sure that each of the four corners of the building is exactly 90deg. Construct batter boards three or four feet back from the stakes at each of the four corners, as shown in Fig. 3. Now string lines between these boards so that the lines pass over the tacks driven into the four stakes. As these lines will have to be moved before the job is finished, it is best not to tie them to tlie batter boards. Notch the boards and tie weights to the ends of the lines so that they hang over the batter boards. Be sure that the batter boards are all at the same elevation. See Fig. 4.
Measure off a distance of 6' from stake A along AB. Drive a stake in at this point (I ). Now measure off 8' from stake A along line AD and drive a stake in at this point (A").
Move tlie lines strung between the batter boards until the distance from stake X to stake Y is exactlv 10'. This will insure that the angle formed at stake A is exactly ninety degrees (90° ).
Reposition stake A so that the tack head is directly under the point where lines AB and AD cross. Drop a plumb line down from this point. Check the other four corners in the same fashion. When you think you have all four corners exactly 90°, run diagonal lines from corner to corner and then measure them. If the lines are equal, your building is square.
Lay additional lines across the batter boards to indicate the width of the foundation wall. Keep the batter boards and lines in place. They will serve as guides for building the foundations.
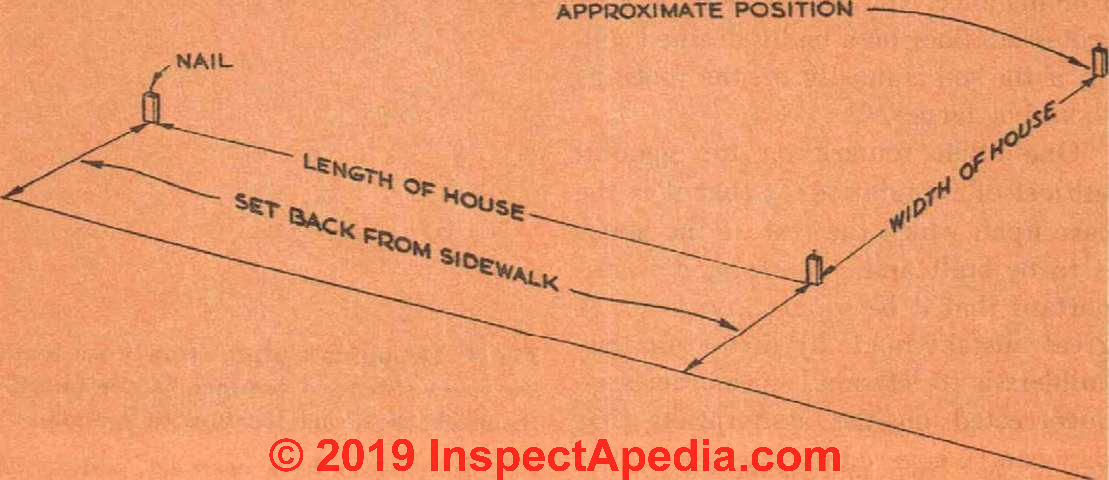
Fig. 2. The first step in laying out the location for the excavation work.
Details for using batter boards to lay out a building are at
Excavation for the Building
Types of Foundation
Before any excavation work gets underway, the typs of foundation the house is to rest on must be decided. Too much emphasis cannot be placed on the importance of setting the house on a firm and permanent base that will not settle and that will anchor the house firmly to the ground. Practically every section of this country is subject, at one time or another, to violent storms of some sort, and unless the house foundations are solid and the house bolted to this base, there is a good possibility of the house being torn loose.
The foundation must be able to carry7 the entire weight of the house without settling. Soil conditions vary greatly and, therefore, before you select any particular type of foundation, it might be wise to check with some local builders and see how they feel about the most suitable foundations for the type of soil you are building on. For instance, you do not want a concrete-slab floor on a badly drained soil, or, if the soil is mostly fill the footings should be larger.
One other remark on the general subject of foundations is that it is the base upon which the rest of the house is to be built and, therefore, it is important that it be square and level. A great mistake made by many amateur builders is to let small inaccuracies go uncorrected on the assumption that they can be covered up later on. Don’t make this mistake. A slight error in the foundations or framing can haunt you right through the entire project. The time required to make a double check on all phases of the building operation is well worth while.
There are several different foundations that a house can be built on. The cheapest and simplest one is made of wood or masonry piers sunk into the ground. These posts or piers make a suitable foundation for small summer-homes or homes built in mild climates, but they are not suitable for year-round homes where there are cold winters because the first floor is unprotected and is chilled by the cold air passing under it.
The conventional house, built forall-year-round living in cold climates, with or without basement, should have a continuous foundation wall of masonry. This insures adequate support for the building and also makes possible a warm first floor.
The masonry used for this type of foundation can be poured concrete or masonry blocks. If masonry blocks are selected, use concrete rather than cinder blocks for below-grade (below ground level) construction.
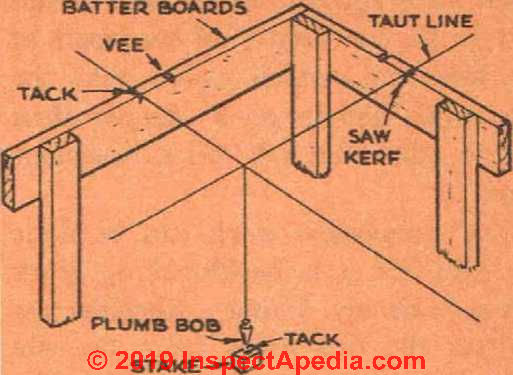
Fig. 3. Dropping a plumb line down from the lines extended between batter boards to check the exact location of a stake.
Excavation for House with Basement
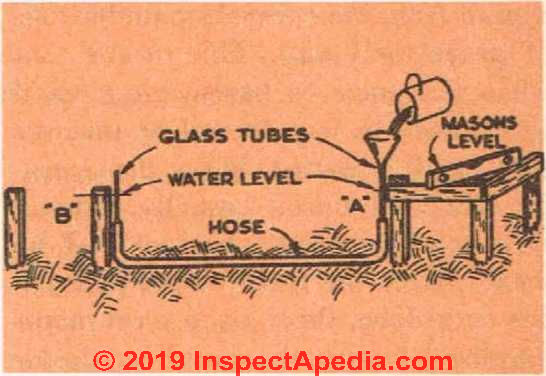
Fig. 4. A simple way to get batter boards at the same elevation.
If you decide to build a house with a basement, your first job is a rather extensive one of excavation. If the ground is level and the foundation is at grade level (ground level), you should plan to have at least 7' of headroom in the basement, which means that the excavation should go 6" deeper than this to allow for a 6"-thick basement floor.
The excavation work can be done by hand but it is backbreaking work and goes slowly. Using a wheelbarrow to haul the dirt away from the site rather than tossing it up with the shovel will save time and energy. As you dig, leave a narrow ramp that, when covered with planks, will make a runway. It is hardly practical these days to hire labor to dig out an excavation by hand. The quickest and cheapest way in most cases is to call in a power shovel. While this equipment with an operator costs a great deal more per hour than a day laborer, it does the work so rapidly that there is, in most cases, a considerable saving in cash.
If possible, try to be on hand when the shovel is at work. Unless you are, the operator will probably bury all the topsoil from the excavation under tons of gravel and clay. This means that when you come to landscaping you’ll either have to buy topsoil or uncover that which is buried. Have the operator dump all topsoil (usually running to a depth of about one foot) off by itself.
After the main excavation job has been done, there are several minor digging jobs that the shovel can do for you that will save time and money later on. Trenches for water pipes and sewer lines can be dug to within a few feet of the excavation. The excavation
for a septic tank or cesspool can also be made and one for an outside fuel-oil storage tank, if this is required. An outside underground coal bin is well worth considering as it gives you more room in the basement as well as removing much of the dirt and dust that accompanies coal when stored indoors. If you plan to build a breezeway and garage in the future, have the shovel dig the foundations for them.
The Area to Be Excavated
If the soil is compact, you may be able to get by without any outside form for poured concrete foundations as the earth will serve the purpose. In this ease, you should go to work with a shovel and clean up the corners of the excavation as well as complete any trenching, window wells, etc.
The exact area to be excavated is going to depend on local soil conditions, drainage and the type of material used for the foundation. If the soil is well packed, well drained, and you plan to use poured concrete, it may be possible, as mentioned before, to use the sides of the excavation as the outside forms for the concrete. In this case, the excavation should be laid out and dug to the exact dimensions of the house.
If the soil is not well drained and you want to be sure that the basement is going to be dry, drain tile can be laid along the base of the foundation on the outside.
This means that the excavation is going to have to be about two feet wider and you’ll need outside to make your opening about two feet forms. If you plan to use masonry wider so that you will be able to work blocks for the foundation, you will have on the outside face of the wall.
How to Construction House Foundation Footings
The footings are the base that supports the foundation wall and, of course, the entire weight of the house. They must be used with all types of foundations, even piers. In normal soil conditions, the footings should be as deep as the foundation walls are wide and twice as wide as the walls. In other words, if the foundation walls are to be 10" thick, the footings should be 10" deep and 20" wide. The foundation is then centered on the footing so that the footing extends out 5" bevond the foundation on each side.
Footings should be made of poured concrete and they must extend below the frost line. If they do not, there is a strong possibility of frost getting in under the footing, heaving it up and thus cracking the foundation wall as well as throwing the entire house out of plumb.
In most cases, you will not require any forms for the footings as the sides of the trench dug for them will serve the purpose. This trench should be dug by hand and you should try to get it as square as possible. Footings poured into a trench with a rounded bottom will not have the carrying capacity of those with a square, even base.
If the walls of the excavation are to serve as the outside forms for the foundation wall, it is going to be necessary to undercut into this wall for a distance of 5" for the footing. The best way to handle this situation is to place a 2"x4" on edge 15" in from the wall of the excavation.
Drive stakes along the inside of this board so that it is held securely in place and be sure that it is level because it will serve as a top to the form for the footing. Now go ahead and undercut into the excavation for 5" and then dig the trench. See Fig. 5. Make the sides and bottom of this trench as clean as possible. If the soil is very dry and tends to crumble, dampen it a little before you pour the footings.
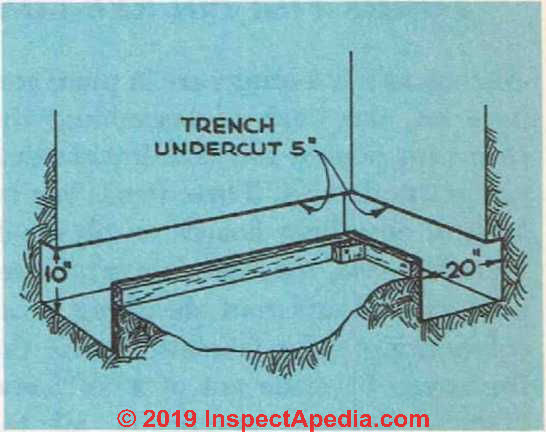
Fig. 5. Excavation cut back to make an earth form for the footing. A 2"x4" on edge along the inside edge of the cut serves as a form for the top of the footing and also as a means of anchoring the base of the foundation forms in place.
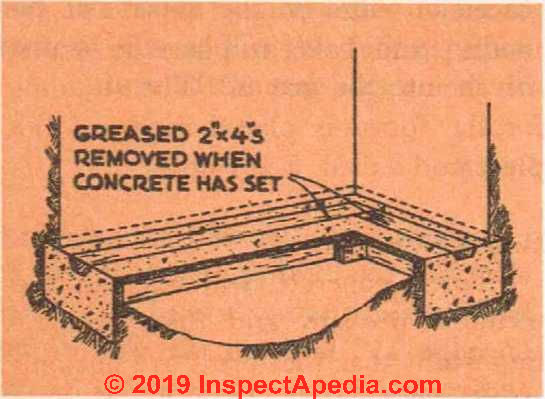
Fig. 6. A recess can be made in the footing by setting a beveled and greased 2"x4" into the concrete before it is hard. This is removed before the foundation forms are installed.
Footings should be poured in one operation. The usual mix is 1 part cement, 3.75 parts sand and 5 parts gravel. The method of surfacing the top of the footings will depend on what materials are going to be used for the foundation wall. If you plan to use masonry blocks, the top of the footings should be level and smooth.
If you are going to use poured concrete, you want to make a key slot in the footings so that you will get a good bond between footings and foundations. This key slot can be made by taking a 2"x4" and beveling the edges. Now before the footings have set, force this 2"x4" down along the middle of the
footings. See Fig. 6. Grease the 2"x4" before you set it into the concrete so that it can be removed easily after the footings are hard. If you arc going to use poured-concrete foundations, be sure that the footings do not extend above the 2"x4,/ that is serving as the inner form. The reason for this is that the 2"x4" can be used later on to attach the foundation forms in place. Keep the fresh concrete covered and damp until such time as the concrete has set hard.
How to Use Forms for Poured Concrete Foundation Walls
As soon as the footings are in place and have set, the work of assembling the forms for poured-concrete foundations can get underway. These forms can be built of sheathing boards or plywood. In either case, the materials can be reused as wall and roof sheathing or as sub-flooring. The framework for the forms can be made out of 2x4s and 2x6s.
Because practically all the material required for forms can be reused, it is important that you do as little cutting as possible. Use your lengths of short dimension for the framework and allow them to extend up beyond the top of the forms rather than cutting them to exact size. It is usually advisable to use special concrete-form nails with two heads, as these can be removed easily and without damage to the wood. You can either build the forms in sections and then put them together or build them all in one piece.
Attaching the Base of the Forms
There are several ways to attach the base of the forms in place. If you used a 2"x4" as a form for the top of the footing, this can serve as a nailing base for the sole plate of the form. See detail in Fig. 7- Place a 2"x4" or 2"x6" down along the footing, allowing the edge to overlap the 2"x4" staked to the ground. Spike the two together and then use the sole plate to toe-nail the vertical framework of the forms to.
When the time comes to put on the sheathing for the forms, be sure that the first course extends far enough down so that its lower edge can be nailed to this base plate as well as to the vertical studding.
If the footings come just level with the ground, a 2"x4" or 2"x6" can be placed on edge on the outside of the footing and held in place by stakes driven into the ground. The studding for the forms is placed inside of this plate and nailed. See Fig. 8.
Bracing the Concrete Foundation Wall Forms
Poured concrete will exert a tremendous pressure and, therefore, it is important that the forms are not only solidly built but are braced so that the weight of the concrete will not force them out of position.
Figs. 7 and 8 show two different methods of bracing the forms.
You will note that outside as well as inside forms are used in these illustrations. As previously mentioned, whether outside forms are necessary will depend on local soil conditions.
Dry soil that tends to crumble easily does not make a very adequate outside form because, in the first place, the dry soil will absorb moisture from the concrete before the concrete is hard, and, second, as the concrete is poured, some of this soil is bound to get mixed in with it. This will cause weak spots in the concrete and may even cause the wall to leak.
If no outside form is required, a 2" x 6" or wider board can be set along the edge of the excavation on edge to provide a form for that portion of the foundation extending above the ground and also to serve as a top guide in getting the foundation level. This outside form must be braced adequately and it must be level.
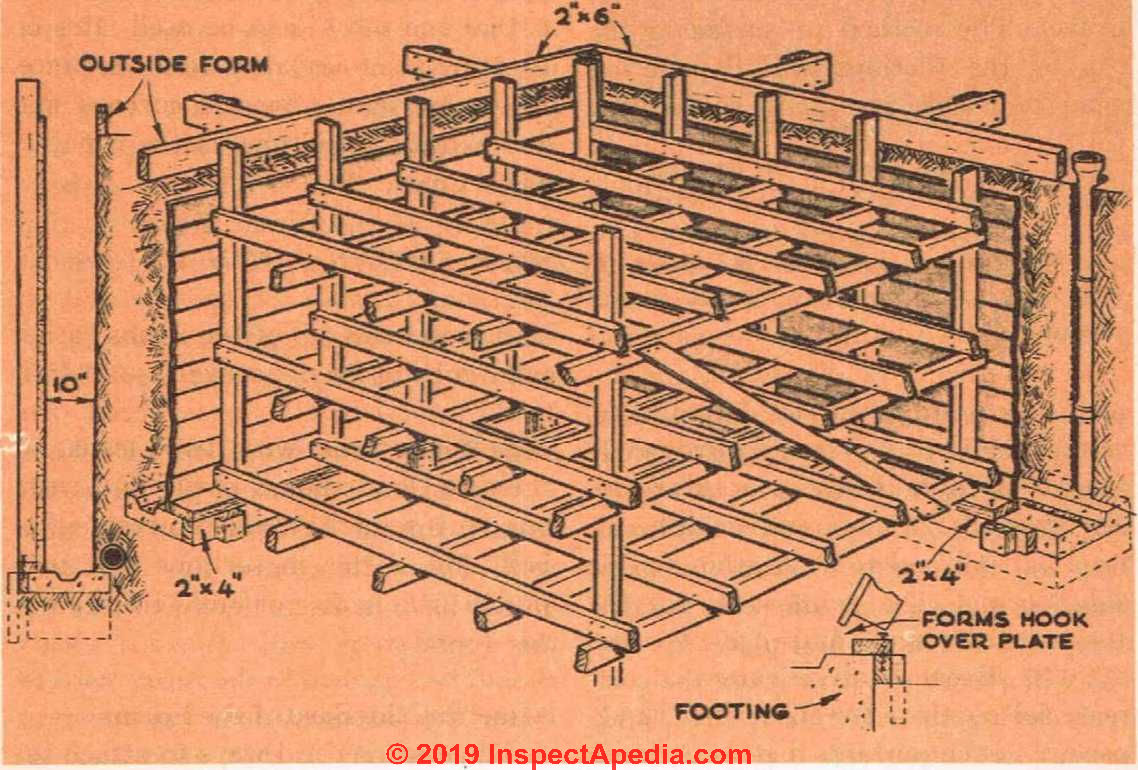
Fig. 7. One method of supporting the forms for the foundations. The detail shows a 2"x4" spiked to the top of the footing form. The siding used for the forms overhangs the form framework enough so it will hook behind this 2"x4".
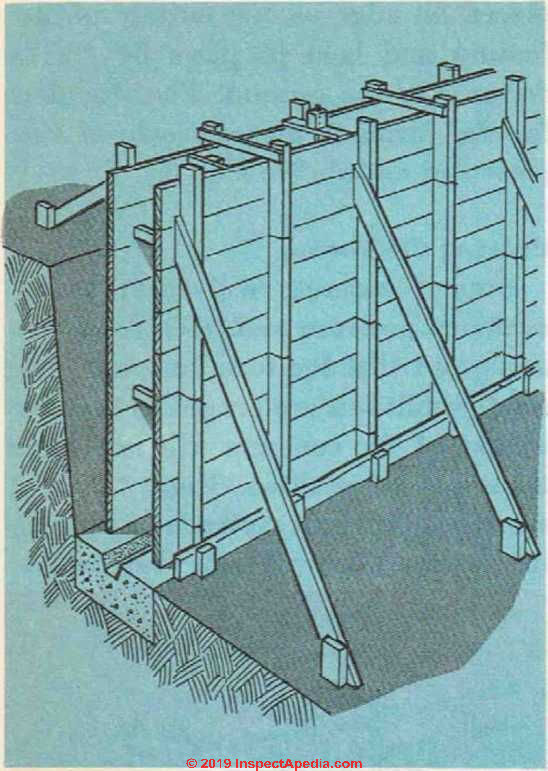
Fig. 8. Another method of bracing the forms for the foundations. A length of 2"x4" on edge along the base serves to hold the lower portion of the form in place. Diagonal braces support the upper portion.
Studding for Concrete Wall Forms
Studding for the forms should be spaced no more than 18" on center, and the sheathing is applied on the inside of the studding so that the weight of the concrete will not force it awaj’ from the studding as would be the case if it were applied on the outside. If you use both inside and outside forms, 1" x 2" spacers should be used to keep the two halves of the form an equal distance apart. The inside and outside studding of the forms should be tied together with No. 10 wire to prevent spreading. Install the spacers first so that, as the wire is tightened, the forms will not be pulled together. See Fig. 8.
Stair Well; Windows; Girder Pockets
Fig. 9 shows details of the forms necessary for the basement outside stair well. The walls around this stair well do not have to be as thick as those for tlie foundation wall. Beveled cleats should he attached to the forms used to frame the basement door (as shown in the illustration) so that, after the concrete is hard, the cleats, which remain embedded in the concrete, can be used to fasten the door frame in place. For these cleats, use wood treated to resist decay and insects.
You will need windows in the basement, and the openings for these should be cut in the forms and framed. You can build these forms for window frames out of wood or you can purchase metal ones intended for use with metal window sashes. See Fig. 10. As these windows will be belowT or, at best, near ground level, you will also need wells around them on the outside. These wells can be dug by hand and can be made out of either poured concrete or metal. Concrete window wells should be 18" deep and their walls should be 6" thick. If there is to be a coal chute into the basement, this should be installed in the forms. If you plan on having an underground coal bin with an access door into the basement, frame the opening for the door at the base of the forms.
You must also make a pocket in the foundation wall at each end for the girder, which must be used on all wood-floor houses, to support the floor joists. The pocket for the girder we have chosen should be 8" wide and about 8/4" deep. The girder should extend about Vs" above the top of the foundation wall. See Fig. 11.
The inside of the wood forms are often greased to make it easier to remove them after the concrete has set. However, do not grease them if you plan to finish off the inside foundation wall with paint later.
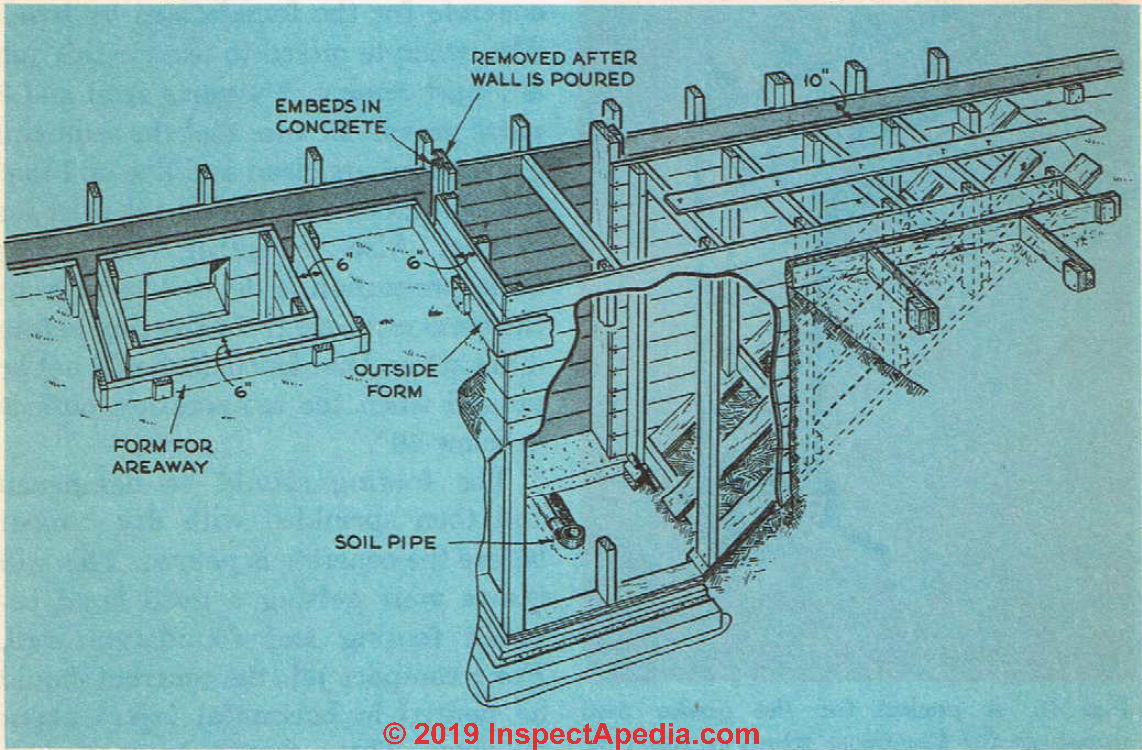
Fig. 9. Forms for the basement stair well should be constructed at the same time as those for the foundation walls. [Click to enlarge any image]
Note the detail of the doorway into the hasement. Beveled cleats are embedded into the concrete and will serve as a nailing base for the basement doorway frame. The areaway around the basement window should extend for at least 18" below the bottom of the window opening.
How to Pour Concrete Foundation Walls
If you want the foundation walls to be watertight, the entire wall must be poured in one operation. There are several ways in which this can be done. One is to order ready-mixed concrete delivered to the site.
This comes in trucks and is ready to pour on arrival. The other method is to rent a concretemixer and have enough extra help on hand to mix, pour and tamp the concrete in the forms. In fact, even if ready-mixed concrete is used, you should have additional help to aid you in tamping and spading the concrete as it is poured. It is not practical to try to mix the concrete for the foundations by hand.
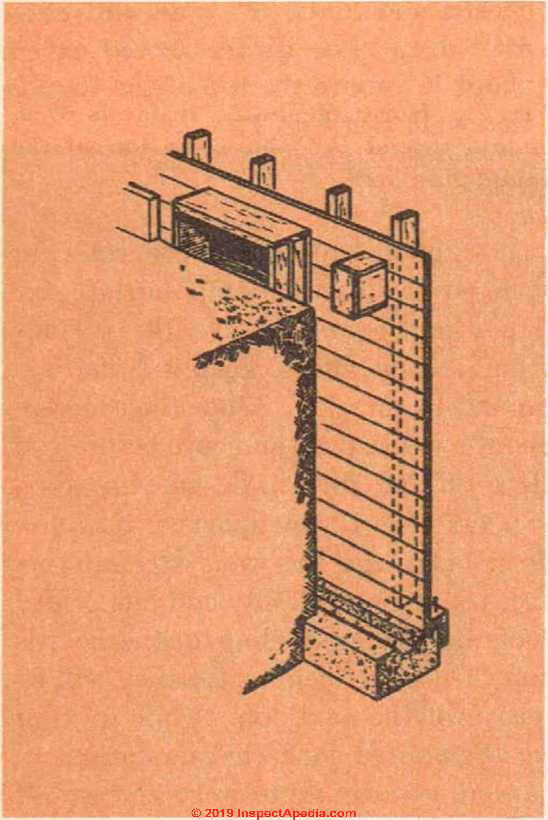
Fig. 10. A pocket for the girder and openings for basement windows must be built into the form. The frame for the window opening has beveled cleats on the sides which remain in the concrete after the forms are removed and serve as a nailing base for the window frames.
The concrete mixed to use for this job is 1 part cement, 2% parts sand and 3 parts gravel. Be sure that the sand and gravel used are clean and fine and that water suitable for drinking is used for mixing. Also remember that unless some precaution is devised to prevent the fresh concrete from freezing before it has set and hardened, it should not be poured when the temperature outside is below 40°.
The footing should be dampened and then sprinkled with dry cement before the concrete is poured. This will insure your getting a good bond between footing and foundation wall. For a compact job, the concrete should be poured in horizontal layers about 6" deep. These should be spaded so that the concrete is compact and free from air pockets.
Do not, however, spade and hoe too much, for this will bring the large-size aggregate to the top.
Keep in mind that concrete must be poured 30 minutes after mixing the dry cement with the sand. If the concrete is not used during this period, it will begin to set and will not have the same strength as freshly mixed concrete. Do not try to make concrete that has once set workable again by adding water to it; this will produce inferior concrete. As the concrete is poured, remove the 1" x 2" spacer boards from between the forms. Be particularly careful that the concrete is worked in around window' and other openings.
Installing Anchor Bolts in Concrete Foundation
After all the concrete has been poured, give it time to set a little and then install the anchor bolts. If you prefer, these can be installed in the forms before the concrete is poured by hanging them on spacer strips in the forms. These anchor bolts are used to tie the wood sills and framework to the foundation. Anchor bolts should be %" or %" in diameter and should be spaced between 6' and S' apart, with bolts a foot or so from each corner. They should extend about 18" into the concrete and should extend above the finished wall about 3" to allow them to be slipped through holes in the sill and then fitted with washers and nuts.
Keep the bolts about 3" from the outside of the foundation wall so that they will come at about the center of the sill. After these anchor bolts are in place, smooth off the top of the concrete and then cover it with damp burlap, tar paper or boards to save the surface from damage and to keep it from drying out too quickly.
Allow the concrete about a week to set and cure before you strip off the forms. Be careful when you take the forms apart so that you do not damage the wood beyond further use. Knock off any odd bits of dry concrete that may cling to the boards and then store them where they will be ready for the next job.
While waiting for the poured-concrete foundations to harden, you can go to work and install the additional footings and piers that will be needed for the girder, and footings for the chimney and fireplace.
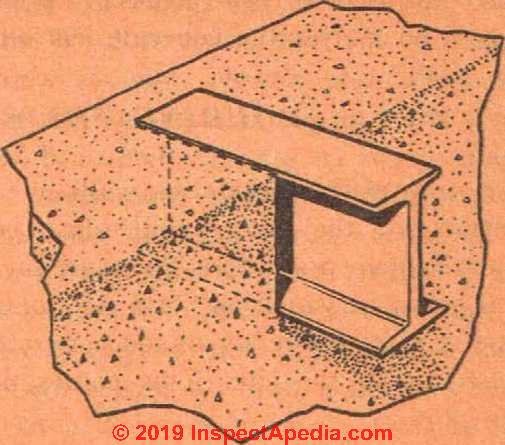
Fig. 11. The steel I-beam, if one is used, should extend 1/8" above the top of the foundation wall.
Girder Installation in Home Construction
This heavy wood or steel beam is used to support the ends of the floor joists.
It is not required for homes with concrete floor slabs because no wood joists are required in this type of construction. The ends of the girder are supported by the foundation walls. When the walls were poured, recesses were made at the proper locations so that the girder could be set into them and be level with the top of the foundation.
The girder can be one solid piece of heavy timber, it can be built up of two or more pieces of stock or it can be a steel I-beam. For our purposes, we have selected a built-up girder made out of three pieces of sound 2" x 1U" These are nailed together with 20d nails placed near the edges on both sides. The nails are spaced every 2' and, by alternating the spacing on the sides of the girder, you will have a nail at top and bottom passing right through the girder every foot or so. A 6" steel I-beam can be used in place of this built-up girder.
Bearing Posts
Of course, you will never be able to get one solid piece of timber that will run from wall to wall. There will be some joints and these must be spaced in such a way that they come over the bearing posts. For our purposes, posts of 4"x6" will do.
The amount of weight a girder can effectively carry will depend on its size and the number and the distance apart of the bearing posts. The more bearing posts used, the lighter the girder can be, but, of course, a great many bearing posts will make the basement unfit for other purposes. The trick is to hit a happy medium between the thickness of the girder and the number of posts used to support it.
Many persons make the mistake of assuming that the load on the girder is the same as that on the foundation wall and, therefore, does not require a solid footing and support.
This is a very grave error and is the cause of many weak and sagging floors. A girder that is located in the exact center of a floor will carry about half the total floor weight. The other half will he divided equally between the two foundation walls. Even when the girder does not run through the exact center of the floor, it will carry about one-half the total weight of the floor and the load imposed on the floor.
You can see, therefore, that it is important that the girder be as strong and solid as possible without wasting money or materials.
Installing the Girder
If the house is not to have a fireplace, setting the girder in place is more
or less a simple matter. The first step is to pour the footings for the bearing posts that support the girder. These can be of the type shown in Fig. 12. They are approximately 1 foot square and about 6" in depth. Their location should be such as to divide the total distance between the foundation walls into thirds, but, of course, a slight difference one way or the other is permissible. After these footings are hard and the forms have been removed from the poured-concrete foundations, you can put the girder in place and then install the bearing posts.
The posts should be cut to the exact size and then placed on the footings and braced so that they will stand upright. The sections of the girder can then be put into position, one end resting in the recess made for it in the foundation wall and the other end resting on the bearing posts. The additional sections of the girder can be installed in the same manner. Naturally, it is very important that the girder be absolutely level. If it isn’t, your floor will have either a crown in the middle or a slight depression.
Steel girders can be put into place before the footings are in and, in fact, you may find that this is a great deal easier to do than trying to get the girder level after the footings have been poured.
The sections of the girder should be hooked or bolted together and the girder set in place. Support it by “figure A” or other temporary braces placed near the joints and get it absolutely level. Then bolt the pasts or beams in place. Now the concrete can be poured around the ends of the posts to form the footings. As soon as the footings are hard, the temporary braces can be removed and the girder will be supported by the posts resting on the footings.
If you pour the footings first, you may have some trouble in getting the steel beams cut to just the right size. They should fit exactly because of the importance of having the girder level.
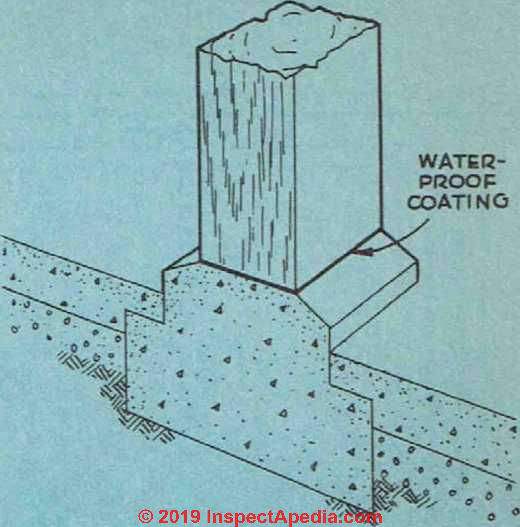
Fig. 12. An excellent type of concrete footing and foundation to use for wood bearing posts. The thin coat of waterproofing prevents the end of the post from rotting and if the footing should settle it will not crack the basement concrete floor.
Chimney Footing Construction
Footings for the chimney should be 12" in depth and at least 6" wider on all sides than the chimney itself. Before deciding the final dimensions of the footing, be sure to consult the installation specifications for the type of heating equipment you intend to use, in case they require some minor readjustments.
If the house is to have a fireplace in basement, first floor or both, the footing must be 12" in depth and 3' by 6' in area.
Rather than use a wood or steel girder under the first floor, a wall of masonry blocks can be built out from each side of the fireplace to support the floor joists. One of these walls can run right over to the nearest foundation wall. The other wall must be broken a few feet from the fireplace to allow an opening for a door.
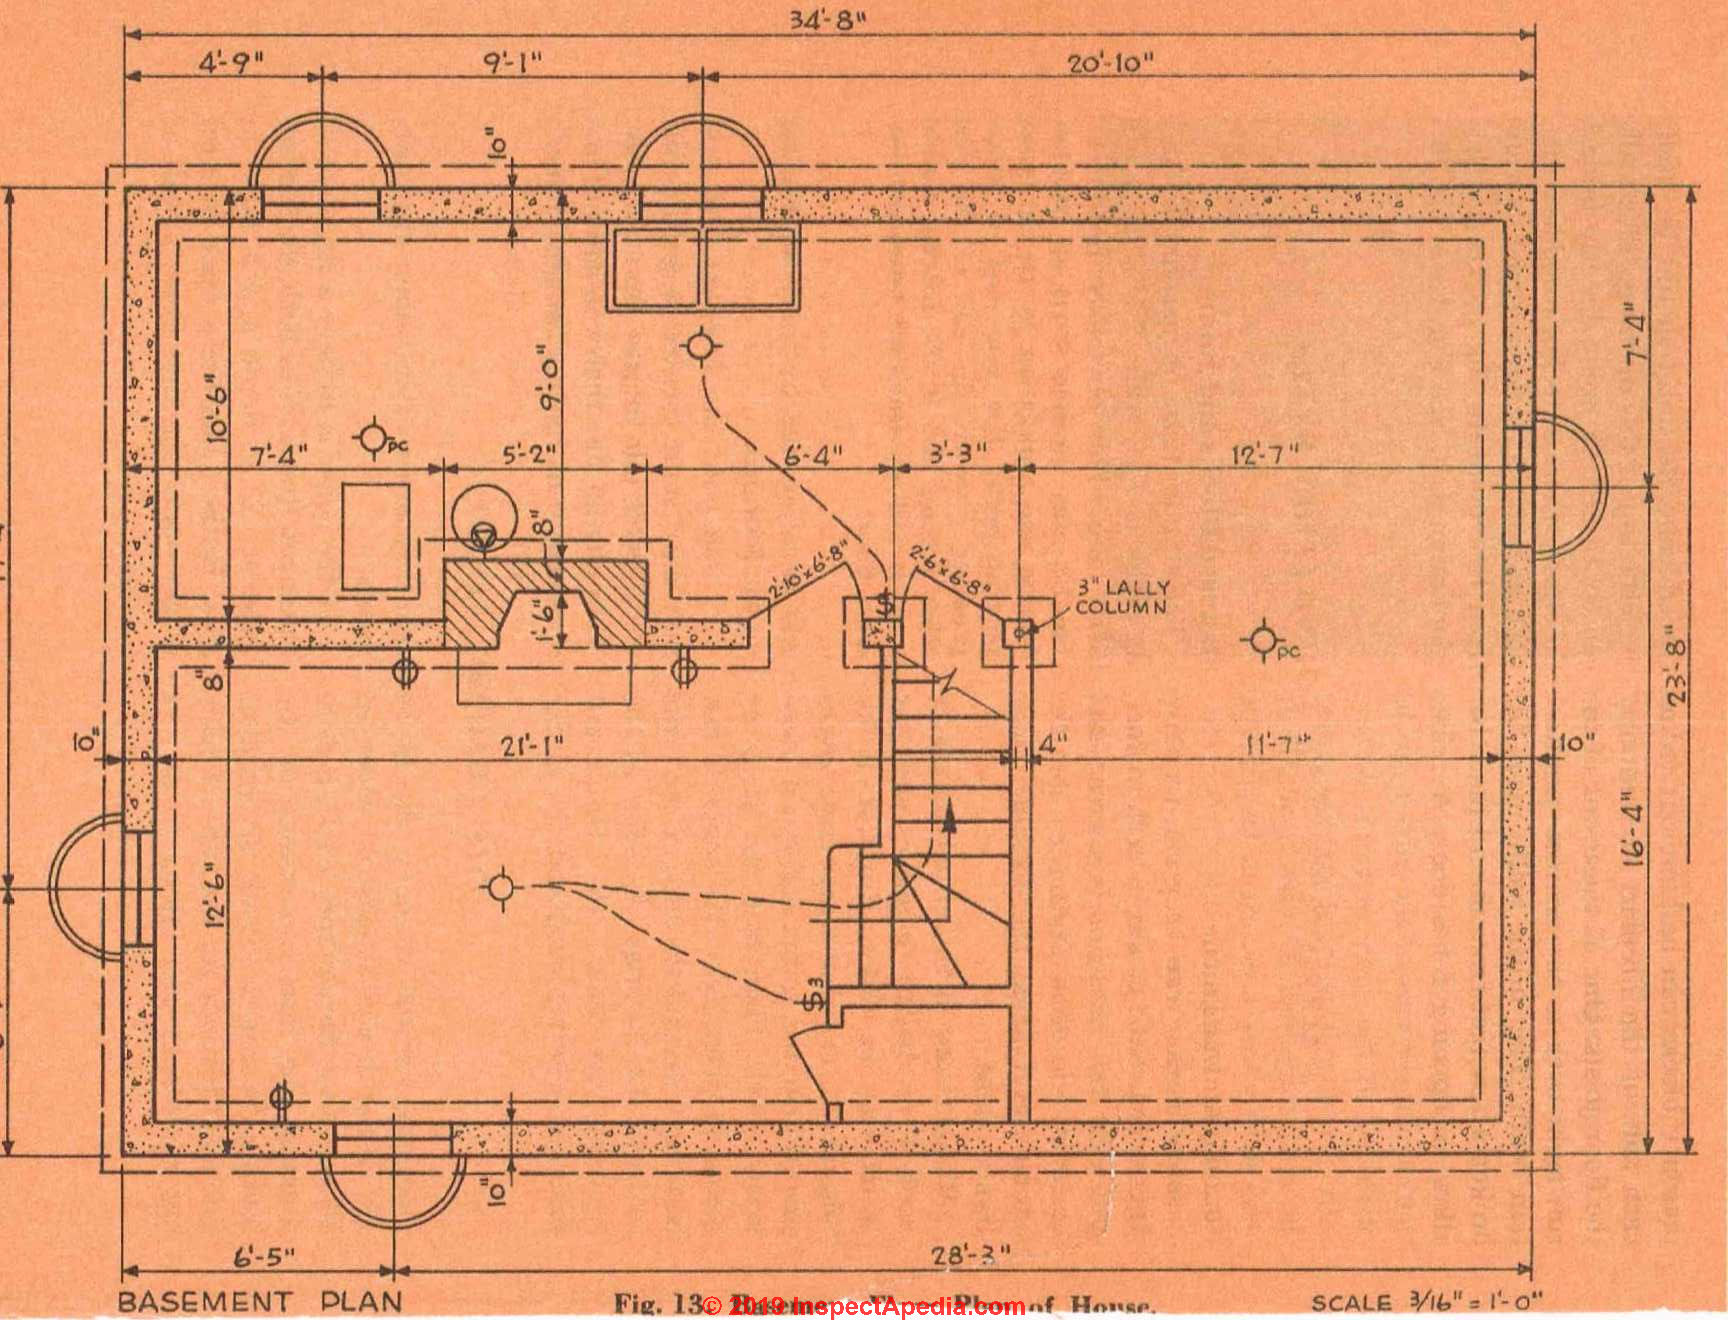
A reinforced concrete lintel should be used over the top of this opening. This wall can continue to a point directly under the stairs, where a steel or wood bearing post is installed, and a girder is run from this point to the pocket in the foundation wall. See Fig. 13 on pg. 78.
Masonry Block Foundation Wall Construction Details
Foundation walls made out of concrete masonry-blocks offer several advantages over poured concrete to the home builder. First of all, one man can do the entire job of building the foundation himself. Second, the work does not all have to be completed in one day or in one operation. You can take as long as you wish to lay up the wall when you use blocks. The disadvantage in using these blocks is, first, a somewhat higher cost than poured concrete and, second, the necessity of waterproofing the outside of the wall if the site is not well drained.
The Excavation
If you plan to use masonry blocks for the foundation, have the excavation made several feet wider than the dimensions of the foundation in order to provide space for you to work on both sides of the wall. Due to the dimensions of masonry blocks, footings for a block-foundation wall do not have to be as large as for poured-concrete walls. A footing 8" deep and 16" wide is sufficient.
Standard Concrete Blocks and Joints
The standard size of masonry building-block is 7%" wide, 7%" high and lo%" long. This obviously produces a wall approximately 8" thick. Aside from the standard block, there are corner blocks, with one end square, and half-blocks, which allow a wall to be built up with staggered vertical joints between courses and lintels for framing the top of window, door, and other openings. The mortar used with masonry blocks is made with 1 part cement and 2 parts clean fine sand. Add enough water to this mixture to produce a workable plastic and do not make more mortar than vou can use in 30 minutes. The normal mortar joint, horizontal and vertical, is about
Building the Foundation Wall
Your first job in building a foundation wall with masonry blocks is to determine the exact points for the corners. This can be done by dropping a plumb line from the building lines that are strung between the batter boards. The four comers should be built up first, to a height of three or even four courses. Place a guide post at each corner to enable you to check and be sure that the corners are straight.
A line strung between these posts will act as a guide in positioning the blocks between corners. After the corners have been built up, lay the first course of blocks between the corners without any mortar. The purpose of laying the blocks dry is to get a general idea of how they will fit between the corners. See Fig. 14. Needless to say, they will seldom come out just right. It may be necessary to use a half-block at some point or even to decrease the width of the mortar joint. Blocks can be cut in half with a cold chisel and a hammer.
Once vou have worked out the man-ner in which the first course of blocks should be laid out, set them in with mortar. Be sure that the footing is clean and level. See Fig. 15.
Unlike bricks, which are completely buttered with mortar, the mortar for masonry blocks is applied in two strips along the edges. This provides an air space between the mortar strips that will help to keep the wall dry. Apply the mortar along the edges of the block in the course below the one you are working on. See Fig. 16. Now7, apply mortar to the vertical strips of the block that is to be laid up. Lift the block and place it gently in position. Be sure that it comes out flush with the guide line strung between the posts at the corners. Tap the block into position and, writh the aid of a level, check to be sure that it is sitting right. See Fig. 17. Remove the mortar that is squeezed out along the joint. When the mortar has become a little stiff, it should be tooled so that it will be compressed and make a waterproof joint. A v-shaped steel joiner is used for this job.
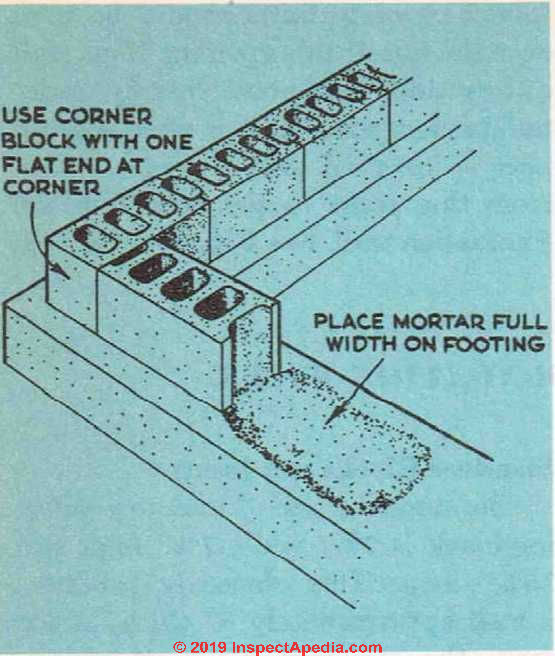
Fig. 14. The first course of masonry blocks should be laid over a bed of mortar the width of the footing. Note the special corner block with a flat end.
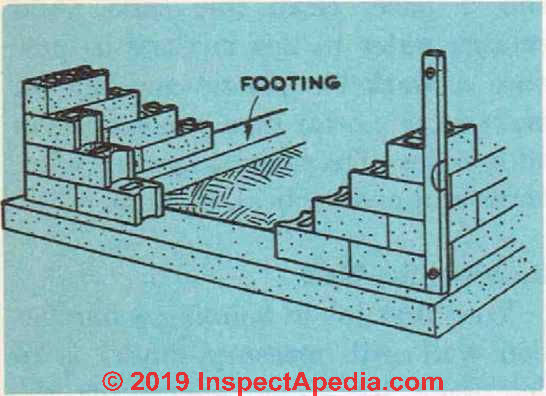
Fig. 15. When building with masonry blocks, the corners are set up for several courses first, and then the blocks are put in between them. Note the level used to check a corner to be sure that it is plumb.
Openings; Anchor Bolts Set Into the Foundation
Openings for windows, doors, etc., can be made with the use of half-blocks. A recess for the girder or I-beam is made by breaking off a section of the block as shown in Fig. 18. The voids (hollow cores) in the blocks for two courses below the girder should be filled with concrete to prevent the masonry’s cracking at this point because of the heavy load.
Anchor bolts for the sill are fastened to the blocks by filling the cores or voids with mortar and sinking the bolts into this before the mortar has set. The mortar should extend through two courses of blocks. A piece of screening can be placed belowr these two courses to prevent the mortar falling down through the wall or old newspapers can be packed down into the cores. Anchor bolts should be placed in the same way as for a poured-concrete foundation.
Waterproofing the Foundation Wall
After the foundation wall has been laid up, it should be waterproofed on the outside. This is done by applying a Vx" coat of cement plaster to the masonry. Use the same mixture as was used for the mortar and apply the plaster in two coats, each thick. The wall should be painted over with a cement grout (a mixture of cement and water mixed to the consistency of a thick paste) before the first coat goes on. The first coat should be given a rough surface! After it has set, apply plaster damp and covered until hard-the second coat. Keep this cement ened; then coat with hot asphalt.

Fig. 16. Three steps in mortaring concrete masonry blocks. Note that mortar is only applied to the edges of the lower course of blocks.
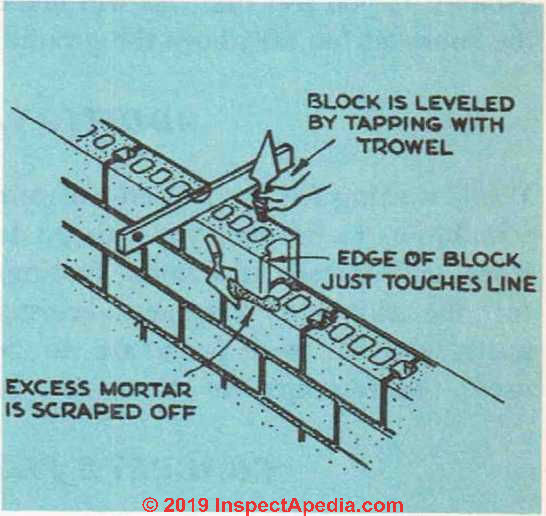
Fig. 17. Method of setting a concrete block into place. A line is run along the wall to serve as a guide so that all blocks will be even. A level is used to make sure that the blocks sit perfectly level on the course below.
FOUNDATIONS WITHOUT BASEMENTS
If no basement is required for the house, the job of excavating can be done by hand. Either poured concrete or masonrv blocks can be used for the foundation. Local stone can also be used. All require a footing and this must be placed below the frost line. Check with a local contractor or builder to find out the depth of the frost line in your locality.
The foundation should be high enough so that there is a space of at least 18" between the ground and the floor of the house. If you want adequate crawl space under the house—and it has many advantages—build the house 24" off the ground. If you feel that this will make the house sit too far above the ground, some excavation can be done so that, while the house is only 18" or so off the ground on the outside, there is a 24" clearance under the floor.
Openings for ventilation (as well as for access to the space under the floor) should be made in the foundation wall. If the space under the house is not ventilated, it will become damp and musty. This may lead to decay of the wood members. If the soil appears to be extremely damp, cover it with strips of roll roofing. These strips should overlap about 3" at the seams. Be sure that no roots of trees or bits of wood left over from building remain under the floor on the ground, because they will attract wood-destroying insects.
ADDITIONAL FOOTINGS
While waiting for the poured-concrete poured after the post is in place. Fig. foundation to harden, you can go to 12 (Pg. 77) shows the type of footing work and install additional footings and base to use for wooden bearing for the chimney, fireplace, bearing posts. Fig. 13 (Pg. 78) shows the loca-posts, etc. If steel posts are to be tion and size of both the fireplace and used, the footings for these can be the chimney footings.
CONCRETE FLOORS ON GROUND
This type of floor can be used for where there is a danger of surface water homes with or without radiant floor reaching the concrete slab. The ground heating. See Fig. 19. It should not should slope away from the house with be used, however, if you are building adequate drainage. The floor must be on a site that is low lying or damp or at least 6" above ground level.
Excavation; Foundation and Footings
The excavation for this type of floor includes the removal of all roots and other organic matter from the floor area. After this, the site should be rough graded so that it stands a little higher than the finished grade. Now it should be tamped down until it is compact. Once all this work has been completed, you can go ahead and build the foundations.
They are the same as those required for a continuous foundation. Do not try to build the house up from the concrete slab floor; it requires a foundation and footing. You will also need footings for the chimney and under the bearing partition.
Fill
The next step is to cover the sub-grade with a layer of granular fill. This gravel fill serves two purposes. First, it prevents ground moisture from getting to the finished concrete slab and, second, it acts as insulation. The fill used should range in size from Vi" to 1". Do not use small-size gravel, as it will reduce the insulating value of the fill and also increase the chances of the concrete slab’s becoming damp through capillary attraction.
Before the fill is poured, utility lines, such as water pipes and sewer lines, should be laid under the floor and brought up so that they will open above the level of the fill and slab. See Fig. 20.
All water pipes must be laid in trenches sufficiently deep so that they will not be subject to either frost or freezing.

Fig. 18. Recess for girder made in wall of masonry blocks. The voids in the two courses of blocks directly under this opening are filled with mortar so that the blocks will not crack under the weight of the girder.
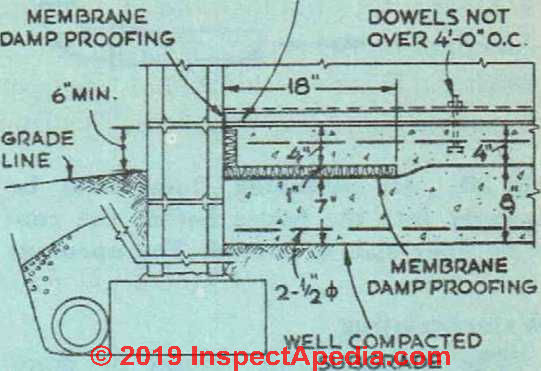
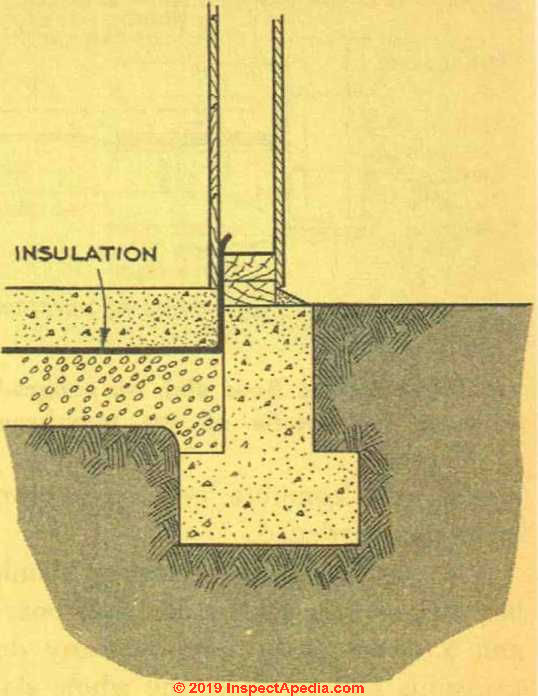
Fig. 19. Construction detail of concrete floor slab on ground. Note the insulation between the slab and the foundation wall.
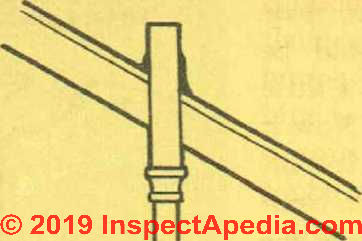
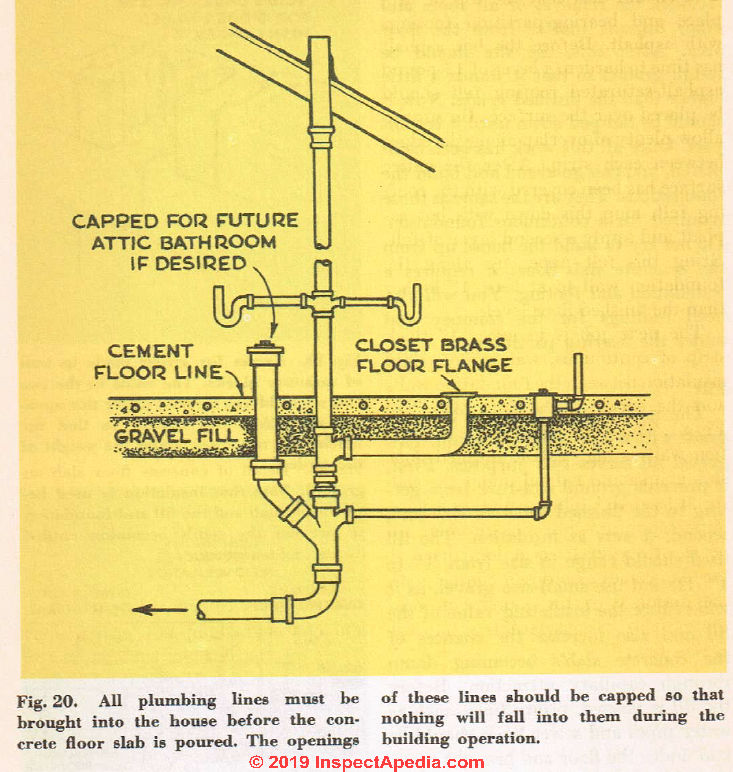
Fig. 20. All plumbing lines must be brought into the house before the concrete floor slab is poured. The openings of these lines should be capped so that nothing will fall into them during the building operation.
The granular fill should be compacted and brought to the proper level. It should be 6" deep except for an area extending in 18" from the foundation walls, where it is 5" deep to allow for the insulation required here. The fill should now be covered with a W coating of cement grout made with 1 part cement to 3 parts sand. The purpose of this grout is to provide a smooth surface for the membrane waterproof-ing that is to follow. Once the grout is hard, mop it over with hot asphalt. You should also coat the top of fireplace and bearing-partition footings with asphalt. Before the hot asphalt has time to harden, a layer of 15-pound asphalt-saturated roofing felt should be placed over the surface. Be sure to allow plenty of overlap along the edges between each strip. After the entire surface has been covered with the roofing felt, mop this down with hot asphalt and apply a second layer of felt. Bring this felt paper up along the foundation wall to at least 1" higher than the finished floor level. The next job is to lay a 1" thick strip of continuous, waterproof, rigid insulation between the foundation walls and the edges of the floor slab. See Fig 21. This should run up the foundation wall as high as the finished floor slab and should extend under the slab for at least 18". This insulation is most important, for while the granular fill below will prevent heat loss there, if the slab comes into direct contact with the masonry of the foundation wall there will be considerable heat loss at this point. Also see FOUNDATION INSULATION OPTIONS Before the concrete slab is poured, it is wise to make lines or to tack strips of wood to the inside of the foundation wall to indicate the exact point that the surface of the floor will be brought to. These check points will help you to get the floor level with the foundation. The concrete mix for the slab is 1 part cement, 214 parts sand and 3 parts gravel up to 1" in diameter. After the concrete has been poured, it should be tamped or spaded. It is necessary to put metal reinforcement in the concrete, and it should not weigh less than 40 pounds per 100 square feet. Standard metal mesh is available for this purpose. Pour a layer of concrete to about 1/4" from the top of the finished slab. After this layer has been properly spaded, put the metal reinforcement in place and pour on the rest of the concrete before the first layer has hardened. The surface of the concrete should be worked over with a leveling board and a wood float to remove any de-pressions and to make the whole slab compact. When the concrete has begun to set, smooth it over with a steel trowel. See Fig. 22. Fig. 21. Detail of concrete floor slab on ground. Note that insulation is used between the slab and the fill and foundation to prevent the slab’s becoming chilled during cold weather.
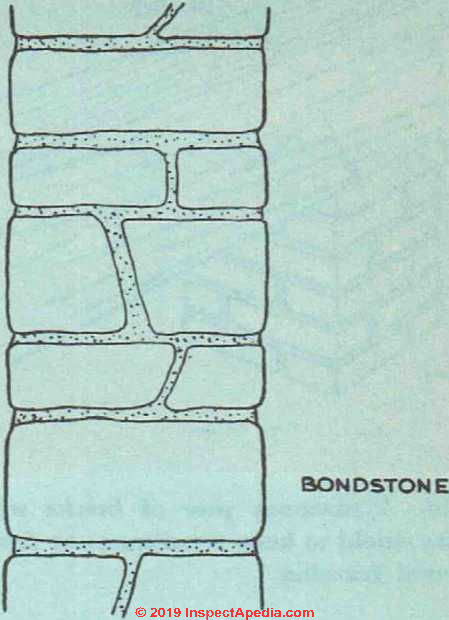
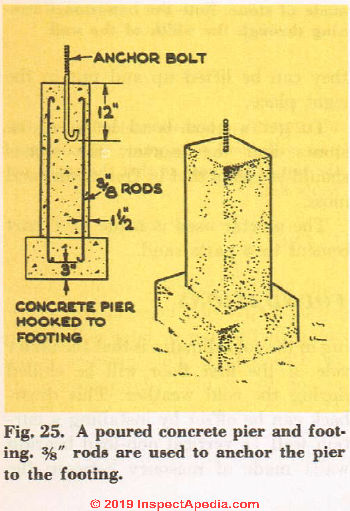
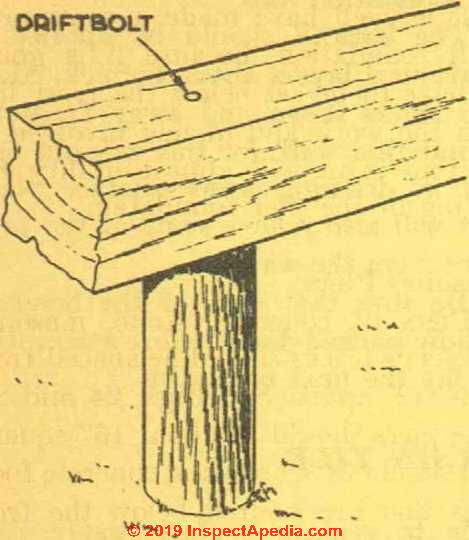
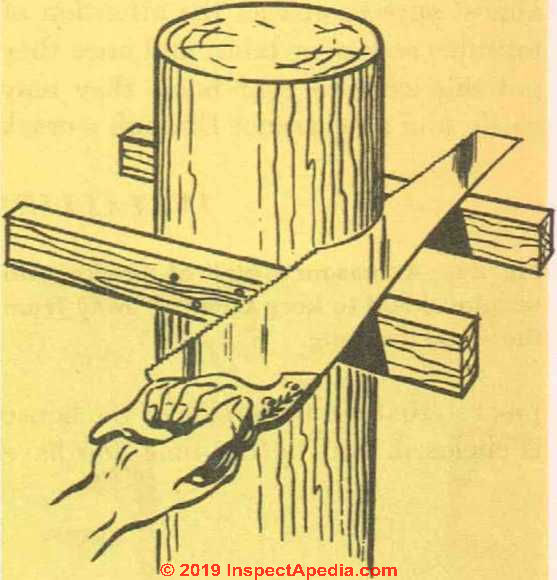
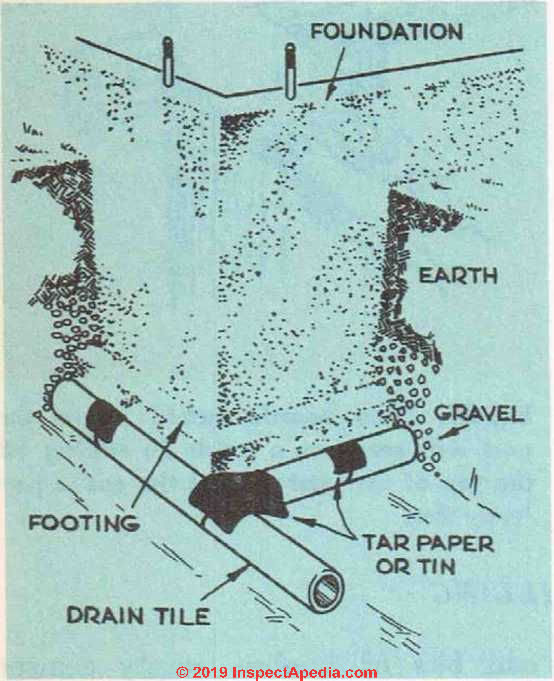
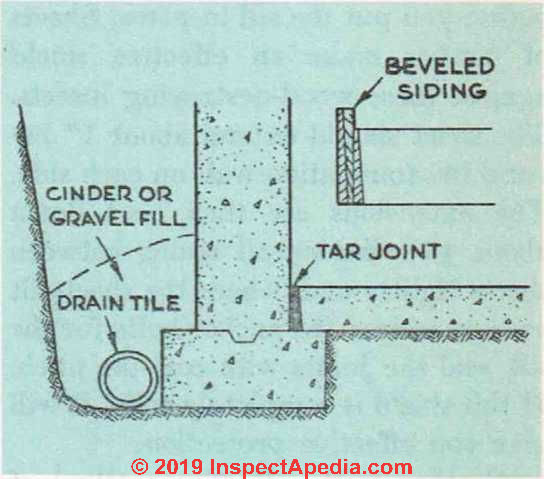
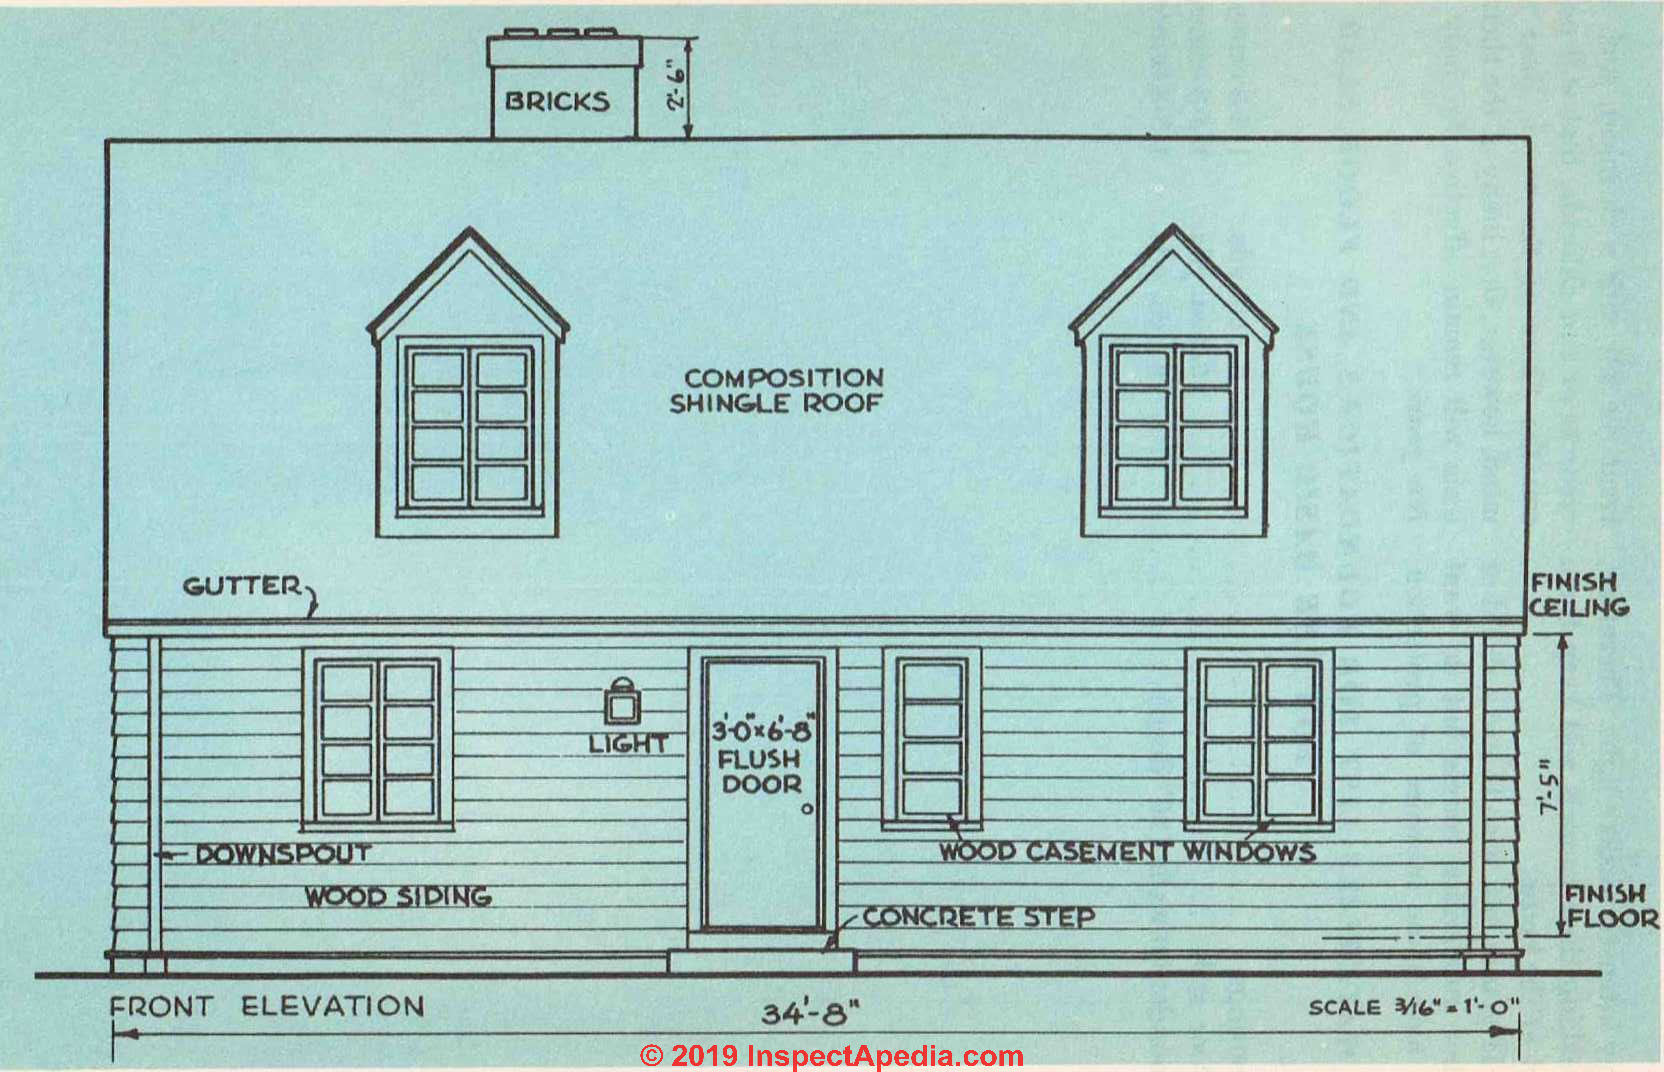
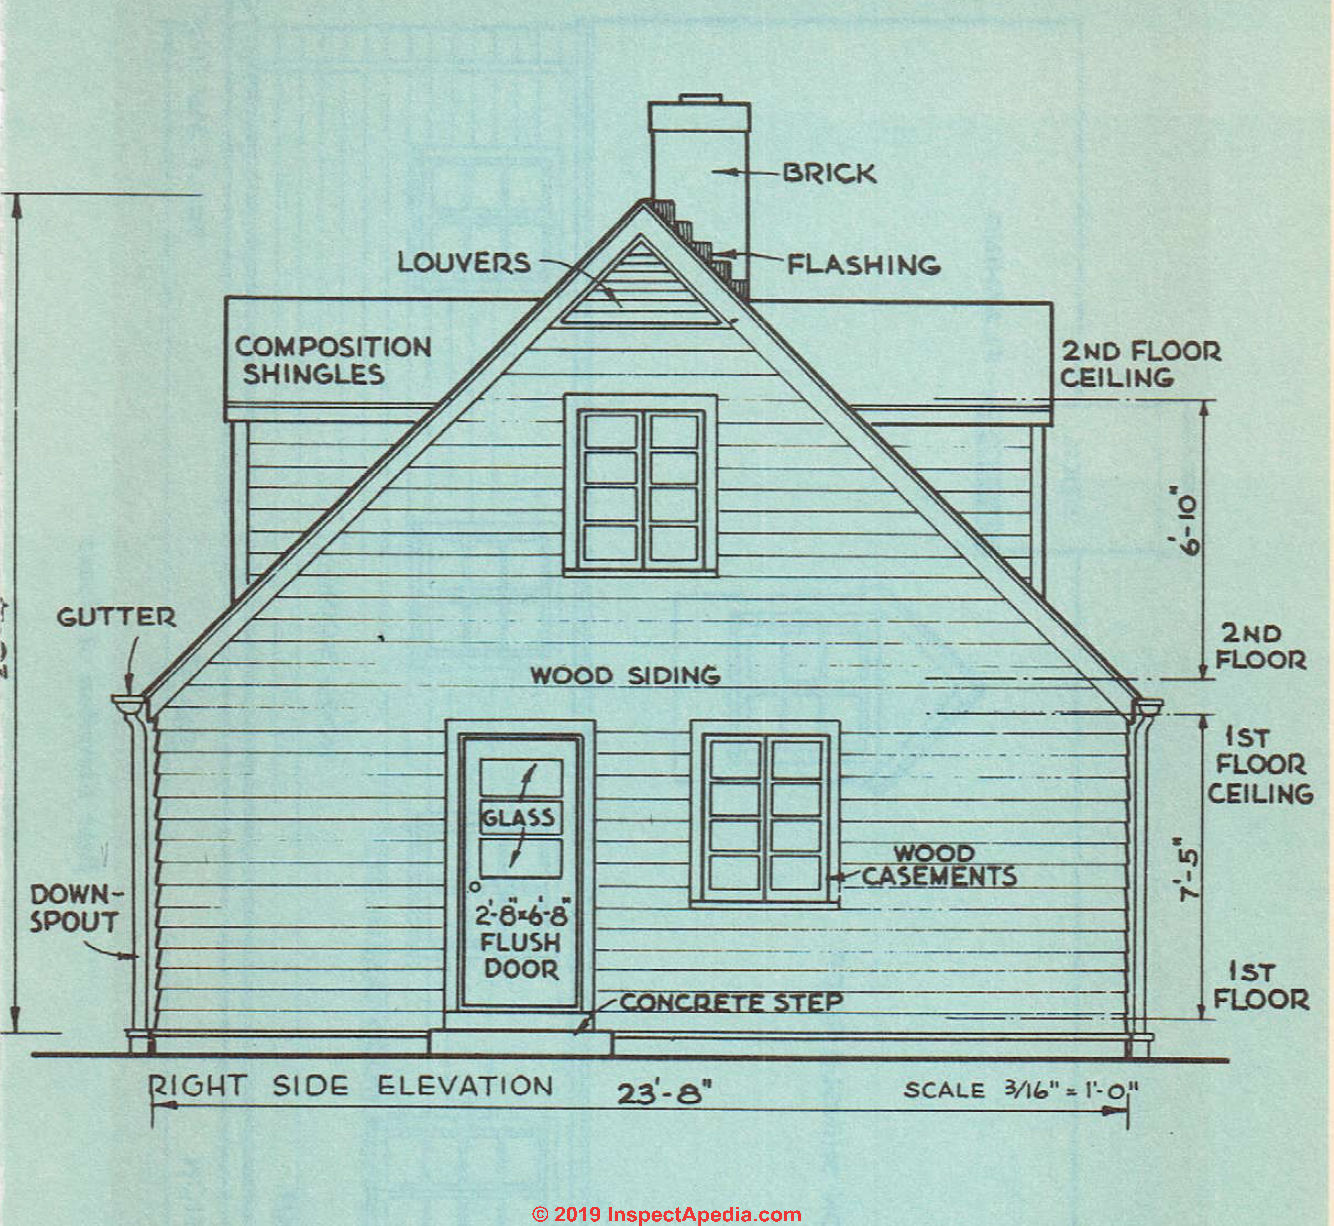
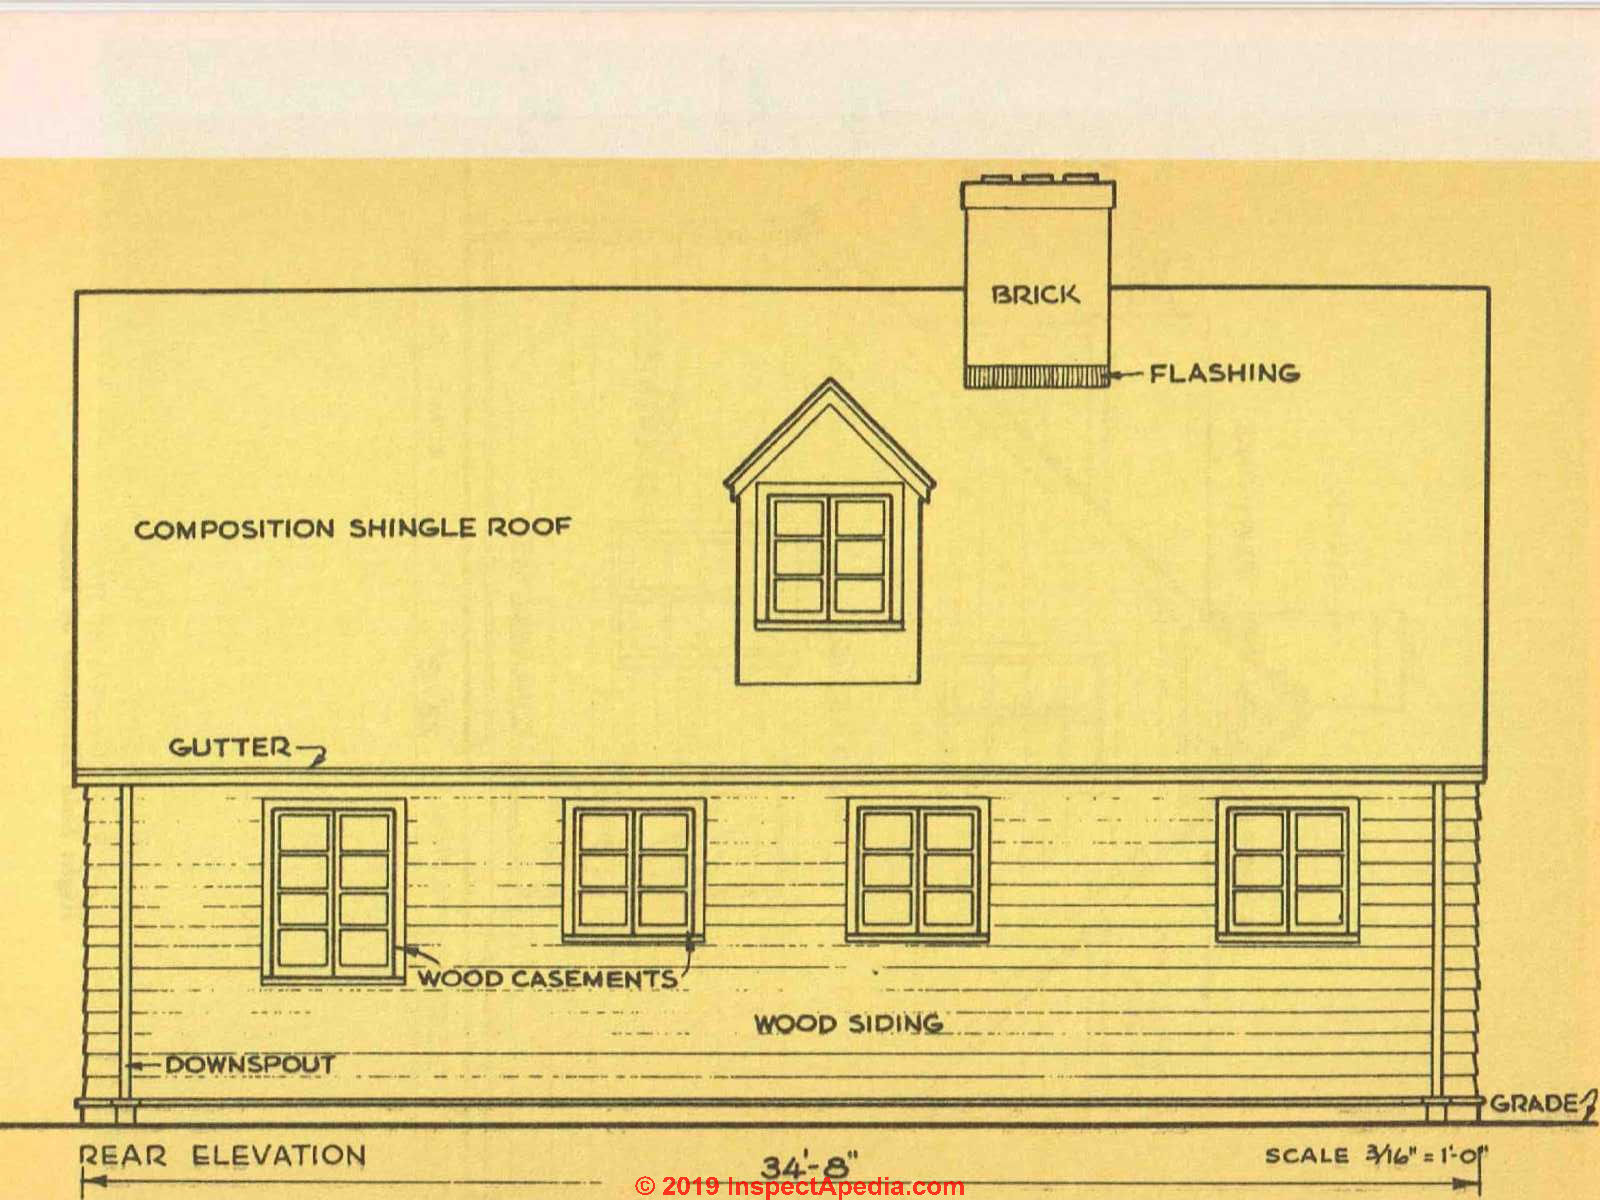
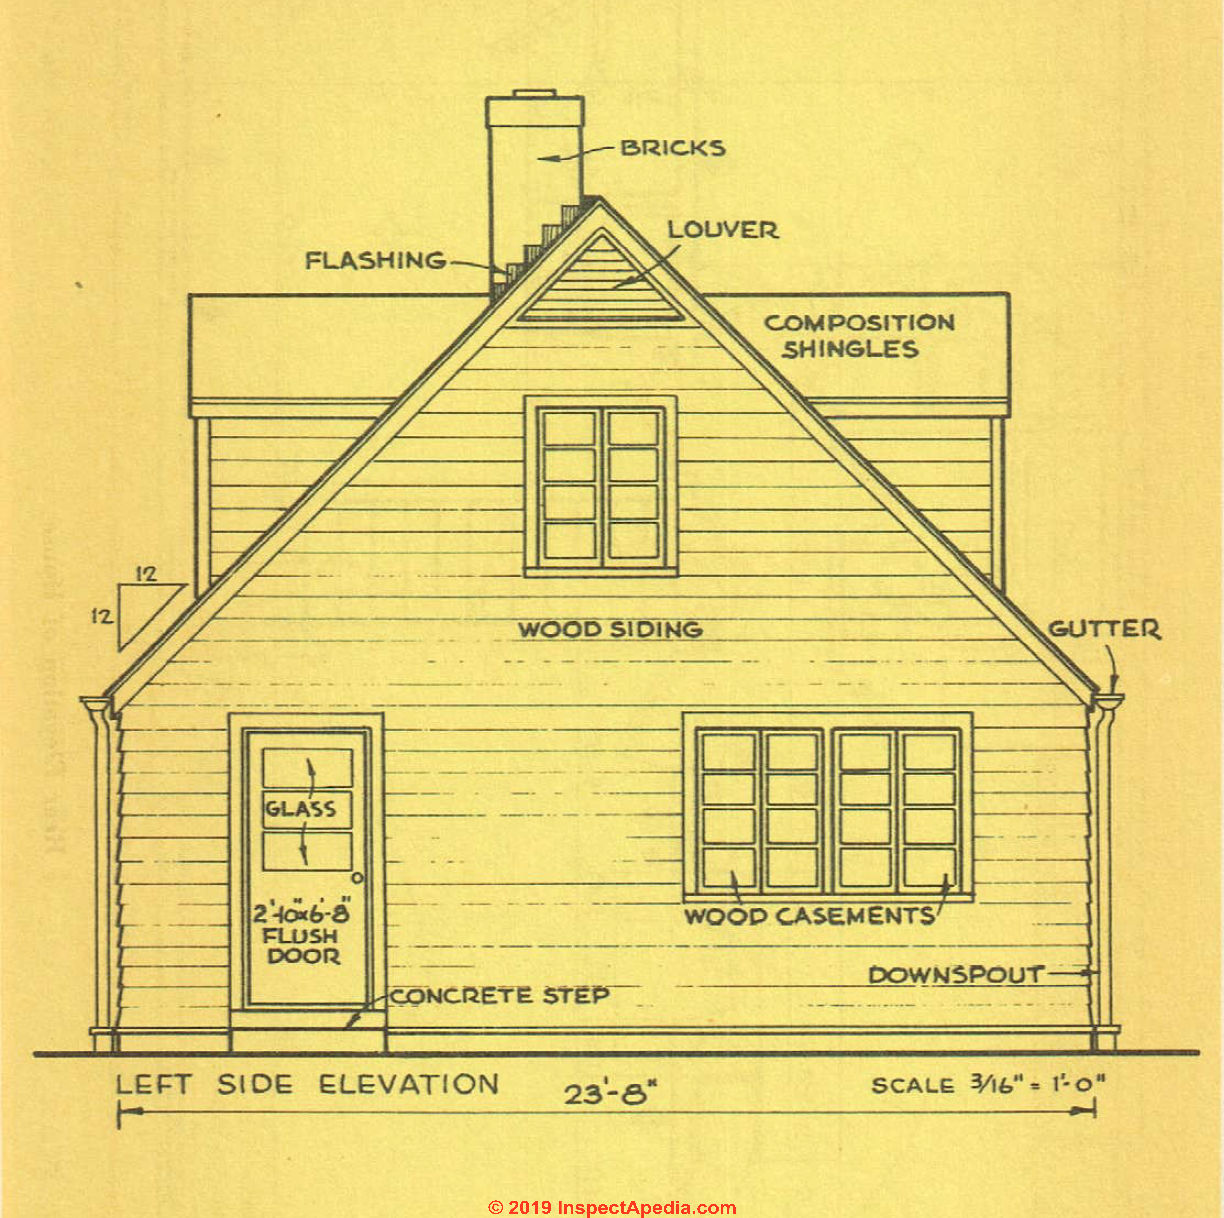
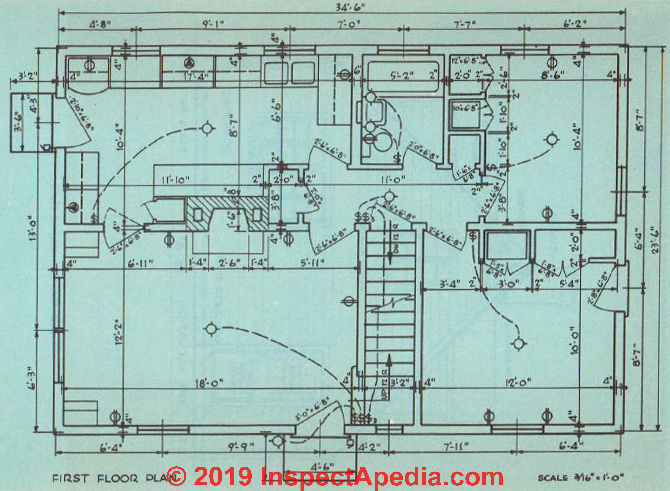
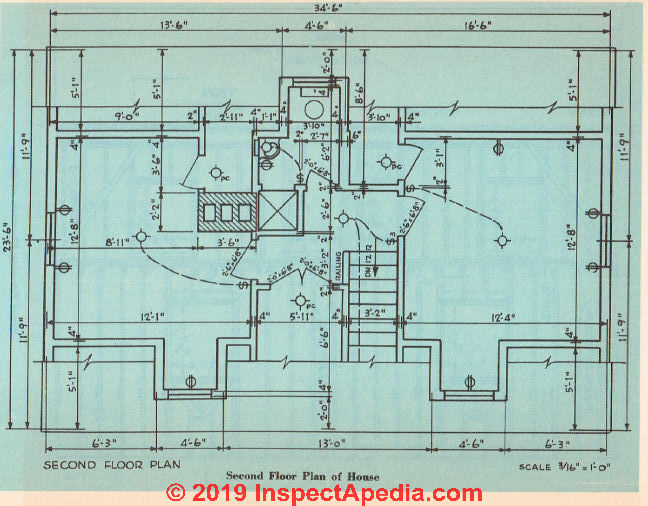
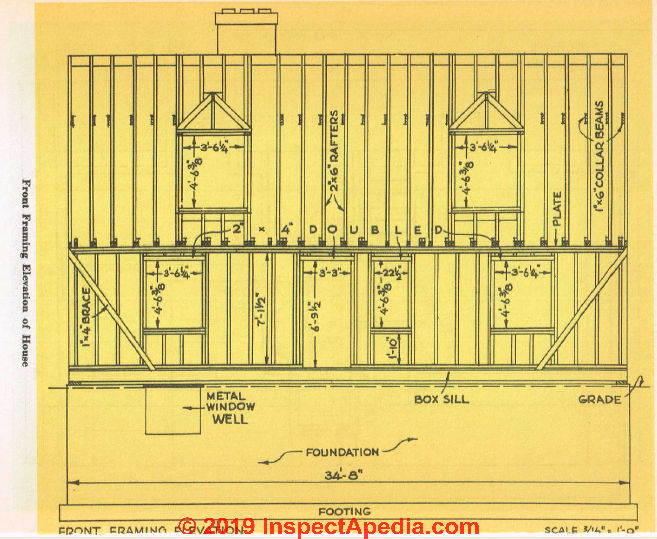
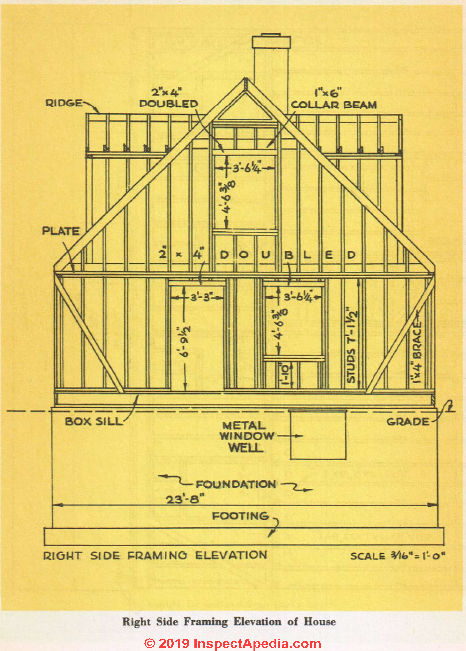
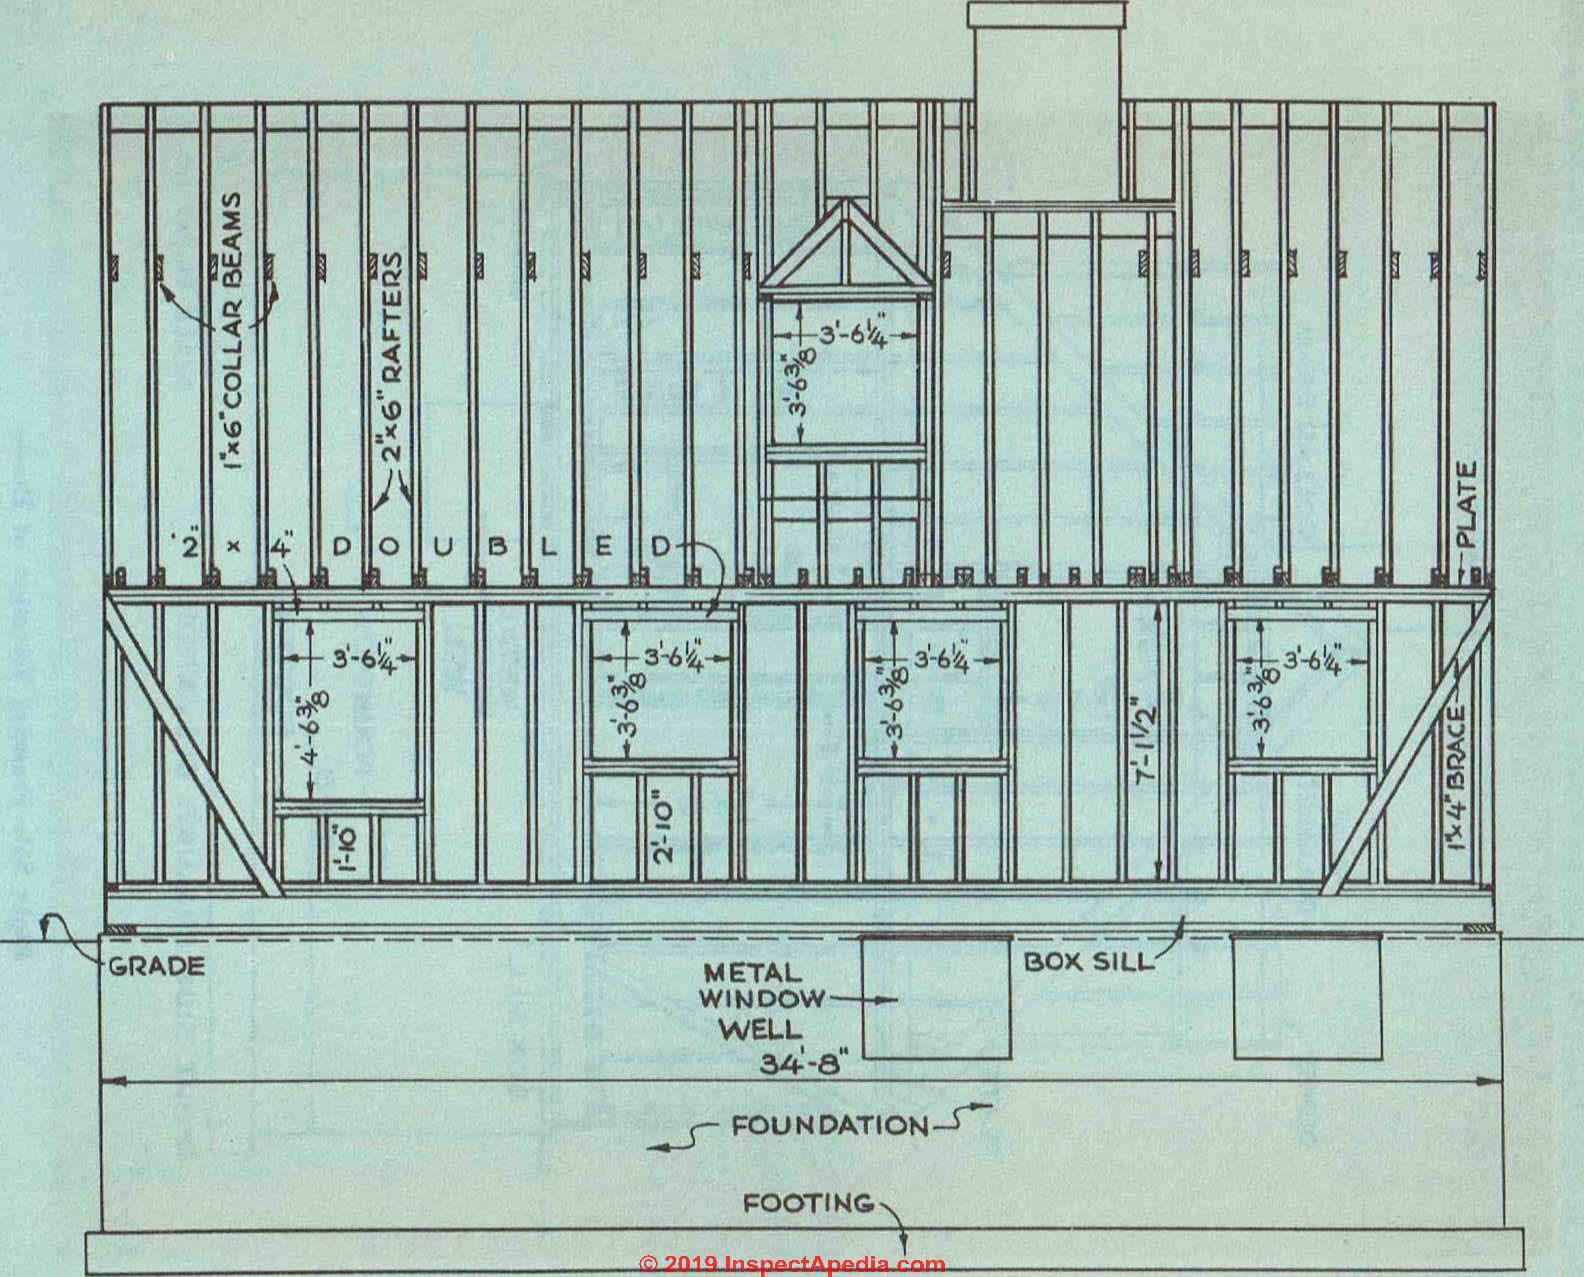
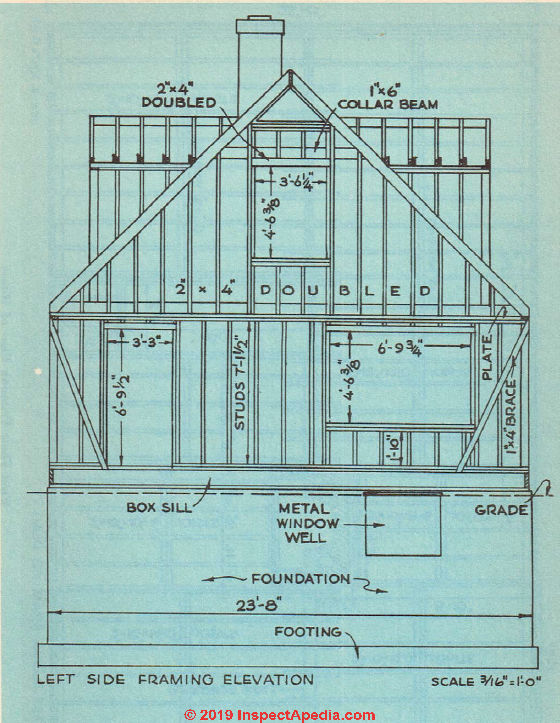
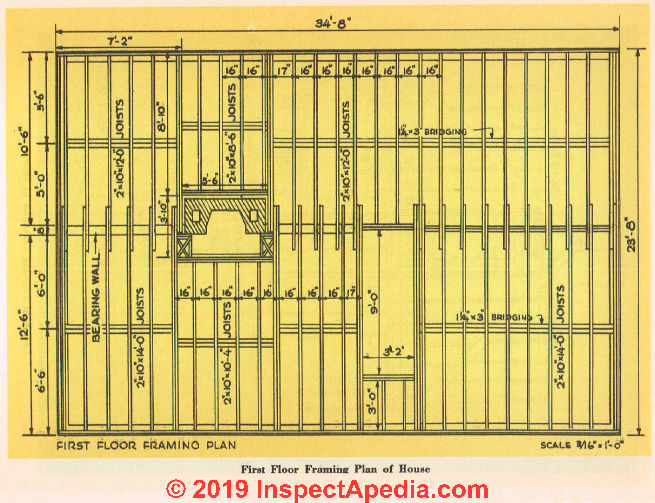
Fig. 22. Concrete floor slab on subgrade showing the details of the membrane dampproofing, insulation and hearing partition footing. If a wood floor is to be installed over the concrete slab, w’ire clips should be installed before the concrete hardens so that the wood sleepers can be tied to the concrete. At the point on the slab where the bearing partition is to rest, a narrow, 2"-deep, vertical trowel-cut should be made and bolts installed in it, so that the plate of the partition can be attached to the slab. Bolts should also be installed at other points on the slab where partitions are to be erected, although the wood plates can be attached to hardened concrete with masonry anchors. If radiant-heating floor panels are to be installed in the concrete floor slab, consult Chapter 16 for modifications to these instructions. If you are building on a site where there is an ample supply of native stone, the foundation wall can be made out of it. You will need a footing for this type of wall, too. It can be made of poured concrete. Sometimes you will find large rocks set far enough below the ground to be used as a footing; of course, they must be below the frost line. A stone or nibble wall must be at least 16" thick. A thinner wall can carry the load of the house but, because of the manner in which these walls are erected, it is almost impossible to build one less than 16" thick and have it hold together. Random-size stones can be used, and there should be a bond stone—one long enough to extend through the wall or almost through the wall—every 10 square feet of vertical wall area. See Fig. 23. Rather than use large quantities of cement mortar to fill out irregularities in a stone so that the next one can be set in place, small rocks should be mixed in the mortar joints. All joints should be completely filled with mortar if the wall is to be solid and waterproof. Building a foundation wall out of rocks is hard work. It takes a tremendous number of rocks and the work does not go very quickly. On the other hand, if you have the rocks on hand and do the work yourself, it is about the least expensive type of continuous wall foundation you can build. You will find that in the long run it does not pay to use very large rocks, even though they fill a great deal of space once they are in position. Working with them is very exhausting after a short time and trying to position them properly may knock a portion of the wall loose. If you insist on the large stones, use a block and tackle so that they can be lifted up and put in the right place. To get a good bond between the stones and the mortar, the stones should be clean, that is, free of dirt and moss. The mortar used is made of 1 part cement to 3 parts sand. Fig. 23. Section of a foundation wall made of stone. Note the bondstones running through the width of the wall. Another inexpensive type of foundation is made with wood posts or masonry piers. This type of foundation is often used for summer homes or homeslocated in mild climates. The drawback to using it for all-year-round living in the cold climates is that the underside of the first floor will be chilled during the cold weather. This drawback can be offset by installing a curtain wall (a vertical non-load-bearing wall) made of masonry between the piers so that the underside of the house is enclosed. But by the time you have installed this curtain wall, you might just as well have made a continuous wall foundation, because it is going to have to be set below the frost line and the work and money involved in putting it in will almost nullify the saving of the pier foundation. Above: Fig. 24. A masonry pier of bricks with termite shield to keep termites away from the wood framing. Above: Fig. 25, concrete pier & footing with 3/8" re-bar Fig. 25. A poured concrete pier and footing. %" rods are used to anchor the pier to the footing. Piers of concrete, stone, masonry blocks or bricks should be spaced from 8' to 12' apart. See Figs. 24 and 25. The piers should be about 16" square. All should be set on solid concrete footings that are poured below the frost line. Holes for the piers will have to be dug by hand. The piers need extend only about 12" or so above ground, because you are going to need a very heavy sill for this type of foundation and the thickness of the sill will bring the floor to the required 18" above the ground. Masonry piers should be fitted with anchor bolts so that the sill can be anchored to the pier. If you are building in a section of the country where there are high winds, the piers themselves should be anchored to the footing. See Fig. 25. These posts are usually spaced 6' apart in rows 6' to 8' apart. Their usual diameter is 8". Wood posts are usually made of rot-resisting woods such as cypress, black locust or cedar. The best types are those treated with a preservative under pressure. Like the masonry piers, the posts should be set on a solid concrete footing poured below the frost line. Sometimes a heavy solid rock far enough down will serve as a footing for the posts. If you are building in soil that is free from rocks, a posthole digger can be used for making the holes. See Fig. 26. Posts can be cut to the right length after they are in place. A line should be strung along the posts and checked with a level. Mark the posts and then cut each one to size. Two strips of wood nailed on either side of the posts will help you to make the cut accurate. See Fig. 27. Fig. 26. Pier foundation made out of a wood post. The heavy house-sill is anchored to the post by means of a driftbolt. Fig. 27. Two boards tacked across the post will serve as a guide in sawing off the top of the post so that the cut is perfectly flat. fter the foundation wall has been completed, the dirt removed during the excavation is put back around the outside of the foundation wall and later on is covered with topsoil and seeded. The usual practice is to toss anything you can lay your hands on into this space around the foundation walls— odd bits of lumber, empty cement sacks, empty nail kegs, in fact everything that sooner or later will have to be disposed of. This practice is one reason for so many damp basements. It is also the reason for a lot of homes being troubled with termites. The only materials that should be used for back- fill are gravel, cinders and earth. If refuse is used, it not only makes it easy for surface water to drain down along the foundation wall, but in the course of time the refuse is going to rot away and this will cause depressions or even holes to appear in the finished grading. Odd bits of lumber underground are almost sure to attract the attention of termites sooner or later, and once they get this close to your home they may easily find an entrance through a crack or faulty mortar joint in the basement or foundation wall. The backfill should be applied in horizontal layers about 1' thick. Slope the layers down and away from the foundation wall, for this will not only aid in draining away surface water but will also relieve some of the pressure from the wall. Be sure that each of the layers is solidly packed down before attempting to lay the next one down. Fig. 28. Joints between the section of drain tile around the foundation wall should be covered with strips of tar paper or tin to prevent dirt from getting into the system. Be sure that the system has sufficient pitch to carry the water away from the building before putting back the fill. Tile to remove surface water from around the outside of the foundation wall is required for concrete slab floors. It should be used for poured-concrete or masonrv foundation walls where there is a basement, for it is one of the best ways to insure the basement’s being dry at all times. If you are building in soil that does not drain very well and you plan a basement, drain tile is a “must.” The excavation should be made wide enough so that after the foundation has been completed, 4" drain tile can be laid around the outside of the footing at its base. This tile should not be joined together, rather, a slight crack of about %" should be left between sections. Put a piece of tar paper or tin over the top of this crack so that dirt will not get into the tile. See Fig. 28. The drain tile should be given a little downward slope so that w'ater entering it will flow through the system and eventually end up in a connected sewer or dry well. You can check each section of tile with a level to be sure it has the required pitch. After the tiles are all in place, fill the trench up to within about a foot of the surface of the finishing grading, if you are protecting a concrete slab floor. Gravel or stone up to about 1" in size and not smaller than %" can be used for this fill. Now cover the gravel over with burlap, sod or even old brush. This is done to prevent the loose dirt from washing down through the gravel. Over this covering can go the topsoil. Be sure, when you pour the gravel in, not to disturb the position of the drain tile. The concrete basement floor may be poured when the other concrete work, such as the foundations, is done or, if you do not wish to spend the time on this sort of work at the moment, it can be done later on when it may be more convenient. If the soil is well drained, the concrete can be poured directly over the ground in one operation. If the soil is poorly drained, you will need two layers of concrete with a membrane waterproofing between them. Fig. 29 shows how the floor should be poured over well drained soil. First, the ground should be leveled off so that it is flush with the top of the footing. Be sure that all roots and other debris have been removed from the soil and that it is well compacted. If it is not, there will be danger of the concrete floor’s cracking. The concrete floor should not come directly up against the foundation wall. You need a waterproof expansion joint at this point. Before the concrete for the floor is poured, line the bottom of the foundation wall with three pieces of beveled siding. These should be soaped or oiled so that they can be removed after the concrete is hard. See Fig. 29. If you are pouring the concrete at the same time that the foundations are put in, be sure that you make allowance in the floor for any openings required for utilities. The correct concrete mix for the floors is 1 part cement, 2 1/4 parts sand and 3 parts gravel. The floor should be at least 4" thick. Fig. 29. The basement concrete floor should not come directly in contact with the foundation wall. An expansion joint is required at this point and is made with beveled siding and tar. After the concrete has been poured and is hard, remove the pieces of beveled siding along the edges and fill the seam between the floor and the foundation wall with hot tar or some similar mastic. The same procedure should be followed for the joints between the basement floor and the footings for the chimney and bearing posts. Waterproofing If the soil under the house shows signs of being damp, pour a 2" layer of concrete that comes up level with the top of the footing. When this slab is hard, mop it over with hot asphalt. Before the hot asphalt has time to harden, put down 15-pound asphalt-saturated roofing felt. You want two layers of the felt and you will need an application of hot asphalt between them. The strips of asphalt felt should be given ample overlap and the ends should be brought up along the foundation wall so that they will extend at least as high as the top of the finished floor. See Fig. 19. A final application of hot asphalt should be applied over the felt and then the remaining portion of the floor, that is, the second layer, can be poured. If you decide to use a termite shield, it should be put on top of the foundation wall all the way around the house before you put the sill in place. Sheets of copper make an effective shield against these wood-destroying insects. The sheet should extend about 1" beyond the foundation wall on each side. The extensions are then bent down about 45°. Solder all seams between sheets tightly and, where the sheets fit over or around the anchor bolts for the sill, seal the joints with coal tar pitch. If this shield is completely solid, it will give you effective protection. Another fairly effective method of guarding against termites is to lay a course of slate just under the sill. The slate, however, must be embedded in a strong cement mortar. Termites are able to burrow through concrete that is lean or porous as well as through poor mortar. Such methods of termite-prevention as those just described will usually keep the insects out of the house. Occasionally, termites will build tunnels outside and around obstructions. This is particularly likely to happen where honeysuckle, or some such plant growth, has been growing against the house for some years and not only contains some old dead wood but also provides contact between the ground and the wood of the house above the foundation. Inspection once or twice a year will reveal anv such tunnels, which are easily identified and destroyed. Termites must return to the ground to obtain moisture, otherwise they die; also, they intensely dislike light. Therefore, breaking their tunnels will keep them out of the house. If you do not wish to use a shield or other impervious course but do want to have some measure of protection, treat the sill with a chemical, such as creosote or zinc chloride, that will poison the fibers of the wood. Bear in mind, however, that many of the chem-icals will remain effective for only a few years. Footings - 6 cu. yds. 1-5-3 cement Floor Slab - 10.2 cu. yds. 1-5-3 cement Floundation walls (20" deep) - 6 cu. yds. 1-5-3 cement Front Elevation of House [Click to enlarge any image] - scale 3/16" = 1 ft. Above: Right Side Elevation of House - scale 3/16" = 1 ft. Above: Rear Elevation of House - scale 3/16" = 1 ft. Above: Left Elevation [Click to enlarge any image] Above: First Floor Plan of House - scale 3/16" = 1 ft. Above: Second Floor Plan of House - scale 3/16" = 1 ft. Above: Front Framing Elevation of House - scale 3/16" = 1 ft. Above: Right Side Framing Elevation of House - scale 3/16" = 1 ft. Above: Rear Framing Elevation of House - scale 3/16" = 1 ft. Above: Left Side Framing Elevation of House - scale 3/16" = 1 ft. Above: First Floor Framing Plan for House - scale 3/16" = 1 ft.
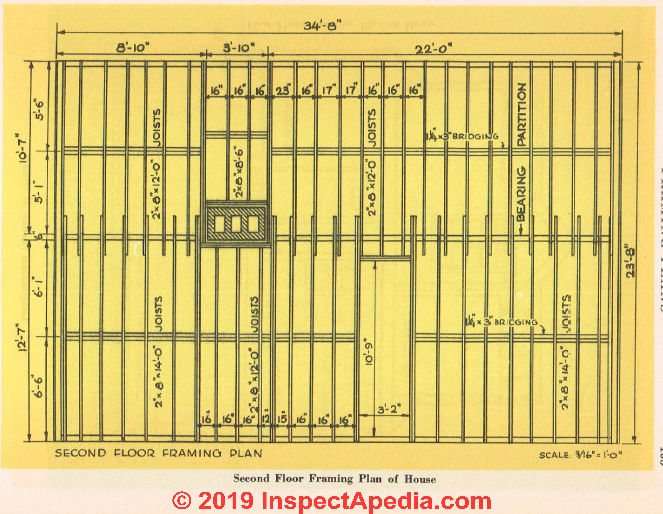
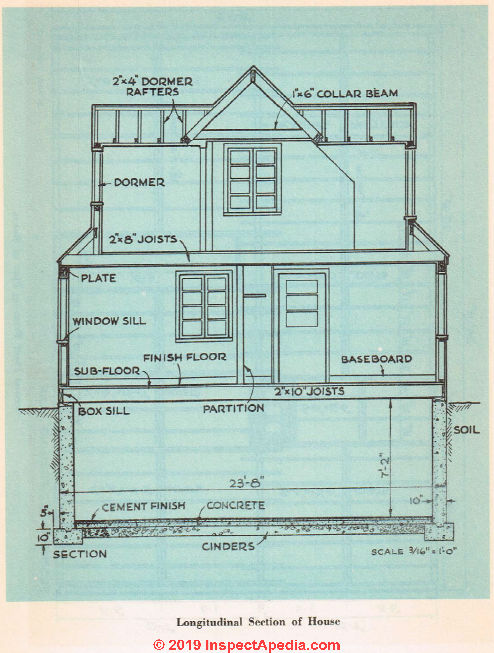
Above: Second Floor Framing Plan of House - scale 3/16" = 1 ft. Above: Longitudinal Section of House: side elevation - scale 3/16" = 1 ft. Cross Section of House Footings ... Continue reading at FRAMING THE HOUSE - next chapter in this book, or go to book contents at BUILD YOUR DREAM HOME, or select a topic from the closely-related articles below, or see the complete ARTICLE INDEX. Or see these FOUNDATION LAYOUT & CONSTRUCTION at InspectApedia.com - online encyclopedia of building & environmental inspection, testing, diagnosis, repair, & problem prevention advice. Or see this Or use the SEARCH BOX found below to Ask a Question or Search InspectApedia Or see Or use the SEARCH BOX found below to Ask a Question or Search InspectApedia Questions & answers or comments about how to identify the architectural style of buildings and building components Try the search box just below, or if you prefer, post a question or comment in the Comments box below and we will respond promptly. Search the InspectApedia website Note: appearance of your Comment below may be delayed: if your comment contains an image, photograph, web link, or text that looks to the software as if it might be a web link, your posting will appear after it has been approved by a moderator. Apologies for the delay. Only one image can be added per comment but you can post as many comments, and therefore images, as you like. IF above you see "Comment Form is loading comments..." then COMMENT BOX - countable.ca / bawkbox.com IS NOT WORKING. We'll reply to you directly. Please help us help you by noting, in your email, the URL of the InspectApedia page where you wanted to comment. In addition to any citations in the article above, a full list is available on request.Waterproofing the Area Under the Floor Slab
The Concrete Slab
Clips and Bolts
Stone Wall Foundation Details
POST AND PIER FOUNDATIONS
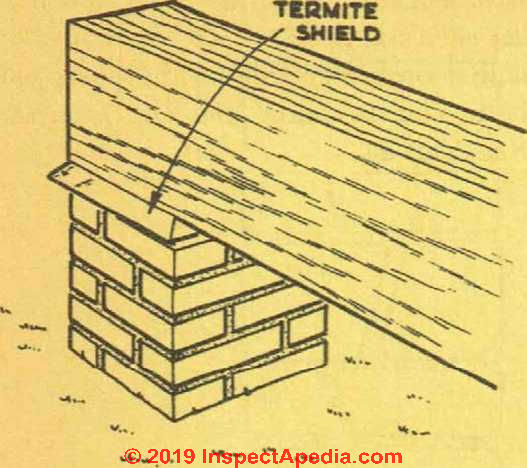
Masonry Piers
Wood Post Pier Foundations
BACKFILLING
DRAIN TILE
THE BASEMENT FLOOR
Expansion Joints
TERMITE SHEATHING
MATERIALS LIST FOR FOUNDATIONS AND FLOOR SLAB FOR THE BASIC HOUSE
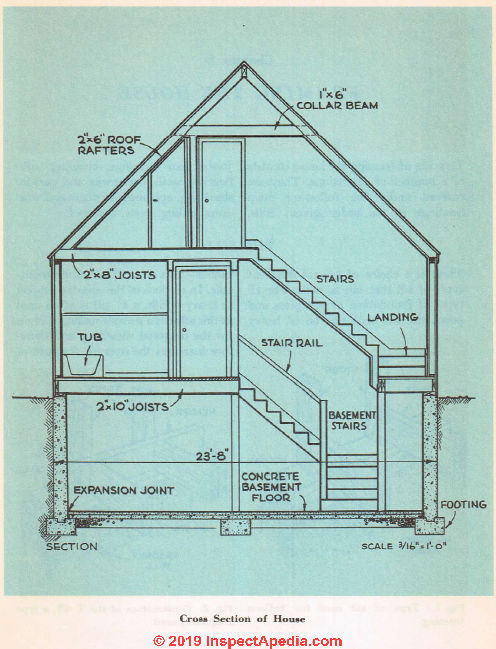
Above: Cross section of house

Recommended Articles
Suggested citation for this web page
INDEX to RELATED ARTICLES: ARTICLE INDEX to BUILDING ARCHITECTURE
INDEX to RELATED ARTICLES: ARTICLE INDEX to BUILDING DAMAGE, DISASTER, REPAIRS
Ask a Question or Search InspectApedia
Share this article:
You will not receive a notification when a response to your question has been posted.
Please bookmark this page to make it easy for you to check back for our response.
In any case you are welcome to send an email directly to us at InspectApedia.com at editor@inspectApedia.com Citations & References
CONTINUE READING or RECOMMENDED ARTICLES.
Thanks to Alan Carson and Bob Dunlop, for permission for InspectAPedia to use text excerpts from The HOME REFERENCE BOOK - the Encyclopedia of Homes and to use illustrations from The ILLUSTRATED HOME .
Carson Dunlop Associates provides extensive home inspection education and report writing material. In gratitude we provide links to tsome Carson Dunlop Associates products and services.

HOME
ABOUT
ASK a QUESTION
CONTACT
CONTENT USE POLICY
DESCRIPTION
POLICIES
PRINT
PRIVACY
© 2026 - 1985 Publisher InspectApedia.com - Daniel Friedman