
 Working with Concrete Masonry Blocks & Bricks
Chapter 5 of How to Build Your Dream Home © 2020 InspectApedia.com

- POST a QUESTION or COMMENT about how to identify the architectural style of buildings and building components
How to work with concrete, poured concrete, masonry blocks, bricks.
This article series provides an updated version of Hubbard Cobb's Your Dream Home, illustrated by Sigman-Ward, first published by Wm. H. Wise & Co. New York, 1950.
InspectAPedia tolerates no conflicts of interest. We have no relationship with advertisers, products, or services discussed at this website.
- Daniel Friedman, Publisher/Editor/Author - See WHO ARE WE?
Chapter 5 How to Build with Concrete Masonry, Bricks, Blocks
 This is Chapter 5 of BUILD YOUR DREAM HOME at InspectApedia.com - online encyclopedia of building & environmental inspection, testing, diagnosis, repair, & problem prevention advice.
This web page is also available as WORKING WITH CONCRETE, MASONRY BLOCKS, & BRICKS [eBook] or as a PDF image at WORKING WITH CONCRETE, MASONRY BLOCKS, & BRICKS [PDF] original page images
It is virtually impossible today to do without sooner or later having to use concrete in one place or another. Concrete—good concrete is much building a vital building material; likewise the knowledge how to mix it properly.
Mixing Concrete
Concrete is made of Portland cement to which are added aggregates such as sand and gravel. The cement itself comes in sacks weighing 94 poimds and, unless it has been exposed to moisture, it will not give you any trouble.
If the cement in the bag is lumpy and you cannot break these lumps with your fingers, it should not be used. Always store cement in a dry place, even if the bags are sealed tight.
Aggregates Used in Mixing Concrete
A lot of concrete is ruined by using poor quality aggregates. Sand should be clean and free from dirt or any other organic matter. If you have a sand pit on your lot or one near by, you might save a few dollars by taking the sand from there rather than buying it from a lumber yard, but unless you take the time to wash and screen the sand before use, it will make inferior cement. Considering the cost of sand, it is hardly worthwhile to go to all this trouble.
Sand is referred to as the “fine aggregate,” gravel or crushed stone is the “coarse aggregate.” It is just as important that the gravel or crushed rock is free of dirt and organic matter as that the sand is.
You can test the quality of the aggregates easily enough with a milk bottle or quart fruit-jar. Put in about 2" of the dry aggregate and then fill the bottle with water about three-quarters full. Shake it for about a minute and then allow it to stand quiet for an hour. Any dirt or silt will form a layer over the top of the aggregate in the bottle.
If this layer is over %" thick, the sand is too dirtv to use and must be washed.
To test the sand for vegetable matter, a 12 oz. prescription bottle is used. This is filled to the 41/4-oz. mark with sand. A 3% solution of caustic soda is then added. This can be made by dissolving 1 oz. of household lye in a quart of distilled water. Be careful when you handle this solution because it is very corrosive to clothes and skin. When this solution has been added to the sand, shake the bottle thoroughly and then let it sit for twenty-four hours.
If, at the end of that time, the liquid inside the bottle is clear, the sand is clean and good to use. If the liquid is straw colored, there is some vegetable matter but it is not enough to produce an inferior grade of concrete. If the liquid is darker than this, the vegetable content is too high and the sand should be washed before it is used.
Sometimes sand and gravel are used just as they come from the gravel bank with the sand mixed in with the gravel. This is not satisfactory because there is usually too much sand in with the gravel to produce the desired grade of concrete.
Water Used in Mixing Concrete
The water you use for mixing the concrete should he pure enough to drink. This means that it should be pure enough to drink when it is added to the cement and sand and not just when it conies from the tap. There is no point to worrying about the quality of the water and then carrying it to the mixer in an old bucket that is full of dirt, oil and what not. The water should be free from oil, acid and alkali. Beach sand and salt water are not suitable for concrete under most circumstances.
The strength as well as the watertightness of concrete depends upon the amount of water used for mixing each bag of cement. In recent years, it has been found that the less water used the better. Of course, you have to use a sufficient amount of water to get a workable mixture, but if more water than is required is used, the finished concrete will he inferior.
It is seldom possible to get sand that is absolutely dry. In most cases, it will be anywhere from slightly damp to very wet. The amount of moisture in the sand must be taken into consideration because there will usually be enough to have a marked effect on the final mix. Sand is usually classed as damp, wet or very wet. You can make a very simple test yourself to see what category the sand you have on hand falls into. Take a handful of sand and press it together.
If the sand falls apart when you open vour hand, it is damp. If it holds its shape, it is wet, and if it actually wets your hand, it is very wet. It is reasonable, then, to use less water when working with wet sand than when working with sand that is only damp.
Mixing Concrete: Ratios, Ingredients
Table I, on Pg. 47, shows the various types of mixture, along with the amount of water required for each bag of cement, depending on the condition of the sand.
If you are making up a small amount of concrete, that is, when you are using less than one sack of cement, Table II, on Pg. 48, can be used.
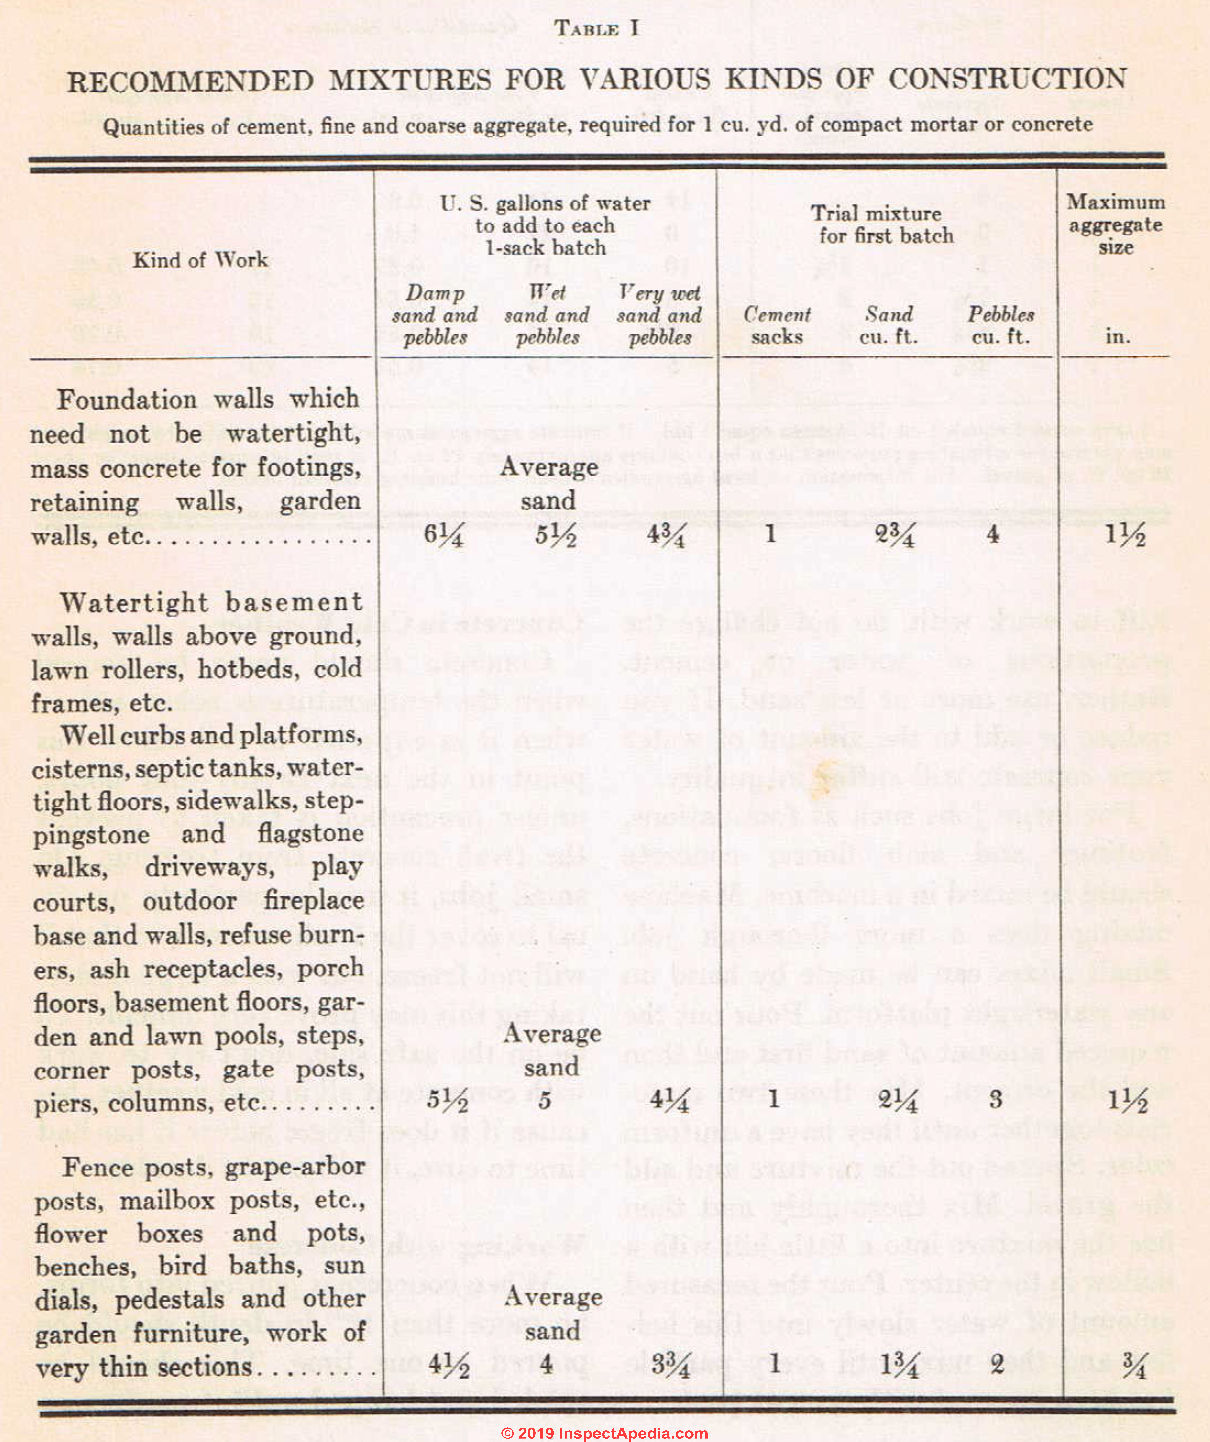
Above: Table I describes the quantity of water, sand, pebbles, and cement to prepare concrete or to mix mortar.
Below: Table II explains how to figure the proper quantities of cement, sand, and gravel to mix cement for various purposes.
[Click to enlarge any image]
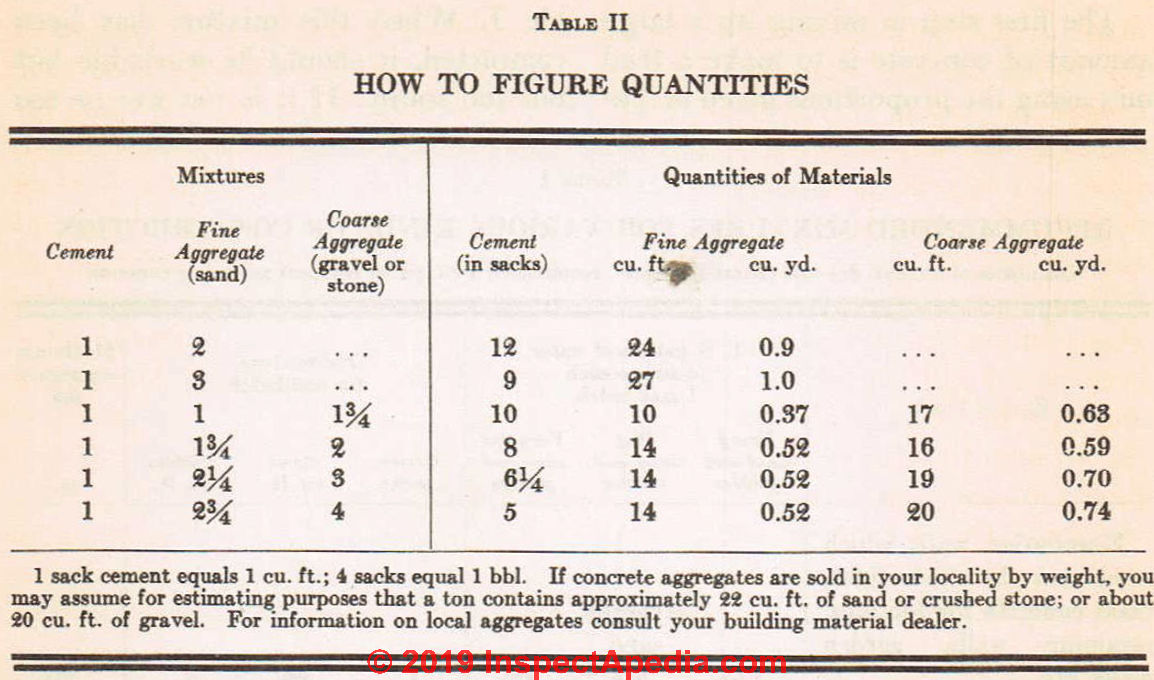
1 sack cement equals 1 cu. ft.; 4 sacks equal 1 bbl. If concrete aggregates are sold in your locality by weight, you may assume for estimating purposes that a ton contains approximately 22 cu. ft. of sand or crushed stone; or about 20 cu. ft. of gravel. For information on local aggregates consult your building material dealer.
The first step in mixing up a large amount of concrete is to make a trial mix using the proportions given in Table I. When this mixture has been completed, it should be workable but not too soupy. If it is too wet or too stiff to work with, do not change the proportions of water or cement. Rather, use more or less sand. If vou reduce or add to the amount of water your concrete will suffer in quality.
For large jobs such as foundations, footings and slab floors, concrete should be mixed in a machine. Machine mixing does a more thorough job. Small mixes can be made by hand on any watertight platform. Pour out the required amount of sand first and then add the cement. Mix these two materials together until they have a uniform color. Spread out the mixture and add the gravel. Mix thoroughly and then hoe the mixture into a little hill with a hollow in the center. Pour the measured amount of water slowly into this hollow and then mix until every particle has been covered with cement paste.
Pouring Concrete in Cold Weather
Concrete should never be poured when the temperature is below 40° or when it is expected to fall below this point in the next twenty-four hours, unless precaution is taken to prevent the fresh concrete from freezing. On small jobs, it may be perfectly practical to cover the fresh concrete so that it will not freeze, but with a large undertaking this may prove very difficult. To be on the safe side, don’t try to work with concrete at all in cold weather, because if it does freeze before it has had time to cure, it will not be durable.
Working with Concrete
When concrete is poured into forms, no more than 12" in depth should be poured at one time. This should be spaded and tamped until it produces a dense mass. Work the concrete against the forms so that when they are removed the surface will be flush. If the concrete is not adequately spaded, there will be voids in the wall that will decrease its strength and watertightness.
Remember that concrete sets in about 30 minutes after the cement has been mixed with water. As the sand is almost sure to contain some moisture, the 30 minutes should begin from the time the sand and cement are mixed together. Do not allow concrete to stand too long before pouring into the forms and then try to thin it back to working consistency by adding more water.
No matter howT fast you work, there will be places where the concrete has hardened before the adjoining batch is poured into place. The first thing you should do is to roughen up the hardened surface so that you will get a good bond with the fresh concrete.
Now just before the new batch of concrete is poured, brush the hardened surface clean and paint it with a mixture of cement and water of the consistency of thick paint. Be sure that the new concrete is poured right after this grout is applied, before the grout has had a chance to harden.
Curing Concrete
The longer the concrete has to cure, the stronger it will be, up to a point. For practical purposes, seven days of curing will produce a good grade of concrete. During this period exposed concrete surfaces should be covered with damp burlap, sand or straw and sprinkled with water at least once a dav.
How to Build with Concrete Blocks
If you decide to build the outside walls of the house with blocks, either cinder or concrete, refer to the chapter on how to build foundation walls and study the procedure given there for laying up a foundation wall with masonry blocks. This is exactly the same procedure that is required for building the entire house, with a very few exceptions.
The Foundation
Start at the footing and lay the blocks up just the same as you would if you were building a foundation wall. Leave a recess at each end of the building for the girder or lintel that is to support the first-floor joists. (If your house is to have a concrete-slab floor, this is not necessary.) The girder should be installed in the same manner as explained elsewhere except for one point.
If you are going to use a wood girder, it should come up flush with the top of the blocks that it is recessed into. If you are using a steel I-beam, it should be set 1..." below the top of the blocks.
The reason for all this is that the wood floor-joists are going to rest on edge on the top of the blocks in this same course and, therefore, it is important that the top of the girder or lintel he in the same plane.
If it is not, you will have trouble with a floor that is not even. The steel girder has to be set 1 %" below the top of the blocks because vou will need to attach a 2"x 4" to it to serve as a nailing base for the joists. The top of this 2" x 4" should come flush with the top of the blocks.
Floor Joists
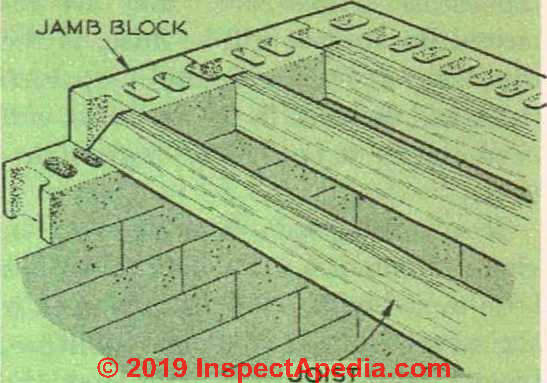
Once the girder is in place, you can go ahead and put in the floor joists. These will run from the foundation wall to the girder. You will note from Fig. 1 that they rest on the top of the blocks and that the voids in this course of blocks have been filled with mortar to give them added strength. Jamb blocks arc used with the ends open so that the joists have a place to rest. Note also that the ends of the joists are not cut off square but arc cut at an angle.
The purpose of doing this is to prevent the joist from damaging the wall should it ever fall. If the end was cut square, the joist would hang in the wall recess and perhaps crack the entire wall. By cutting it off at an angle, you make certain that if it should ever fall, it would drop out of the recess without causing any trouble.
Put one set of joists down first and spike them to the girder. Be sure that they are parallel. Now go on the other side of the wrall and lav out the other set of joists. You will probably have to do a little arranging here with the spacing of the jamb blocks so that the ends of both sets of joists will meet over the girder, or rather overlap, so that they can be nailed together.
Fig. 1. How wood floor joists can be set into a concrete masonry-block wall. Jamb blocks are used to allow the ends of the joists to extend into the wall for several inches. Note that the end of the joists are cut off at an angle. This is done so that if a joist falls after the wall above has been completed, the joist will fall free of the wall rather than damaging it.
Framing Openings
The next point that comes up is making the openings for doors. In a few more courses vou will have to start thinking about the openings for windows but the method of making them is just about the same.
There are several wavs to frame these openings. One method is to put the frame in place, plumb and brace it and then build the blocks up right around it. This is an easy wav to do the job but it has several drawbacks. First of all, no matter how well the frame has been primed with paint, it is almost sure to absorb some moisture from the damp mortar, which will not do it any good at all.
Secondly, there is great danger that in working you will knock the frame out of plumb and have to spend a lot of time checking it and setting it right again. Another point against this method is that the frame is almost sure to become marred or scarred in one way or another.
A somewhat better method of making the openings is to build them first to fit the frame and then slip the frame into place. This is fine and dandy but there seems to be considerable risk involved here that the opening may not be quite right for the frame.
Probably the best way to handle this business of getting the openings just right is to build a rough frame and then build up around it. After the opening has been finished you can remove this rough frame and slip in the finished frame.
Sills and Lintels
The sill or threshold for the doors can be made out of wood or masonry. It must be set in place so that it will come up at least even with the finished flooring. If you have a slab floor that is to be covered with linoleum, this distance need be only 1/8" or so. If you are using wood sleepers and hardwood flooring, it must be equal to the combined thickness. The same holds true if you are using wood floor over floor joists.
Windows require a sill as well as the doors and these can be precast con-
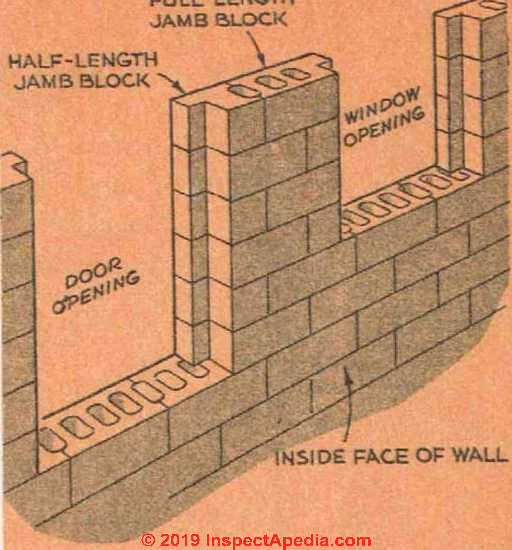
Fig. 2. Openings in concrete masonry walls for windows and doors are made with special jamb blocks, which provide a recess for the door or window frame.
crete. Figs. 2 and 3 show the method of framing an opening either for a window or door with jamb blocks.
The top of the door and window openings are covered with a precast concrete lintel that is reinforced with metal rods and can be had in either one or two pieces. You can get these at the same place where the ordinary blocks arc purchased.
Walls
With the exception of the openings for doors and windows, the work of laying up the blocks is just the same as for a foundation wall. Care must be taken to be sure that the wall goes up plumb and that each block is level.
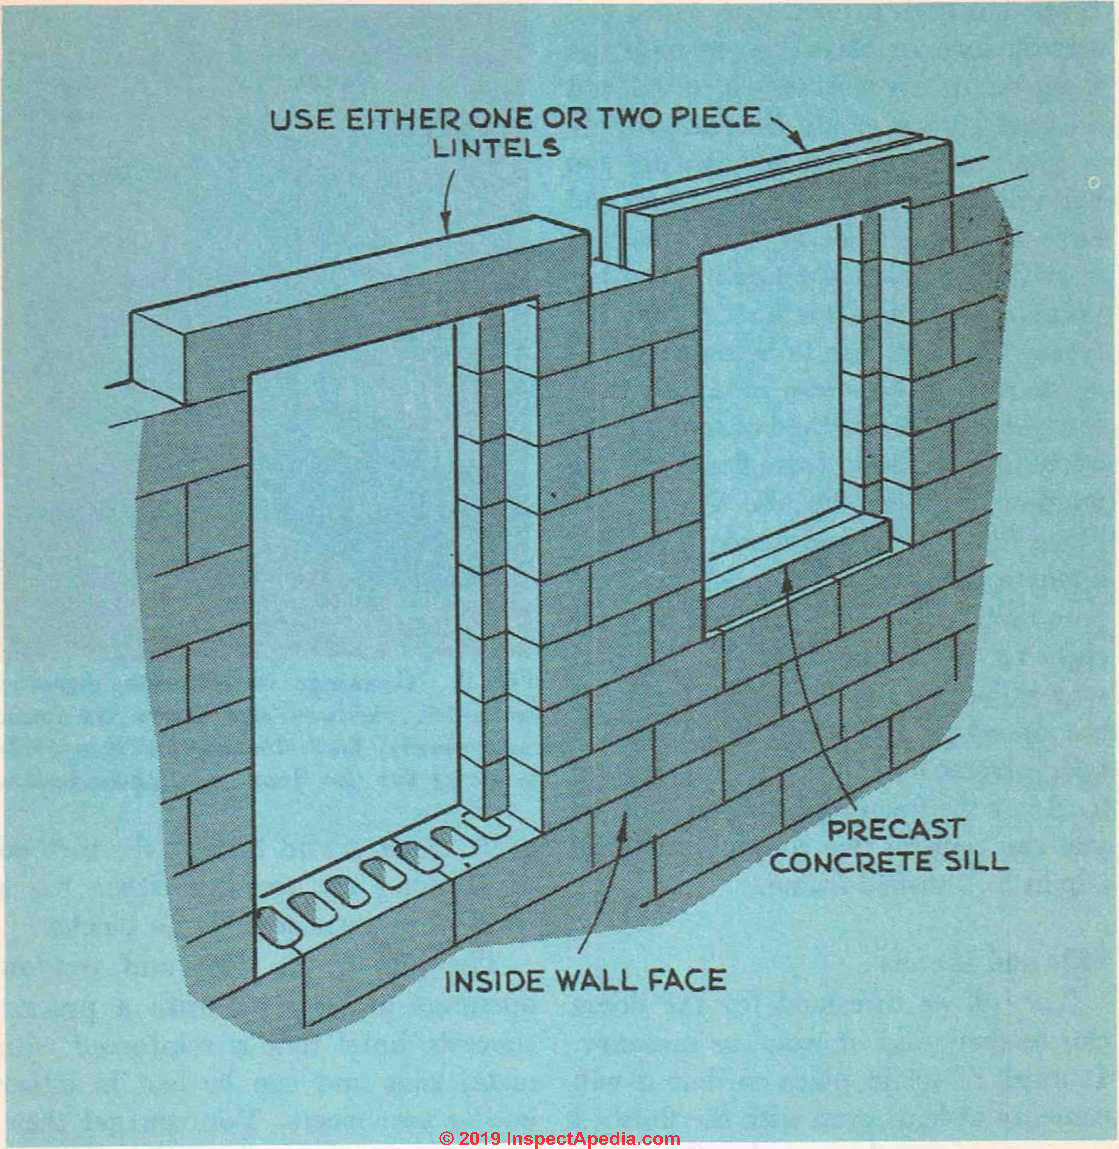
Fig. 3. Precast concrete lintels should be used above window and door openings.
Use a horizontal chalk line to be sure that each course is true and drop plumb lines down to check that it is perfectly upright.
Bring the four walls up to a height of 7' 3". This is as far as we will go with concrete blocks. The gable ends of the building will be framed with wood because, if blocks are used, special equipment will be needed to cut them off at an angle so that they will fit the pitch of the roof.
The voids (hollow cores) in the last two courses of blocks at the top of the wall must be filled with mortar to give them added strength. It is best to lay wire screening along the top of the course of blocks under the last two courses so that the mortar used to fill the upper voids will not fall on down.
You will need to sink %" x 8" bolts down into the mortar in the last two courses of blocks so that the top plate of 2" x 4" can be anchored to the masonry. These bolts should be spaced every 4' from the corners. The end joints between the top plates can be made up in the same manner as the sills for a frame house on a foundation Avail.
After the top plate of two 2" x 4"’s has been anchored in place, you can go on and put in the ceiling joists and then frame the roof. Finally, the studding for the gable ends can go in place. This procedure is the same as that used in building a frame house.
Insulating Concrete Masonry Walls
There are several ways to insulate walls made out of masonry blocks. One of the simplest ways is just to pour granular insulation into the voids in the blocks as you build the wall. This does not require much time and is ven effective. Of course, when this is com bined with some other type of insula tion on the inside, you get a very wrarn wall.
The inside of a concrete wall can be insulated Avith any of the materials that are used for frame-house insulation. The insulation is not attached directly to the masonry but to 2" x 2" furring strips, which are used to line the inside wall. These strips should be spaced every 16" on center. It is best to treat them with some sort of wood preserArative so that if they should become damp because of a leak in the Avail or through condensation, they will not decay. The wood strips can be attached to the masonry by nails driven through the mortar joints.
These furring strips not only serve as a means to attach the insulation but they are also going to serve as a base for either plaster and lath or some sort of Avallboard. Many persons make the mistake of applying the interior plaster or wallboard direct to a masonry wall. This is a poor practice because the interior wall material is almost sure to become chilled by being in direct contact with the cold masonry and condensation or sweating will occur.
If the wall is insulated and the interior wall is set away from the masonry, you should have no trouble with condensation or cool walls. A vapor barrier is as important for masonry walls as for wood ones.
How to Build with Bricks
Types of Brick
There are three types of bricks that you should be familiarwith: the common brick, face brick, and firebrick.
Common bricks measure 8" long, 3 3/4" wide and 2 1/4" thick. They are used for for all work where appearance is not of prime importance and where they will not be subject to high temperatures.
Face-bricks are the same size as the common but they are more carefully made and come in different colors. These are the bricks that you would use around the fireplace and mantel where appearance is important.
Firebricks are somewhat larger than the common or face-bricks and they are used wherever resistance to flame or high temperature is important. Firebrick must be used for lining the fireplace.
Brick Courses
Each layer of bricks is called a course. When the bricks are laid end to end, it is called a stretcher course. When the bricks are set crosswise, they are called headers. When set crosswise on end, they are called a soldier course.
See Fig. 4.
A combination of courses is called a bond, and there are many different kinds of bonds. One of the most familiar types of bond is the “common bond.” This is made up of five courses of stretchers and a sixth course of headers.
Another bond is the “English,” where you have alternate rows of stretchers and headers.
See Fig. 5. You will note that the minimum thickness a wall of bricks can be is 4".
Mortar
Bricks are laid up with a cement mortar made of 1 part Portland cement to 3 parts clean fine sand. Sufficient water is added to this mixture to produce a workable plastic. You can, if you wish, replace 10 per cent of the cement with hydrated lime. This will give you a mortar that is somewhat easier to work with than the straight cement and sand mix.
As the strength of the brickwork is going to depend on the strength of the mortar, it is important that this be of the best quality and that only enough mortar should be mixed as can be used in 30 minutes.
Bricks should be wet before they are put into place. This prevents them from absorbing the water out of the fresh mortar. You can hose the bricks down or, if you are only doing a small job, soak them in a bucket of water until they are ready to be laid up.
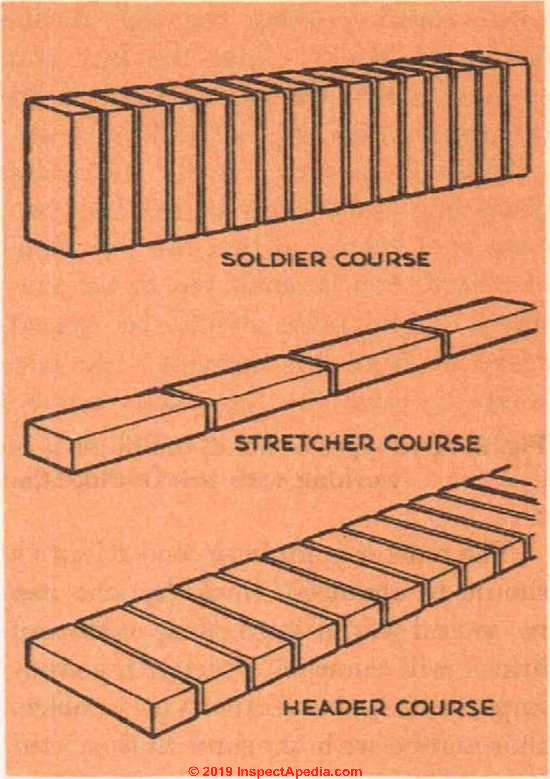
Fig. 4. Three types of brick courses.
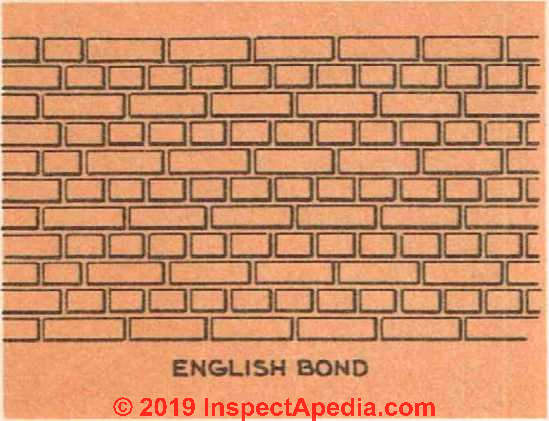
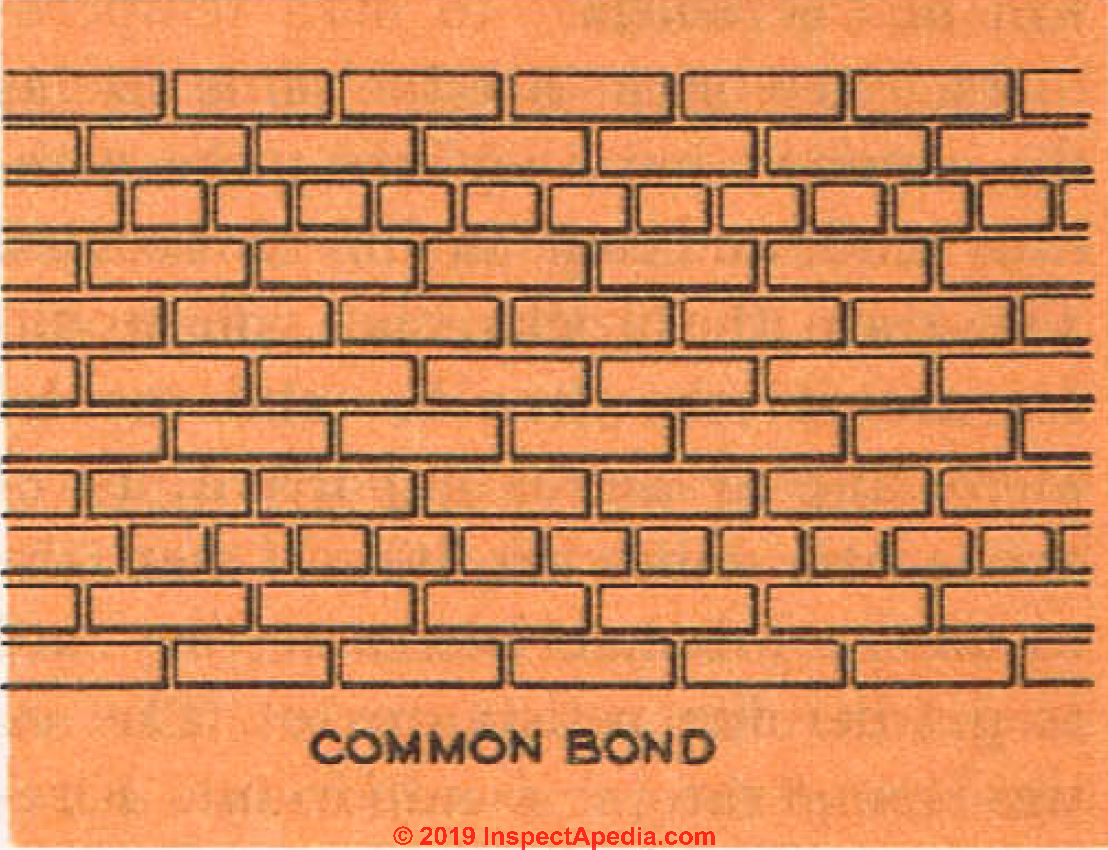
Fig. 5. Two types of bond, the English and the common, that are frequently used in working with bricks. Note that the joints are always staggered.
The mortar joint between each brick should be about %" thick, but this can be varied slightly so that a row of bricks will come out even. It is very important that all joints be packed thoroughly with mortar. One of the most common causes of leaking fireplace chimneys is that the interior mortar joints are not filled with mortar and moisture works into the brick-work from the top and seeps down through these faulty joints.
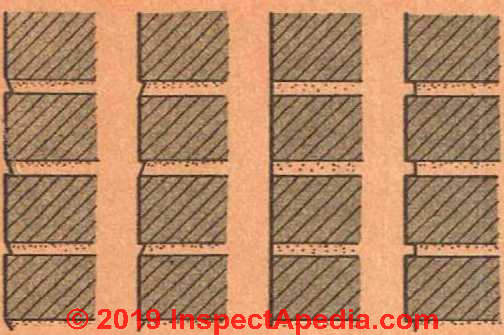
Fig. 6. The common types of brick joints are illustrated above: from left to right: Struck, Weathered, Flush, and Raked.
The exposed mortar joints can be finished in several ways. Fig. 6 shows four of these joints. The struck joint is easily made by running the point of the trowel along the joint after the mortar has begun to set. This joint should not be used for outside w'ork since moisture can easily collect on the brick under the edge of the joint.
The best joint to use for outside work is the weathered joint. This is just the opposite of the struck joint and any moisture reaching the joint will drain off quickly. The flush joint is not suitable for outside work because its rough face absorbs moisture. It is, of course, a very simple sort of joint to make.
A raked joint is started just as if it were going to be a flush joint but, after the mortar has set for a few minutes, a steel jointer is used to cut back the mortar to the depth required.
This joint, too, should not be used for outside work.
Laying Up Bricks
The first step in this job is to lay the outside course of bricks along the base without using mortar to see how well they fit. If there is a slight difference, it can often be taken up by increasing or decreasing the width of the mortar joints slightly. If this fails to do the job, half-bricks can be used to get the dimensions correct. The entire base of the job should be laid out in this fashion. Fig. 7 shows how comers can be treated.
Bricks can be cut more or less to size with a cold chisel and a hammer. Score the brick where the cut is to be made on all sides and then give the chisel a sharp crack with the hammer.
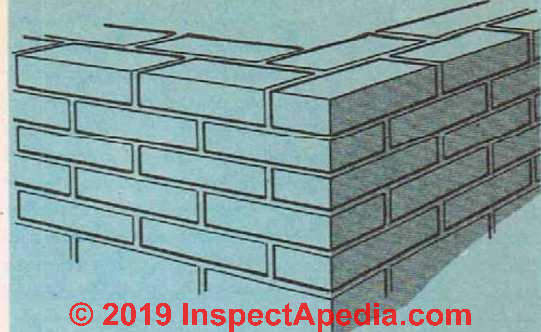
Fig. 7. Detail of construction for the corner of a brick wall.
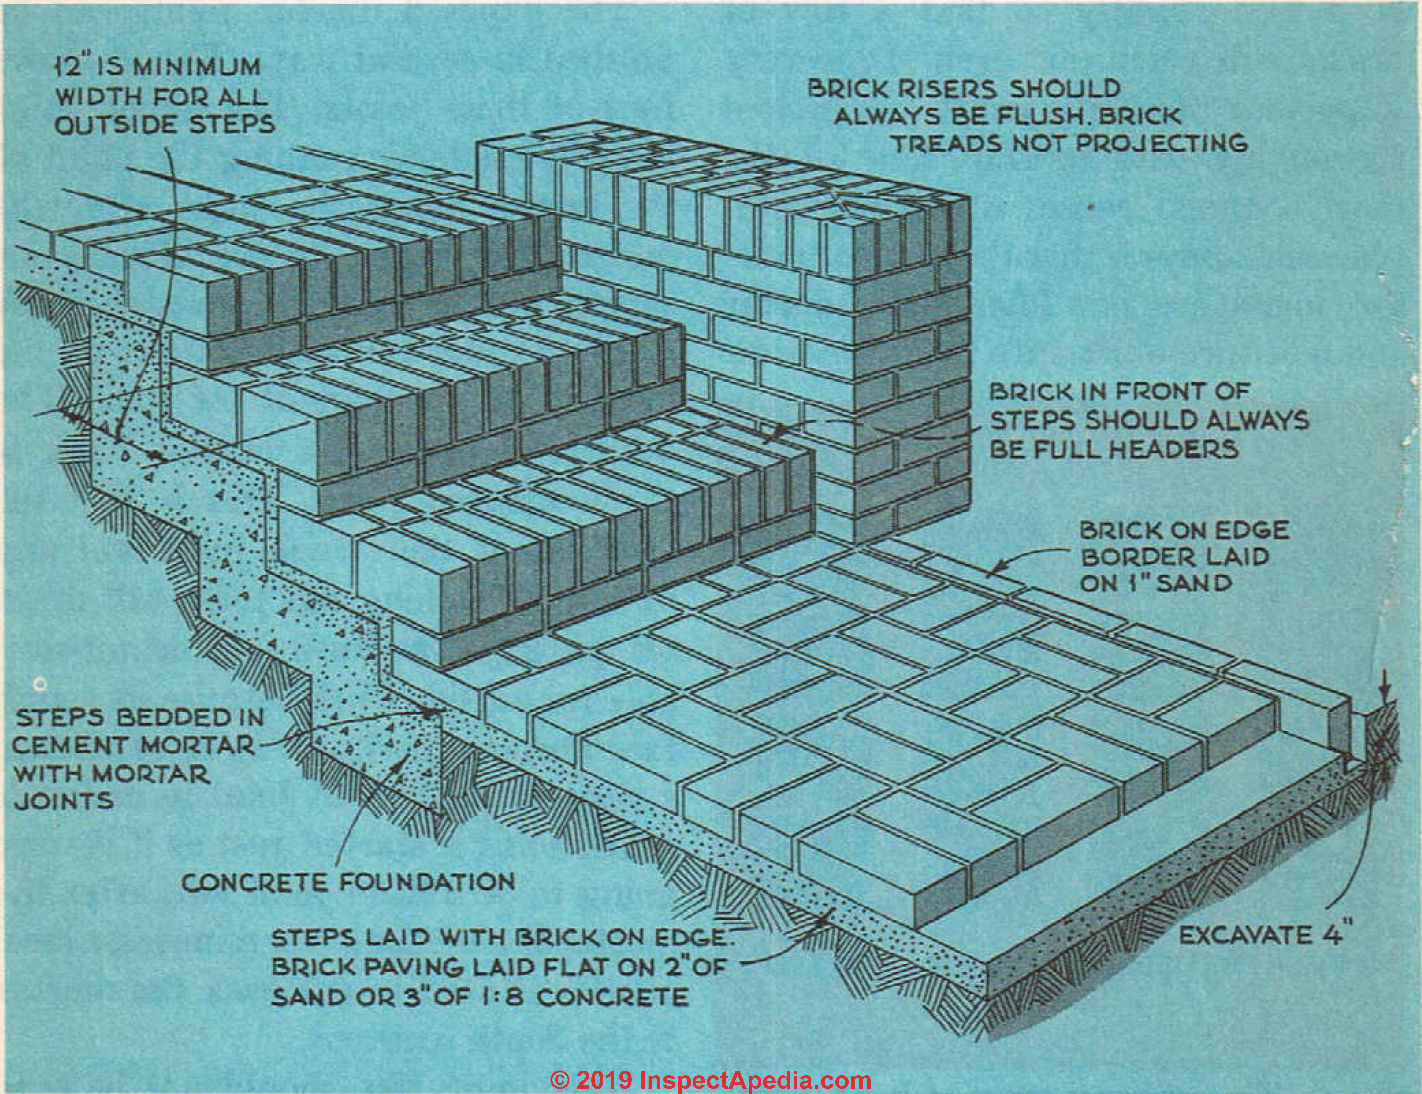
Fig. 8. A flight of attractive brick steps for the front of the house.
Care should be taken not to disturb the bricks once they have been set in place with mortar. As has been mentioned before, cement mortar will set within 30 minutes after the cement and sand have been mixed together. If the bricks should be moved after this interval of time, the mortar joint will never be as strong as was the original.
You will note that the trade mark of the manufacturer appears on only one face of a brick. The bricks should be set in place with the trade mark facing down.
Fig. 8 shows an attractive flight of outdoor steps made out of bricks over a concrete base. The concrete base is poured just as if the steps themselves were to be of concrete. After the concrete is hard and the forms have been stripped away, the bricks are set in place with mortar.
...
Continue reading at LOCATING THE HOUSE ON THE SITE - next chapter in this book, or go to book contents at BUILD YOUR DREAM HOME, or select a topic from the closely-related articles below, or see the complete ARTICLE INDEX.
Or see these
Recommended Articles
- ARCHITECTURE DICTIONARY of BUILDINGS & COMPONENTS
- BLOCK FOUNDATION & WALL DEFECTS - home
- BRICK FOUNDATIONS & WALLS - home
- BUILD YOUR DREAM HOME
- CONCRETE COLORING & POLISHING
- CONCRETE DECK PIER & DIY JOB MIXING PROCEDURE
- CONCRETE DELIVERY & MIXING
- CONCRETE DIY SMALL JOB PROCEDURE
- FOUNDATION CONSTRUCTION TYPES
- GLOSSARY of BUILDING TERMS
Suggested citation for this web page
WORKING WITH CONCRETE, MASONRY BLOCKS, & BRICKS at InspectApedia.com - online encyclopedia of building & environmental inspection, testing, diagnosis, repair, & problem prevention advice.
Or see this
INDEX to RELATED ARTICLES: ARTICLE INDEX to BUILDING ARCHITECTURE
Or use the SEARCH BOX found below to Ask a Question or Search InspectApedia
Or see
INDEX to RELATED ARTICLES: ARTICLE INDEX to BUILDING DAMAGE, DISASTER, REPAIRS
Or use the SEARCH BOX found below to Ask a Question or Search InspectApedia
Ask a Question or Search InspectApedia
Share this article:Questions & answers or comments about how to identify the architectural style of buildings and building components
Try the search box just below, or if you prefer, post a question or comment in the Comments box below and we will respond promptly.
Search the InspectApedia website
Note: appearance of your Comment below may be delayed: if your comment contains an image, photograph, web link, or text that looks to the software as if it might be a web link, your posting will appear after it has been approved by a moderator. Apologies for the delay.
Only one image can be added per comment but you can post as many comments, and therefore images, as you like.
You will not receive a notification when a response to your question has been posted.
Please bookmark this page to make it easy for you to check back for our response.
IF above you see "Comment Form is loading comments..." then COMMENT BOX - countable.ca / bawkbox.com IS NOT WORKING.
In any case you are welcome to send an email directly to us at InspectApedia.com at editor@inspectApedia.com
We'll reply to you directly. Please help us help you by noting, in your email, the URL of the InspectApedia page where you wanted to comment.
Citations & References
In addition to any citations in the article above, a full list is available on request.
- In addition to citations & references found in this article, see the research citations given at the end of the related articles found at our suggested
CONTINUE READING or RECOMMENDED ARTICLES.
- Carson, Dunlop & Associates Ltd., 120 Carlton Street Suite 407, Toronto ON M5A 4K2. Tel: (416) 964-9415 1-800-268-7070 Email: info@carsondunlop.com. Alan Carson is a past president of ASHI, the American Society of Home Inspectors.
Thanks to Alan Carson and Bob Dunlop, for permission for InspectAPedia to use text excerpts from The HOME REFERENCE BOOK - the Encyclopedia of Homes and to use illustrations from The ILLUSTRATED HOME .
Carson Dunlop Associates provides extensive home inspection education and report writing material. In gratitude we provide links to tsome Carson Dunlop Associates products and services.
 |
HOME | ABOUT | ASK a QUESTION | CONTACT | CONTENT USE POLICY | DESCRIPTION | POLICIES | PRIVACY | |
| © 2026 - 1985 Publisher InspectApedia.com - Daniel Friedman | |||||||||