
 Cutting Costs when Building Your Own Home
Chapter 4 of How to Build Your Dream Home © 2020 InspectApedia.com
- POST a QUESTION or COMMENT about how to identify the architectural style of buildings and building components
How to cut costs when building your own home.
This article series provides an updated version of Hubbard Cobb's Your Dream Home, illustrated by Sigman-Ward, first published by Wm. H. Wise & Co. New York, 1950.
From site selection and obtaining financing through each step in construction of a single family home the simple procedures and drawings in this book are still useful for anyone building or repairing a home or other small structure.
InspectAPedia tolerates no conflicts of interest. We have no relationship with advertisers, products, or services discussed at this website.
- Daniel Friedman, Publisher/Editor/Author - See WHO ARE WE?
Cutting Costs; The Basic Material; Necessary Tools
 This is Chapter 4 of BUILD YOUR DREAM HOME at InspectApedia.com - online encyclopedia of building & environmental inspection, testing, diagnosis, repair, & problem prevention advice.
This web page is also available as CUTTING COSTS, BASIC MATERIALS, NECESSARY TOOLS [eBook]
or as a PDF image at CUTTING COSTS, BASIC MATERIALS, NECESSARY TOOLS [PDF] original page images
There are two ways to cut costs in construction work. One is to use inferior-grade materials and the other is to use the better quality stuff and make every piece and penny count. As one of the reasons you are building your own home is to save money, cutting costs where possible should be given plenty of thought.
Saving Materials
You will be able to save a great deal just by not wasting materials.
For example, take a small item like nails. If you keep the nails where they will not become wet and rust and if you take only enough to do the job and do not toss them around, you will find that you will save $10 or $20. A very substantial way in which you can save is by conserving lumber.
Don’t ever cut up a long piece of material if there is a short one somewhere about that can be used.
Professional builders usually allow 10 per cent or more for waste, but you can cut down on this considerably and at * the same time not take up too much extra time. When you use a piece of lumber for a temporary brace, don’t, when you are finished with it, knock it off with your hammer or hatchet.
The chances are that if it is light you will split it and it will have no further use except as firewood. Take the time to pull out the nails and put the lumber away. Then, when you need it, it will be there ready for use.
Receiving Deliveries
It will always pay you to be on hand when deliveries of materials are made. Some of the drivers of trucks are just as apt to dump the whole load off as not, and this is almost sure to damage some of the material.
If the driver and his helper are not in the mood to take the materials off by hand, do it yourself. Items such as masonry blocks, steel-casement windows, glazed-window' sashes and so on, should be handled with care, since, if they are tossed around too much, they will either break, crack or get sprung out of line.
Items that can be damaged by the weather should be brought in under cover as soon as they are delivered. Even if there is no sign of rain, dampness from dew can harm items such as
hardwood flooring or interior trim. Cement should be taken inside, and sand should be kept covered because if there is a hard rain, a large amount can be washed away.
Supervising Help
Whenever you have any hired help working around the place, try to be on hand, not only to help out when you can, but to give the necessary directions. This does not mean that help, professional or otherwise, is just going
WHAT MATERIAL to BUILD WITH
One of the first things that you must decide before you break ground is just what materials you are going to use to build your house. As far as the frame or the shell of the house goes, you have a choice between wood and concrete masonry-blocks. Let us take just a minute here to see the advantages and disadvantages of each type.
Wood
As far as a wood-frame house is concerned, you have a medium—wood —that most of us have had some experience in working with.
Almost anyone who plans to build a house by himself probably knows how to saw and nail wood and perhaps has even done a little construction work of a heaw nature, such as building a garage, fences, or something else. Almost everyone knows that wood is an easv medium to work in. If a board is cut too long, it is a simple matter to plane or saw it down so that it fits just right.
Most of us can guess what size nail is about right and which size is too large and will split the board. These are all important points to consider about wood. Wood is something that most of us have the feel of.
to sit down the minute you leave the site, but it is sometimes difficult to plan an entire day’s work for a man, and if he does not have proper instructions, he can do nothing else but loaf around on the job until you show up and tell him what to do next.
Don’t make the mistake that one home builder did of hiring a bulldozer to put in a driveway and then going off somewhere and forgetting to tell the driver where the driveway was supposed to be placed.
Masonry-Blocks
Of course, wood has certain disadvantages.
First of all, it can be damaged by the weather, insects or decay. It will shrink some unless it is very well seasoned, and this means that cracks may appear in the plaster or wallboard interior walls, windows and doors may stick, and there will be a lot of small maintenance jobs that must be done, even after the house has just been completed.
If the exterior siding is of wood, it will have to be repainted at least every five years, perhaps more often.
Special care will have to be taken to check and make sure that decay has not set in at various points.
A house built entirely of wood is very inflammable, and once it gets on fire it may be totally ruined before the fire is put out. This may be a very important point to keep in mind if you are building far out in the country where the fire department is some distance away.
Concrete masonry-blocks, on the other hand, are verv resistant to fire.
They will not be damaged by moisture, insects or decay. If you do not care about appearance, they do not need any sort of paint or finish to protect them from the weather.
Many persons don’t care for masonry houses just on general principals, but most of them cannot tell the difference between a house made of masonry blocks and one of wood until they are near enough to see the texture of the siding. You can have just as attractive a home made out of masonry as out of wood—if the job is done correctly.
Probably the greatest point against masonry blocks is that most of us are just not used to working with masonry.
There are different skills required for this sort of work and few persons care to go into a new element. Of course, there will be a few who have watched a group of skilled masons erect the walls of a concrete house in almost no time at all and, as they work with ease, the ill-informed will assume that building with these blocks is as simple as these skilled craftsmen make it appear.
Don’t let this fool you. Lifting a block and putting it down in a bed of mortar is not difficult, but making sure that all your measurements are correct, that the wall is level and true, is something else again. There is no easy way to build a house in a hurry.
Any type of construction you choose is going to require time and a little skill. So keep this in mind when you begin to think about materials. As far as the actual cost is concerned, there isn’t much choice between wood or masonry.
Exterior Siding
If you decide to build a wood-frame house, you can have a wide selection in the type of materials used for the outside walls. While wood siding requires such maintenance as painting, stucco or asbestos shingles do not have to be painted until they become so soiled from soot that they can no longer be cleaned. The same holds true of brick veneer, but this is both a very difficult and a very expensive type of construction.
Naturally, when we say that stucco, for example, does not require much maintenance, it is assumed that the stucco is properly applied. If it is not, you will be forever patching cracks or spots where the stucco has fallen off the lath, and you wrill probably begin to long for a house writh w'ood siding that only requires a little paint from time to time.
The Basement
The next point that you have to think about is whether you are going to have a house with a full basement, no basement but crawl space under the first floor, or a concrete slab poured on
If the ground with or without radiant heating in it.
The main purpose of a basement in many homes is to provide a place for the heating system. This was because old-fashioned heating plants had to be below the lowest radiator or register. This is no longer true. Another reason for basements was storage room. This may still hold true in some cases, but most of the basements you run across are so damp and dirty that they do not make a suitable place to store anything except fuel and a few pieces of gardening equipment, etc., which will not be harmed by a little moisture and dampness.
A basement can add lo per cent to the cost of a house, and if this investment is only going to be used for a heating system and a damp, dirty storage space, it not worth your money. If you want a basement, then let it be used for some useful purpose, such as a game room or den, and build it with care so that it will be dry and properly ventilated and can be used for livable rooms.
itting the Base
If you decide to get along without a basement, you can build your house either on a continuous wall foundation
with a wood floor or with a concrete slab floor. Of course, in either case, you will not have quite as much room, as in the house with the basement because the heating system and hot-water heater and other utilities will have to be placed in the utility room. On the other hand, you save a good deal of time and money, which is pretty important too. You will not have any place in which to build a recreation or game room, and this may cramp your style later on, unless you want to build a detached building for this purpose.
Personally, if there is going to have to be a rumpus room somewhere, we would just as soon have it as far away from the main house as possible.
A slab floor with radiant heating panels in it has one advantage over a wood floor off the ground, which is that you save space that would be taken up by radiators and registers.
TOOLS REQUIRED FOR THE JOB
In theory, a man can build himself a house with no tools other than a saw, a hammer and a framing square. You probably can build a house with only this minimum amount of equipment, but it probably won’t be too good a house when it is finished. To do a good job, you will need quite a sizable collection of tools and they should be good tools.
The right tool for the job not only does a better job but makes the work go faster. For example, you can rip a board lengthwise with a crosscut saw, but the cutting will take time and you won’t get the same nice, even cut as you will by using a rip saw.
If you are building a house yourself, it is well worth the money to invest in a set of carpentry tools right at the start. If you do this, you will have them right on hand when you need them and not have to put off doing an essential job until you get down to a hardware store or over to a friend to buy or borrow the equipment you need. And anyway, there will always be some work to be done around the house after it has been completed, so investing in tools at this time is really a long-term affair.
On the other hand, it is hardly worthwhile to invest in a lot of tools for specialized work. Plumbing tools, for example, will probably he used only during the installation of the plumbing system. After that, with the possible exception of a pipe wrench, they will be of no further use, so don’t buy tools of Hus sort unless you have to.
The same holds true of the specialized tools you may need for the electrical and heating systems. If you can possibly get by without buying them, do so.
The tools you will need for the car-pentry end of the job are, a crosscut and a rip saw, a hammer, a shingle hatchet, a plane, a screwdriver, a brace
and assorted bits, a level, a framing square, a rule, a plumb line and bob, a nail set, a chisel, and two solid sawhorses (these you can make yourself easily enough). Of course, there arc many more or less specialized tools that could be added to this list, but this is about the minimum requirement for house building.
For masonry work you will need a small and large trowel, which you will find use for later on in many different jobs.
If you are using BX cable for the electrical system, you must use a hacksaw to cut the cable—and a hacksaw makes a useful addition to anjr tool kit.
The other tools required for some jobs can be rented or borrowed. Use the money that you would otherwise invest in something like caulking irons to buy the better and more expensive grades of tools, because you will find that good quality equipment is much superior to the cheaper grades, which soon become worthless.
THE FRAMING SQUARE AND ITS USE
It is virtually impossible to do much in the way of house construction without a working knowledge of the framing square. This tool has many important uses besides that of checking to find out if the end of a board is square or if the joint between two boards forms a right angle. The steel framing square contains a quantity of information on both its sides that enables you to figure out, for instance, how rafters should he cut for almost every possible condition or how a flight of stairs can he laid out.
The rafters for the basic house described in this book can be made according to the pattern given in illustration. but some of those for the other homes covered in this book will have to be figured out by the home-builder himself. Therefore, it is important that you know how to use the framing square.
The framing square is made of steel with a tongue that is 1 Yi” wide and usually 16" long. The blade is 2" wide and 24" long. Stamped on the front and back face of the square are all the necessary figures required for laying out various types of rafters.
Before you can go ahead with marking and cutting rafters, there are a fewr important terms that you should be familiar with. First of all there is the span. The span is the distance between the outside surfaces of opposing wall plates, and therefore, it is the shortest distance between two opposite rafter seats.
The rise is the vertical distance from the wall plate to the ridge of the roof. The run is the shortest horizontal distance that the rafter must cover, and therefore, it is one-half the span, if the building has equal pitch on both sides of the roof.
The pitch of the roof is the amount of slope and it is equal to the total rise (the vertical distance of the ridge from the wall plate) divided by the span. For example, if the house has a span of 24 feet and a total rise of 8 feet, the pitch can be found by dividing 24 into 8, which gives Vz.
Therefore, this particular house has a roof with a Vz pitch. It is sometimes necessary to find the rise of a roof when only the span and pitch are known. This is simple enough to do. If the span is 24 feet and the roof has a pitch of Vz, divide the pitch into the span and you get the rise. In this case it would be 8 feet, of course.
The unit of run is the unit of measurement used with a framing square for measuring the rafters. It is always taken from a level plane and is always 12 inches. The unit of span is always twice the unit of run and, therefore, is always 24 inches.
The rise in inches is the number of inches that the roof actually rises for every foot of run. If the rise in inches is not given, you can find it by multiplying the pitch by the unit of span. For example, if the pitch is Vz and the unit of span is 24 inches, the total rise in inches per foot of run is 8.
Now, if you look at the tongue of the framing square you will find the number 12. This is the unit of run and is used for roof-framing purposes. Rim a diagonal line from this point to “4 inches" on the blade of the square. This shows a 4" rise per 12" run, which results in a roof with a Vo pitch.
If the line wTere to run from “12 inches” on the tongue to “8 inches” on the blade, the pitch would be Vz. If the line runs from “12 inches” to “12 inches,” you get a V> pitch, and if it runs from “12 inches” on the tongue to “24 inches” on the blade, the pitch is 1.
The cut of the roof is the rise in inches and the unit of run, which is the constant 12 inches.
Now, let us assume that you want to find the length of a main or common rafter, using a steel square with a rafter table. You will find stamped on the blade of the square “Length of Main Rafters Per Foot Run," and the table that follows gives the unit lengths of main rafters from a 2" to an 18" rise. As the roof we are discussing has a %
pitch and an 8" rise, you should look for the figure under 8. This is 14.42, which is the length of the rafter in inches and hundredths of inches per foot of run. To find the actual length of the rafter, multiply 14.42 (the foot-run) by the number of feet in the run. As the span of the roof is 24, the run is 12, and this times 14.42 gives 173.04 inches.
Dividing by 12, the total length of the rafter turns out to be 14.42 feet. This is the total length of the rafter from the middle of the ridge board to the outside edge of the wall plate. If there is going to be a ridge board, one-half the thickness of this ridge board should be deducted from the total rafter length; if the rafter is to extend beyond the wall plate, the amount of the extension must be added to its length.
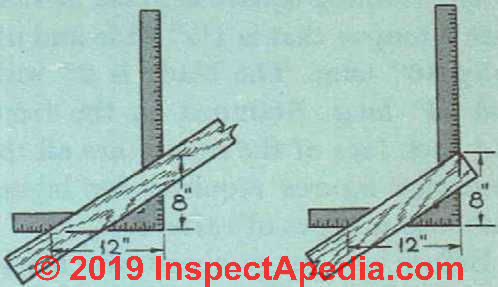
Once you have the right length of rafter, the top and bottom cuts are made. The top cut, where the rafter joins the ridge board, is called the plumb cut. It can be made by placing the rafter on its side and then placing the square over it so that the rise per foot—8 inches in this case—is at the top of the rafter while the number 12 on the tongue is on the same edge of the rafter but below the 8" mark. Now a line can be drawn along the edge of the square to give the angle of the cut. The same general procedure is used.

See details on how to use a framing square found at FRAMING SQUARE USER'S GUIDE
HEEL CUT PLUMB CUT
Fig. 1. How the framing square can be used to mark out the rafters for the plumb and heel cut.
to determine the heel cut. See Fig. 1 above.
There are a good many types of rafter that you may run across, and naturally, all are not so simple to work out as the common or main rafter, which extends from the ridge of the roof to the wall plate. However, if you look again at the framing square, you will note that under the information given for the common rafter there is similar information for a hip or valley rafter, a jack rafter at 16 inches on center and at 24 inches on center, and also the necessary data for making side cuts on all these.
A hip rafter is one that runs diagonally from the corner of a building to the roof. A valley rafter is one used where two roofs intersect, as when the garage roof joins the breeze way.
...
Continue reading at WORKING WITH CONCRETE, MASONRY BLOCKS, & BRICK - next chapter in this book, or go to book contents at BUILD YOUR DREAM HOME, or select a topic from the closely-related articles below, or see the complete ARTICLE INDEX.
Or see these
Recommended Articles
- BUILD YOUR DREAM HOME
- CONSTRUCTION DICTIONARY
- FRAMING SQUARE USER'S GUIDE
- FRAMING TRIANGLES & CALCULATIONS
- GLOSSARY of BUILDING TERMS
Suggested citation for this web page
CUTTING COSTS, BASIC MATERIALS, NECESSARY TOOLS at InspectApedia.com - online encyclopedia of building & environmental inspection, testing, diagnosis, repair, & problem prevention advice.
Or see this
INDEX to RELATED ARTICLES: ARTICLE INDEX to BUILDING ARCHITECTURE
Or use the SEARCH BOX found below to Ask a Question or Search InspectApedia
Or see
INDEX to RELATED ARTICLES: ARTICLE INDEX to BUILDING DAMAGE, DISASTER, REPAIRS
Or use the SEARCH BOX found below to Ask a Question or Search InspectApedia
Ask a Question or Search InspectApedia
Share this article:Questions & answers or comments about how to identify the architectural style of buildings and building components
Try the search box just below, or if you prefer, post a question or comment in the Comments box below and we will respond promptly.
Search the InspectApedia website
Note: appearance of your Comment below may be delayed: if your comment contains an image, photograph, web link, or text that looks to the software as if it might be a web link, your posting will appear after it has been approved by a moderator. Apologies for the delay.
Only one image can be added per comment but you can post as many comments, and therefore images, as you like.
You will not receive a notification when a response to your question has been posted.
Please bookmark this page to make it easy for you to check back for our response.
IF above you see "Comment Form is loading comments..." then COMMENT BOX - countable.ca / bawkbox.com IS NOT WORKING.
In any case you are welcome to send an email directly to us at InspectApedia.com at editor@inspectApedia.com
We'll reply to you directly. Please help us help you by noting, in your email, the URL of the InspectApedia page where you wanted to comment.
Citations & References
In addition to any citations in the article above, a full list is available on request.
- In addition to citations & references found in this article, see the research citations given at the end of the related articles found at our suggested
CONTINUE READING or RECOMMENDED ARTICLES.
- Carson, Dunlop & Associates Ltd., 120 Carlton Street Suite 407, Toronto ON M5A 4K2. Tel: (416) 964-9415 1-800-268-7070 Email: info@carsondunlop.com. Alan Carson is a past president of ASHI, the American Society of Home Inspectors.
Thanks to Alan Carson and Bob Dunlop, for permission for InspectAPedia to use text excerpts from The HOME REFERENCE BOOK - the Encyclopedia of Homes and to use illustrations from The ILLUSTRATED HOME .
Carson Dunlop Associates provides extensive home inspection education and report writing material. In gratitude we provide links to tsome Carson Dunlop Associates products and services.
 |
HOME | ABOUT | ASK a QUESTION | CONTACT | CONTENT USE POLICY | DESCRIPTION | POLICIES | PRIVACY | |
| © 2026 - 1985 Publisher InspectApedia.com - Daniel Friedman | |||||||||