 Standing Seam Metal Roof Systems
- POST a QUESTION or COMMENT about standing seam metal roof installation, troubleshooting, repair
Standing seam metal roofs:
This article explains the proper installation, fastening, and flashing details for standing seam metal roofs. Standing-seam roofing consists of individual panels that run the length of the roof with a high rib up each side of the panels.
The ribs overlap and lock together, concealing the fasteners and giving the roofing its name.
InspectAPedia tolerates no conflicts of interest. We have no relationship with advertisers, products, or services discussed at this website.
- Daniel Friedman, Publisher/Editor/Author - See WHO ARE WE?
Standing-Seam Metal Roofing Installation Practices & Details
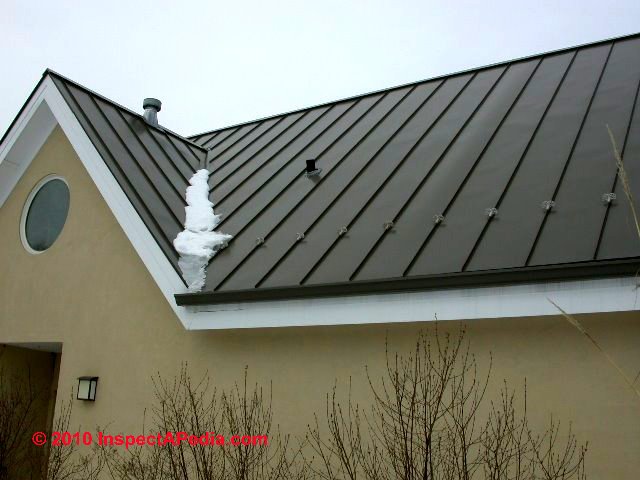 Adapted/paraphrased with permission from Best Practices Guide to Residential Construction (Steve Bliss, J Wiley & Sons) , chapter on BEST ROOFING PRACTICES:
The hidden fasteners allow thermal movement in the panels and are less likely to leak than exposed fasteners. However, some trim pieces are still fastened with exposed screws.
The smooth surface of a standing-seam roof provides a cleaner appearance and is easier to keep clear of leaf debris than tile, wood, or other textured roofing surfaces.
Also, it can be walked on when necessary. Snow slides off easily as well, making this a popular choice in high snow regions. The cost is generally 25% to 50% more than an exposed-fastener roof of similar materials.
Materials Used in Standing Seam Metal Roofs
Standing-seam panels are 8 to 24 inches wide and available in steel, copper, and aluminum with a wide array of finishes (discussed below). Stiffening ribs may be added to wider panels to reduce waviness (oil-canning). Thicknesses for quality residential applications are typically 24 or 26 gauge, but lighter and heavier stock is also available.
Standing seam metal roof installers can form panels on-site from coil stock with portable roll-forming equipment, or they can order factory-made panels from a growing number of metal roofing manufacturers. Most factory-made panels have snaptogether seams, eliminating the need for special crimping equipment used by site fabricators. In most cases, panels are fabricated to run from eaves to ridge, eliminated the need for end lap joints.
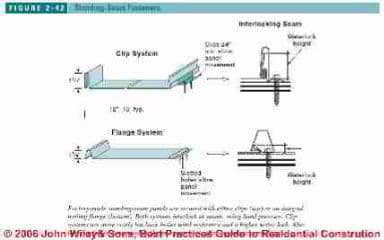
- Clips vs. flange standing seam roof panel fastening methods. Standing-seam panels either have
an integral screwing flange (through-fastener panels)
or are installed with clips placed 20 to 24 inches
on-center (Figure 2-42).
Clip systems are more costly to manufacture and to install, but they have better wind resistance and a higher water-lock at the seams.
[Click to enlarge any image]
Also, because the clips allow unlimited panel movement, panels can be fabricated to any length. The flange type should be limited to 40 feet for steel and 20 feet for aluminum for normal climate conditions. - Site vs. factory fabrication of standing seam metal roof panels. For those with the equipment,
site fabrication provides flexibility and saves on
shipping costs, which can be high.
Site fabricators can also produce matching flashings and accessories to match the specific needs of the job. Factory-made panels, on the other hand, offer consistent quality, as well as preformed flashings and fittings that simplify installation. Using factory-produced panels, however, requires detailed planning since every piece of roofing must be preordered to length.
Installation Specifications for Standing Seam Metal Roofs
On new homes, most panels are installed over a solid plywood deck with minimum No. 30 felt underlayment. Metal roofing manufacturers recommend plywood rather than OSB due to plywood’s better screwholding ability.
Install the felt with plastic cap nails rather than metal buttons, which can cause corrosion when in contact with the roofing panels.
See GALVANIC SCALE & METAL CORROSION.
After installing the drip edge, install the first panel, making sure it is square to the bottom edge of the roof. If the roof is not square, pull the panel away from the rake so the first rib does not overhang the rake edge.
Later, the rake trim piece will cover any small discrepancies. If the panels have an integral screw flange, keep the screws just snug so the panels can move with temperature changes. The clips are designed to allow thermal movement.
The next panel fits over the first with an overlapping rib. Fit each panel to a line snapped up the roof, marking the edge of each panel. Without layout lines, the panels can build up an incremental error, throwing off the layout. As panels are installed and secured, the joints are easily locked together with hand pressure.
Traditional standingseam roofing required special motorized crimpers to lock the seams. While these are still used on some low-slope systems, most residential installations now use snap-together panels. Unless the layout works perfectly, the last panel will need to be cut along the opposite rake and bent with a hand seamer to form the end rib.
Reroofing Using Standing Seam Metal Roofs Over Other Roof Coverings?

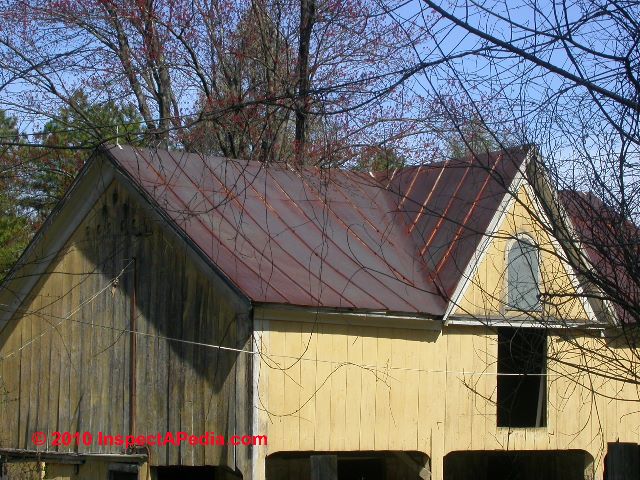
Our standing seam barn roof re-roof photo (left) demonstrates that re-roofing with standing seam metal roofs over older buildings is a very old practice.
In this case the barn roof originally was covered with wood shingles, installed when the barn was constructed in the late 19th century in upstate New York.
Many installers will not install standing-seam roofing over existing asphalt shingles since the rough surface will tend to bind the panels and cause “oil-canning,” as the panels move with temperature changes.
One option is to install the new metal roofing over 2x4 purlins nailed through the old roofing and shimmed to form an even plane.
Follow manufacturer’s recommendations for spacing of purlins, typically no more than 24 inches on-center.
Flashing and Sealing Details for Standing Seam Metal Roofs
[Click to enlarge any image]
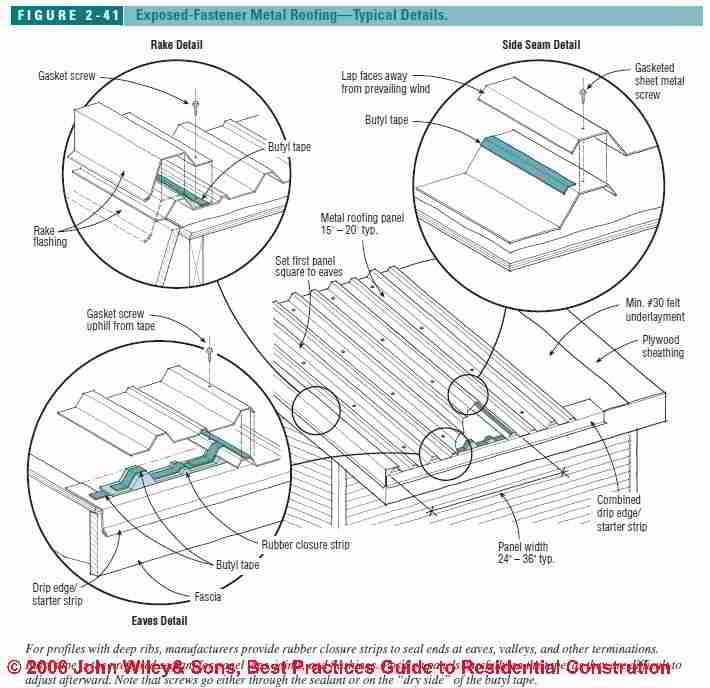
Typical standing seam metal roof flashing details are similar to those found in Figure 2-41 shown at left .
Manufacturers of preformed roofing panels provide eaves and rake flashings, ridge caps, and sidewall flashings in matching finishes, as well as coil stock for site fabrication.
Many flashings are
designed with hidden fasteners; others require exposed
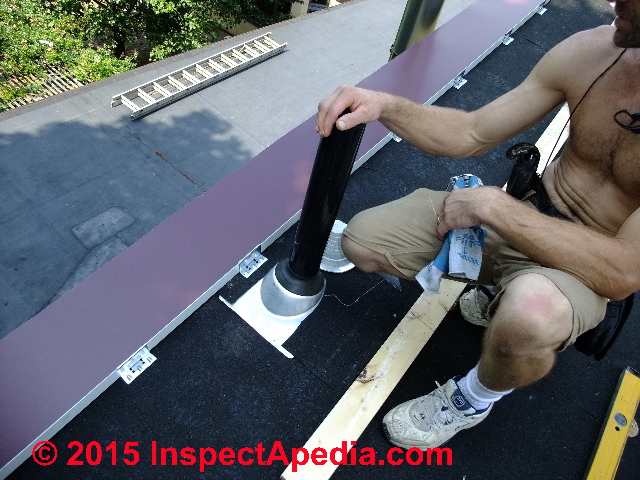
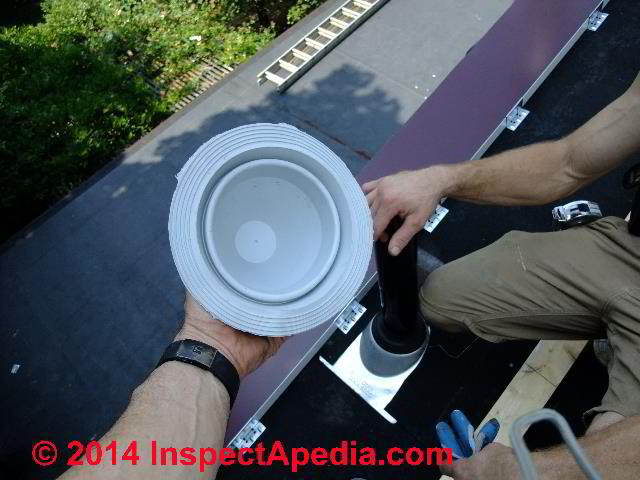
gasketed screws. If you want to see the original installation details for the plumbing vent shown at above right, take a look at the photos and text at the bottom of our article
on PLUMBING VENT DEFECTS & NOISES.
Follow manufacturers’ recommendations regarding which sealants to use for compatibility with the roofing (typically butyl tape, or gunnable terpolymer butyl or urethane sealant).
In general, avoid acid-cure silicone (the type that smells like vinegar) as it can be corrosive to many metal finishes.
-- Adapted with permission from Best Practices Guide to Residential Construction (Steve Bliss, J Wiley & Sons) .
Resources: Roofing Materials & Equipment Suppliers
Manufacturers
Metal Roofing Suppliers
- Atas International www.atas.com Modular metal shingle, tile, and standing-seam panels
- Classic Products www.classicroof.com Modular metal shingle panels and standing seam panels
- Custom-Bilt Metals www.custombiltmetals.com Modular metal shakes and standing seam panels
- Decra Roofing Systems www.decra.com Modular metal shingle, tile, and shake panels
- Dura-Lok Roofing Systems
www.duraloc.com
Modular metal roofing shingles with granular coating
[Reader comment suggests this company may no longer be in business - Ed. Somewhat curious remark as we found the contact information listed below in January 2015]- Dura-Lok Roofing Systems, Wintex Industries, 17221 Alico Center Road Fort Myers, FL 33967, (since 1986), Website: duralocroofingsystems.com/and Email: wintexinc@yahoo.com
- DuraLok Roofing, (239) 449-0356 Fort Myers, FL USA
- EDCO Products, website: http://www.edcoproducts.com/ (since 1946)
- Fabral www.fabral.com Exposed fastener and concealed clip metal roofing panels
- Gerard Roofing Technologies www.gerardusa.com Modular metal shake and tile panels with granular coating
- Met-Tile Website: www.met-tile.com Modular metal roof-tile panels
- Metro Roof Products, Website: http://www.metroroofproducts.com/
- Zappone Manufacturing, website www.zappone.com/
Zappone Manufacturing, 2928 North Pittsburg St. Spokane, WA 99207 1-800-285-2677, Washington State Copper Roofing Supplier of Copper scallop shingles, copper shingles, copper bay windows, vertical walls, aluminum roof shingles
Venting Underlayments
- Benjamin Obdyke www.benjaminobdyke.com Cedar Breather, a 3/8 -in.-thick matrix-type underlayment designed to provide ventilation and drainage space under wood roofing
More Information about Roofing Materials, Methods, Standards
- Metal Roofing Alliance www.metalroofing.com
Standing Seam Metal Roof Seam Heights
Reader Question: 20 January 2015 Jack said:
What should be the minimum height of the standing seam for a 1.5"/12 roof?
Reply:
Jack,
The flange system metal roof is typically made with a seam height of 1 1/4" - also referred to as "Eco" seam by some manufacturers.
Flat or "Dutch" or locking type standing seams range in height from a low of about 1" to 2 3/8" with taller seams generally used on lower slopes.
For relatively low slopes like the 3:12 you cite you may need to go to the higher seam height to protect against leakage, especially in a snow-climate. For roofs you describe that are as low slope as 1.5 in 12, in a snow climate where there is risk of ice dams I I question if a standing seam roof would be recommended by some manufacturers.
But Atlas Roofing describes standing seam roofing products used for low slope roofs described as sloped to 2:12 or less over solid substrate. These roofs are covered with a locking type standing seam that is 2 3/8" in height.
OPINION: Watch out: even with a tight, tall locking standing seam roof, if your low -slope roof is subject to ice dams, snow blockage or any other condition that could cause water backup-s on the roof such that the water depth can ever exceed the seam height you can expect leak trouble.
- You can contact Atlas International, an Allentown PA USA company at (610) 395-8445 or at www.atlas.com
InspectAPedia is an independent publisher of building, environmental, and forensic inspection, diagnosis, and repair information provided free to the public - we have no business nor financial connection with any manufacturer or service provider discussed at our website.
...
Reader Comments, Questions & Answers About The Article Above
Below you will find questions and answers previously posted on this page at its page bottom reader comment box.
Reader Q&A - also see RECOMMENDED ARTICLES & FAQs
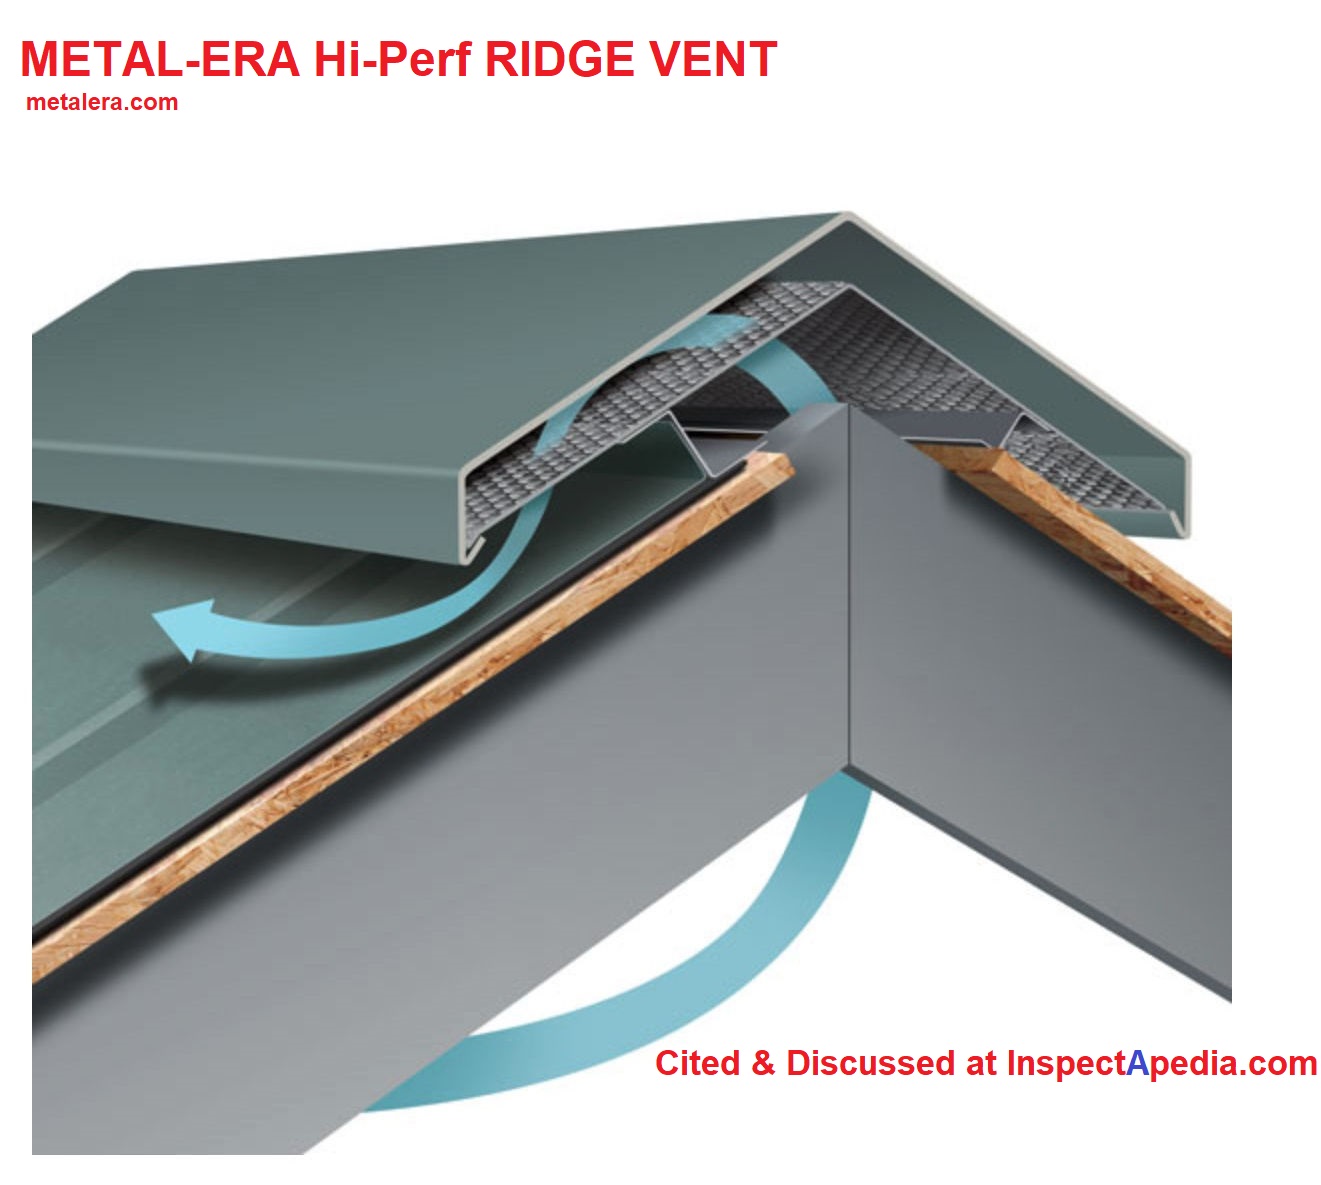
On 2021-03-14 by Jeff - Metal-Era ridge vent for use on standing seam metal roofs
 Follow up On my 2021-02-15 Question
Thank you for the hip roof vent suggestions. I realize that venting the hips could be problematic, as you noted, so I continued researching ridge vents for standing seam roofs.
I've contacted Metal-Era, who custom fabricates a well designed ridge vent system that allows up to a 6" wide cut at the ridge. Metal-Era said I could accomplish my venting needs with a 26' ridge cut 4" wide, which I have, and no need to vent the hips.
It's not an inexpensive solution, but it provides for plenty of NFA. In fact, I will probably order their 5" High-Perf ridge vent because I have plenty of soffit intake venting to feed the ridge vent.
Here is Metal-Era's website should others have a similar venting problem to solve.
Metal-Era Hi-Perf RIDGE VENT PRODUCT DESCRIPTION [PDF], Metal-Era, 600 Airport Road
WaukeshaWI53188
Phone
800-558-2162
Fax
800-373-9156
Email
info@metalera.com
On 2021-02-15 by (mod) - roof venting for standing seam metal roofs
@Steven Bliss,
Thank you for the comments Steve.
As we've discussed, the particular rub is how to vent hip roofs along the whole hip - which in my OPINION either we eschew, (or we skip it), or we risk leaks into the roof at the lower 1/ 3 of the hip.
As you point out the codes are not dictatorial on this point.
On 2021-02-15 by Steven Bliss on roof venting recommendations for metal roofs
Roof venting is a good thing and required by code in most areas, with exceptions made for unvented cathedral ceilings (generally a bad idea).
The building code requires an NFVA of 1 sq. ft. for each 150 sq. ft. of attic floor space.This can be reduced to 1:300 in Climate Zones 6,7,and 8 if there is an attic vapor retarder and 40 to 50% of the ventilation is within 3 ft. of the ridge (2012/2018 IRC).
For some reason, the code does not specifically require balanced ventilation with low and high vents if you follow the 1:150 rule.But they do recommend this as do vent manufacturers, because the vents don’t work well without it. There is some evidence that just having ridge vents can do more harm than good by depressurizing the attic, pulling moist air from inside the living space.
The ratios are based more on history than science and a lot of research (especially by William Rose) has determined that roof ventilation does a lot less than promised. Still it’s better to have roof ventilation than not. I wouldn’t sweat it however, if you can get reasonably close to the code ratios.
For hip roofs, you can use specialized hip-ridge vents, designed to not leak in rain and snow on hips. Another option is in-field vents, sometimes called box vents. These may be rectangular or round and installed every few feet across the upper portion of the roof. Their flashings will have to be adapted for metal roofing by the installer.
The main reasons for roof ventilation are to:
• Prevent ice dams
• Lower attic temperatures to prolong shingle life and reduce cooling loads.
• Remove excess moisture from the sheathing, insulation, and roof framing caused by condensation or roof leaks
Not sure what climate you are in or your roof slope, but ice dams are usually not a problem with steep-slope metal roofs, although they can still form at valleys and other roofing details that tend to hold snow.Shingle life is not a concern for you and roof ventilation has minimal effect on cooling loads if your ceiling (or cathedral ceiling) insulation meets code.
That leaves moisture reduction. Here there is strong evidence that the best thing you can do to prevent condensation on the underside of the sheathing is to have an airtight ceiling air barrier, free of holes for recessed lighting, leaky attic hatches, and unsealed mechanical chases.
However, if your roof structure ever gets wet, whether from condensation or a flashing leak, you will need ventilation to promote drying. Without ventilation, you are more likely to grow mold and decay fungi.
The roof ventilation is there just in case. It’s a belt-and-suspenders approach, always a good idea in home construction, which is rarely done perfectly.
On 2021-02-15 by Jeff
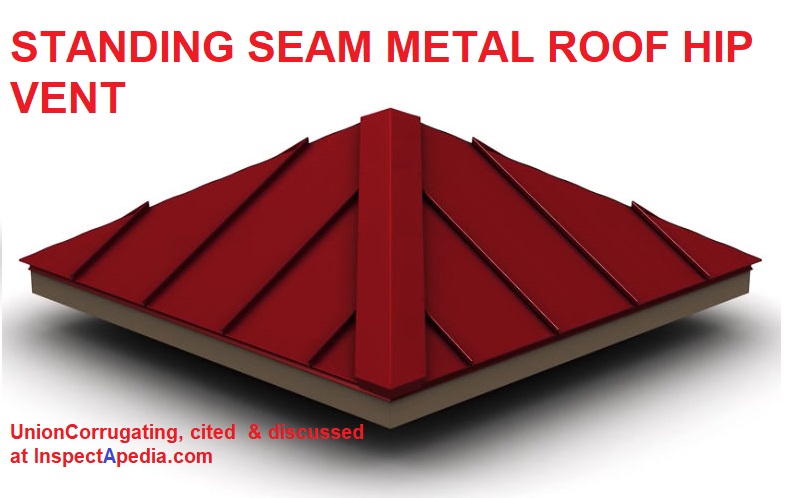 I am requesting estimates to replace my old composite shingle roof with a standing seam roof. The roof has a 5:12 pitch, a 41' x 68' footprint and a ridge line that is 25' long. It has a total ridges of 29 linear feet and total hip ridges of 44 linear feet.
There is plenty of soffit venting but, according to an online calculator I used, additional hip venting would be required to meet the 1,264 NFVA recommended amount beyond what the ridge venting can provide. What is the best method of venting hip "ridges" to eliminate water penetration and maximize ventilation?
On 2021-02-15 by (mod) - where to find venting solutions for metal hip roofs
Jeff
Thank you for the question on how to vent a hipped roof section when you're using standing seam metal roofing. It's not an easy problem. The general approach is to vent the upper portion of the hip using a ridge-vent type product. That's a partial solution that may be the best we can do.
I've published notes on this problem across several articles - found by searching InspectApedia.com for "hip roof vent" and will list the main one below where there is a more detailed discussion of the "solution" to venting hipped roofs.
But
1. I've not reviewed all of the options provided by metal roof manufacturers
2. I'd appreciate seeing what else you think or have to say on this, and I'll ask Best Practices author Steve Bliss if he has more to add.
Please take a look at
HARD to VENT ROOF SOLUTIONS for HIPS & CATHEDRAL CEILINGS
The standing seam metal roof hip vent shown here is provided by Union Corrugating - cited in the article we recommended
On 2020-01-25 by Elsbeth McPhee
My husband and I are building a new home with a standing seam metal roof. Our roof will have a 5:12 pitch with the longest panels at 42'. City ordinance says we must use 24-gauge metal with a maximum seam height of 1". Our builder and roofer, however, are concerned that a 1" seam on our roof will result in oil canning, leaking, and lower durability overall. In your opinion, is a 1" seam sufficient or should we be concerned? Thank you.
On 2020-01-25 by (mod)
Elsbeth
In general I like higher seams as stronger and less likely to leak in some snow or ice dam conditions.
I would really like to know why the city limits the SS roof seam height? They must have a reason. Ask them and tell me.
Bottom line: I trust the roofer AND the roofing product manufacturer. Go to the manufacturer and get their advice in writing and take that to the city. Surely your city (do tell us the country and city) will want your roof to be installed per the manufacturer's instructions.
On 2016-03-03 by Riley
Our home has a standing seam steel roof with a 12x12 pitch. Heavy rain runoff and deep snow deposits are a problem. What do you suggest to divert the rain & snow away from the foundation? We have a 2' over hang and 3 window wells. Thanks
On 2016-03-05 by (mod)
Riley,
I use gutters, downspouts, and snow guards - all of which can be searched and read about AD inspectapedia.com
Alternatively you can put down gravel and Barry geotextiles reading Roof village away from the building and today lite - a more costly and troublesome alternative that is sometimes required below metal roofs in high snow areas.
Comment: I think DuraLoc is out of business. Players not included are Metro Roof Products and EDCO Products....
New Metal Suppliers - Update said:
Hi, You ought to consider updating your metal roofing suppliers. I think DuraLoc is out of business. Players not included are Metro Roof Products and EDCO Products....both good, well distributed firms. (Feb 3, 2012)
Question: underlayment for metal roofs installed atop existing roof surfaces?
AUTHOR:Anonymous (no email)
COMMENT:We have a project which has a steel truss roof system with a structural metal deck diaphragm (B deck type for seismic requirements)installed over the steel trusses.
We want to provide a standing seam roof over the structural metal deck. Slope is 3:12 and the attic is a cold attic. Do we have to provide any underlayment between the structural deck and the standing seam roof?
Or can we just install the standing seam roofing directly over the structural deck. (The structural deck grooves are running perpendicular to the slop of the roof). Any assistance for the best installation procedures will be appreciated. You can reply to this e-mail: jfil@msn.com.
Thank you,
James R.
Reply:
You will probably need to install underlayment - being safer against galvanic or other corrosive problems and you might need more. Here are some example specifications from Best Buy Metals - bestbuymetals.com but you will want to check the installation specifications for the specific brand you are buying.
Also check standing seam height alternatives. For relatively low slopes like the 3:12 you cite you may need to go to the higher seam height to protect against leakage, especially in a snow-climate.
- Standing Seam is designed to be installed over solid decking.
- Make sure any existing decking is smooth, level and in good condition. Replace any decking not meeting those requirements.
- In most cases Standing Seam can be installed over existing shingles. Check local building codes to confirm this is possible in your area.
- If installing over existing shingles, we recommend the use of 30 lb felt or synthetic underlayment over the shingles first to keep the rough side off the shingles off the backside of the panels.
Here is another example specification from the Summit Pacific metal sales standing seam roof installation guide:
Underlayments
- After verifying that the roof is true and square, the roof deck is ready for underlayments. A 30# asphalt saturated felt underlayment is recommended, and should be used in conjunction with rubberized ice and water shield type membranes as necessary.
- Apply underlayments starting at the eave of the roof, and continue upwards to the top of the roof, and over the ridge or nosing, or up the endwall.
- Follow underlayment manufacturer’s installation recommendations.
- Do not allow underlayments to be exposed for prolonged periods of time, as they may wrinkle and warp, creating an uneven substrate that may telegraph through the metal roofing panels.
Question: can I add just partial snow guards on my metal roof?
(Oct 31, 2014) Mary said:
I've had a standing seam metal roof for about 3 years, without any snow guards, on my ranch-style home in central NY. Now, with my nearly deaf mother living with me, I want to add the guards over the porch to protect her when she takes her dog out. Is there a problem with just doing the limited application rather than full coverage? Thank you.
Reply:
Mary,
We see lots of metal roofs on which installers provided snow guards ONLY over entrances or other spots where there is extra risk. As long as snow falling off of other sections of the roof are not going to cause trouble, your approach is fine.
...
Continue reading at LIFE EXPECTANCY of METAL ROOFS or select a topic from the closely-related articles below, or see the complete ARTICLE INDEX.
Or see these
Recommended Articles
- CATHEDRAL CEILING VENTILATION
- HARD to VENT ROOF SOLUTIONS for HIPS & CATHEDRAL CEILINGS
- HOT ROOF DESIGN PROBLEMS
- METAL ROOFING - home
- ROOF NOISE TRANSMISSION
- SNOW GUARDS on METAL ROOFS for more examples of conditions and leaks on standing seam metal roofs.
Suggested citation for this web page
STANDING SEAM METAL ROOF INSTALLATION at InspectApedia.com - online encyclopedia of building & environmental inspection, testing, diagnosis, repair, & problem prevention advice.
Or see this
INDEX to RELATED ARTICLES: ARTICLE INDEX to BUILDING ROOFING
Or use the SEARCH BOX found below to Ask a Question or Search InspectApedia
Ask a Question or Search InspectApedia
Try the search box just below, or if you prefer, post a question or comment in the Comments box below and we will respond promptly.
Search the InspectApedia website
Note: appearance of your Comment below may be delayed: if your comment contains an image, photograph, web link, or text that looks to the software as if it might be a web link, your posting will appear after it has been approved by a moderator. Apologies for the delay.
Only one image can be added per comment but you can post as many comments, and therefore images, as you like.
You will not receive a notification when a response to your question has been posted.
Please bookmark this page to make it easy for you to check back for our response.
IF above you see "Comment Form is loading comments..." then COMMENT BOX - countable.ca / bawkbox.com IS NOT WORKING.
In any case you are welcome to send an email directly to us at InspectApedia.com at editor@inspectApedia.com
We'll reply to you directly. Please help us help you by noting, in your email, the URL of the InspectApedia page where you wanted to comment.
Citations & References
In addition to any citations in the article above, a full list is available on request.
- Architectural elements: the technological revolution: Galvanized iron roof plates and corrugated sheets; cast iron facades, columns, door and window caps, ... (American historical catalog collection), Diana S Waite, available used out of Amazon.
- "Choosing Roofing," Jefferson Kolle, January 1995, No. 92, Fine Homebuilding, Taunton Press, 63 S. Main St., PO Box 5506, Newton CT 06470 - 800-888-8286 - see http://www.taunton.com/FineHomebuilding/ for the magazine's website and for subscription information.
- [1] Follansbee Roofing, Follansbee WV 26037, Tel: 800-624-6906, website: www.follansbeeroofing.com and http://www.follansbeeroofing.com/products/TerneII.aspx Quoting Follansbee on TerneII properties:
Follansbee Steel is the only manufacturer of a pre-painted or natural Terne roof and is a leading supplier of metal roofs for new and retrofit commercial, institutional, residential and historic preservation projects.Terne II - Classic Terne-Coated Steel ... is a new and improved version of historic Terne metal, ... Terne II has improved capability for resisting corrosion in all environments ... also has excellent formability, solderability, and affinity for paint ... without compromising mechanical characteristics. It can be used in flatlock, standing seam, vertical wall designs and virtually any other application in which original Terne has been used. It is strong and ductile, having high yield and tensile strengths as well as workability. This new material can easily be formed with conventional roofing tools.
With Terne II roofing, it is advisable to paint the material as soon as conditions permit. Oxide formation is slower than with the original Terne and the wait for proper painting conditions provides substantially less risk. The new material is coated with Follansbee's new ZT® alloy, a combination of zinc and tin. This coating is designed not only as a barrier but also to be anodic to the steel substrate and reduce the potential for oxidation before painting.
The traditional oil-based paints long required on original Terne are not recommended for application on Terne II. Follansbee's Rapidri paint with its faster drying time and ease of application is much superior to the old painting system. The Rapidri acrylic paints are aesthetically pleasing while offering enhanced durability and color retention. ...
- Metal Roofing Alliance, E. 4142 Hwy 302, Belfair, WA 98528, Telephone:(360) 275-6164, Customer Support 410-534-6900, Email: support@metalroofing.com,
Website: www.metalroofing.com. Quoting:
The Metal Roofing Alliance was formed in 1998 by a small group of forward-thinking metal roofing manufacturers with the main goal of educating consumers about the many benefits of metal roofing. Since our inception, we've shown millions of people just how beautiful, durable and money-saving metal roofing can be for them. Over the years, our membership has grown to include paint companies, material suppliers, industry publications and more. Be sure to take advantage of all of the great resources our members offer. - The Metal Initiative, 4700 W. Lake Ave., Glenview, IL 60025, P:847.375.4785 Website: www.themetalinitiative.com/, Email: Louise Ristau lristau@connect2amc.com Quoting:
The Metal Initiative is a coalition of manufacturers, individuals and associations that have come together to provide information on the features and benefits of metal in construction. Carrying its message of metal primarily to the professional building owner community, The Metal Initiative seeks to gather and disseminate useful information for decision-makers. - Metal Roofing, an Illustrated Guide, R.A. Knowlton , [metal shingle roofs],
- "Metal Roofing: 'Fixing' for Thermal Movement", Thomas L. Smith, AIA, CRC., Professional Roofing, [date pending] p. 72, NRCA
- NRCA, Smith, Thomas L., AIA, CRC, METAL ROOF SYSTEMS: DESIGN CONSIDERATIONS FOR SNOW AND ICE [PDF] Professional Roofing, [date pending] p. 74, NRCA, http://www.nrca.net/
- NRCA, Smith, Thomas L., AIA, CRC, STEEL [ROOF] DECK ISSUES for the 1990s [PDF], NRCA, http://www.nrca.net/
- NRCA, Smith, Thomas L., AIA, CRC, STEEL [ROOF] DECK CORROSION BULLETIN [PDF] Professional Roofing, [date pending] p. 58, NRCA, http://www.nrca.net/
- NRCA, Smith, T. THE MANY ASPECTS of METAL [ROOF] SHINGLES [PDF] Thomas L. Smith, AIA, CRC., Professional Roofing, [date pending] NRCA, Web: nrca.net
- Copper Roofing, by CDA
- Copper Roofing, Master specifications for copper roofing and sheet metal work in building construction: Institutional, commercial, industrial, I.E. Anderson, 1961 (hard to find)
- Corrugated Iron, Building on the Frontier, Simon Holloway
- Problems in Roofing Design, B. Harrison McCampbell, Butterworth Heineman, 1991 ISBN 0-7506-9162-X (available used)
- Grapevine Design Guidelines - Web Search 07/12/2010
- "Copy on file as - /roof/Asbestos-to-Zinc_Metal_Roofing_NPS.pdf - From Asbestos to Zinc, Roofing for Historic buildings, Metals - ", Technical Preservation Services, National Park Service, U.S. Department of the Interior, web search 9./29.10, original source:
http://www.nps.gov/history/hps/tps/roofingexhibit/metals2.htm - "Copy on file as - /roof/Asbestos-to-Zinc_Metal_Roofing_NPS_3.pdf - From Asbestos to Zinc, Roofing for Historic buildings, Metals-part II, Coated Ferrous Metals: Iron, Lead, Zinc, Tin, Terne, Galvanized, Enameled Roofs - ", Technical Preservation Services, National Park Service, U.S. Department of the Interior, web search 9./29.10, original source:
http://www.nps.gov/history/hps/tps/roofingexhibit/metals.htm - "On file as /roof/Asbestos-to-Zinc_Metal_Roofing_NPS_2.pdf - From Asbestos to Zinc, Roofing for Historic buildings, Metals- Roofing Today - ", Technical Preservation Services, National Park Service, U.S. Department of the Interior, web search 9./29.10, original source:
http://www.nps.gov/history/hps/tps/roofingexhibit/roofingtoday.htm - Sweetser, Sarah M., ROOFING for HISTORIC BUILDINGS [PDF] (1978) Preservation Brief 4, Technical Preservation Services, National Park Service, U.S. Department of the Interior, web search 9./29.10, original source: http://www.nps.gov/history/hps/tps/briefs/brief04.htm
- Park, Sharon C., AIA, THE USE OF SUBSTITUTE MATERIALS ON HISTORIC BUILDING EXTERIORS [PDF] Preservation Brief 16, Technical Preservation Services, National Park Service, U.S. Department of the Interior, web search 9./29.10, original source:
http://www.nps.gov/history/hps/tps/briefs/brief16.htm - NRCA, Smith, Thomas L., AIA, CRC, METAL ROOFING: 'FIXING' FOR THERMAL MOVEMENT [PDF] Professional Roofing, [date pending] p. 72, NRCA - Web: http://www.nrca.net/
- NRCA, Smith, Thomas L., AIA, CRC, METAL ROOF SYSTEMS: DESIGN CONSIDERATIONS FOR SNOW AND ICE [PDF] Professional Roofing, [date pending] p. 74, NRCA, http://www.nrca.net/
- NRCA, Smith, Thomas L., AIA, CRC, STEEL [ROOF] DECK CORROSION BULLETIN [PDF] Professional Roofing, [date pending] p. 58, NRCA, http://www.nrca.net/
- "Steel [Roof] Deck Corrosion Bulletin, NRCA [ copy on file as /roof/Steel_Roof_Deck_Corrosion_NRCA.pdf ] - ", Thomas L. Smith, AIA, CRC., Professional Roofing, [date pending] p. 58, NRCA
- NRCA, Smith, Thomas L., AIA, CRC, THE MANY ASPECTS of METAL [ROOF] SHINGLES [PDF] Professional Roofing, [date pending] NRCA, Web: nrca.net
- NRCA - National Roofing Contractors Association, 10255 W. Higgins Road, Suite 600, Rosemont, IL 60018-5607, Tel: (847) 299-9070, Web: nrca.net,
- Our recommended books about building & mechanical systems design, inspection, problem diagnosis, and repair, and about indoor environment and IAQ testing, diagnosis, and cleanup are at the InspectAPedia Bookstore. Also see our Book Reviews - InspectAPedia.
- In addition to citations & references found in this article, see the research citations given at the end of the related articles found at our suggested
CONTINUE READING or RECOMMENDED ARTICLES.
- Carson, Dunlop & Associates Ltd., 120 Carlton Street Suite 407, Toronto ON M5A 4K2. Tel: (416) 964-9415 1-800-268-7070 Email: info@carsondunlop.com. Alan Carson is a past president of ASHI, the American Society of Home Inspectors.
Thanks to Alan Carson and Bob Dunlop, for permission for InspectAPedia to use text excerpts from The HOME REFERENCE BOOK - the Encyclopedia of Homes and to use illustrations from The ILLUSTRATED HOME .
Carson Dunlop Associates provides extensive home inspection education and report writing material. In gratitude we provide links to tsome Carson Dunlop Associates products and services.


