 How to Install a Skylight
Detailed Guide to Installing & Flashing Around Skylights
Installing large skylights
- POST a QUESTION or COMMENT about roof skylight installation
Skylight flashing installation details:
Here we provide details about framing the skylight opening, constructing the skylight well or chute, sealing the skylight, flashing around skylights to avoid leaks, and protecting from ice dams and ice dam leaks at skylights.
We describe how to construct the skylight well, framing, opening, skylight opening framing, the skylight window well, sealing the underlayment at skylights, ice dam protection for skylights, skylight flashing details, skylight installation on low slope roofs, and skylight installations on steep slopes.
We also discuss how to install a skylight on low slope roofs, on very steep roofs, and how to install a large skylight that requires cutting and removing one or more rafters or part of rafters.
InspectAPedia tolerates no conflicts of interest. We have no relationship with advertisers, products, or services discussed at this website.
- Daniel Friedman, Publisher/Editor/Author - See WHO ARE WE?
Skylight Installation Procedures
Article Contents
- SKYLIGHT OPENING FRAMING
- SKYLIGHT WINDOW WELL
- SKYLIGHT UNDERLAYMENT SEAL
- SKYLIGHT ICE DAM PREVENTION
- SKYLIGHT FLASHING DETAILS
- SKYLIGHT INSTALLATION on LOW SLOPE ROOFS
- SKYLIGHT INSTALLATION on STEEP SLOPE ROOFS
- SKYLIGHT TYPES
- SKYLIGHT INSTALLATION TIPS - LARGE
- SKYLIGHT MANUFACTURERS, SOURCES
This skylight installation and repair article series discusses the selection and installation of skylights, including choosing a skylight, how to install the skylight, constructing the skylight well or chute, skylight controls, and skylight shades or screens.
We also discuss skylight condensation and special skylight products such as light tubes. See the list of articles at page end.
...Skylight Opening Framing
Take care when framing skylight openings to make the opening as accurate and square as possible.
This will simplify both the installation and trim, since most skylight designs leave little margin for error where the interior finish meets the frame. Unless using a skylight designed to fit between 16- or 24-inch on-center framing, you will need to head off the opening and use double trimmers on either side.
For truss roofs, consult the truss designer or an engineer before modifying the truss plan or cutting an existing truss. In new construction, trusses are typically doubled on either side of the opening with 2x cross pieces framed in “ladder” fashion.
...The Skylight Window Well: the Light Well

There are many ways to frame a light well or "skylight chute" as some builders call them. In a cathedral ceiling, the rafters and headers create the well. Framing the upper header square and lower header plumb splays the opening.
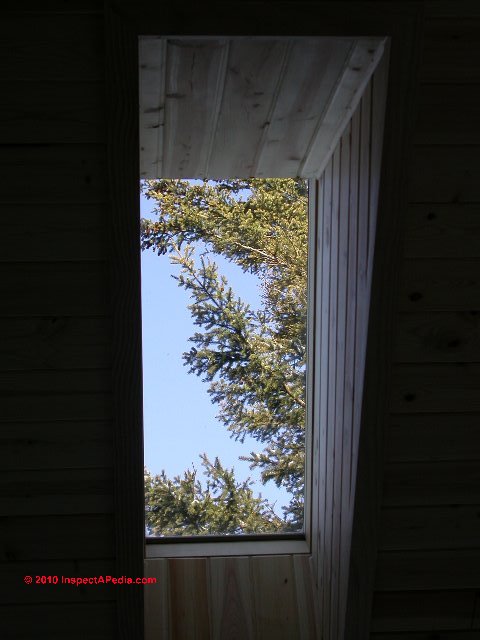
Our photo (left) shows a wood-framed skylight well (the builder called them "shoots", meaning "chutes") in a truss-framed roof in Minnesota -DF. To frame a perfect skylight well the builder actually constructed the shell on the floor below then lifted and nailed it into place below the skylight. We took care to assure that the sides of the skylight well were insulated.
With an attic, the top side of the well is typically framed perpendicular to the roof plane and the bottom and sides are framed plumb.
For small skylight wells, the opening can be created with 3/4-inch plywood while larger openings are typically built like stud walls. Make sure the well is sealed tightly against air infiltration and well-insulated to guard against condensation on the skylight or sides of the well.
It is also possible to splay the two sides of a skylight well in addition to the top and bottom sides, although the framing and drywall are a lot more complicated.
To keep the four sides of the skylight window well flat, the bottom of the opening must be shaped like a trapezoid, wider on the high side of the opening. You can just see that feature in our skylight photo above.
To keep the opening rectangular at the ceiling plane, the two sides become curved like twisted strips of plastic. This requires framing with angled struts and bending the drywall. Either approach makes for a complicated framing job.
Also see SKYLIGHT LIGHT TUBES.
...Sealing the Underlayment at Skylights
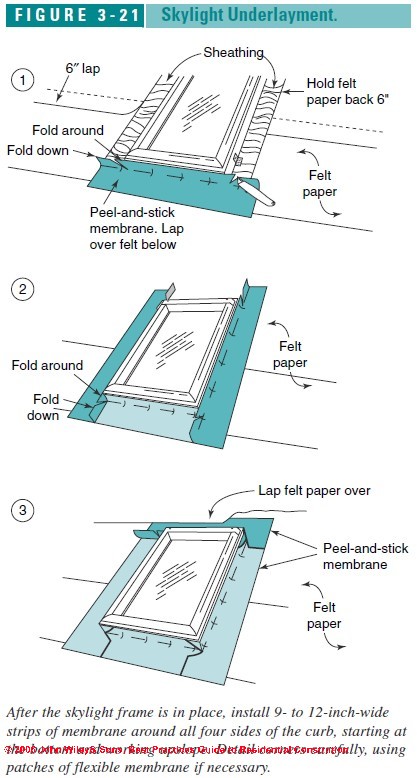
To ensure a leak-free installation with any type of roofing, use peel-and-stick membrane to seal the skylight to the sheathing and underlayment, creating a primary barrier to water entry below the finished roofing.
Any water that manages to penetrate the flashing will be stopped by the membrane. Hold the roofing felt back about 6 inches from the opening so the peel-and stick membrane can bond directly to the roof sheathing.
After the skylight frame is in place, install 9- to 12-inch-wide strips of membrane around all four sides of the curb, starting with the bottom, and working uphill so the upper pieces always overlap the lower pieces (Figure 3-21).
Detail corners carefully using patches of moldable flashing (see FLASHING MEMBRANES PEEL & STICK) if necessary. Tuck the top piece of membrane under the roofing felt above, and lap the lower piece over the roofing felt below.
With ganged window units, use a single strip of membrane between each unit, running down one skylight frame, across the mullion, and up the next skylight frame.
...Ice Dam Protection for Skylights
Snow can build up above skylights and ice can build up below them as snow melt from the glass area refreezes.
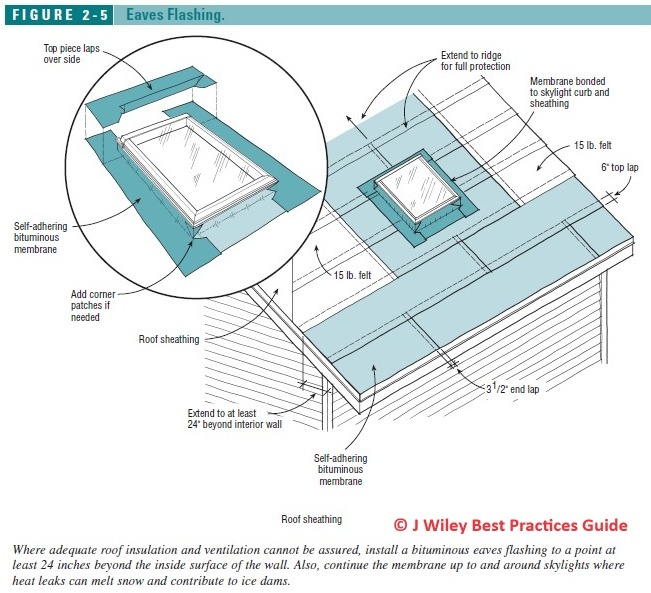
As extra protection against leaks in areas subject to heavy snow and ice damming, some contractors run a wide band of the peel-and-stick membrane around the sides and top of the skylight and all the way down to the roof eaves (see Figure 2-5 at left.)
On low-slope roofs, the membrane often covers the entire roof surface and continues up and around any skylight curbs for complete protection.
Extensive details about ice dam prevention are at ROOF ICE DAM LEAKS. Also see SKYLIGHT VENTILATION DETAILS.
...Skylight Flashing Details
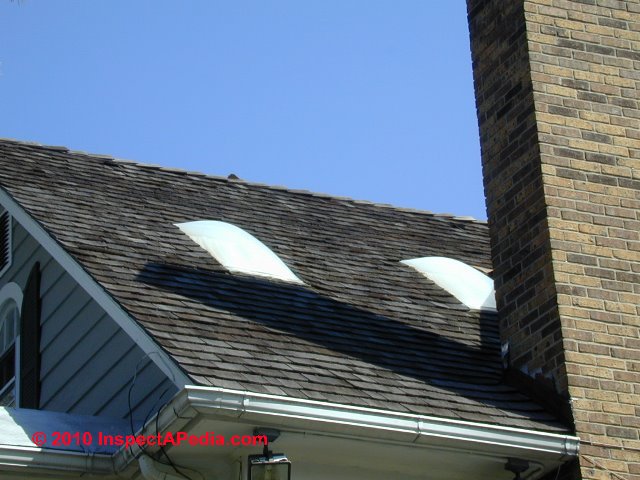 Older-style skylights (photo at left) were notorious
for leaking
Older-style skylights (photo at left) were notorious
for leaking
(see SKYLIGHT LEAK DIAGNOSIS & REPAIR),
but today’s pre-formed skylight flashing kits combined with bituminous peel-and-stick membranes have made leaky skylights mostly a thing of the past
(see FLASHING MEMBRANES PEEL & STICK).
Most major skylight manufacturers provide flashing kits for asphalt shingles as well as specialty flashings for tile and metal roofing, typically with a wraparound head flashing and moldable apron flashing that conforms to the roofing profile.
With asphalt shingles, avoid skylights that provide only a continuous side flashing, which relies on roofing cement for a waterproof seal. Step flashing is much more reliable.
With metal roofing, use the manufacturer supplied kit or have the roofing contractor fabricate a matching flashing from the metal roofing material. While a custom flashing can create a more attractive installation, make sure the corners of the head flashing are properly sealed with solder or a high-performance caulk.
Also see SKYLIGHT LEAK DIAGNOSIS & REPAIR ...
Skylight Installation on Low Slope Roofs
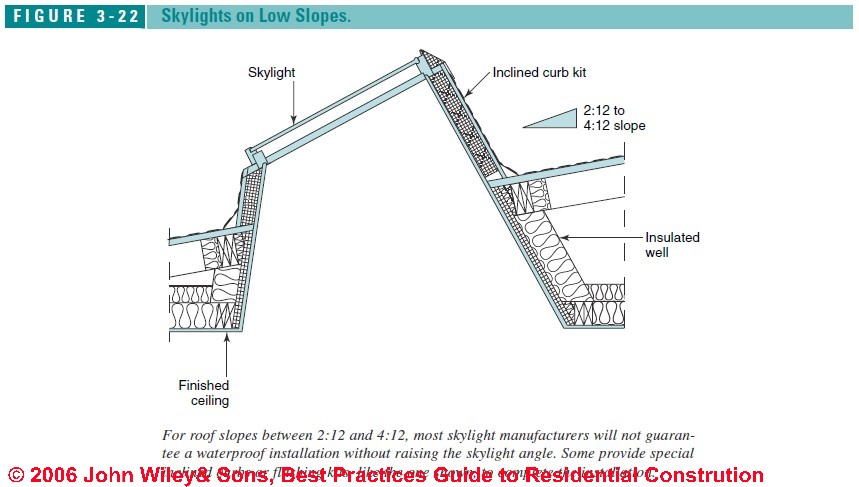
For roof slopes between 2:12 and 4:12, most skylight manufacturers will not guarantee a waterproof installation unless the skylight angle is raised with a built-up curb or a special inclined flashing kit (Figure 3-22).
The raised skylight curb should be sealed on all sides with peel-and-stick membrane carefully sealed at all corners, as in Figure 3-21.
Figure 3-21
...Skylight Installations on Steep Slopes
For very steep slopes, such as mansards, skylight manufacturers typically recommend a water deflector or Z-flashing to safely divert water around the unit.
Check with the manufacturer for steep-slope requirements.
...Skylight Types
Using their terminology, Velux offers three types of residential skylights for applications where a building egress is not required through that opening: [adapted from information provided by Velux [3].]
- Deck-mounted skylights.
A deck mounted skylight combines an insulated glass lens, pre-finished white wood frame and protective aluminum or copper cladding into one unit that mounts directly to the roof deck. - Curb-mounted skylights.
A curb-mounted skylight combines an insulated glass lens and maintenance free frame that is designed to mount directly to a site-built curb. - Pan-flashed skylights.
A pan-flashed skylight combines an insulated glass lens and an all-in-one frame and flashing that is designed to mount directly to the roof deck using roofing sealant.
Large Skylight Installation Tips
How to install a skylight across several rafters
Decide the exact location of the skylight that is wanted, such as over a kitchen island.
When running a skylight along the slope of the roof so that one or more rafters need to be cut and interrupted you are facing a standard roof framing problem solved by adequately sized headers running parallel to the eaves and ridge, and possibly, doubling the rafters at either either side of the skylight opening.
For large roofs where the loads are greater, engineered wood beams may be more efficient for that framing location.
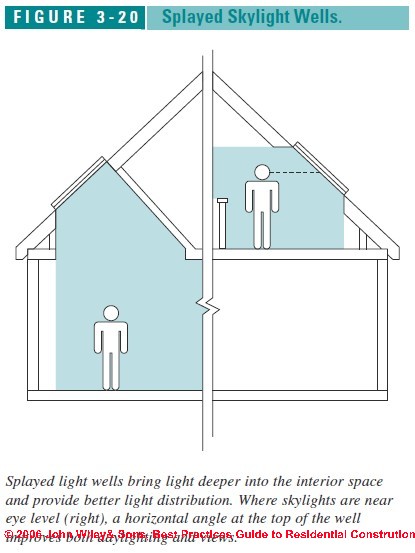
Typically, the top side of the skylight well runs at 90 degrees to the roof slope, and the bottom side, if splayed, is framed plumb (see Figure 3-20 above).
On very steep roofs where the top of the skylight is near eye level, a horizontal angle works well for the top side of the well.
The sides are usually left plumb to simplify the framing (see the "light well"
Also see SKYLIGHT LIGHT TUBES.)
Watch out: However you are asking for trouble unless you consult with the skylight manufacturer and obtain a properly designed and flashed unit.
That's because you want to run the skylight across rather than along the slope of the roof, and because typically the flashing kit that comes with a factory-made skylight presumes that the upper end of the skylight is predefined and is in the narrow width of the unit.
If your skylight did not come with a factory built flashing assembly, we recommend using a manufactured skylight flashing kit from the same manufacturer who provided the skylight.
Watch out: Just make sure that whether factory-built or site-built for a custom-built skylight, your flashing kit has a proper HEAD FLASHING along the up roof side of the skylight.
Step flashing won't work correctly along the up-roof or uppermost edge of the skylight. Velux and other skylight manufacturers provide specific head flashing for that location.
Watch out: Also, if you purchased an operable (openable) skylight whose uppermost end is in its narrow axis and if you then rotate it to install it with a long axis uppermost, the window may not open, vent, nor function correctly.
You can avoid all of these concerns by making sure you, your builder, and the skylight manufacturer/provider are all on the same page.
Watch out: when buying a skylight, be sure that the skylight you are buying is designed for the pitch or slope of the roof into which it is being installed and that you are mounting the skylight in the proper position.
For example the Velux skylight model # GGL P10 3073 94cm x 160cm operable skylight includes a center pivot and a pine finish vent opening across the 94cm axis that is intended to be mounted in the uppermost position. This skylight is designed for roof slopes from 15o to 90o.
...Skylight Manufacturers & Product Sources
- Andersen Windows and Doors www.andersenwindows.com Skylights and roof windows with exterior sash clad with glass-fiber-reinforced material
- Milgard Windows and Doors www.milgard.com Skylights with aluminum frames (thermal break optional) with vinyl subframes on operable models; optional motorized controls with rain sensor
- Pella Windows and Doors www.pella.com Wood interior, aluminum exterior, optional motorized controls, and manual or motorized fabric-pleated shades
- Roto Frank of America www.roofwindows.com Wood interior, aluminum exterior, optional motorized controls, and manual or motorized fabric-pleated shades; Sweet16 model fits 16 in. o.c. framing
- Velux America Inc. www.velux.com Skylights and roof windows with wood interior and aluminum-clad exterior. Options include insect screens, blinds, motorized controls and shades with rain sensor, electrochromatic glass, and flashing kits for metal and tile roofs and mulled units
- Skylight Light Tube Manufacturers & Sources
- SolaTube www.solatube.com Light tubes from 10 to 21 in. in diameter; options include electrical lighting, daylight dimmer, and integral bath fan
- Sun-Tek Skylights www.sun-tek.com Light tubes from 10 to 21 in. in diameter; options include electrical lighting and multitube Spyder skylight
- VELUX America Inc., 450 Old Brickyard Rd. Greenwood, SC 29648-5001, Tel: 800-88-VELUX or 1.800.888.3589. Website: http://www.veluxusa.com.
The company is happy to provide detailed installation instructions for their products and for the various flashing kits used with their skylights.
Velux America provides Sun Tunnel light tubes from 14 to 22 in. in diameter with flexible or rigid tubes
Industry Associations for Windows & Doors
- American Architectural Manufacturers Association (AAMA) www.aamanet.org
- Efficient Windows Collaborative www.efficientwindows.org
- National Fenestration Rating Council (NFRC) www.nfrc.org Sustainable by Design www.susdesign.com
- Shareware calculators for sun angles, solar heat gain, and shading
- Window and Door Manufacturers Association (WDMA) www.wdma.com
-- Portions of this article were adapted and paraphrased, edited, and supplemented, with permission from Best Practices Guide to Residential Construction (Steve Bliss, J Wiley & Sons) .
Thanks to ASHI home inspector John Craynor for editing help with this article. - Ed.
- John Cranor [Website: /www.house-whisperer.com ] is an ASHI member and a home inspector (The House Whisperer) is located in Glen Allen, VA 23060. He is also a contributor to InspectApedia.com in several technical areas such as plumbing and appliances (dryer vents). Contact Mr. Cranor at 804-873-8534 or by Email: johncranor@verizon.net
...
...
Continue reading at SKYLIGHT LEAK DIAGNOSIS & REPAIR or select a topic from the closely-related articles below, or see the complete ARTICLE INDEX.
Or see
WINDOWS & DOORS - home
Or see these
Recommended Articles
- SKYLIGHTS, GUIDE - home
- SLIDING GLIDING DOOR MANUFACTURERS & REPAIR GUIDES
- SLOPED GLAZING DETAILS
- SPONTANEOUS GLASS BREAKAGE NiS
Suggested citation for this web page
SKYLIGHT INSTALLATION PROCEDURE at InspectApedia.com - online encyclopedia of building & environmental inspection, testing, diagnosis, repair, & problem prevention advice.
Or see this
INDEX to RELATED ARTICLES: ARTICLE INDEX to DOORS & WINDOWS
Or use the SEARCH BOX found below to Ask a Question or Search InspectApedia
Ask a Question or Search InspectApedia
Share this article:Try the search box just below, or if you prefer, post a question or comment in the Comments box below and we will respond promptly.
Search the InspectApedia website
Note: appearance of your Comment below may be delayed: if your comment contains an image, photograph, web link, or text that looks to the software as if it might be a web link, your posting will appear after it has been approved by a moderator. Apologies for the delay.
Only one image can be added per comment but you can post as many comments, and therefore images, as you like.
You will not receive a notification when a response to your question has been posted.
Please bookmark this page to make it easy for you to check back for our response.
IF above you see "Comment Form is loading comments..." then COMMENT BOX - countable.ca / bawkbox.com IS NOT WORKING.
In any case you are welcome to send an email directly to us at InspectApedia.com at editor@inspectApedia.com
We'll reply to you directly. Please help us help you by noting, in your email, the URL of the InspectApedia page where you wanted to comment.
Citations & Reviewers
In addition to any citations in the article above, a full list is available on request.
- Basic Housing Inspection, US DHEW, S 352.75 U48, p.144, out of print, but is available in most state libraries; New York State version, ca 1955, source of some of our window parts and window repair sketches.
- Best Practices Guide to Residential Construction, by Steven Bliss. John Wiley & Sons, 2006. ISBN-10: 0471648361, ISBN-13: 978-0471648369, Hardcover: 320 pages, available from Amazon.com and also Wiley.com. See our book review of this publication.
- [3] VELUX America Inc., 450 Old Brickyard Rd. Greenwood, SC 29648-5001, Tel: 800-88-VELUX or 1.800.888.3589. Website: http://www.veluxusa.com
- Velux Australia contact information: http://www.velux.com.au
- Velux New Zealand contact information: http://www.velux.co.nz/
- Velux UK contact information: http://www.velux.co.uk/
- Velux China contact information: http://ccne.mofcom.gov.cn/225137
- In addition to citations & references found in this article, see the research citations given at the end of the related articles found at our suggested
CONTINUE READING or RECOMMENDED ARTICLES.
- Carson, Dunlop & Associates Ltd., 120 Carlton Street Suite 407, Toronto ON M5A 4K2. Tel: (416) 964-9415 1-800-268-7070 Email: info@carsondunlop.com. Alan Carson is a past president of ASHI, the American Society of Home Inspectors.
Thanks to Alan Carson and Bob Dunlop, for permission for InspectAPedia to use text excerpts from The HOME REFERENCE BOOK - the Encyclopedia of Homes and to use illustrations from The ILLUSTRATED HOME .
Carson Dunlop Associates provides extensive home inspection education and report writing material. In gratitude we provide links to tsome Carson Dunlop Associates products and services.
 |
HOME | ABOUT | ASK a QUESTION | CONTACT | CONTENT USE POLICY | DESCRIPTION | POLICIES | PRIVACY | |
| © 2026 - 1985 Publisher InspectApedia.com - Daniel Friedman | |||||||||