
InspectAPedia® FREE Encyclopedia of Building & Environmental Construction, Diagnosis, Maintenance & Repair |
Question? Just ask us! InspectAPedia
|
 Dry Out a Crawl Space & Keep it Dry
10 steps to crawl area cleanup, dryout: stop mold, insect damage, rot
- POST a QUESTION or COMMENT about how to dry out a wet crawl space & prevent future crawl space water entry
This article describes ten steps needed to get into, inspect, clean, and then dry out a building crawl space and keep it dry.
We add advice on how to keep the crawl space dry and clean so that this process doesn't have to be repeated.
This step by step crawl space entry, inspection, cleanout, dryout and keep dry guide explains how to get into or inspect a crawl space even if there is no ready access, how to assess crawl space conditions, how to stop water that is entering the crawl area, how to dry out the space, how to clean up and, if necessary, disinfect or sanitize the crawl space, and how to keep out crawl space water and moisture in the future.
InspectAPedia tolerates no conflicts of interest. We have no relationship with advertisers, products, or services discussed at this website.
Dry Out a Crawl Space, Remove Mold, Rodent Debris, Unsafe Materials
 Damp or wet crawl spaces or basements are often a source of health and structural problems in buildings. Wet areas beneath the occupied space invite mold contamination, insect attack, and structural rot and may also contribute to bacterial hazards.
Keeping these spaces dry and clean is not difficult if we address the steps needed in the right order.
[Click to enlarge any image]
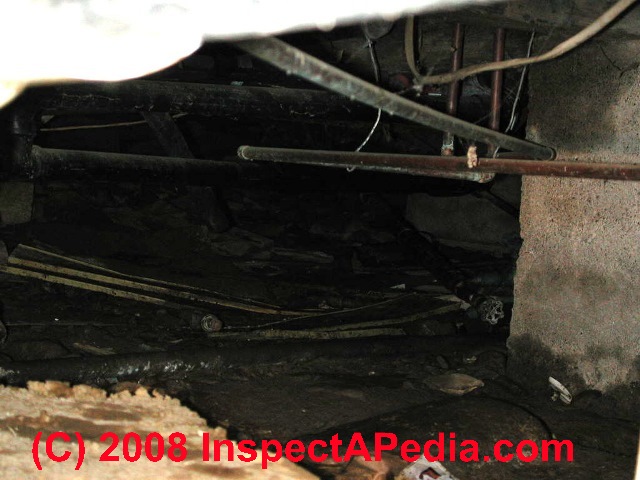
The crawl space shown in our page top photo was in our opinion not a readily accessible area because of flooding. This decision is made by the inspector on the scene, not by anyone else. The crawl space shown at left was tight and so junk-filled it could not be entered either.
10 Steps to a Clean, Dry, Safe & Sanitary Crawl Space
We break down a thorough crawl space dryout and cleanup process into these steps - presented here in order as a series of crawl space dryout and cleanup and waterproofing articles:
- CRAWL SPACE ACCESS: Enter the crawl space. If there is no crawl space access door, make an entry if necessary; if there is no space to get into the crawl space, outside clues might justify making inspection portals through the foundation wall or through an interior floor.
Watch out: Crawl space entry procedures are discussed
at CRAWL SPACE ACCESS - live link just above
and CRAWL SPACE SAFETY ADVICE. - CRAWL SPACE INSPECTION: Look first for unsafe conditions, second for conditions affecting the structure or its mechanical systems or other components.
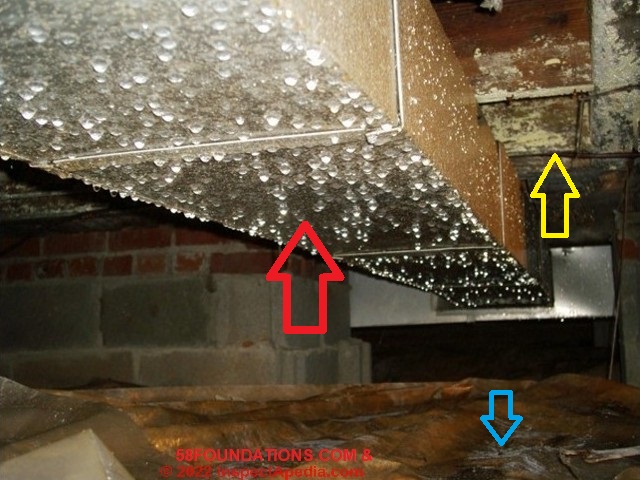
Photo: here we show a very wet crawl space that in turn, risks rot, mold contamination, insect damage in the building.
The extreme condensation on the exterior of metal ductwork in this photo (red arrow), courtesy of '58Foundations a U.S. foundation repair company, is the most obvious symptom of a crawl space water problem. But that's not all.
Notice also the water atop what looks like plastic over dirt in the crawl area (blue arrow).
And notice as well what looks like yellow mold growing on the floor joists overhead (yellow arrow).
- CRAWL SPACE, WATER ENTRY STOP: Find and fix the sources of water entry or high moisture.
Separately, our series of basement dry out, clean up and leak prevention articles begins
at BASEMENT LEAKS, INSPECT FOR where you will find still more details about how to find and stop the sources of water leaks into building basements or crawl areas.
Watch out: if the crawl area has been wet by a sewage spill, backup, or burst waste piping, the area is unsanitary and may be hazardous to enter without proper protection.
See CRAWL SPACE SEWAGE CLEANUP. - CRAWL SPACE DRY-OUT PROCEDURE: Get rid of crawl space water & high moisture levels; remove crawl space water, moisture, dampness that is already there. We describe the steps necessary for rapid crawl space dryout.
- CRAWL SPACE DEBRIS: Get rid of crawl space debris. Junk left in the crawl space makes inspection and cleaning difficult and can support mold, rodents, hold moisture, etc.
- CRAWL SPACE CLEAN UP: Clean or remove mold from crawl space surfaces; remove unsanitary dirt, rodent droppings, dead animals, etc.
- CRAWL SPACE SANITIZERS: Clean or sanitize the crawl space surfaces including the floor. When should we use spray disinfectants, sanitizers on crawl space surfaces? What about sealing wood surfaces?
- CRAWL SPACE MOISTURE BARRIERS: Control moisture with crawl space interior measures to keep water out: sump pumps, dehumidifiers, drainage, plastic or poly moisture barriers on the floor and walls.
Also see our other crawl space dryout and safety discussions beginning
at CRAWL SPACE GROUND COVERS where we describe crawl space venting, crawl space poly over dirt, and crawl space heat, to illustrate current best-practices in keeping a crawl space dry. - CRAWL SPACE WATERPROOFING: Keep water out of building crawl areas.
- CRAWL SPACE DEHUMIDIFICATION: Dehumidify a damp crawl space. Tips for most effective use of a dehumidifier, suggestions for using a fan to improve dehumidification speed & area coverage.
CRAWL SPACE REINSPECTION: Inspect the crawl space periodically to make sure your crawlspace dryout measures have been effective. How often do you need to inspect the area? It depends ... on site conditions and building history.
At least once a year you should look for any new leaks such as a leaky plumbing drain or an outside water entry problem. If you have been having trouble keeping water out of the crawl area, you should check more often until your confidence is restored.
Watch out: for steps 1-7 above, in some conditions, dust containment, negative air, and more protective gear or help from professionals may be needed.
Also see MOLD CLEANUP - MISTAKES to AVOID for a master list of the principal ways that people foul up mold cleanup projects.
How to Enter, Inspect & Assess Crawl Space Conditions for Water or Other Problems

Hazards in some crawl spaces include breathing moldy or unsanitary air, getting poked by a rusty nail, stirring up a hornets' nest, getting shocked or electrocuted by unsafe wiring while crawling over wet ground, crawling through unsanitary water from burst waste piping, kneeling in unsafe pesticide chemicals left by an ignoramus, and the occasional spider, rodent, snake, skunk or even trapped raccoon.
Wear appropriate protective clothing, use a good light, and don't work alone.
Take a thorough look in all areas of the crawl space itself for water and dampness and for unsafe or unhealthy conditions such as
- Water:
puddles, water stains, signs of prior leaks or actual crawl space flooding, as well as odors that indicate mold or dampness - Moldy crawl spaces:
start with a careful visual inspection for mold or mold suspect materials. Keep in mind there may be hard to see or even "invisible mold" such as moldy insulation - Wet insulation:
or inappropriate insulation materials (we don't use fiberglass or other fibrous insulation materials in wet or damp areas) - Rodent:
or other animal feces or droppings or urine, or smells from dead animals - Unsafe building materials:
such as falling or loose asbestos pipe insulation, construction debris, rusty nails - EFFLORESCENCE SALTS & WHITE DEPOSITS -
these white deposits are a great indicator of where moisture is penetrating a foundation
Contributors & Research on Crawlspace Dryout
- Photo-Contributor: Cherie Wicks, 58Foundations, a U.S. foundation repair company in business since 1958, with offices along the east coast of the U.S. from Pennsylvania to South Carolina. Tel: 888-698-1958 or (865) 320-3649, Email: cwicks@58Foundations.com, Web: https://58foundations.com/
Locations: Knoxville, TN Chattanooga, TN Tri Cities, TN North Carolina Charlotte, NC Georgia Delaware Central Virginia South Carolina Greater Philadelphia Central Pennsylvania Maryland Washington, DC South Jersey - See also CRAWL SPACE VENTILATION CODES
- Domhagen, Fredrik. CONTAMINANT TRANSPORT BY AIR INFILTRATION FROM CRAWL SPACE TO OCCUPANT AREA: Numerical Simulations and Field Measurements in Swedish Schools [PDF] Chalmers Tekniska Hogskola (Sweden), 2020.
- Erickson, Brian D., and Zhiqiang John Zhai. EVALUATION OF VENTILATION CODE REQUIREMENTS FOR BUILDING CRAWL SPACES [PDF] In Building Simulation, vol. 1, no. 4, pp. 311-325. Springer Berlin Heidelberg, 2008.
- Isaksson, Tord, Sven Thelandersson, Annika Ekstrand-Tobin, and Pernilla Johansson. CRITICAL CONDITIONS FOR ONSET OF MOULD GROWTH UNDER VARYING CLIMATE CONDITIONS [PDF] Building and environment 45, no. 7 (2010): 1712-172
- Malkin-Weber, Melissa, Cyrus Dastur, Maria Mauceri, and Benjamin Hannas. CLOSED CRAWL SPACE PERFORMANCE: PROOF OF CONCEPT IN THE PRODUCTION BUILDER MARKETPLACE [PDF] North Carolina Advanced Energy Corporation, 2008.
Abstract Excerpts:
... That project, funded under award number DE-FC26-00NT40995 and titled 'A Field Study Comparison of the Energy and Moisture Performance Characteristics of Ventilated Versus Sealed Crawl Spaces in the South' demonstrated the substantial energy efficiency and moisture management benefits that result from using properly closed crawl space foundations for residential construction instead of traditional wall vented crawl space foundations.
Two activities of this first project included
(1) an assessment of ten existing homes to document commonly observed energy and moisture failures associated with wall-vented crawl space foundations and
(2) a detailed literature review that documented both the history of closed crawl space research and the historical lack of scientific justification for building code requirements for crawl space ventilation.
The most valuable activity of the 2005 project proved to be the field demonstration of various closed crawl space techniques, which were implemented in a set of twelve small (1040 square feet), simply designed homes in eastern North Carolina.
... The key findings from the field demonstration were that
(1) closed crawl spaces stay substantially drier than traditional wall-vented crawl spaces during humid climate conditions, and
(2) the houses built on the closed crawl space foundations saved, on average, 15% or more on annual energy used for space heating and cooling.
- Matilainen, Miimu, and Jarek Kurnitski. MOISTURE CONDITIONS IN HIGHLY INSULATED OUTDOOR VENTILATED CRAWL SPACES IN COLD CLIMATES [PDF] Energy and buildings 35, no. 2 (2003): 175-187.
- Kurnitski, Jarek. GROUND MOISTURE EVAPORATION IN CRAWL SPACES [PDF] Building and Environment 36, no. 3 (2001): 359-373.
- Kurnitski, Jarek, and Miimu Matilainen. MOISTURE CONDITIONS OF OUTDOOR AIR-VENTILATED CRAWL SPACES IN APARTMENT BUILDINGS IN A COLD CLIMATE [PDF] Energy and buildings 33, no. 1 (2000): 15-29.
- Kurnitski, Jarek. CRAWL SPACE AIR CHANGE, HEAT AND MOISTURE BEHAVIOUR [PDF] Energy and buildings 32, no. 1 (2000): 19-39.
- Kurnitski, Jarek. "HUMIDITY CONTROL IN OUTDOOR-AIR-VENTILATED CRAWL SPACES
IN COLD CLIMATE BY MEANS OF VENTILATION, GROUND COVERS
AND DEHUMIDIFICATION." PhD diss., Helsinki University of Technology, Department of Mechanical Engineering, 2000.
- Richter, Jan, and Kamil Staněk. MOISTURE SAFE AND MOULD FREE CRAWL SPACES: STATE-OF-THE-ART AND DESIGN OF FULL-SCALE EXPERIMENT Energy Procedia 78 (2015): 2754-2759.
- Zoeller, William, James Williamson, and Srikanth Puttafunta. SEALED CRAWL SPACES WITH INTEGRATED WHOLE-HOUSE VENTILATION IN A COLD CLIMATE [PDF] No. NREL/SR-5500-64458; DOE/GO-102015-4699. National Renewable Energy Lab.(NREL), Golden, CO (United States), 2015. Zoeller, William, James Williamson, and Srikanth Puttafunta. Sealed Crawl Spaces with Integrated Whole-House Ventilation in a Cold Climate. No. NREL/SR-5500-64458; DOE/GO-102015-4699. National Renewable Energy Lab.(NREL), Golden, CO (United States), 2015.
Reader Comments, Questions & Answers About The Article Above
Below you will find questions and answers previously posted on this page at its page bottom reader comment box.
Reader Q&A - also see RECOMMENDED ARTICLES & FAQs
Question: 4-years trying to fix this wet crawlspace
Re-posting from private email, with permission.
[Click to enlarge any image]
Hoping you can advise - I've a moisture problem that I've been working on this is now the fourth year- still havent solved. Our house has an infection, which just keeps moving and won't clear.
House is built on a slope, cinder block piers with oak 4x6 joists on original- pine 2x8 (or ten?) joists on addition.
Knowing the site was wet, original plan to have the house up off the ground- the older part's a couple feet off the ground in the lowest place.
Then, an addition built with terrible drainage and too close to the ground-lowest maybe a foot high but still something I can worm under.
Then half-underpinned the addition so as to still any air movement from wind, as well as the gutter pouring right under the house.
Fiberglass insulation in the floor was staying constantly wet, as was the dirt. T
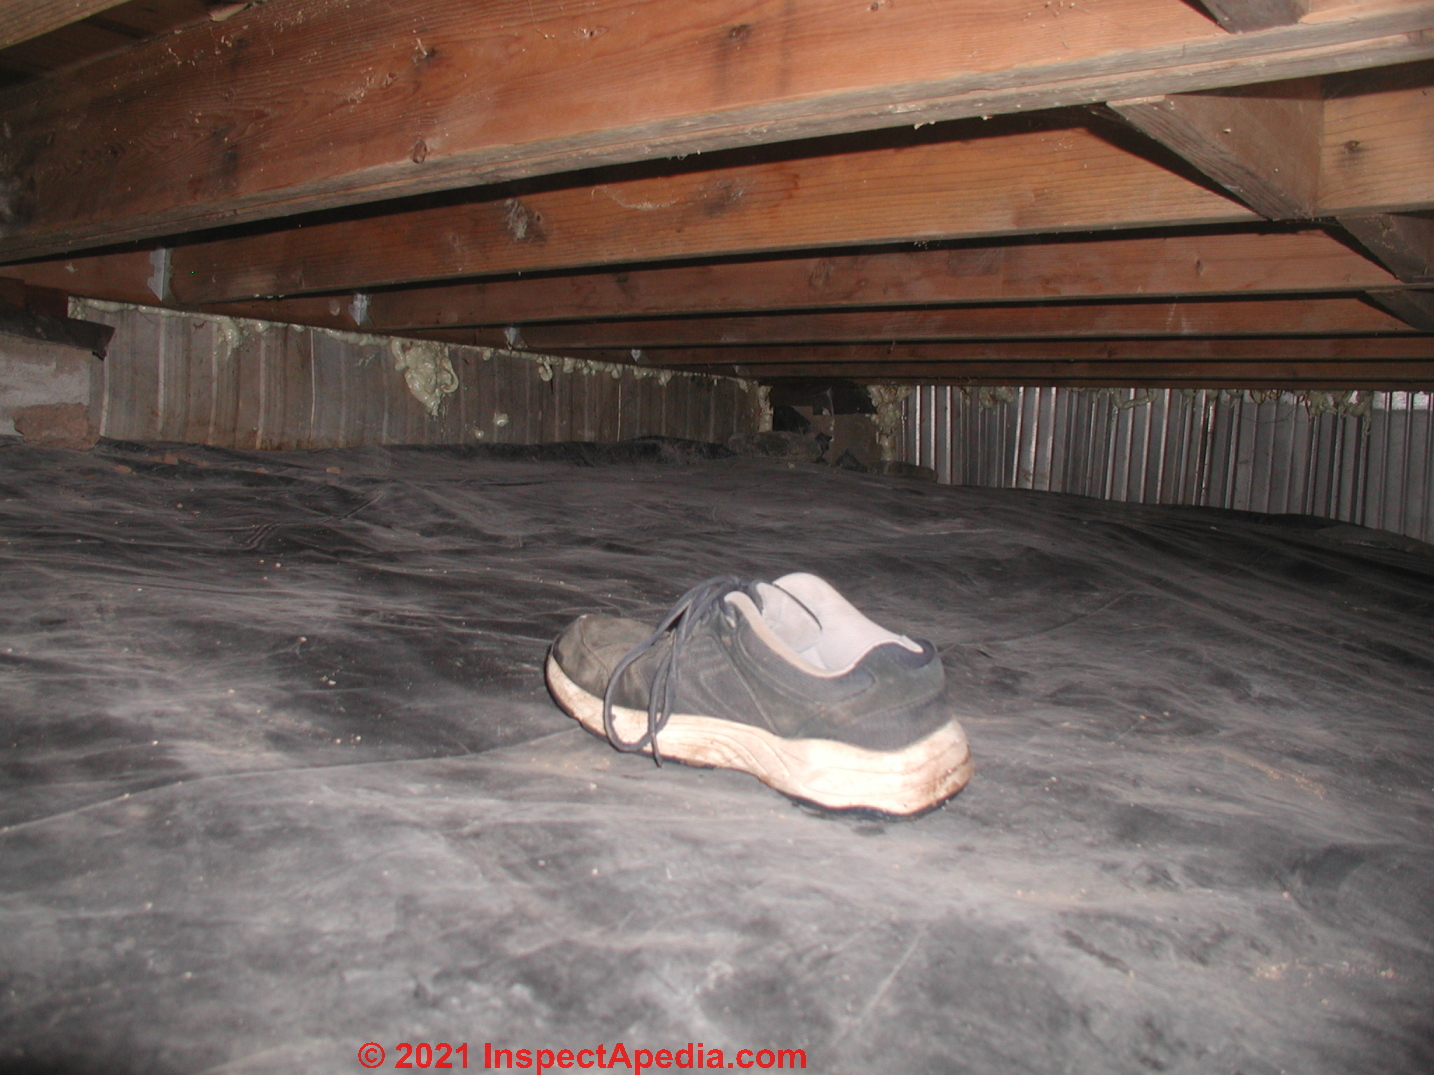
errible health problems in digestion and lungs for myself and my kid (husband appears unaffected). at the end of 2018, the bottom of house was skirted with aluminum roofing and a 6 mil vapor barrier was laid down, but messily, and with no tape.
Landscaping and a big drainage ditch and re routing the gutters in the back by the addition, as well as all the insulation torn out of the addition floor. (women's size 8 shoe for reference) - Anonymous by private email 2021-02-17
The infection seems to have moved from the back room's wet insulation and dirt, to the front -and maybe back- room's dirt and is quite happy beneath (or between the layers of) the plastic.
Which also happens to be a very stinky plastic, in the 3 years it's been down, it has not ceased to smell. i'm chemically sensitive and have reason to believe I have issue with the smelly plastic as well.
It is in NO way taped down or sealed in this 'crawl', there are many seams and gaps- contractor did a terrible job.
Husband is convinced a true encapsulation with taped seams is not possible- due to the corrugations on the tin, plus heat/cold extremes of tape on tin would just un-stick the tape after a bit.
One option would be to 'pinch' the plastic's edges under the tin, which is buried maybe 6 in- not deep enough to keep mice out. the 'infection' seems to be most happy where the condensation gets trapped between the layers of plastic, under the front room. there is a lot of top soil under the house, too. Nutrients.
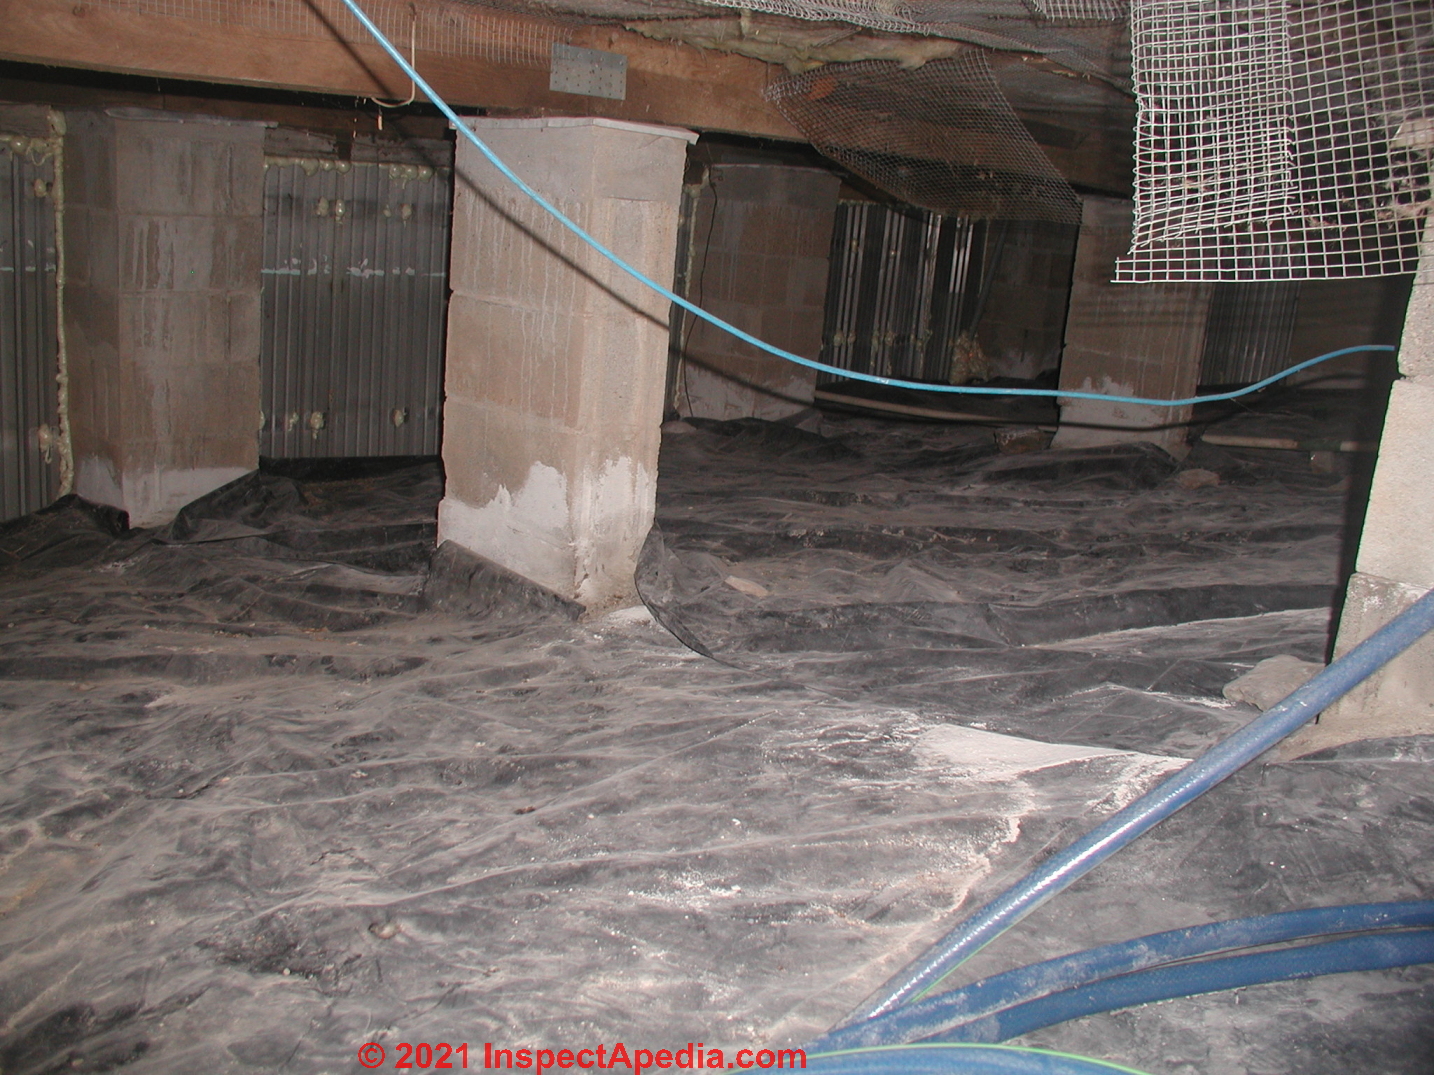
Below, you can see where, when I lift the seam, the water has been just wicking up and into the air. we have a dehumidifier which keeps actual crawl air under 50% but it doesnt touch 'below the plastic'.
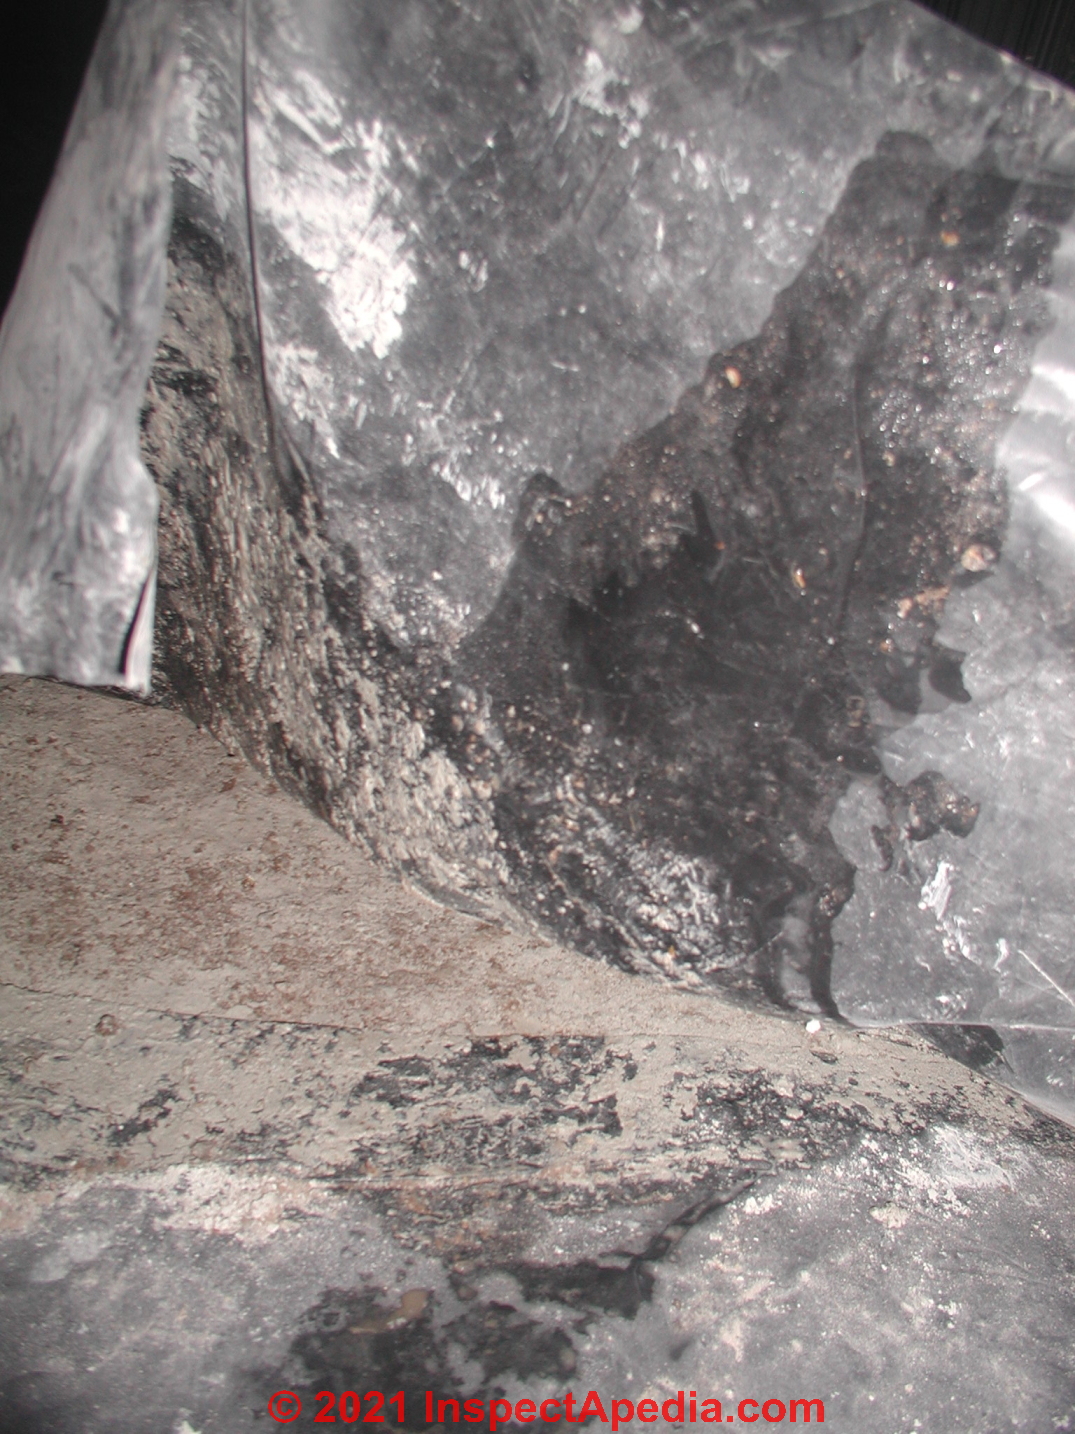
Our house has too many windows on the south/not enough to weatherward, plus wood heat- making a helluva stack effect and sucking all that from the crawl up into the living area, it's a split level and not vapor sealed in any conscious way- though there is paper backing on the floor's insulation, not in the 'knee-wall'.
We seem to be in a 'dead zone' as far as getting anyone to come and have a look around, and I am tired of 'guessing' and mucking about with it myself.
One company just at the edge of our range sounded promising- but ended with just sending a price sheet of all the different 'tests' they do (all far out of our budget), and no option to come and look around so I can pick a guy's brain and get experienced advice.
Every year about this time of year, the problem peaks, and I have to peel the plastic back from the dirt -very wet and nearly mud- and spread barn lime on the soil- this knocks the problem back to 'bearable' -but is not a cure. This is why the pics all look so grey.
Our actual dirt is red clay. but under the plastic it never dries- even in the dry season, so the infection is always mildly active. unlike under my un-enclosed porches where the ground is always bone dry, even in the wettest weather.
The next plan was to put vapor barrier under the bottom of the joists (probably looking at that mylar bubble-wrap stuff b/c it's cheap- husband is thrifty), *completely* sealed at seams with Great Stuff, to keep crawl air out of the living space. hoping just keeping it out of living space would help, even if it is still festering under that plastic, tho i'd love to find a way to not have that happening, either.
Also to add a fresh air intake from the outside of the house to right behind the wood stove at least, (and maybe with more vents elsewhere), in hopes for not only fresh air but to help 'pop the bubble' as it were, of intense stack effect.
Been flipping through your site for long enough to know that sealing joist-bottoms may well backfire badly as well, so am waiting for some input from..somewhere. living in central WV, supposedly zone 6a, we are more a hot-humid/rainy climate anymore, it does not often get down to zero in the winter lately for more than a night or two.
Having wood heat, the humidity levels are ridiculously low in heating season (currently 15% inside- goes down to something like nine when it's zero out), which initially made me think the danger of 'shut in joists' would not apply to us.
However what I am gathering also is that should I seal the bottom of the house, I should not trap vapors between vapor barrier layers- that I may well have to take out the insulation and it's paper backing in order for the 'sealing the bottom' to work and not just give the infection another place to hide. Plus the infection is likely dormant in the insulation, even tho it was never 'constantly wet' like in the addition, as there's a layer of dirt along the bottom where it was kicked up as dust.
Right after we did the thing with the skirting and enclosing, I came upon this article, which seems like it makes much better sense for our area. Too bad we didn't find it right before. -just open it up to the winds, with a tightly sealed bottom.
[Ed. note: link to the research article below]
Glass, Samuel V., Charles G. Carll, Claudette Hanks Reichel, Todd F. Shupe, Qinglin Wu, Roy O. Martin Sr., Jay P. Curole, Matthew D.Voitier, INSULATING RAISED FLOORS IN A HOT, HUMID CLIMATE [PDF], Research findings on moisture management, LSU AgCenter Pub. 3187 “Insulating Raised Floors in Hot, Humid Climates “, Retrieved 09/01/2022, www.LSUAgCenter.com Louisiana State University Agricultural Center
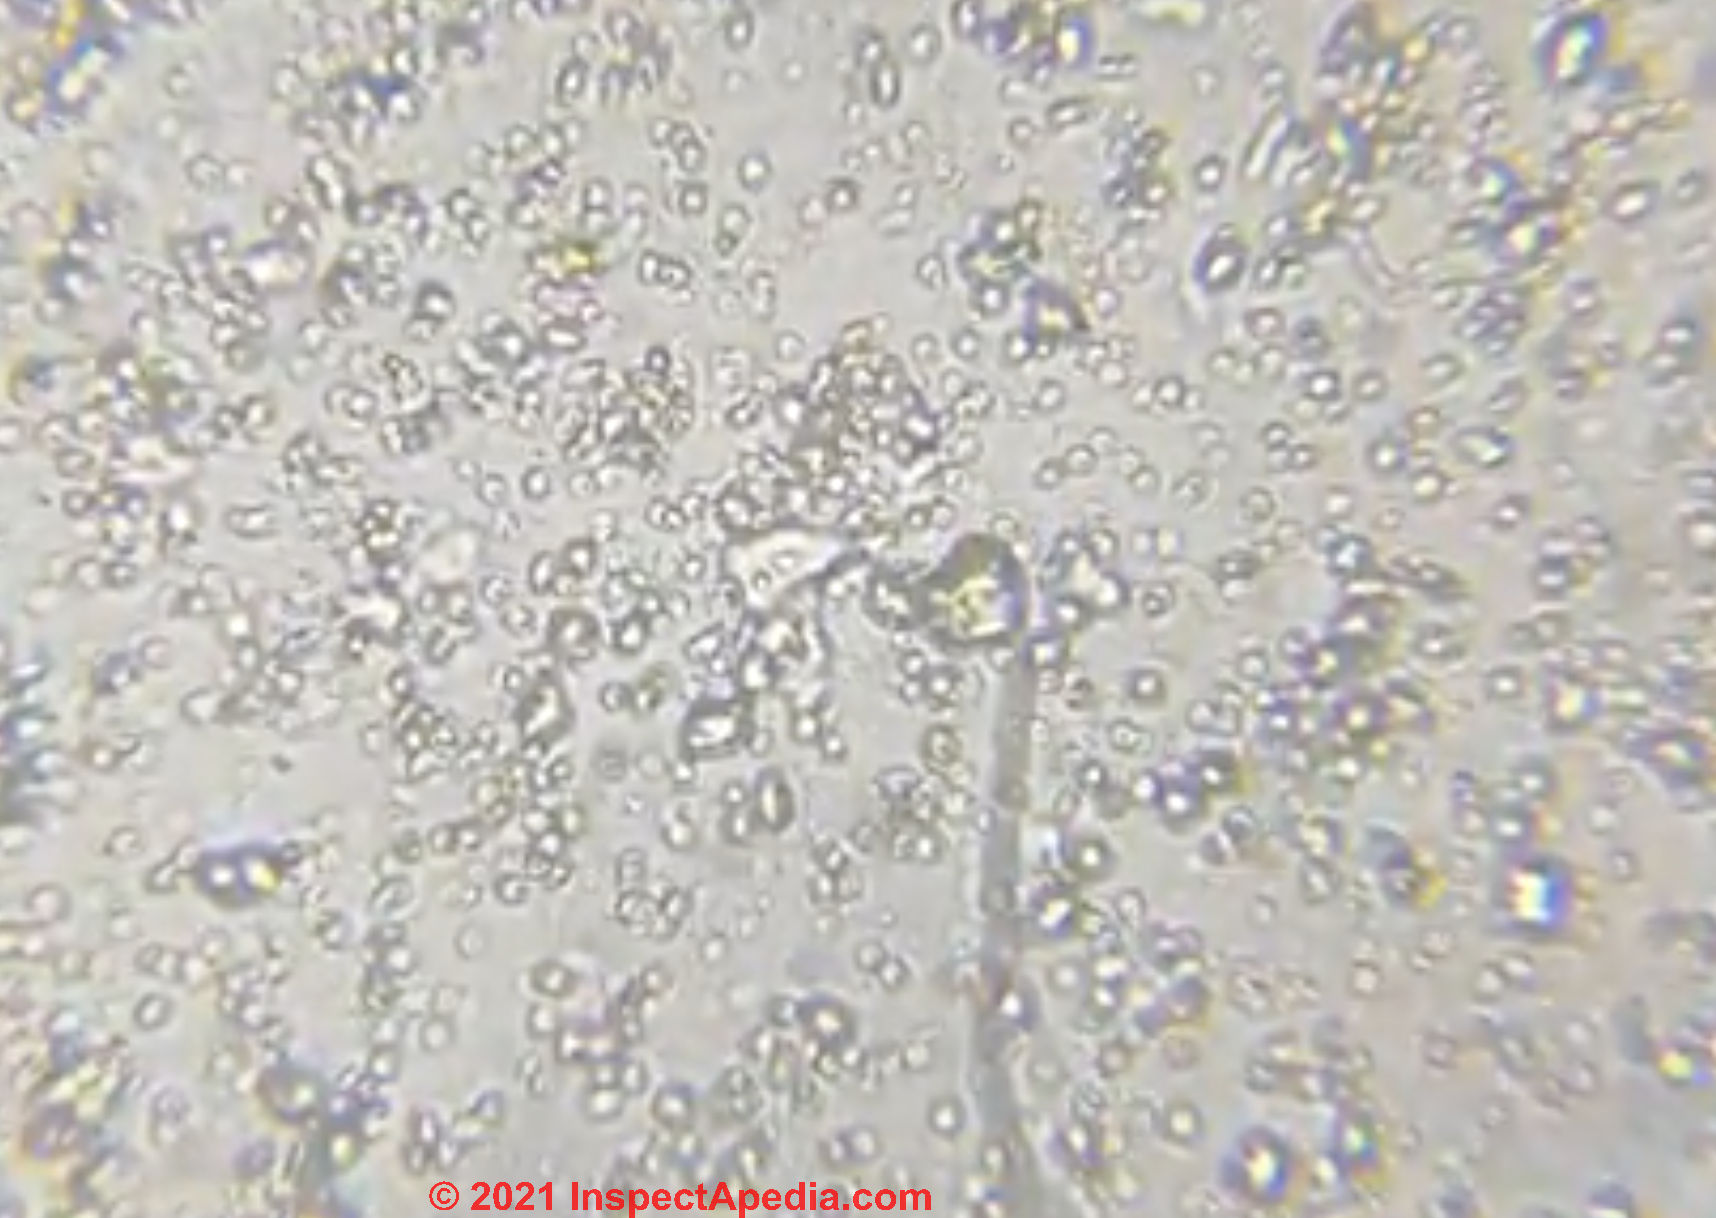
I recently acquired a microscope- and this is what I find hanging out in the condesnation between the layers of plasitc under the house (condensate on plastic over plain dirt just harbors some pond-scum, structureless looking green algae).
This is at 1000x, as small as my microscope will go. Looking at pics on the web (Iknow, lol) the closest thing I have found to look like them is aspergillus-type spores. the 'moving things' that are out of focus, may just be shadows. I never could get that in focus.
Moderator reply: crawl space mold hazards & basic procedures
There is more here than I can digest and comment upon without taking more time to read and think, but first off from a quick scan:
Watch out: you should not crawl into a very tight crawl space when working alone as you could be injured, trapped, and die there;
Watch out: If you've got respiratory illness of any sort you should not be entering a space where there is a suspicion of significant levels of airborne mold spores.
Those small spores, for example, Aspergillus or Penicillum (common in wet crawl spaces, insulation, on wood framing and other surfaces) or other crawlspace molds can cause very serious lung infections that you should discuss with your doctor.
See details at ASPERGILLOSIS
A person otherwise healthy might work in such an area provided she's wearing appropriate protective clothing, eye protection, respirator, etc.
Watch out: Your crawl area may be a mold reservoir whose spores can readily enter the living area.
See details at DEFINITION of STACK EFFECT in BUILDINGS
Watch out: Converting a crawl space to conditioned space works well but not until you've
- corrected the sources of water entry
- dried out the area
- removed all mold contamination such as contaminated insulation, and have cleaned moldy surfaces such as wood framing
The articles I list below may be of help, but given how long you've been struggling with these problems, I'm concerned that you've not had a suitable expert examine the home and make a complete, unbiased (no conflicts of interest) assessment of the problems, causes, and needed cures.
- CRAWL SPACE DRY-OUT PROCEDURE
- CRAWLSPACE MOLD ADVICE
- MOLD CONSULTANTS / INSPECTORS
- MOLD / ENVIRONMENTAL EXPERT, HIRE?
Reader follow-up:
I've read the crawlspace dryout- much like what we did in the initial close-in in 2018. The mold on dirt is not an article I've seen and is opening further article-paths to follow.
[Ref: MOLD on DIRT FLOORS - Ed.]
I HAVE gotten all the 'mushroom' out of the dirt a summer or two ago- an enormous job! -although I suspect it was drinking water that is now feeding this other trouble-now I just have 'regular' top soil that is too wet, no more decaying barky bits. all the house's wood appears fine (now- after I've washed the back room joists initially in 2018).
Current problem is not something I can see, smell or taste- but I sure can cough on it! And no, I have not had a suitable expert nor can I seem to find one- with the house as well as my actual health condition. the kid can get a diagnosis of 'bacterial infection' when he's very bad, a round of antibiotic helps it, but living here it just goes back to 'dry cough and digestive' and then comes right back. for myself, it is always 'nothing'.
I am pretty much on my own it would seem, managing the best I can. Hence the reaching out to your website/contact!
Sources of water entry is 'the ground' - the water table in the wet season can get level with the soil surface here. since our house is on a slope, the ditch in the back only seems to work for the back room, sortof- about 12 feet wide. It seems likely that I would have to dig 1 or 2 more gravel filled, tiled drainage ditches across the crawl. Much harder work than tearing off the underpinning and having an open crawl with sealed house-bottom.
As for your concerns of my safety- I appreciate this. Our crawl is really not very cramped, and mostly wide open and 'safe' -save for all the recently- cut and hanging hardware cloth due to some structural modifications with the floor joists. That will get fixed, replaced or removed depending on what course of action we take.
After the terrible job of the contractor with the plastic- I honestly don't trust many besides myself to do what I feel I need done! I'm pretty sure anything in the crawl IS readily entering the living area - I smell the smell of the plastic that's down there when it's warm, the 'condensation is up' and the stack effect is very strong.
Hence the desire to make a strong barrier between house and crawl with a solid, seam-sealed vapor barrier on the bottom of the house-structure itself- regardless what we decide to do with the crawl itself.
I do work in a respirator of maximum filtration (p100 particulate plus VOC/org vapor filters), and wear appropriate clothing- if I am not sleeping in the house, I can work on it. often though I cannot live in the house at all if i'm just trying to live in it, especially trying to sleep here.
So, generally, doing my own work to improve the situation is not as harmful as 'not getting into it', but still being here. as being in the house is just as much 'in it' as tearing into it to try and fix. We have a Molekule filter but it is underpowered- I have moved it down to the kitchen and have to run it on high in order to have any higher brain function and digestive ability.
Moderator reply: a few suggestions
You do not need to prevent soils in a crawlspace from being wet by groundwater as long as you can maintain an adequate moisture barrier or "seal" atop the crawlspace soils. That means overlapping and taping your polyethylene vapor barrier sections and if you can't seal the poly to your metal crawlspace sides, put down treated lumber sleepers to hold the plastic down at the crawlspace edges.
You don't have to make the crawlspace 100% airtight and watertight if you cover the ground thoroughly, but
Watch out: you do need to be sure that you're not getting standing water atop the water and moisture barrier you've put down in the crawl area.
At other cases like yours, where you report frequent high water tables, owners or building dry-out crews install a crawlspace drainage system, ideally draining water to daylight but if that's not feasible, using a sump pump to pump water sufficiently far from the building that we never get water atop the moisture barrier.
I would also avoid insulating with any porous material like fiberglass batts when it's going into a damp or mold-suspect crawlspace. If we're going to add insulation later, I'd use closed-cell foam or foam spray.
Watch out: in my OPINION, given your description of health concerns and the crawl area, and given my own experience with becoming mold-sensitized by exposure, you ought not be the one working in that space at all.
Pending drying out the crawl and becoming confident that it's adequately cleaned and mold-free, you can reduce the movement of airborne mold spores and MVOCs up into the occupied space by putting the crawlspace under negative pressure (fans blowing "out").
Watch out: no "air purifier" can remove a mold hazard in a building; you need to find and remove the mold source.
...
Continue reading at CRAWL SPACE DRY-OUT PROCEDURE or select a topic from the closely-related articles below, or see the complete ARTICLE INDEX.
Or see these CRAWL SPACE DRYOUT FAQs - questions and answers posted originally at the end of this article.
Or see these
Recommended Articles
- BASEMENT CEILING VAPOR BARRIER
- CRAWL SPACE DRYOUT - home
- CRAWL SPACE DEHUMIDIFICATION
- CRAWL SPACE DRY-OUT PROCEDURE
- CRAWL SPACE GROUND COVERS
- CRAWL SPACE INSULATION RETROFIT
- CRAWL SPACE MOISTURE BARRIERS
- CRAWLSPACE MOLD ADVICE
- CRAWL SPACE SAFETY ADVICE
- CRAWL SPACE SEAL & SANITIZE
- CRAWL SPACE SEWAGE CLEANUP
- CRAWL SPACE VAPOR BARRIER LOCATION
- CRAWL SPACE VENTILATION CODES
- CRAWL SPACE WATER ENTRY STOP
- CRAWL SPACE WATERPROOFING
Suggested citation for this web page
CRAWL SPACE DRYOUT at InspectApedia.com - online encyclopedia of building & environmental inspection, testing, diagnosis, repair, & problem prevention advice.
Or see this
INDEX to RELATED ARTICLES: ARTICLE INDEX to CRAWL SPACES
Or use the SEARCH BOX found below to Ask a Question or Search InspectApedia
Ask a Question or Search InspectApedia
Try the search box just below, or if you prefer, post a question or comment in the Comments box below and we will respond promptly.
Search the InspectApedia website
Note: appearance of your Comment below may be delayed: if your comment contains an image, photograph, web link, or text that looks to the software as if it might be a web link, your posting will appear after it has been approved by a moderator. Apologies for the delay.
Only one image can be added per comment but you can post as many comments, and therefore images, as you like.
You will not receive a notification when a response to your question has been posted.
Please bookmark this page to make it easy for you to check back for our response.
Our Comment Box is provided by Countable Web Productions countable.ca
Citations & References
In addition to any citations in the article above, a full list is available on request.
- [2] Product literature and MSDS sheets for the biocides and fungicidal sealants listed in this article.
- [3] US Centers for Disease Control, CDC: www.cdc.gov/ncidod/diseases/hanta/hps/ describes the risks associated with hantavirus.
- [4]U.S. City or State Adopted versions of the model buiding code produced by ICC Section R408, Under Floor Space, http://publicecodes.cyberregs.com/icod/irc/2012/icod_irc_2012_4_sec008.htm, retrieved 3/2/2013
See IRC Section M1305.1.4 [PDF] Section M1305.1.4 for access requirements where mechanical equipment is located under floors. - [5]U.S. City or State Adopted versions of the model buiding code produced by ICC Section R406, Foundation Waterproofing and Dampproofing, http://publicecodes.cyberregs.com/icod/irc/2012/icod_irc_2012_4_sec006.htm, retrieved 3/2/2013
- Thanks to reader C. Brown for suggesting the need for detail about rapid dryout procedures for a wet crawl space
- WEATHER RESISTIVE BARRIERS [PDF] U.S. Department of Energy, ", how to select and install housewrap and other types of weather resistive barriers
- In addition to citations & references found in this article, see the research citations given at the end of the related articles found at our suggested
CONTINUE READING or RECOMMENDED ARTICLES.
- Carson, Dunlop & Associates Ltd., 120 Carlton Street Suite 407, Toronto ON M5A 4K2. Tel: (416) 964-9415 1-800-268-7070 Email: info@carsondunlop.com. Alan Carson is a past president of ASHI, the American Society of Home Inspectors.
Thanks to Alan Carson and Bob Dunlop, for permission for InspectAPedia to use text excerpts from The HOME REFERENCE BOOK - the Encyclopedia of Homes and to use illustrations from The ILLUSTRATED HOME .
Carson Dunlop Associates provides extensive home inspection education and report writing material. In gratitude we provide links to tsome Carson Dunlop Associates products and services.
 | HOME | ABOUT | ASK a QUESTION | CONTACT | CONTENT USE POLICY | DESCRIPTION | POLICIES | PRIVACY | |
| © 2024 - 1985 Publisher InspectApedia.com - Daniel Friedman | |||||||||