
InspectAPedia® FREE Encyclopedia of Building & Environmental Construction, Diagnosis, Maintenance & Repair |
Question? Just ask us! InspectAPedia
|
 Water Softener De-Winterizing Guide
How to Restore a Water Softener to Operation
- POST a QUESTION or COMMENT about the steps necessary to turn on a water softener and make sure that it is working properly after having been shut down, winterized, or taken out of service.
Water softener de-winterizing procedure to return a water softener to service:
This article describes how to turn on the water softener and get it working in a building where that equipment has been shut down or winterized.
The articles at this website will answer most questions about water softeners and about freeze protection for piping and other building plumbing and heating system components: how to winterize a building to avoid frozen pipes, and how to thaw frozen water supply & drain piping, wells, & water tanks.
InspectAPedia tolerates no conflicts of interest. We have no relationship with advertisers, products, or services discussed at this website.
- Daniel Friedman, Publisher/Editor/Author - See WHO ARE WE?
Restoring Water Treatment Equipment - How do We Return the Water Softener to Operation & Use at the End of Winter?
When the building is reoccupied, you'll need to take these steps to get your water softener working again:
- If you drained the water softener (a step we recommend if the building was to be left without heat) you'll need to close any drain valves that were opened, or reconnect any pipes that were cut to drain them.
Then follow your water softener's general start-up instructions such as checking the salt level in the salt tank, and checking that the float control in the salt tank moves freely up and down - that it's not stuck.As we discuss at WATER SOFTENERS & CONDITIONERS, a water softener control that is not operating properly can become stuck in the backwash position where it runs continually.
That failure not only wastes water it can damage a well pump or flood the septic drainfield.
Water Heater Tip: get your water softener working and recharged before you re-fill and turn on your water heater.
That will avoid filling your water heater with hard water.
If you forgot this step, you might want to turn off your water heater and drain its tank, allowing the water heater to re-fill with softened water.
- Restore the water softener bypass valve to the "service" position, that is, to the not-bypass position
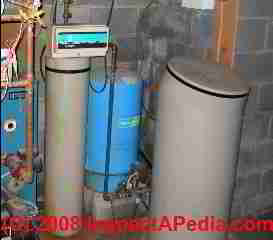
Locate the bypass valve on the water softener: Our photo shows the water softener bypass control on an older model. Pushing the knob labeled "bypass" in will stop routing building water through the water softening equipment.
If you are having trouble finding the bypass valve
see BYPASS VALVE on WATER SOFTENERSRe-set the water softener bypass valve: To restore the water softener to use, push in the comparable knob on the opposite side of the control so that the "bypass" valve is in the "out" position.
Look on the face of each knob for a label indicating which knob or button is the bypass position.
On newer Culligan™ water softener models since 1995, the Blue knob is pushed IN to use the water softener (go off of bypass) and a Red knob is pushed in (from the opposite side of the control) to set the softener into bypass mode and stop using it.
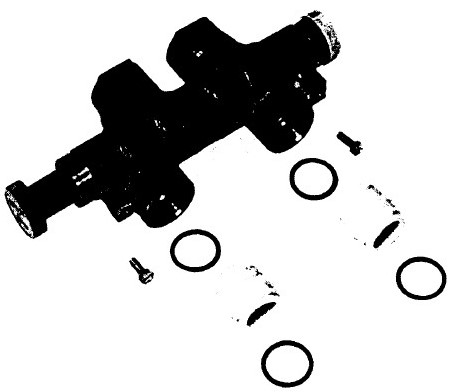
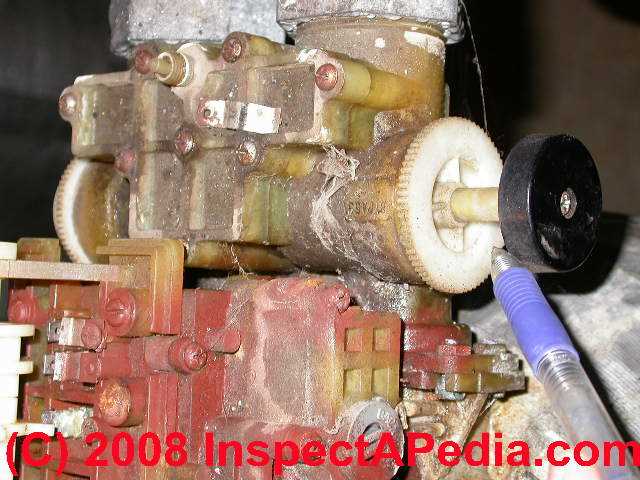
Lubricate the water softener bypass valve? The bypass valve on a Culligan™ water softener (and probably most others) connects to the back of the main control valve assembly with two screws.
After having been left "off" for a long time the water softener bypass valve may be difficult to operate: it may need lubrication
. Inside the valve are o-rings that permit the valve to operate without leaking.If these moving parts appear to need lubrication, use a silicone-based lubricant, not a petroleum-based lubricant which could damage the control.
The softener bypass valve shown in this sketch from a Culligan water softener installation manual includes replaceable o-rings that may be needed if your bypass valve is leaky.
- Turn on electrical power to the water softener - or just plug it back in
- Check for leaks: look at the softener for evidence of leaks; if heat was left on in the building and the area around the water softener stayed above freezing you should be ok, but still, never walk away from a piece of equipment you've turned back on without looking it over to make sure it's un-damaged.
On a water softener which has lots of plastic parts resistant to freeze cracking, a common place to spot damage is in the control assembly itself. If water remained inside of the softener control assembly it may have frozen and damaged the control. Look around the base of the control for drips or running water when the equipment is restored to operation.
Also check for leaks in the water supply and drain piping around the water softener (and elsewhere in the building).

- Set the clock and the water softener recharge time: set the water softener to the proper day and time of day
Set the clock dial to the accurate time of day and set the water softener regeneration time to the correct time of recharge: an hour when the building occupants are least likely to be using water, such as at 2AM - the standard factory pre-set regeneration hour.Usually the "clock dial" is adjusted by lifting it up and turning it to the proper position, or turning a dial to line up the correct hour of the day with an indicator arrow (lower right in our photo).
The dials on the water softener control should permit you to set the correct time of day, the time (hour) of recharge, the frequency of recharge (every day, every other day, once a week, etc).This extra step avoids running mineral-laden water into the water piping and water heater where a high mineral content leads to clogged water pipes.
See WATER SOFTENER ADJUSTMENT & CONTROLS for details of setting the water softener controls.
- Check the level of salt in the water softener salt reservoir.
If the salt level is low but the tank is clean you'll want to add salt.
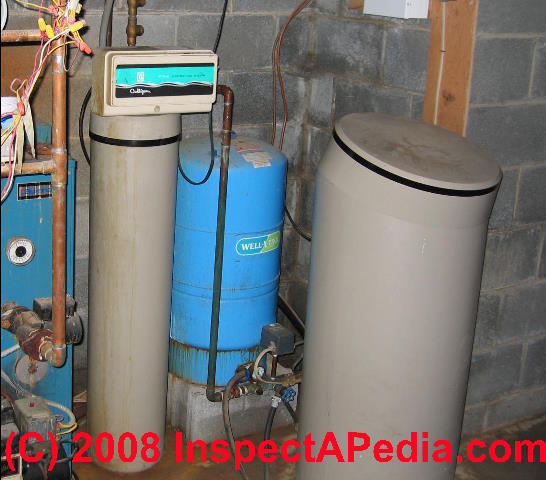
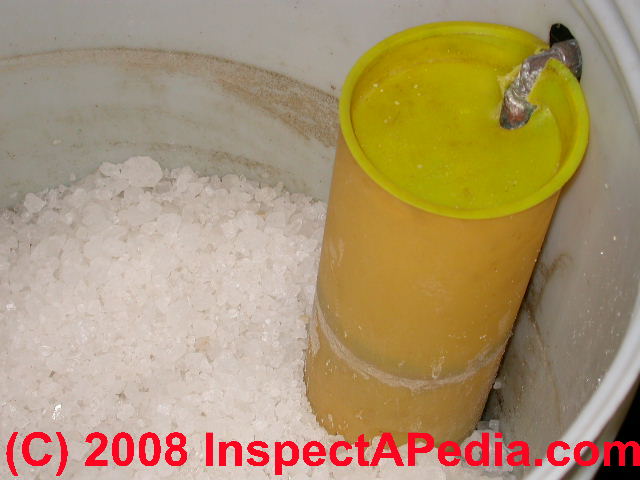
Check the Brine Refill Valve Assembly: In our photo the yellow tube at the right side of the salt reservoir contains a float assembly that controls the water level in the salt tank during a softener recharge cycle.
On water softener salt tanks where there is no cap on this tube it's possible to spill salt into the tube when adding salt to the larger tank. Don't pour salt into the yellow tube. Doing so can jam the float and cause the softener to malfunction.
If a water softener is not working, check to see that the float inside of this tube can rise and fall freely in response to water level in the bottom of the tank.
Clean & Sanitize the water softener reservoir? Every year or two we let the softener use up its salt so that we can inspect and remove any dirt or sludge that may have accumulated at the bottom of the salt tank.
To sanitize a water softener (and its salt reservoir or brine tank), pour a one cup of household bleach (if your water softener is a 9" diameter unit) or two cups of bleach (if your water softener is a 12-inch diameter unit) right into the salt tank.
We pour the bleach into the yellow tube that houses the float assembly but don't do this and let the bleach sit there for days since it might be so concentrated as to damage water softener parts. Just go ahead to the next step: set the water softener to perform an extra (manual) recharge cycle.
This will flush salty chlorine disinfectant through the equipment. (No, using the recommended quantity of bleach will not harm the septic system.)
See the details of how to clean and sanitize the water softener at WATER SOFTENER CLEANING & SANITIZING
See WATER SOFTENER ADJUSTMENT & CONTROLS for details of setting the water softener salt dose and water usage controls. - Regenerate the water softener: use the extra water softener regeneration cycle switch or control on your water softener to instruct it to run through an extra regeneration cycle.
For the water softener control shown in our photograph (above), pressing the red knob inwards and turning it counterclockwise until the arrow on the red knob lines up with the arrow at the "Start" label on the control will initiate an extra regeneration cycle.
See WATER SOFTENER MANUAL REGENERATION for complete instructions on how to cause an extra or manual water softener regen cycle.
Question: tips for starting up a water softener that has been left off
(Jan 4, 2015) michel said:
sa fait plus de 3 ans qu il n as pas ete en marche,dois je faire quelque chose de précs avant de le redémarrer
Reply:
Michel
OUI. Vous voudrez pour nettoyer et désinfecter l'adoucisseur d'eau avant de le retourner à l'opération. Les détails sont à
WATER SOFTENER CLEANING & SANITIZING
For our English speaking readers he wrote" its been more than 3 years that there have not been n on, should I do something in particular before restarting"
We replied:
YES. You will want to clean and sanitize the water softener before returning it to operation. Details are at inspectapedia.com/plumbing/Water_Softener_Cleaning.php
If you are not sure if your water softener is working properly, it's easy to test the treated water for hardness.
This procedure and more detailed information about the use of water softeners is at WATER SOFTENERS & CONDITIONERS
...
Continue reading at DE-WINTERIZE a BUILDING or select a topic from the closely-related articles below, or see the complete ARTICLE INDEX.
Or see these
Water Softener Articles
- DIAGNOSE WATER SOFTENER PROBLEMS
- WATER SOFTENERS & CONDITIONERS - home
- BYPASS VALVE on WATER SOFTENERS
- DE-WINTERIZE WATER SOFTENER
- DIAGNOSE WATER SOFTENER PROBLEMS
- INSTALLATION of WATER SOFTENERS
- WATER SOFTENER CLEANING & SANITIZING
- WATER SOFTENER MANUAL REGENERATION
- WATER CONDITIONER / SOFTENER MANUALS
- WATER SOFTENER RESIN REPLACEMENT
Suggested citation for this web page
WATER SOFTENER / TREATMENT TURN-ON at InspectApedia.com - online encyclopedia of building & environmental inspection, testing, diagnosis, repair, & problem prevention advice.
Or see this
INDEX to RELATED ARTICLES: ARTICLE INDEX to BUILDING FREEZE PROTECTION
Or use the SEARCH BOX found below to Ask a Question or Search InspectApedia
Ask a Question or Search InspectApedia
Questions & answers or comments about the steps necessary to turn on a water softener and make sure that it is working properly after having been shut down, winterized, or taken out of service.
Try the search box just below, or if you prefer, post a question or comment in the Comments box below and we will respond promptly.
Search the InspectApedia website
Note: appearance of your Comment below may be delayed: if your comment contains an image, photograph, web link, or text that looks to the software as if it might be a web link, your posting will appear after it has been approved by a moderator. Apologies for the delay.
Only one image can be added per comment but you can post as many comments, and therefore images, as you like.
You will not receive a notification when a response to your question has been posted.
Please bookmark this page to make it easy for you to check back for our response.
Our Comment Box is provided by Countable Web Productions countable.ca
Citations & References
In addition to any citations in the article above, a full list is available on request.
- [1] "New Electric Heat Tapes Help Prevent Fires," US Consumer Product Safety Commission (CPSC) #00936
- [2] "Freezeproof Your House," Mike McClintock, Rodale's New Shelter, p. 30, October 1985 (approximate date)
- [3] "How to Winterize Your Pipes," Mike McClintock, Homeowners How-To Magazine, p. 59-62, Nov-Dec 1979.
- [4] North Dakota Standards for Water Softeners, North Dakota General Authority Law, Chapter 62-04-08, Water Softener Units http://www.legis.nd.gov/information/acdata/pdf/62-04-08.pdf. "The objective of this chapter is to provide a standard of quality, capacity, and performance for water softener units. Water softener performance is to be based upon referee tests procedures described in section 62-04-08-09."
- [5] Culligan Mark 10 Water Softener 1994-1998 Installation and Operating Instructions (covering models manufactured after 1995) (1-96) 01881948.pdf available from www.culligan.com
- [9] "Non electric water softener, Installation and Operating Instructions", IBC Filtration & Water Treatment Products (Australia), op.cit.
- [10] "Water Softener Twin Tank Installation and Operating Instructions", IBC Filtration & Water Treatment Products (Australia), op.cit.
- Our recommended books about building & mechanical systems design, inspection, problem diagnosis, and repair, and about indoor environment and IAQ testing, diagnosis, and cleanup are at the InspectAPedia Bookstore. Also see our Book Reviews - InspectAPedia.
- In addition to citations & references found in this article, see the research citations given at the end of the related articles found at our suggested
CONTINUE READING or RECOMMENDED ARTICLES.
- Carson, Dunlop & Associates Ltd., 120 Carlton Street Suite 407, Toronto ON M5A 4K2. Tel: (416) 964-9415 1-800-268-7070 Email: info@carsondunlop.com. Alan Carson is a past president of ASHI, the American Society of Home Inspectors.
Thanks to Alan Carson and Bob Dunlop, for permission for InspectAPedia to use text excerpts from The HOME REFERENCE BOOK - the Encyclopedia of Homes and to use illustrations from The ILLUSTRATED HOME .
Carson Dunlop Associates provides extensive home inspection education and report writing material. In gratitude we provide links to tsome Carson Dunlop Associates products and services.
 | HOME | ABOUT | ASK a QUESTION | CONTACT | CONTENT USE POLICY | DESCRIPTION | POLICIES | PRIVACY | |
| © 2024 - 1985 Publisher InspectApedia.com - Daniel Friedman | |||||||||