
InspectAPedia® FREE Encyclopedia of Building & Environmental Construction, Diagnosis, Maintenance & Repair |
Question? Just ask us! InspectAPedia
|
 Guide to Installing Wood Wall Siding Products
- POST a QUESTION or COMMENT about how to install wood siding, clapboards, etc.
Wood siding installation & product guide:
This article provides details for proper installation of wood building siding materials.
This article series discusses best practices construction details for building exteriors, including water and air barriers, building flashing products & installation, wood siding material choices & installation, vinyl siding, stucco exteriors, building trim, exterior caulks and sealants, exterior building adhesives, and choices and application of exterior finishes on buildings: paints, stains.
InspectAPedia tolerates no conflicts of interest. We have no relationship with advertisers, products, or services discussed at this website.
- Daniel Friedman, Publisher/Editor/Author - See WHO ARE WE?
Installation Details - Guide for Wood Siding
 This article series includes excerpts or adaptations from Best Practices Guide to Residential Construction (Steve Bliss, J Wiley & Sons) , by Steven Bliss, courtesy of Wiley & Sons.
Article Contents
- DRAINAGE BEHIND WOOD SIDING
- BACKPRIMING WOOD SIDING
- WOOD SIDING over FOAM INSULATING BOARD
- PLWYOOD SIDING INSTALLATION GUIDE
- FASTENER TYPES (nails) for BUILDING SIDING MATERIALS
- STAINLESS STEEL SIDING NAIL
- HIGH-STRENGTH ALUMINUM SIDING NAILS
- ELECTROGALVANIZED SIDING NAILS - not recommended
- NAILING SCHEDULE for Building Siding Materials
- VERTICAL SIDING NAILING PATTERN & SPACING
- PLWYOOD SIDING NAILING PATTERN & SPACING
- STAINS on RED CEDAR SIDING
While the premium grades of siding are more forgiving of installation and finishing problems than budget materials, all wood siding requires attention to detail to provide a durable and attractive exterior. Critical details are backpriming, air space, nailing, and finishing.
Drainage Details for Wood Building Siding
An air space behind the siding, in addition to protecting the building shell (see “Rain-Screen Principle,” page 2), also improves the performance of wood sidings. The siding material is less prone to moisture movement and paint is less likely to fail, even if the space is only 1/4 inch wide.
While the vast majority of wood siding is installed directly on the sheathing wrap, builders who have had problems with paint and siding have found that adding an air space is worth the additional cost. New products— such as wrinkled and corrugated sheathing wraps with an integral air space, and behind-the-wall drainage mats such as Benjamin Obdyke’s Home Slicker®—are simplifying this step.
Back-Priming Suggestions for Wood Siding
The major trade associations representing siding manufacturers all recommend back-priming and priming of cut ends. With cedar and redwood, backpriming will minimize the bleeding of extractives from the back of the siding, which can drip onto the face of the siding and stain the finish, and can also degrade sheathing wraps.
With all sidings, back-priming will reduce the movement of moisture into and out of the siding, minimizing problems with cupping, warping, and checking.
Advice for Installing Wood Siding Over Foam
The need for back-priming and a ventilation air space is even greater when installing over foam sheathing.
With no air space and no wood sheathing to temporarily store the moisture, any water that leaks through the siding or is driven in by the sun will tend to wet the back of the siding. The result, documented in a joint study conducted by wood siding and foam manufacturers, is increased cupping, cracking, and paint problems.
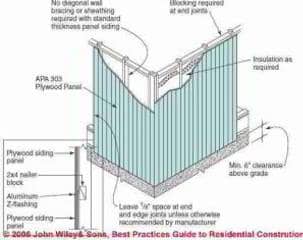
Plywood Siding Installation Details

Plywood sidings are typically nailed
directly to studs or through a layer of foam, and they provide
a structural sheathing as well as an exterior finish.
Most have vertical grooves to imitate vertical sidings.
All plywood sidings should be painted or stained to protect the outer facing and prevent the panels from delaminating over time. Vertical joints are typically hidden by the vertical grooves in the pattern.
Horizontal joints must be protected by a Z flashing to shed water (Figure 1-8 at left).
Fastener Types for Various Building Siding Materials
Nailing requirements are shown in Table 1-3 below.
In general, nails should penetrate the sheathing and studs or blocking by 1-1/2 inches, or 1-1/4 inches with ringshank or spiral-shank nails. Although specialized siding nails with small heads and blunt tips are preferred, staples are acceptable for some applications.
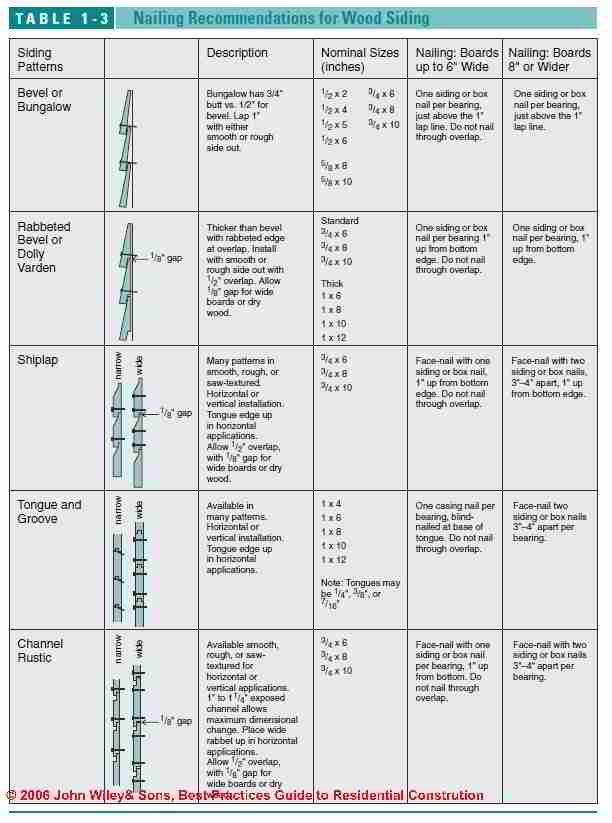
Since the cost of fasteners is a small percentage of a siding job, it makes sense to use stainless steel, particularly with cedar and redwood, which can react with some types of fasteners. The most common fastener choices are as follows:
Stainless Steel Nails for Building Siding
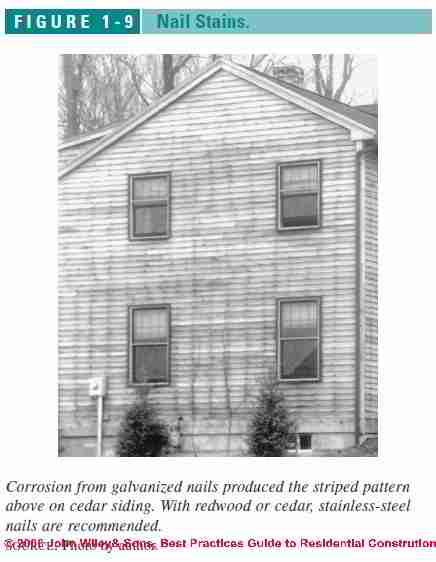
Stainless steel siding nails are the best choice with all sidings, but these are particularly well suited to redwood and cedar, which react with some types of nails (galvanized and copper) and cause dark stains (see Figure 1-9 at left).
Ring-shanked or spiral-shanked siding nails can be set flush and painted over or countersunk and puttied before painting.
High-strength Aluminum Siding Nails
These are corrosion resistant and can be used with all wood sidings. However, the aluminum can react with galvanized steel flashing and cause corrosion Hot-dipped galvanized. These can react with the tannins in cedar and redwood, causing black stains and streaking. Also the protective coating can chip when nailed, exposing the underlying steel to corrosion.
Electrogalvanized Siding Nails - not recommended
These are not recommended for any siding application since the coating is not thick enough and they are likely to corrode and stain the siding.
Nailing Schedule for Building Siding Materials
Both the 2003 International Building Code (IBC) and the Western Wood Products Association require that solid wood siding products be nailed directly into studs or 2x blocking.
Ring-shank nails should penetrate 1-1/4 inches into wood (combined sheathing and stud) and smooth-shank nails 1-1/2 inches.
With high-quality, dry, dimensionally stable siding materials such as kiln-dried redwood and red cedar clapboards, some contractors nail siding directly to nominal 1/2-inch nail-base sheathings, such as OSB and plywood, using ring-shank nails.
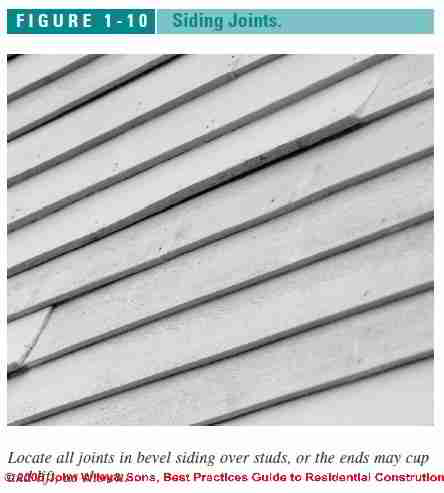
Check with local codes before taking this approach. To avoid problems, make sure joints fall on studs or solid blocking (see Figure 1-10 at left).
Nail Choices & Nail Spacing for Horizontal Siding
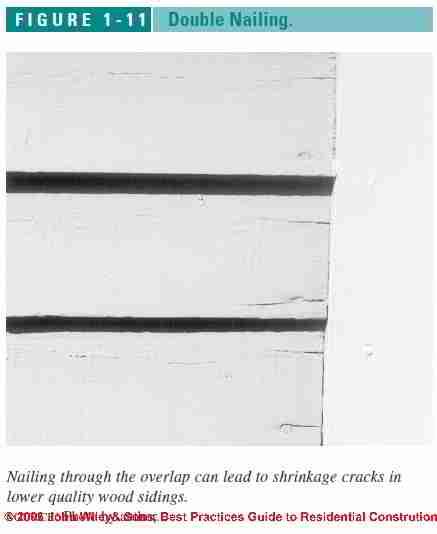
Nailing spacing for horizontal wood siding (such as clapboards) should be maximum 24 inches on-center when over nail-based sheathing and 16 inches on-center over nonstructural sheathings. Trade associations such as the Western Wood Products Association recommend against “double nailing” for most horizontal wood-siding profiles, including bevel siding.
That is, nails should be driven above the overlap line of the siding board below to reduce the risk of cracking. Despite this recommendation, many contractors nail 1/2-inch-thick clapboards just below the overlap line, catching the top edge of the piece below to avoid cracking the siding during installation.
While this approach may be acceptable with dry, premium-grade siding, it will likely lead to problems with lower quality materials (Figure 1-11 at left).
Vertical Siding Nailing Patterns & Spacing Guide
In general, vertical sidings are nailed to the top and bottom plates and to horizontal nailers installed every 36 inches for face-nailed siding and every 32 inches when blind-nailed. Because vertical sidings are vulnerable to leakage, they are not recommended for areas subject to wind-blown rain.
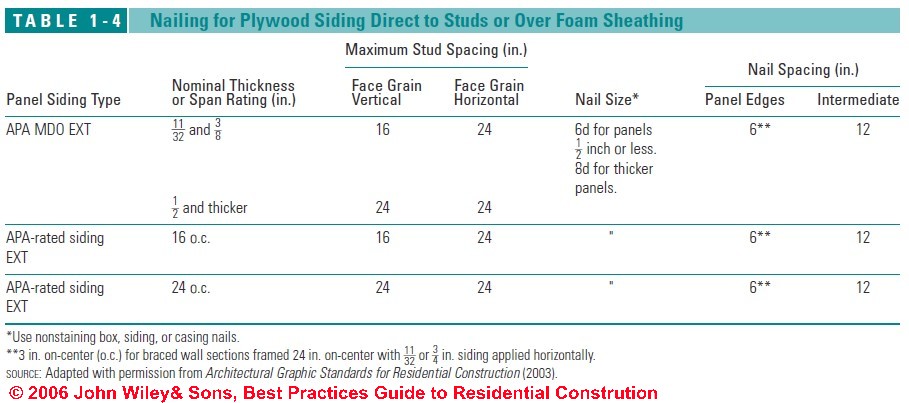
Plywood Building Siding Nailing Pattern & Nail Spacing Guide
Plywood siding is often nailed directly to studs or through an insulating sheathing and serves as a structural sheathing as well as the exterior finish. Use 6d box, siding, or casing nails for nominal 1/2-inch plywood siding nailed directly to studs. For nail spacings, see Table 1-4 below.
-- Adapted with permission from Best Practices Guide to Residential Construction (Steve Bliss, J Wiley & Sons) .
Cause, Cure & Prevention of Stains on Unprimed Red Cedar Siding
Reader Question: Stains on Unprimed Red Cedar Siding
After some research of Dupont Tyvek, Western Red Cedar Association, and your articles on Wood Shingled siding and Wood Siding installation I have developed the following case questions for your response:
Condition:
- Completely unprimed red cedar lap siding has “bubbled" after painting and pealed using latex house paint.
- Tyvek (1980’s) is house wrap / underlayment and in places is stained or “burned through” underneath siding. No wide spread rot of sheathing known.
- No purposeful venting is installed with siding, just what happens due to install of natural lap joints. Siding is uniformly installed
- Last painting was sprayed on in whole and in part. Looks like may have sealed laps in places.
Home owner is considering:
- Option 1: extensive paint removal and repaint with oil based primer and stain or
- Option 2: residing with six sided cedar and new underlayment / house wrap
Questions:
- What is best and/or appropriated underlayment / house wrap for Primed cedar or, Unprimed cedar. Is unprimed cedar compatible with tyvek house wrap?
- Is unprimed cedar ok to paint or is it problematic for painting? Staining? Due to accumulation of moisture on outer side of tyvek.
- What is cost trade off of two options; is one inherently more costly.
- What is best alternate siding option in the industry, all things considered, looks, longevity, minimum maintenance?
Home is located in central Connecticut.
Again, thank you in advance.
Respectfully, - Anonymous [by private email to the Editor, 2015/12/01
Reply: Steve Bliss from BuildingAdvisor.com responds
I’ve taken a closer look at the question of why unprimed red cedar lap siding may show a subsequent coating failure.
It’s always difficult to say why paint failed as so many factors affect the success of a paint job. It’s sometimes difficult even if you visit the job – but from a distance like this, I don’t think it is possible. There are a lot of missing facts here. For example here are some cedar siding paint failure diagnostic questions:
- Was the paint failure on part of the house or entire house?
- What was the condition of the paint before repainting?
- What prep work was done?
- Was the paint applied when it was too cold (based on application temperatures for that paint).
- Was the paint back-brushed after spraying (always a good practice).
- Is the cedar rough side or smooth side out?
- High-quality quarter-sawn stock or more typical, nowadays, flat-sawn – much more common nowadays.
In general, all cedar should be primed before painting. On a repaint, any loose paint must be scraped off and any bare wood spot primed. With a lot of bare wood, it’s probably best to prime the whole wall. Also prime all surfaces if the existing paint is in poor condition. Before priming and painting, it’s always a good idea to wash the walls with a low-pressure washer, and a brush if necessary.
Then wait a few days for the wall surface to dry before painting.
If the walls, or portions of them have never held paint well, there’s a good chance that moisture passing through the wall is at least partly to blame. Painting over such sections without fixing the moisture problem will usually just lead to additional paint peeling.
Regarding the two options:
- Option 1 (strip and re-paint) should work is the paint has traditionally held well, up to this last paint job, which might have failed due to faulty product or application. I agree that oil-based primer is the best option for old wood that has been stripped.
- Option 2 (re-siding) is the optimal and most expensive approach. Because of changes in materials (wood quality and paint) and construction techniques, paint failures are common nowadays.
To ensure good paint performance, priming all faces of the siding (or at least back-priming) is now recommended by paint experts such as William Feist of the US Forest Products Lab. Creating a “drainage plane” behind the siding is also recommended. This is sometimes referred to as “rain-screen siding”.
A drainage gap can be created by installing the siding over vertical strips of furring, plywood, or other suitable materials. But the easier and cheaper way to achieve this is to use a venting housewrap.
There are “wrinkled” housewraps that provide a gap of a couple of mm, but researchers have determined that the gap should be min. 3/16 in. to allow any air flow. I know of two products, Home Slicker and MTI Sure Cavity that can achieve this:
Excerpt from Rain-Screen Walls at BuildingAdvisor.Com
[Note: the link above leaves InspectApedia.com You can return using your browser's back-button]
Plastic drainage mats. Where you’re looking for the protection of a rain screen, but don’t want to cost and hassle of furring out the siding, consider one of the new plastic drainage mats available for sidewalls. Two well established products are Benjamin Obdyke’s Home Slicker 6 and MTI’s Sure Cavity SC 50. These products create a 6mm (1/4 in.) gap between the siding and housewrap (water-resistive barrier in Code-Speak).
Home Slicker is also available laminated to the housewrap Typar for a one-step installation. Both drainage mats are strong and rigid enough to resist compression by the siding but thin enough that windows, doors, and trim can be installed without shimming or furring. A thicker version (10mm) of each product is available that complies with Canadian code.
When using a rain-screen, it’s important to allow for ventilation at the top and bottom of the rain screen – and that these outlets are blocked with sceening to keep out insects.
If you are looking at other options (question 4), I would consider fiber-cement siding. Go with a name-brand product such as Hardiplank. If installed and finished correctly, this can provide years of good performance with very low maintenance.
However it is not foolproof – proper nailing to manufacturer’s specs is critical along with proper handling of butt joints in the siding and joints to abutting materials. The ends of boards, especially cut ends, can soak up water and swell if not properly detailed.
Steve Bliss
...
Continue reading at SIDING WOOD, FLASHING DETAILS or select a topic from the closely-related articles below, or see the complete ARTICLE INDEX.
Or see these
Recommended Articles
- CAULKS & SEALANTS, EXTERIOR
- EXTRACTIVE BLEEDING SIDING STAINS for more about extractive bleeding stains on wood siding.
- FLASHING ROOF WALL DETAILS
- FLASHING SIDING DETAILS
- FLASHING WINDOW DETAILS
- HOUSEWRAP INSTALLATION
- PAINT & STAIN GUIDE, EXTERIOR
- RAIN SPLASH-UP SIDING DAMAGE
- SIDING, WOOD CLEANERS, STAINS, PAINTS
- SIDING, WOOD INSTALLATION
- SIDING WOOD, FAILURES OVER FOAM BOARD
- SIDING WOOD, FLASHING DETAILS
- SIDING, WOOD PRODUCT CHOICES
- SIDING, WOOD PROFILES & SOURCES
- SIDING WOOD SHINGLE BRUSHED CEDAR
- SIDING WOOD SHINGLE INSTALLATION
- STAIN DIAGNOSIS on BUILDING EXTERIORS
- TREES & SHRUBS, TRIM OFF BUILDING
- WOOD SHAKES
Suggested citation for this web page
SIDING, WOOD INSTALLATION at InspectApedia.com - online encyclopedia of building & environmental inspection, testing, diagnosis, repair, & problem prevention advice.
Or see this
INDEX to RELATED ARTICLES: ARTICLE INDEX to BUILDING SIDING
Or use the SEARCH BOX found below to Ask a Question or Search InspectApedia
Ask a Question or Search InspectApedia
Questions & answers or comments about how to install wood siding, clapboards, etc..
Try the search box just below, or if you prefer, post a question or comment in the Comments box below and we will respond promptly.
Search the InspectApedia website
Note: appearance of your Comment below may be delayed: if your comment contains an image, photograph, web link, or text that looks to the software as if it might be a web link, your posting will appear after it has been approved by a moderator. Apologies for the delay.
Only one image can be added per comment but you can post as many comments, and therefore images, as you like.
You will not receive a notification when a response to your question has been posted.
Please bookmark this page to make it easy for you to check back for our response.
IF above you see "Comment Form is loading comments..." then COMMENT BOX - countable.ca / bawkbox.com IS NOT WORKING.
In any case you are welcome to send an email directly to us at InspectApedia.com at editor@inspectApedia.com
We'll reply to you directly. Please help us help you by noting, in your email, the URL of the InspectApedia page where you wanted to comment.
Citations & References
In addition to any citations in the article above, a full list is available on request.
- Best Practices Guide to Residential Construction, by Steven Bliss. John Wiley & Sons, 2006. ISBN-10: 0471648361, ISBN-13: 978-0471648369, Hardcover: 320 pages, available from Amazon.com and also Wiley.com. See our book review of this publication.
- Paul Galow [Website galowconsulting.com ] - technical consultant on networking, LAN design, applications support. Galow Consulting Services [Website galowconsulting.com ] , 914-204-1749, email: paulgalow@galowconsulting.com
- John Rudy, Advantage Home Inspections, Flemington N.J. 08822 home inspector, 908-806- 6364, Home, Radon & Termite Inspections, Central & Parts of North New Jersey, email: jonadvantage1@yahoo.com
- Decks and Porches, the JLC Guide to, Best Practices for Outdoor Spaces, Steve Bliss (Editor), The Journal of Light Construction, Williston VT, 2010 ISBN 10: 1-928580-42-4, ISBN 13: 978-1-928580-42-3, available from Amazon.com
- The Journal of Light Construction has generously given reprint permission to InspectAPedia.com for this article. All rights and contents are ©Journal of Light Construction and may not be reproduced in any form.
- WOOD SIDING INSTALLATION INFORMATION, Application, Priming, Nailing & Pattrn Selection, [PDF] NELMA, Northeastern Lumber Manufacturers Association, Tel: 207-829-6901, Email: info@nelma.org, Website: http://www.nelma.org/, retrieved 2017/05/13,original source: http://www.nelma.org/
- In addition to citations & references found in this article, see the research citations given at the end of the related articles found at our suggested
CONTINUE READING or RECOMMENDED ARTICLES.
- Carson, Dunlop & Associates Ltd., 120 Carlton Street Suite 407, Toronto ON M5A 4K2. Tel: (416) 964-9415 1-800-268-7070 Email: info@carsondunlop.com. Alan Carson is a past president of ASHI, the American Society of Home Inspectors.
Thanks to Alan Carson and Bob Dunlop, for permission for InspectAPedia to use text excerpts from The HOME REFERENCE BOOK - the Encyclopedia of Homes and to use illustrations from The ILLUSTRATED HOME .
Carson Dunlop Associates provides extensive home inspection education and report writing material. In gratitude we provide links to tsome Carson Dunlop Associates products and services.
 | HOME | ABOUT | ASK a QUESTION | CONTACT | CONTENT USE POLICY | DESCRIPTION | POLICIES | PRIVACY | |
| © 2025 - 1985 Publisher InspectApedia.com - Daniel Friedman | |||||||||