
InspectAPedia® FREE Encyclopedia of Building & Environmental Construction, Diagnosis, Maintenance & Repair |
Question? Just ask us! InspectAPedia
|
 Guide to Exterior Wood Finishes, Paints, Stains

- POST a QUESTION or COMMENT about how to choose exterior paints & stains; questions & answers about best methods for applying exterior finishes, paints, stains on buildings.
Buide to choosing & applying exterior paints & stains:
Life expectancy of various exterior paints & stains. Instructions for application of paints & solid stains & Comparing latex vs. oil-based paints (alkyds).
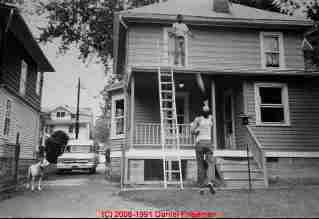
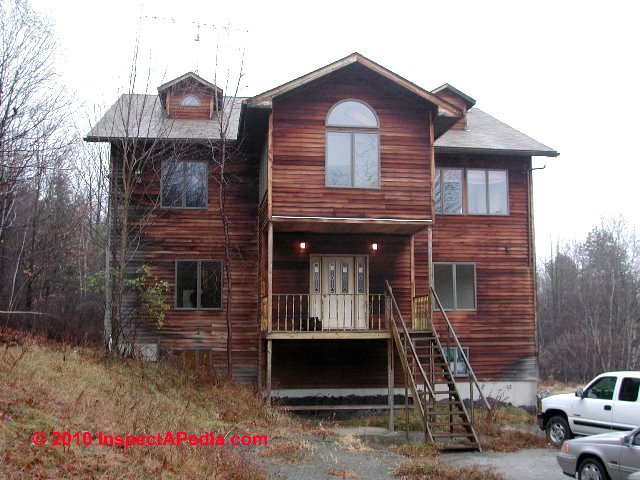
This article explains the selection and proper application of paints and stains on exterior wood surfaces. Page top photo: on the roof, the website author preparing to paint a house on Parker Avenue in Poughkeepsie, NY.
On the ground Ned (the dog) and Art (the guy tossing me a roll of paper towels).
InspectAPedia tolerates no conflicts of interest. We have no relationship with advertisers, products, or services discussed at this website.
A Best Practices Guide to Choosing & Applying Exterior Wood Finishes (Paints & Stains)
 This article includes excerpts or adaptations from Best Practices Guide to Residential Construction (Steve Bliss, J Wiley & Sons) , by Steven Bliss, courtesy of Wiley & Sons.
[Click to enlarge any image]
Article Contents
- PAINT & STAIN GUIDE, EXTERIOR
- MOISTURE IMPACT ON PAINT Paint & stain preparation advice
- EXTERIOR SURFACE PAINTS Which wood species & grains hold paint best?
- SOLID-COLOR STAINS Using solid color stains on wood exterior
- APPLICATION OF PAINTS & STAINS Comparing oil, alkyd, and latex paint characteristics
- DISCOLORATION PROBLEMS Discoloration, mildew, mold on painted surfaces
- EXTRACTIVE BLEEDING & MILDEWED EXTERIORS?
- SEMITRANSPARENT PENETRATING STAINS
- CLEAR & LIGHTLY TINTED FINISHES
- BLEACHING OILS
- UNFINISHED SIDING & TRIM
- EXTERIOR STAIN PRODUCT SUPPLIERS
Our page top photo shows InspectAPedia.com editor D Friedman (on the roof) and partner Art Cady preparing to paint a Poughkeepsie NY house. Ned, Art's dog is supervising from the driveway. Indoors Ned's specialty was flopping down against freshly-painted still-wet baseboard trim and walls.
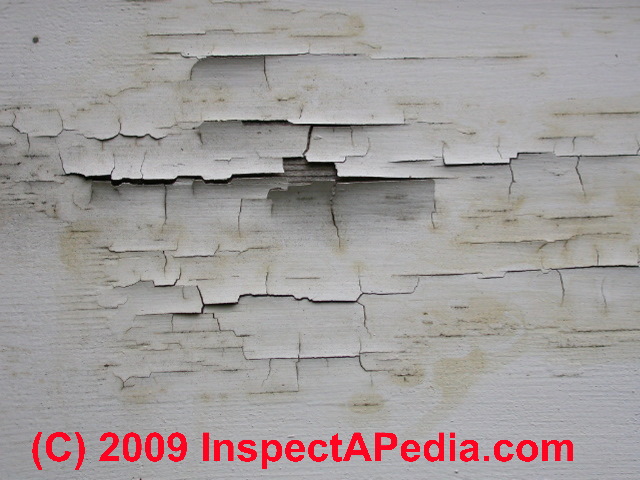
Our photo (above left) shows a failing paint coating on wood clapboards. Notice that the separation is down to bare wood - a diagnostic clue about this early paint failure. According to Best Practices Guide to Residential Construction (Steve Bliss, J Wiley & Sons) :
The USDA Forest Service Forest Products Laboratory (FPL) has done extensive research on how to keep paints and stains on wood sidings and trim.
In general, they recommend paint for the longest lasting finish and best protection of the underlying wood, followed by solid or semi-transparent stains. Clear finishes need the most frequent recoating and offer the least protection from water damage and UV radiation.
How long a paint or stain finish on wood will last depends on many variables, including the quality of the finish, type and texture of wood, application conditions, and exposure. South- and west-facing walls get the most sun and are, therefore, often the first to need recoating.
See this PAINT & STAIN LIFE CHART courtesy of Best Practices Guide to Residential Construction (Steve Bliss, J Wiley & Sons) . Whether painting, staining, or finishing in any manner, the FPL makes the following recommendations:
Odors from paints are also discussed at ODOR DIAGNOSIS CHECKLIST, PROCEDURE.
Moisture Content Impact on Paint Job Success

Never paint wood with a moisture content over 20%. Ideally, the wood should be painted at its average moisture content for that climate—about 12% for most of the United States, 9% for dry southwestern states.
Our moisture meter is shown during a paint failure investigation. Not only is it critical to measure moisture before painting wood, but where the measurements are made is equally critical.
In this case even when the upper wall portions were quite dry and ready for painting, the lower wall, soaked by recent rain splash-up, was still very wet and should not have been painted until later.
The table below gives the recommended moisture content for wood surfaces at the time of painting.

Continuing with building painting advice from Best Practices Guide to Residential Construction (Steve Bliss, J Wiley & Sons) :
Wood Surface Paint Holding Characteristics
A rough-sawn wood surface will hold
paint and stain much longer than a smooth, planed surface,
which is why many contractors prefer to install siding
rough side out. Also most lumber and siding today is flat-grained, which holds paint less well than vertical (or
edge) grained.
The combination of flat grain and planing can create a burnished surface called “mill glaze,” which can cause problems with paint adhesion. To avoid problems, it is best to lightly sand with 50 to 80 grit sandpaper before painting smooth siding. The optimal approach is to first wet the lumber to raise its grain and then let it dry for two days before sanding.
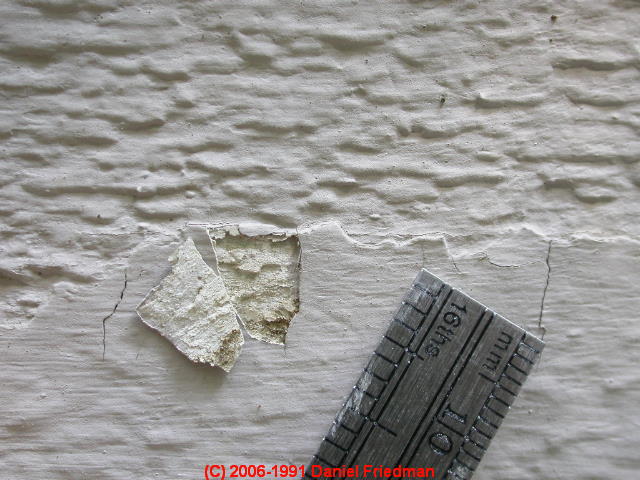
Our photo (left), shows an early paint failure due to improper surface preparation and use of a skim-coat of crack filler over rough-surfaced wood clapboards.
See PAINT SURFACE PREPARATION for details about wood surface preparation before painting. Excerpts are also included in this article, just below.
Weathering Wood Surfaces Before Finishing to Improve Paint Life
Some painters recommend letting smooth siding weather for a few weeks to open up the grain. However, research at FPL has shown that after two weeks of exposure, the wood surface begins to degrade and to loosen the wood fibers on the surface, which weakens the paint adhesion.
The FPL therefore strongly recommends painting within two weeks of installation, whether the rough or smooth side is facing out. If you need to paint wood that is badly weathered, the wood should be sanded, power rinsed, and allowed to dry before priming. Once the primer is dry, the top coat should be applied as soon as possible.
Wood Species and Grain and its Effect on Paint Durability
In general, less dense woods hold paint better than more dense woods. Also, within a single species, vertical-grain (also called edge-grain) wood holds paint much better than the more common flat-sawn lumber, primarily because flat- sawn wood shrinks and swells more from changes in relative humidity.
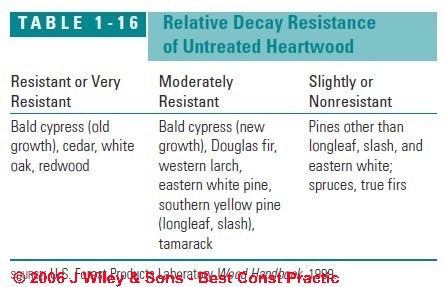
Also vertical-grain wood has narrower bands of latewood, the denser and harder portion of each annual ring in a tree. When paint, particularly oil-based, becomes brittle with age, it tends to peel from the latewood. See the table just below.

Dense woods with wide, flat grain will present the greatest problems in holding paint. This is true for most hardwoods as well as dense softwoods with wide, flat grain, such as southern yellow pine and Douglas fir, especially if planed smooth.
Guide to Choosing Paints for Building Exterior Surfaces
Paints offer wood the greatest protection from the elements and can last from 7 to 10 years if properly applied with one prime coat and two top coats of quality paint. The longevity of a particular job will depend on a number of variables, including paint quality, surface preparation, climate and exposure, and the type of wood.
Choosing Between Latex vs. Oil-Based (Alkyd) Paints for Building Exteriors
What's the Difference Between Traditional Oil-based paint and Modern Alkyd-based Oil Paints?
Older, traditional oil-based paints for both indoor and outdoor used petroleum-based solvents (such as mineral spirits or turpentine) as important ingredients.
To eliminate more toxic petroleum-based solvents and binders used in traditional or historic oil paints, and to reduce the emission of paint-vehicle volatile organic compunds (VOCs) while the paint dries, modern alkyd-paints are substituted for older style traditional oil paints. Most "Oil-based paints" sold today are alkyd products, and in fact you may have trouble even finding an actual oil-based paint.
Also see VOCs VOLATILE ORGANIC COMPOUNDS.
So today if you purchase an "oil based" paint, it is almost certainly going to actually be an alkyd paint.
Contemporary alkyd paints are made using non-petroleum-based oils that have been encapsulated in water. That's why alkyd paints can be cleaned-up with soap and water when the paint is still wet, while oil-based paints require use of a solvent. And because water is used as the paint vehicle, the emissions of petroleum-based VOC's as the paint dries are virtually eliminated.
Alkyd paints make use of a synthetic resin as a binder in the paint - the "oil" in the paint. Alkyd paints may use a vegetable oil rather than the older petroleum-based (and ususally high-VOC) solvents used in traditional "oil paints".
We like alkyd paints for building exteriors and indoors in high traffic areas because alkyd paints are extra resistant to weathering outdoors and surface wear indoors. We also like alkyd paints because of their compatability: alkyd-based paints can generally be applied over either older oil-based painted surfaces or over latex based paints, reducing the need to strip otherwise sound paints from an older building surface.
Alkyd paints, unless a drying agent is added, will dry more slowly (possibly needing 24-hours) than a latex paint (which is another reason they may be preferred by artists).
Comparing "Oil-based" [Alkyd] paints and Latex Paints - continued

In addition to its easy cleanup, latex paint has always held certain advantages over oil.
Perhaps most important, latex paints stay flexible over time while oil-based paints get brittle as they age. This is particularly true of 100% acrylics, which makes them less likely to crack due to seasonal movement of the substrate.
Also, while oil based paint is more resistant to liquid water, latex is more permeable to water vapor, making it less likely to blister in situations where moisture must pass through.
We find [DF] that some painters choose a latex paint for outside use specifically out of concern that a wood surface may not be properly dried, or in hope that faster drying plus tolerance of moisture makes latex paint a safer choice if rain may be imminent.
Latex paint also fades less over time, is not prone to chalking, and is less likely to support mildew growth than oil-based paint.
The best quality latex paints use 100% acrylic binders, offering increased flexibility and durability over latex-vinyl blends.
Oil-based paints, however, are still favored by many professional painters for their better appearance and better adhesion due to the oil penetrating the surface of the wood. Oil paint’s flow characteristics help hide brush strokes and provide better coverage, particularly in high-gloss paints. Also, window sash and doors painted with oil paint dry to a harder finish that is less likely to stick to other painted surfaces.
In the past two decades [to 2010 - Ed.], however, manufacturers have greatly improved the quality of latex paint, overcoming many of the problems associated with it in the past, while oil-based paints have suffered somewhat as manufacturers have had to adjust their formulas to comply with air-quality regulations that restrict the use of VOCs (volatile organic compounds) found in paint solvents.
Since latex now dominates the market in residential paint sales, most development efforts now and in the future will focus on improving latex rather than oil-based paints.
Oil-Based Primers
Many painters still prefer oil [alkyd] as a primer for woods with water-soluble extractives, such as redwood and red cedar, although specially formulated stain-blocking latex primers can also work for this application. Many painters also favor oil primer when repainting over chalky or degraded surfaces because of its penetrating oils and strong adhesion. Painting over high- gloss surfaces also may be easier with oil-based paints.
Finally, oils offer greater temperature flexibility in both hot and cold weather. In hot weather, latex may dry too fast; while below about 50°F, latex should not be used without special additives. Oil-based paints can be safely used to about 40°F. Newer formulations of latex paints, however, promise to extend their temperature range.
SIDING, WOOD CLEANERS, STAINS, PAINTS - a separate article on how to remove stains on siding & how to choose the proper paint or stain coating and we include formulas for bleach solution used to clean wood siding or trim stains
Solid-Color Stains
Solid-color, or “opaque,” stains are not true penetrating stains, since they form a film on the surface of the wood as paint does. In fact, they are formulated the same as paints, only with fewer solids, leaving a thinner, less protective film. They may also contain water-repellents and preservatives. Like paints, they help protect wood from UV degradation; but also like paints, they can peel and blister if applied incorrectly. Most require a primer for best results.
The thinner coating of these products tends to hide the wood grain but allows the wood texture to show through, particularly on rough-sawn siding (see Figure 1-39).
Most solid-color stains sold today are latex-based, which makes them fast-drying and likely to show lap marks if not applied carefully. The most durable latex solid-color stains are 100% acrylic. Oil-based solid stains are sometimes used on redwood and cedar.
Two coats of top-quality latex solid stain over a primer on a solid-wood siding should provide 3 to 7 years of service versus as many as 10 years for an acrylic latex paint of equal quality.
Application of Paints and Solid Stains
Readers should also see PAINT SURFACE PREPARATION for details about preparing building surfaces before painting in order to assure a durable paint job.
The best paint in the world can fail within the first year if applied over a wet, dirty, or degraded substrate. So the first priority is to make sure that the material being painted is sufficiently dry and clean.
Use of Sealers on New Wood Before Painting or Staining - Water Repellent Preservatives (WRPs)
For the best protection of the underlying wood and the longest lasting finishes, bare wood should be sealed with a water-repellent preservative (WRP) before priming and painting or staining. WRPs contain a small amount of wax or other water repellent and a mildewcide, fungicide, or both, usually in a solvent base
. The preservatives help prevent mildew and decay in above-ground applications but are not meant for ground contact. Some WRPs contain UV blockers as well, which slow down the degradation of the outer wood fibers.
While sometimes formulated as a finish treatment for siding, some WRPs can be used as a pretreatment for painting and are recommended for that use by the USDA Forest Products Laboratory (FPL) and Western Wood Products Association (WWPA). Research shows that WRPs resist water entry better than acrylic primers. On bevel siding, they also reduce warping, splitting, and mildew growth.
They can also improve paint performance on hard-to-paint woods, such as southern yellow pine and Douglas fir.
In new construction, the FPL recommends that siding and trim be coated on all sides with a paintable WRP such as DAP Woodlife® or Cuprinol’s Clear Wood Preservative, preferably by dipping or with a brush, roller, or pad.
If the siding or trim is already installed, they suggest treating all places vulnerable to water entry, including door bottoms, window sills, lap and butt joints, edges and ends of trim, and any end grain on panel products such as plywood sidings.
If used as a pretreatment for paint, apply to bare, dry wood when it is above 50°F, and use only a single coat or excess wax buildup on the surface could affect the paint adhesion. Allow two days of warm weather to dry, or up to a week if the material was dipped. If painted before the solvent has evaporated and the wax absorbed, the paint can be discolored and not bond well.
Priming Surfaces is Needed Before Painting a Building
All paints and most solid stains require priming on new wood. Primers are formulated with a higher ratio of binder to pigment than paints. This forms a durable film that bonds well to the surface and blocks water. However, without much pigment, it offers limited UV protection.
For woods with water-soluble extractives, such as cedar and redwood, use an oil-based primer or a stain- blocking acrylic primer formulated to seal in the extractives.
Also use a stain-blocking primer on any knots. Otherwise the extractives can bleed through the finish and stain the siding. For wood species relatively free of extractives, use a 100% acrylic latex primer. If sprayed or rolled on, back brushing is recommended for a good bond.
Many manufacturers now sell siding and trim preprimed. In addition to the convenience for the contractor, the factory-applied coating is applied uniformly without the risk of bad weather or other job-site variables. The only concern is the thickness of the primer. While most major manufacturers of preprimed siding do a good job, some third-party prefinishers may ship material with too thin a coating. In general, the primer should be 1.5 to 2 mils thick—thick enough that it hides the wood grain.
Back Priming Wood Surfaces Before Painting or Staining
Most paint failures are related to moisture moving through the wood either from wind-driven rain that reaches the back of the siding or moisture escaping from the house. In some cases exposed end grain picks up moisture and causes localized peeling. Use of a water- repellent preservative or primer on the back of the siding and on all edges and cut ends, in addition to the visible face, will minimize these problems.
Sealing the wood properly also helps prevent moisture from being driven through the siding by solar radiation.
Advice for Painting Top Coats
For paints and solid stains, apply the top coat as soon as the primer is dry but not more than two weeks later. For best performance, apply two top coats. Latex paints can typically be recoated within a few hours. Oil must cure for one or two days between coats. Apply paint at the coverage recommended on the can. Too thin a coat will wear quickly and too thick a coat may crack.
While brushing provides the best adhesion, a properly done spray job can yield good results. When spraying or rolling, the best results are achieved by back-brushing the paint to help work it evenly into the wood, particularly on rough-sawn surfaces.
Temperature and Time of Day Impact on Paint Job Success
Oil-based paints should be applied when it is over 40°F; for latex coatings the temperature should be at least 50°F during application and for 24 hours after. Also it is best not to apply paint too early or too late in the day. If the dew has not evaporated in the morning, both oil and latex may have adhesion problems. If applied within two hours of sunset and a heavy dew forms before the paint dries, latex paints may streak and oil-based paints may not cure properly.
Painting stucco exteriors in windy or hot sun conditions can lead to early paint failures.
See PAINT on STUCCO, FAILURES for details.
Advice When Painting or Staining Pressure-Treated Wood
Wood that is pressure-treated with waterborne preservatives, such as chromated copper arsenate (CCA), ammoniacal copper zinc arsenate (AZCA), and ammoniacal copper quaternary (ACQ), present special problems for painted finishes.
First, pressure-treated lumber is often shipped to lumberyards with very high moisture contents. If painted while wet, the moisture may get trapped by the paint film and cause peeling. Also the species most commonly pressure- treated—flat-sawn southern yellow pine in the eastern United States and Douglas fir and Ponderosa pine in the West—do not hold paint well to begin with.
Whether or not you intend to paint the wood, pressure- treated exterior trim should be sealed with a water- repellent preservative as soon as the surface is sufficiently dry.
This will protect cut ends and help keep the wood from checking, cupping, and warping as the wood dries out. If this is the only treatment, it will need recoating every one to two years. Factory-sealed treated lumber is now available that only requires treatment of cut ends when installed.
The most common treatment for pressure-treated wood is an oil-based, semitransparent stain. Since this type of finish is relatively permeable to moisture, for best results apply it over a sealer or over factory-sealed lumber. While the sealer can be applied to wood that is still wet inside, it is best to air dry the wood before staining.
This will take from a few days to a few weeks, depending on conditions, with two weeks on average. Two coats of an oil- based, semitransparent stain over a sealer should last several years. The second coat should be applied before the first coat dries completely, or the second coat cannot penetrate the wood.
If a painted finish is desired, you will need to seal the wood first and allow it to dry for two to three weeks before applying a compatible primer and two coats of 100% acrylic top coat. The longer the wood dries, however, the greater the risk that UV radiation will damage the wood surface, interfering with the paint’s adhesion. To avoid these problems and the long delays, consider using kiln- dried treated lumber that can be finished immediately.
Paint or Stain Discoloration Problems on Building Exteriors
at SIDING, WOOD CLEANERS, STAINS, PAINTS - a separate article on how to remove stains on siding & how to choose the proper paint or stain coating and we include formulas for bleach solution used to clean wood siding or trim stains
Readers should also
see STAIN DIAGNOSIS on BUILDING EXTERIORS for details on the diagnosis, cure, or prevention of stains on buildings.
Extractive bleeding and mildew can discolor either bare wood or finished surfaces. They should be removed before finishing or refinishing. After washing, it is important to allow the surface to dry before applying the new finish.
Cleaning & Preventing Extractive Bleeding on Painted or Stained Wood Surfaces
Excess moisture in wood species such as cedar, redwood, Douglas fir, and mahogany can dissolve the natural tannins in the wood and cause them to migrate to the surface, leaving a reddish-brown stain on the finish. Sealers and stain-blocking primers help to minimize this problem but do not always eliminate it.
If staining occurs, the first step is to eliminate the moisture problem. Then, if the extractive bleeding is mild, remove the stains with a mild detergent and water. More severe cases will require cleaning with an oxalic acid solution.
Carefully follow the manufacturer’s instructions when using oxalic acid, as the bleaching solution will harm plants and may bleach existing finishes on siding, trim, and other woodwork. After washing, the oxalic acid must be thoroughly rinsed with clean water and the wood dried before finishing or refinishing. If the extractive bleeding has been allowed to bake in the sun, it may have hardened and be difficult to remove. In this case, you will need to apply a stain-blocking primer before refinishing.
Also see EXTRACTIVE BLEEDING STAIN PROBLEMS on Building Exterior Siding, and see more causal details
at RAIN SPLASH-UP SIDING DAMAGE. And for a photo catalog of building stains
see STAIN DIAGNOSIS on BUILDING EXTERIORS for details on the diagnosis, cure, or prevention of stains on buildings.
"Mildewed" or Moldy Building Exteriors
 Mildew? Really? Speaking accurately, which would be refereshing in politics as well as forensic building diagnosis, there is no mildew found on building surfaces. Mildew, which is comprised of two groups of fungi within the larger class of molds, grows onlyOn living plants: mildew is an obligate parasite that is found, for example, on grapes.
The mildew sub-group of molds includes itself two families: Oidium-Erysiphe (powdery mildew) and Peronosporacae (downy mildew). But in both cases, these grow only on living plants.
So if you see what you think is mildew
On a building exterior, unless the exterior is made of living plants like grapes, it's mold, but it's not not mildew. However because the terms mildew and mildewcide are used very widely among the building trades we have permitted that topic name in this article.
To learn more about mildew and to see photos of what real mildew looks like see our mildew (and some mold) photos
Also see our definitions of mildew
and finally, see MILDEW REMOVAL & PREVENTION.
As we discuss at STAIN DIAGNOSIS on BUILDING EXTERIORS, Algae or Mold Stains on Building Siding may be due to a combination of shade, moisture, and a building surface that uses a material or coating that is particularly conducive to algae or mold growth.
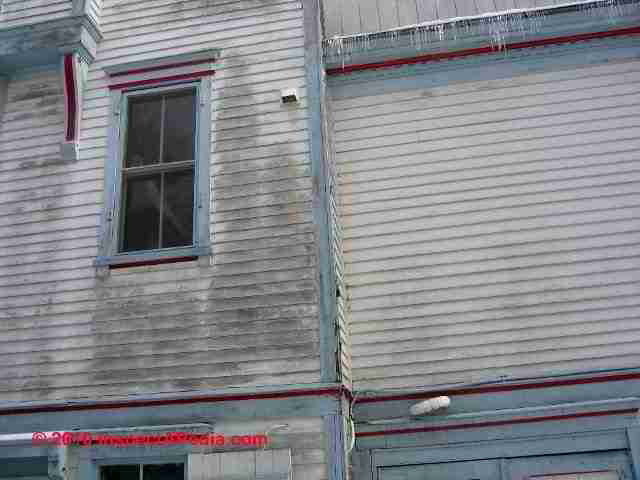
Our photo (above, left) shows black staining on painted wood clapboards on an older building in New York state. Without closer examination and maybe a lab test, we're not sure if the black stains are algae or a mold, but in either case the causes are the same: moisture, shade, and from the stain pattern, possibly the absence of insulation and a moisture barrier in the wall structure.
Also see VAPOR BARRIERS & CONDENSATION in buildings.
Various species of outdoor mold will grow on just about any surface with sufficient moisture and heat. In new construction, it can be minimized by storing wood off the ground and providing adequate ventilation.
[See Offermann, Francis (Bud) J., P.E., C.I.H., ASHRAE & Mark Nicas, Ph.D., MPH, C.I.H., USE WITH ADEQUATE VENTILATION ? [PDF], ASHRAE Journal, May 2018]
Although sealers and stains contain a mildewcide, any mildew should be removed before finishing or refinishing, or it will continue to grow through the new finish.
How to Use Household Bleach to Remove Mold Before Painting
To remove mold ("mildew") from building surfaces, use a sodium hypochlorite solution, which can be made with household chlorine bleach.
Depending on the severity of the problem, the solution
should range from 1 to 8 parts of water to 1 part bleach (usually we use a dilution of 1 part bleach to 4 parts of water).
Spray the solution onto the siding (avoid sprayers with aluminum parts), starting at the top and working down. If two applications do not remove the stains, you may need to scrub in the solution with a brush.
Thoroughly rinse everything with water.
Watch out: be sure to thorughly remove the bleach solution during your rinse operation. Bleach left on a surface can cause paint failure.
Bleach can harm plants, discolor the finishes on trim, and corrode aluminum, brass, and copper. It is best to cover plants with tarps and protect any stained or painted surfaces.
Details about using bleach to clean moldy surfaces are
White Blotches or Blooms in Paint on Exterior Stucco
Painting over high pH surfaces (over pH of 11), or over moisture, both conditions found when new stucco is insufficiently cured can lead to white blooms or efflorescence on the painted surface as well as a short life of the paint job as our photo shows (left).
See PAINT on STUCCO, FAILURES for an explanation of white blotches or white bloom that appears on painted stucco building surfaces.
Also see see PAINT FAILURE, DIAGNOSIS, CURE, PREVENTION for a complete inventory of causes and signs of types of paint failure on buildings.
Guide for Using Semitransparent Penetrating Stains on buildings
Most semitransparent stains are oil-based, and they penetrate the surface of the wood. They have a moderate level of pigment that offers some UV protection and provides some color without hiding the wood grain. Because these stains do not form a film on the surface, they are not subject to blistering and peeling like paints and solid-based stains.
Penetrating stains last longer on rough than on smooth siding materials. One coat of oil-based penetrating stain on rough-sawn siding or plywood will last two to five years, depending on exposure and other variables; two coats may last as long as seven or eight years. In general, subsequent coats last longer than the first coat because the weathered wood will accept more stain. For decks, steps, or other wood subject to foot traffic, use a special deck stain formulated with better abrasion resistance (see “Finishes for Decking,” page 154).
Like paints, penetrating stains can be applied by brush, spray, or roller. If sprayed or rolled on, back-brushing will improve the penetration and performance. Also spraying without back-brushing can cause a splotchy appearance. If two coats are desired, apply the second coat before the first has fully dried or the second coat will not be able to penetrate the surface.
Because oil-based stains are thin and dry quickly, lap marks may form if the applicator is not careful to maintain a wet edge. It is best to work on a small area at a time and, if possible, to work in the shade to extend the drying time.
Guide to Clear and Lightly Tinted Finishes for Building Surfaces
Some customers want to retain the look of “natural” wood siding, particularly with the warm-toned hues of premium red cedar or redwood. Unfortunately, there is no finish that will magically preserve the look of new wood.
Wood turns gray as UV radiation degrades the outer surface and as mildew spores develop. Clear water-repellent preservatives (described under “Sealers,” previous page) with UV blockers can slow down this natural aging process, but will need to be reapplied every year or two to keep the wood from turning a weathered gray.
To retain the tone of new wood, the best approach is to use a WRP or penetrating oil with UV blockers and a tint added to match the redwood or cedar. Amteco’s Total Wood Protectant (TWP®), Flood’s Clear Wood Finish (CWF®), and Penofin® (Performance Coatings Inc.) are proprietary formulations designed to maintain a natural wood appearance.
A similar product called Sikkens Translucent Cetol® (Akzo Coatings) darkens the wood somewhat and creates a thin film, but it does not peel like paint or varnish. Apply one to three coats, according to the manufacturer’s recommendations. Even with “one-coat” finishes, a second coat may be worthwhile on south or southwest sides of the building due to increased UV exposure.
If applied correctly, a high-quality tinted finish can keep redwood or cedar siding looking close to new for three to five years. Before recoating, you may need to clean the siding with a bleach solution to remove any mildew and dirt that has started to discolor the siding. After cleaning, another coat of the original finish should restore the new wood look for another three to five years.
Guide to Using Bleaching Oils on Cedar Shingle Exteriors
In some regions, homeowners like the silver-gray, weathered look of unfinished cedar shingles, but they do not want the splotchy, uneven coloring that sometimes results from uneven wetting and sun exposure. Bleaching oils solve this problem by combining a lightly pigmented semitransparent stain with a bleaching agent. Initially, the pigment colors the wood a silver-gray color, and over time, the bleach lightens the underlying wood to a uniform color.
The uniform weathered look can last for a number of years, but the oil and pigments in the original finish protect the wood for only two or three years.
Beyond that, a clear water-repellent preservative can be used periodically to protect the wood from UV degradation and decay. If, after several years, the siding begins to darken or lose its uniform appearance, another coat of bleaching oil should restore the original look.
Decay Resistance of Unfinished Siding and Trim
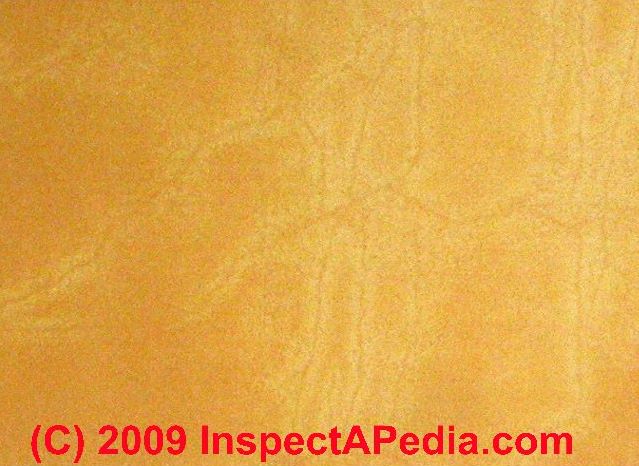
Our photo of a wood clapboard house in upstate New York (left) shows the very uneven color changes from natural weathering. Notice those gray areas along the home's left side and lower right corner, and trace the color difference to where water is spilling on the building walls
Due to their high level of extractives, the heartwood of some species is naturally resistant to decay and insects and can be used on the exterior unfinished. The woods most commonly used this way are western red cedar, northern white cedar, redwood, and bald cypress (see Table 1-16 below).
In salty coastal air with good exposure to sunshine, untreated wood tends to weather to an attractive silver gray. In other regions, uneven staining from mildew is likely. Even in coastal regions, areas of the house that get frequent wetting from splashback, snow, or other types of weather exposure may become darkened from mold.
See "MILDEWED" or Moldy Building Exteriors - no, it's mold. Or something else.
Also see more causal details
at RAIN SPLASH-UP SIDING DAMAGE.
Guide to Selecting Wood Siding or Trim to be Left Unfinished
Also, the wood extractives do nothing to prevent cupping, warping, or cracking from uneven absorption of moisture.
For a uniform appearance without leaving the results to chance, it is best treat the wood with a WRP or bleaching agent.
SIDING, WOOD CLEANERS, STAINS, PAINTS - discusses how to remove stains on cypress siding & how to choose the proper paint or stain coating
Exterior Building Finish Product Suppliers
Suppliers of building paper, flashing tapes, prefab cedar panels, fiber cement siding and trim, exterior insulation and finish systems (EIFS), hardboard trim, polyurehtane trim, cellular polyvinyl chloride (PVC) trim, exterior adhesives, water repellent preservatives, and clear wood finishes as well as trade associations are listed at the end of Chapter 1 of Best Practices Guide to Residential Construction (Steve Bliss, J Wiley & Sons) , [book cited atReferences or Citations ] by Steven Bliss and are also found
at SUPPLIERS OF EXTERIOR PAINT & STAIN PRODUCTS
Question: applying stain on all sides of wood to reduce problems from water and insects
(Oct 3, 2014) Lowell Garner said:
I am building a house and installing an exterior pine closed soffit (T&G 3/4" x 4" planks). I want to protect this from water contact and carpenter bees. Do I apply a Miniwax stain on the face or both sides? Do I need to seal with polyurethane on the face of both sides? I'd like this soffit to need as little maintenance as possible. Thanks.
Reply:
Lowell
I agree that coating all sides of wood with any stain, sealant, or paint will improve its resistance to water. It's not a carpenter-bee barrier however.
Steps to keep water out of the soffit need to address ice dams and gutter snafus too.
Question: spray vs roll vs brush on solid stain on a building exterior
(June 1, 2015) loretta said:
Sherman Williams Wood Scape solid stain. Best way to apply to barnboard on barn. Is it okay to spray and roll. How do you not get lines on a huge wall that is also very tall?
Reply:
Loretta
When Art and I painted the house in the photo at the top of this page we used a combination of spray and roller and brush.
The spray got the coating onto the surface and under edges far faster than we could apply it by brush or roller (though more time was needed for masking off windows etc.). One of us sprayed, the other moved behind with roller and brush working the paint into the surface and evening it out.
The result was superior to spray-only, and about 5 times easier and faster than roller and brush alone.
You may indeed see lines when painting a large area if the area coated dries and the abutting area overlaps the first one giving a double thickness in just that area.
It's a worse problem in "one-coat" paint jobs than if two coats are to be applied. You can avoid this by learning how to feather out both the edges of the first section painted and to feather-in the edges of the second abutting section painted.
Don't fall off your ladder. It's not the fall that hurts it's the sudden stop.
Question: how to paint on a weathered look on wood shingles
(Sept 22, 2015) J pioppi said:
My home has painted white shingles in front and sides are painted shingles burgundy. I would like to achieve a painted "weathered " look with white paint. Is that possible? Thank you.
Reply:
JP
Possible sure, using artistic techniques and a blend of brush stroke and color choices.
You'd first have to define "weathered" look so that the painter knows what you want. Second you might want to look at the cost of such a custom paint-job. I expect it's double a conventional painting cost, before considering costs of surface preparation.
Research on Exterior Paint for Buildings
- ALGAE, FUNGUS, LICHENS, MOSS
- MOISTURE CONTENT TARGETS for Wood Siding on buildings
- Biblis, Evangelos J. "Effect of weathering on surface quality and structural properties of six species of untreated commercial plywood siding after 6 years of exposure in Alabama." Forest Products Journal 50, no. 5 (2000).
- Cassens, Daniel L., and William C. Feist. Selection and Application of Exterior finishes for Wood. Vol. 135. Cooperative Extension Service, Purdue University, 1988.
- Feist, William C., and A. E. Oviatt. "Wood siding: installing, finishing, maintaining." [PDF] Home and garden bulletin 203. US Dept. of Agriculture, Forest Service. Forest Products Laboratory, 23 pages (1983).
- Stayton, Charles L. "Painting the Exterior Wood of Your Home." [PDF] Leaflet/Texas Agricultural Extension Service; no. 984. (1990).
Abstract:
Painted wood siding and trim add color and beauty to the exterior home surface and provide protection against weathering. Proper wood products and paint selection, as well as proper surface preparation and finish application, will make this pleasing appearance last longer. - USDA WOOD SIDING INSTALLING FINISHING MAINTAINING [PDF] United States Department of Agriculture (1975) retrieved 2019/09/27 original source: https://naldc.nal.usda.gov/download/CAT75667271/PD
- U.S. Forest Products Laboratories, WOOD SIDING– INSTALLING, FINISHING, MAINTAINING [PDF] US FPL 1983, retrieved 2018/12/25, original source: https://www.fpl.fs.fed.us/documnts/usda/hgb203.pdf
- Also see additional citations atReferences or Citations
...
Continue reading at PAINT / STAIN SELECTION & PROCEDURES or select a topic from the closely-related articles below, or see the complete ARTICLE INDEX.
Or see these
Recommended Articles
- EXTERIOR WALL SIDING TRIM & FINISHES
- PAINT FAILURE, DIAGNOSIS, CURE, PREVENTION - home
- PAINT REMOVAL BRICK or STONE
- PAINTING MISTAKES
- SIDING EIFS & STUCCO - home
Suggested citation for this web page
PAINT & STAIN GUIDE, EXTERIOR found at InspectApedia.com - online encyclopedia of building & environmental inspection, testing, diagnosis, repair, & problem prevention advice.
Or see this
INDEX to RELATED ARTICLES: ARTICLE INDEX to PAINTS & STAINS & FAILURES
Or use the SEARCH BOX found below to Ask a Question or Search InspectApedia
Ask a Question or Search InspectApedia
Questions & answers or comments about how long paint or stain should last on a building exterior surface.
Try the search box just below, or if you prefer, post a question or comment in the Comments box below and we will respond promptly.
Search the InspectApedia website
Note: appearance of your Comment below may be delayed: if your comment contains an image, photograph, web link, or text that looks to the software as if it might be a web link, your posting will appear after it has been approved by a moderator. Apologies for the delay.
Only one image can be added per comment but you can post as many comments, and therefore images, as you like.
You will not receive a notification when a response to your question has been posted.
Please bookmark this page to make it easy for you to check back for our response.
Our Comment Box is provided by Countable Web Productions countable.ca
Citations & References
In addition to any citations in the article above, a full list is available on request.
- Steve Bliss's Building Advisor at buildingadvisor.com helps homeowners & contractors plan & complete successful building & remodeling projects: buying land, site work, building design, cost estimating, materials & components, & project management through complete construction. Email: info@buildingadvisor.com
Steven Bliss served as editorial director and co-publisher of The Journal of Light Construction for 16 years and previously as building technology editor for Progressive Builder and Solar Age magazines. He worked in the building trades as a carpenter and design/build contractor for more than ten years and holds a masters degree from the Harvard Graduate School of Education. Excerpts from his recent book, Best Practices Guide to Residential Construction, Wiley (November 18, 2005) ISBN-10: 0471648361, ISBN-13: 978-0471648369, appear throughout this website, with permission and courtesy of Wiley & Sons. Best Practices Guide is available from the publisher, J. Wiley & Sons, and also at Amazon.com - Suppliers of Exterior Paint & Stain Products
- Water-Repellent Preservatives (WRPs)
- Cuprinol www.cuprinol.com Cuprinol Clear Wood Preservative
- Dap www.dap.com DAP Woodlife
- Wolman www.wolman.com Premium Water-Repellent Sealer
- Clear Wood Finishes
- Amteco www.amteco.com Total Wood Protectant (TWP)
- The Flood Company www.floodco.com Clear Wood Finish (CWF)
- Performance Coatings Inc. www.penofin.com Penofin wood finishes
- Sikkens/Akzo Nobel www.nam.sikkens.com Sikkens Cetol finishes<
- For More Information on Building Practices for Exterior Wall Products
- California Redwood Association www.calredwood.org
- Cedar Shake and Shingle Bureau www.cedarbureau.org
- USDA Forest Products Laboratory (FPL) www.fpl.fs.fed.us
- Vinyl Siding Institute www.vinylsiding.org
- Western Wood Products Association (WWPA) www.wwpa.org
- In addition to citations & references found in this article, see the research citations given at the end of the related articles found at our suggested
CONTINUE READING or RECOMMENDED ARTICLES.
- Carson, Dunlop & Associates Ltd., 120 Carlton Street Suite 407, Toronto ON M5A 4K2. Tel: (416) 964-9415 1-800-268-7070 Email: info@carsondunlop.com. Alan Carson is a past president of ASHI, the American Society of Home Inspectors.
Thanks to Alan Carson and Bob Dunlop, for permission for InspectAPedia to use text excerpts from The HOME REFERENCE BOOK - the Encyclopedia of Homes and to use illustrations from The ILLUSTRATED HOME .
Carson Dunlop Associates provides extensive home inspection education and report writing material. In gratitude we provide links to tsome Carson Dunlop Associates products and services.
 | HOME | ABOUT | ASK a QUESTION | CONTACT | CONTENT USE POLICY | DESCRIPTION | POLICIES | PRIVACY | |
| © 2024 - 1985 Publisher InspectApedia.com - Daniel Friedman | |||||||||