 Best Practices Guide Exterior Adhesives & Glues for Buildings
- POST a QUESTION or COMMENT about construction glues & adhesives
Exterior glues & adhesives, sealants, repair epoxies.
This article series discusses best practices construction details for building exteriors, including water and air barriers, building flashing products & installation, wood siding material choices & installation, vinyl siding, stucco exteriors, building trim, exterior caulks and sealants, exterior building adhesives, and choices and application of exterior finishes on buildings: paints, stains.
InspectAPedia tolerates no conflicts of interest. We have no relationship with advertisers, products, or services discussed at this website.
- Daniel Friedman, Publisher/Editor/Author - See WHO ARE WE?
Exterior Building Adhesives & Glues: Product Choices, Installation Details
Table of Exterior Glues & Adhesives: Types, Properties, Applications
Portions of this article were adapted/paraphrased and used with permission from Best Practices Guide to Residential Construction (Steve Bliss, J Wiley & Sons) by Steven Bliss.
Watch out: No exterior millwork should rely entirely on adhesives,
since no glue is 100% waterproof, and any adhesive can
fail with enough moisture cycling and movement in the
wood. It is always wise to back up an exterior glue joint
with mechanical fasteners, design the woodwork to shed
water, and protect it with a good paint job. Still, there are
several good options for gluing exterior work that should
last indefinitely if well maintained (see Table 1-14) given just below. Also
see CAULKS & SEALANTS, EXTERIOR
[Click to enlarge any image].
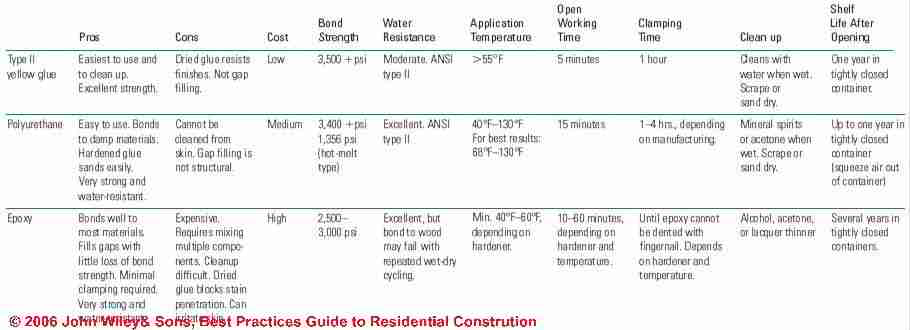
There are several factors to consider in selecting a glue. For exterior woodwork, the biggest concerns are typically water resistance, strength, and cleanup. Working temperatures, clamping time, and gap filling abilities may also be important, depending on the specific job and conditions.
A glue’s water resistance is classified as Type I or Type II.
A Type I adhesive designation indicates that the glue bond can survive repeated submerging in boiling water. Type 1 glues are used for laminating structural timbers such as glulams. The most common Type 1 glue, resorcinol, has strict temperature and clamping requirements and is rarely used on residential job sites.
Type II glues must maintain their bond after being soaked for four hours and then dried three successive times. These are suitable for all but the most punishing residential applications.
Guide to Polyurethane Glues and Adhesives on Building Exteriors
One-part polyurethane glues have grown in popularity over the past few years due to their excellent strength and increased water resistance compared to yellow glue. Since polyurethane requires moisture to cure, it will bond to wood that has up to 25% moisture content.
For wood that has less than 10% moisture content or appears dry, you should moisten one of the two surfaces being joined with a sprayer or damp cloth and apply a thin coating of glue to the other. Polyurethane bonds well to wood, stone, most metals (not stainless steel), and ceramics, as long as at least one of the surfaces being glued is porous.
Polyurethane foams up as it cures, expanding to three to four times its original size and filling any small gaps in the joint. But unlike epoxy, the filled gaps have no strength. Clamping time is one to four hours, depending on the specific formulation. For maximum strength, clamp for 24 hours.
Because of its tenacious grip, you should protect any materials or finished surfaces from drips and protect your hands with latex gloves, as the glue cannot be removed except by abrasive cleansers.
If wet glue drips onto a finished surface, wipe with a dry cloth, since anything wet will activate curing. After the glue has dried, scrape away the squeeze-out with a sharp chisel and sand any residue. The glue dries to a brownish tan, which can be painted.
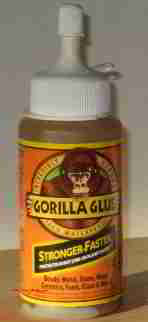
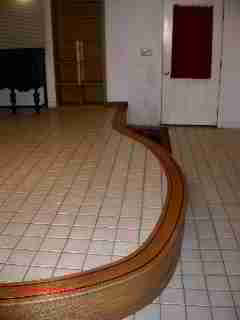
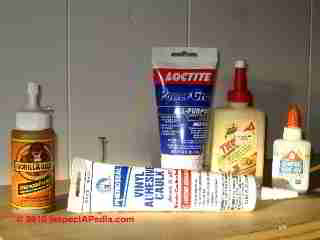
OPINION-DJF: we really enjoy almost everything about Gorilla Glue (photo above), and have used it very extensively in both repair (it will expand and secure a wobbly chair leg) and in construction indoors and out. Our favorite indoor project using this glue was building site-built built-up custom curved trim. Our photos (below) show the an in-process stage of constructing custom wood trim in a home as well as the finished result after sanding and finishing.
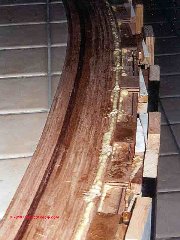
We ripped and planed a mix of Brazilian cherry and white oak into narrow strips that were bent to shape, glued, and clamped in place. Critical was to use enough wedges and later clamps to be sure that our wood strips remained closely aligned with no open gaps during drying.
We cut away the flue overflow after it dried, by hand, using a sharp chisel. A final sanding with an orbit sander and a router to round the edge of our curved trim/stair was all that it took to produce a beautiful end product.
What's not to enjoy: working wearing protective plastic gloves proved impossible - as soon as the gloves got sticky with glue it was impossible to pick up anything. Working bare-handed means you will have glue on your hands for several days. Washing the dishes in the kitchen sink every day will speed wearing off of this ooky mess.
Continuing from from Best Practices Guide to Residential Construction (Steve Bliss, J Wiley & Sons) :
Using Epoxy Glues and Adhesives on Building Exteriors
Long the adhesive of choice for boat builders, epoxy has high adhesive strength and rigidity, low shrinkage, and good resistance to water and chemicals. It bonds well to wood, concrete, foam insulation, and other porous substrates—and to nonporous surfaces as long as they are lightly roughed up.
epoxy is comparable in strength and water resistance to polyurethanes, requires minimal clamping, and can fill gaps with little loss of strength, making it an ideal choice for less-than-perfect carpentry joints.
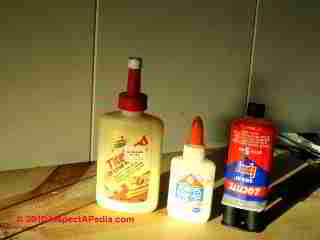
In our photo (left) an example of Loctite™ Epoxy is on the right.
As a two-part system—with various hardeners to choose from and additives such as fillers to improve gap filling—epoxy is also the most complicated and costly approach. Once the resin and hardener are mixed, the working time ranges from about 10 minutes to an hour, depending on the ambient temperature and whether a slow or fast hardener is used.
Heat speeds up the curing, so a slow hardener is recommended in hot weather, a fast hardener in cold weather. It is important to mix the correct proportions and mix thoroughly or un reacted resin or hardener may remain in the cured epoxy.
For best results, use a disposable brush to coat both sides of the joint with liquid epoxy. After coating the joint, add fillers to the mix if required. Fillers change the viscosity of the mix and enable it to bridge gaps with minimal loss of strength (you can bridge small gaps up to about 1/16-inch without fillers).
A small amount of filler helps keep the mix from running. Once the fillers have been added, apply the thickened epoxy to one side of the joint and clamp just enough to squeeze out a little epoxy. A common mistake with epoxy is clamping too tightly. This will create a weak, “glue-starved” joint. Cleanup of the wet epoxy requires solvents such as acetone or lacquer thinner. Workers should use rubber gloves to protect their skin.
Any kind of clamping that holds the joint still is suitable, including staples, nails, or wood screws. Scrape off any squeeze-out with a putty knife or dry rag. Once the epoxy has cured to a solid state that cannot be dented with a fingernail, it has reached 90% of its final strength. Then the clamps can be removed and any excess sanded off. The epoxy continues to gain strength for several days and is paintable.
Hot Melt Glue Uses in Construction
Where clamping is not practical, another option is hot melt polyurethane. Hot-melt polyurethanes have been used in industrial settings for many years, but they have only recently been introduced for job-site use.
Unlike its moisture-cured cousin, hot-melt polyurethane does not foam up and needs no clamping.
It sets in about 30 seconds and provides the same level of water resistance as regular polyurethane but less than half the strength.
Still, this is more than enough for many applications. Remove any squeeze-out with a putty knife or scraper as soon as it firms up, as it is difficult to sand clean.
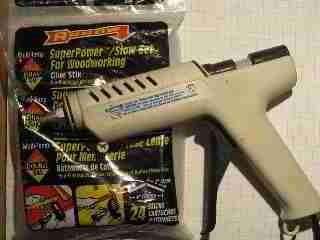
Hot melt glues are sold in a variety of formulations and colours and can be used on both porous and non-porous surfaces.
Watch out: getting hot melt glue on your fingers is likely to result in an unpleasant burn. Hotmelt glues flow from a low-melting-temperature glue gun at about 250°F and from higher temperature hotmelt glue guns at 380°F.
Guide to Super Glue for Exterior Applications
Since Steve's original chapter on exterior glues and adhesives was penned (ok well types), several of the stunning superglue producers have developed super glue products that perform well in outdoor or "exterior" applications.
Super glues are technically cyanoacrylate adhesives (of the formula Ethyl cyanoacrylate). These glues dry clear, bond very quickly, and are very strong provided that you follow the manufacturer's instructions and provided that the surfaces are suitably smooth. Slow-setting super glues and gel type superglues are adaptations of the original product that can make working with super-glue easier. Super glues are available for bonding a wide range of products, even concrete, steel and wood.
Common names for these instant bonding adhesives inclulde Krazy Glue and Superglue (the original), and pegamento instante.
Watch out: if using a super glue in a construction application choose the proper glue product for the materials your are bonding and also for interior or exterior use. Some cyanoacrylate adhesives super glues, but not all, are suitable for exterior use.
Exterior rated super glues include (this is not a complete list) LePage® Gel Control ® Super Glue, LePage® Ultra Gel Control® Super Glue, Loctite® Super Glue ULTRA Gel Control™ ,
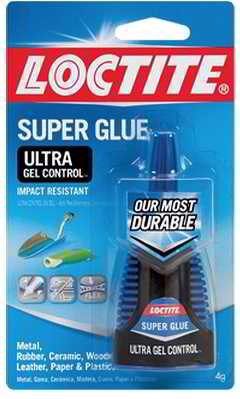
An example of an exterior-rated super-glue is Loctite® Super Glue Ultra Gel Control™ shown at left and described by the company as follows:
Loctite® Super Glue ULTRA Gel Control™ is a specially formulated rubber toughened instant adhesive that resists impact, shock, vibration and temperature extremes. It is ideal for bonds subject to daily use and harsh conditions.
The Rubber Toughened Formula is also Outdoor Safe and gives more time to align pieces before the glue takes hold. Loctite® Super Glue ULTRA Gel Control™ comes in a patented side-squeeze design for maximum control and air-tight storage. It dries clear and sets without clamping.
Loctite® Super Glue ULTRA Gel Control™ is resistant to moisture and freezing temperatures. - retrieved 18 Feb 2015, original source: loctiteproducts.com
Watch out: getting superglue in the eye can result in a serious eye injury "ocular superglue injury" (McLean 1997 and others) as we cite atReferences or Citations
Watch out: superglue bonds instantly to the skin (Daniell 1997 and others). Getting super glue on your fingers can result in tearing of skin before you can pry your hands apart. This substance would in special and personal appications be more effective than the famous astringent mother-in-law plant, but for legal reasons (we have no liability insurance) we don't recommend its application on a human being unless that use is for medical purposes and supervised by a physician.
Superglues used in Medical Applications are Different
Superglue in a somewhat different molecular structure (Dermabond Advanced™ [2-Octyl cyanoacrylate] or Histoacryl® Topical Skin Adhesive Butyl cyanoacrylate]) has indeed been used in wound closure and in reconstructive surgery by orthopedic surgeons.
Kennedy (1994) warned that superglues used in medical applications are similar but not identical to those used to glue your hat-band back on. Legat (2004) discusses the use of superglue in the dental field. And though manufacturers rightly warn about eye injury from getting superglue in your eye, there are also medical applications using superglue of the Dermabond type in sealing clear corneal cataract sounds (Rittterbrand 2005).
Report of use of superglue to fix Jim's broken spine
Our friend Jim Kelly was shopping when he bent over the meat cooler. He woke up in hospital. A soda delilvery operator had toppled an overloaded hand truck of soda onto Jim, breaking his back and leaving Jim unconscious. Jim's orthopedic surgeon, in an emergency procedure, used super-glue in the course of repairing damage to Jim's spinal column and remarkably, he was up and walking the next day. (Actually all of them were up and walking the next day, but the soda delivery operator was, we heard, walking the sidewalks looking for a new job.)
Watch out: while some super glues have been specially formulated for use on foamed plastics, most don't work on soft or foamed plastics such as insulating board. For gluing foam board a construction adhesive recommended by the insulating board manufacturer will work and is suitable, for example, when gluing foam board insulation to a basement foundation wall. Spray adhesives can also work for affixing foam board insulation to building surfaces.
Non-cyano-acrylate Super Glue Alternatives Offer Additional Bonding Properties
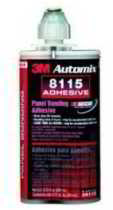
3M Corporation offers 3M Super Fast Flex Repair, a 20-second set urethane adhesive that "repalces cyanoacrylates". 3M says that their urethane adhesive will not crack or become brittle like cyanoacrylates and that it bonds to virtually anysubstrate with excellent gap filling properties for bonding small parts.
Above: 3M Automix 8115 fast-set urethane adhesive.
Fast setting epoxies also can be an alternative to superglue for some bonding alternatives.
Guide to Type II Yellow Glue on Building Exteriors
Polyvinyl acetate (PVA) is the most common glue on residential job sites due to its low price, long shelf life, easy cleanup, and overall ease of use. The Type II version provides good water resistance and provides a very strong bond, and it is only slightly more expensive than the regular yellow glue.
In our photo (left) the yellow Titebond™ glue (at left in the photo) is suitable for the applications discussed here. While Elmers™ also makes a yellow Type II glue, do not use the white "school glue" shown in the center of our photograph for construction purposes. White school glue lacks water resistance and strength and won't work outdoors.
Similar to the older style white glue, yellow glue is formulated with a higher solids content to make it less runny and with other additives to make it set up quicker. Clamp time is about one hour. Any squeeze-out is simple to remove with a damp rag. Once the glue dries, however, it will resist paint and stain and needs to be scraped or sanded off.
In general, yellow glue should not be applied in temperatures below 50°F or allowed to freeze before it cures. In freezing weather, store the glue indoors, since a couple of freeze-thaw cycles may ruin the glue. For exterior work subjected to moderate weather exposure, Type II yellow glue is a good option.
Uses for White Craft Glue
Watch out: White Craft Glue, which in some cases such as Elmers' glue products is sold in a similar-looking bottle is white in color, not yellow, and is not suitable for outdoor applications. Because white craft glues use water as the solvent and carrier for the adhesive, these glues are easy to clean-up during use, are low in toxicity, and are often used in crafts and projects in schools and for children.
White glues or "craft glues" are intended for gluing light, porous materials such as cardboard, cloth, and paper and are not suitable for general construction indoors nor outside.
What's the difference between Type I Yellow Glues and Type II Yellow Glues?
Type I yellow glue is rated for interior use only. Type II yellog glues can be used outdoors.
Watch out: Yellow wood glue, discussed just above, may be sold in both interior-use and exterior-use applications. Interior-use yellow glues are also water-based and use adhesives simlar to those used in white craft glue (vinyl acetate polymers) but are stronger and may be suitable for interior use in buildings such as gluing trim. However a Type I yellow glue that is not marked as "for exterior use" should not be used outdoors.
- - Portions of this article were adapted and used with permission from Best Practices Guide to Residential Construction (Steve Bliss, J Wiley & Sons) .
Where to Buy Exterior Glues & Sealants
Construction Sealant (Caulks) Suppliers & Products
- Chemrex www.chemrex.com
Polyurethanes and other high-performance sealants
- DAP www.dap.com
- Acrylic latex caulks
- Dow Corning Sealants www.dowcorningsealants.com
- Silicone sealants
- GE Silicones www.gesilicones.com Silicone sealant
- Geocel Corp www.geocelusa.com Acrylic latex, tripolymer, copolymer, Kraton, and clear sealants
- Macklanburg-Duncan www.mdteam.com Acrylic latex sealants
- OSI Sealants Inc www.osisealants.com Polyseamseal PVA-based caulk. Pro Series includes latex, polyurethane, and Kraton sealants.
- www.phenoseal.com Phenoseal vinyl adhesive caulk
- Red Devil www.reddevil.com Acrylic, silicone, and butyl sealants
- Sashco Sealants www.sashco.com Big Stretch and Mor-Flexx water-based sealants, Lexel Kraton sealant
- Sika Corp www.sikaconstruction.com Complete line of Sikaflex polyurethane-based sealants, butyl sealant
- Tremco Inc. www.tremcosealants.com High-performance, architectural-grade sealants,
- UGL www.ugl.com Acrylic latex caulks
- White Lightning www.wlcaulk.com Tripolymer, butyl, polyurethane, silicone, elastomeric, and other high-performance sealants
Exterior Adhesives & Repair Epoxies for Concrete or Wood
Some of these epoxies can be used for structural repairs of concrete or wood or other building materials.
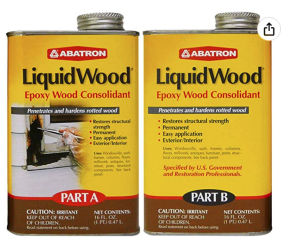
Above: Abatron's Liquid Wood is a penetrating epoxy that we have used to penetrate and destroy rotted or insect-damaged wood.
- ABATRON EPOXY WOOD REPAIR / RESTORATION 5501 - 95th Avenue, Kenosha, WI 53144 USA Tel: (262) 653-2000
Fax: (262) 653-2019, For orders: (800) 445-1754 Web: http://www.abatron.com
Abatron provides a wide range of wood & building restoration epoxy products including a low-viscosity system that penetrates and solidifies rotted wood and a thicker wood repair putty type epoxy.
- Ambel www.excelglue.com Excel polyurethane glue
- Epoxy, BestBond polyurethane glue
- Elmer’s Products www.elmers.com Yellow glues, ProBond polyurethane glue
- Custom-Pak Adhesives www.custompak.com Resorcinol and yellow glues
- DAP Inc. www.dap.com Weldwood contact cement, resorcinol, and construction adhesives Resources 49
- Franklin International www.titebond.com Titebond yellow glue, Liquid Hide Glue, and construction adhesives
- Gloucester Co. Inc. www.phenoseal.com Phenoseal adhesive caulk
- Gougeon Brothers www.westsystem.com West System epoxy
- Gorilla Group www.gorillaglue.com Gorilla® polyurethane glue
- Krazy Glu®e, 460 Polaris Pkwy, Suite 500, Westerville OH 43082, USA, Tel: 888-435-6377, website: www.krazyglue.com
- LePage® Brand Products, LePage® Super Glue, Tel: 800-624-7767, Website: lepageproducts.com
- Loctite® Brand - Consumer Products Henkel Corporation 26235 First Street Westlake Ohio 44145Consumer Relations Help Line: 800-624-7767 HELP LINE Website: http://www.loctiteproducts.com/ providers of Super Glue including exterior rated superglue products.
- MACCO Adhesives www.liquidnails.com Liquid Nails construction adhesive
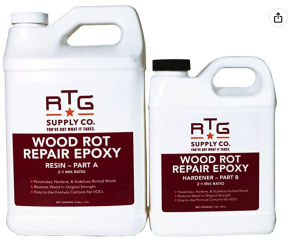
- RTG Wood Rot Repair Expoxy [above], produced by Jsmestown Distributors, described by Amazon as:
RTG Wood Rot Repair Epoxy is a low-viscosity, two-part liquid epoxy sealer that's great for repairing wood around the house, such as windowsills, trim, drip caps, decks, and more. It saturates softened wood quickly and completely to penetrate, harden, and restore the wood's structural strength. Wood Rot Repair Epoxy seals the wood, and prevents further damage by isolating it, and stopping hidden hairline leaks. In extreme cases, drill a series of holes in the wood, and pour Wood Rot Repair Epoxy liberally into the area. It's also great for sealing new wood to provide long-lasting protection against humidity.
The 2:1 mix ratio makes it very easy to measure accurately for reliable results. Apply with a brush, roller, syringe, or epoxy spreader, and allow enough time for it to completely saturate the wood fibers. The minimum application temperature is 50°F. Pot life and cure times are temperature dependent. At 75°F, pot life is 25-30 minutes and full cure is 4 days. At 85°F, pot life is 18-22 minutes and full cure is 2 days. The cured surface can be painted or varnished after light sanding. You'll appreciate the no-odor, no-VOC formula and the fact that it's not only 100% waterproof once - SI Sealants www.osisealants.com PL400 construction adhesive
- Super Glue Corporation, 9420 Santa Anita Ave. Rancho Cucamonga, CA 91730 Phone: Toll Free 800-538-3091 or local 909-987-0550 Email: info@supergluecorp.com, Website; supergluecorp.com
- System Three Resins www.systemthree.com Quick Cure epoxy
- - Adapted with permission from Best Practices Guide to Residential Construction (Steve Bliss, J Wiley & Sons) .
...
Reader Comments, Questions & Answers About The Article Above
Below you will find questions and answers previously posted on this page at its page bottom reader comment box.
Reader Q&A - also see RECOMMENDED ARTICLES & FAQs
On 2018-12-10 - by (mod) - odorless paint thinner useful for some adhesive removal
Have you tried a little odorless paint thinner to see if that would remove the adhesive?
Very often freakeasy that are not water based solvent will work with minimal damage to the siding material course you need to consider what is on the exterior of your house when using any solvent to remove adhesive so you might want to test the solvent in an unobtrusive area first.
On 2018-12-10 by David Collister
Hi - A contractor, working on a building adjacent to my property, splattered the side of my house of what appears to be some sort of exterior adhesive.
The material remained soft and tacky throughout the summer and did not harden. I have not yet been able to get the general contractor to take responsibility for the mess,
I was wondering if anyone was able to identify what type of adhesive it might have been, from some images, so that I can better determine what sort of work was being done on the property that may have caused the splatter. (I think it may be related to wood porch and balcony built on top of the second floor.)
Would appreciate any thoughts and views.
IMAGE LOST by older version of Clark Van Oyen’s Comments Box code - now fixed. Please re-post the image if you can. Sorry. Mod.
On 2018-11-17 - by (mod) -
I like high-temperature silicone sealant for the application you describe. There is a wide range of products including some that can tolerate very high temperatures such as used on automotive engines and heating boilers.
For your application a sealant like Rutland's high-heat silicone, capable of exposure at 450 degF. and intermittent exposure to 500 degF. would be sufficient. See what's available in your area and read the product specifications. Certainly there are many other brands, I'm not endorsing a specific one.
Careful attention to cleanup will make for a neat job.
IMAGE LOST by older version of Clark Van Oyen’s Comments Box code - now fixed. Please re-post the image if you can. Sorry. Mod.
On 2018-11-17 by Hai Nguyen
We have the window display platform which is finished by stainless steel panel on the MDF panels, under the sun heat the sus 304 panel pilled off like the picture shown
Can u help to advise which glue we should use for this best performance under this condition of the window display ?
Tks
IMAGE LOST by older version of Clark Van Oyen’s Comments Box code - now fixed. Please re-post the image if you can. Sorry. Mod.
On 2016-04-16 - by (mod) -
Kim, you can use a variety of solvents on petroleum-based adhesives, with the warning that
Watch out:
these solvent chemicals themselves and/or their VOC offgassing can be harmful.
Read and follow the manufacturer's warnings and instructions.
Lacquer thinner
Acetone
(rapidly dissolves plastic - can cause immediate serious damage)
Benzine (carcinogenic)
Petroleum-based solvents
Depending on the situation, I use warmth (hot water in a glass or plastic container whose label I want to remove), or a hair dryer (blast of warm air) or in extreme cases, a heat gun to soften adhesives on some surfaces: those that the heat won't itself harm and were there's no fire risk.
Then I remove the ... whatever ... that can be peeled away, then depending on the requirement I may use a solvent to remove the remaining glue. My preferred solvent is odorless paint thinner as it works on many adhesives and is itself less toxic than some other chemicals. Still I wear gloves etc.
On 2016-04-16 by Kim
How to remove petroleum based adhesives
Question: how to stop oozing black streaks on walls in North Carolina
(Mar 1, 2014) Paula Hannah said:
We built our home 2.5 years ago on the Outer Banks, NC. Since then black streaks have run down the exterior walls from under the window frames. The material won't come up with soap or water or mineral spirits. The only thing that comes off when we try to clean it is our paint. What is caused the material to ooze out from under the window frame, does the building material that was used have a product warranty, and how do we stop the oozing?
Reply:
I'm not sure Paula. Can you use our CONTACT link to send me some sharp photos?
Question: how to glule a polyurethane medallion to a ceiling
May 31, 2014) Carmin said:
What is a good adhesive to use to mount a polyurethane ceiling medallion to a metal deck ceiling? Thank you.
Reply:
Polyurethane adhesive should be compatible. You'll have to use blue masking tape to hold the medallion in place until the glue has set.
Question: glue hooks to vinyl siding
(Nov 17, 2014) vicki said:
I need to glue some hooks to vinyl siding. What glue will work best?
Reply:
On the glue product label you'll see a list of materials each glue will adhere. You need to know both the material of the siding (vinyl) and of the hooks.
...
Continue reading at CAULKS & SEALANTS, EXTERIOR or select a topic from the closely-related articles below, or see the complete ARTICLE INDEX.
Or see these
Recommended Articles
- ANTIQUE & OLD LOG CABINS
- CAULKS & SEALANTS, EXTERIOR
- CRACKS CHECKS SPLITS in BEAMS, LOGS & POSTS
- WOOD BEAM LOG VIGA CRACK REPAIR METHODS
Suggested citation for this web page
GLUES ADHESIVES, EXTERIOR CONSTRUCTION at InspectApedia.com - online encyclopedia of building & environmental inspection, testing, diagnosis, repair, & problem prevention advice.
Or see this
INDEX to RELATED ARTICLES: ARTICLE INDEX to EXTERIORS of BUILDINGS
Or use the SEARCH BOX found below to Ask a Question or Search InspectApedia
Ask a Question or Search InspectApedia
Try the search box just below, or if you prefer, post a question or comment in the Comments box below and we will respond promptly.
Search the InspectApedia website
Note: appearance of your Comment below may be delayed: if your comment contains an image, photograph, web link, or text that looks to the software as if it might be a web link, your posting will appear after it has been approved by a moderator. Apologies for the delay.
Only one image can be added per comment but you can post as many comments, and therefore images, as you like.
You will not receive a notification when a response to your question has been posted.
Please bookmark this page to make it easy for you to check back for our response.
IF above you see "Comment Form is loading comments..." then COMMENT BOX - countable.ca / bawkbox.com IS NOT WORKING.
In any case you are welcome to send an email directly to us at InspectApedia.com at editor@inspectApedia.com
We'll reply to you directly. Please help us help you by noting, in your email, the URL of the InspectApedia page where you wanted to comment.
Citations & References
In addition to any citations in the article above, a full list is available on request.
- Steve Bliss's Building Advisor at buildingadvisor.com helps homeowners & contractors plan & complete successful building & remodeling projects: buying land, site work, building design, cost estimating, materials & components, & project management through complete construction. Email: info@buildingadvisor.com
Steven Bliss served as editorial director and co-publisher of The Journal of Light Construction for 16 years and previously as building technology editor for Progressive Builder and Solar Age magazines. He worked in the building trades as a carpenter and design/build contractor for more than ten years and holds a masters degree from the Harvard Graduate School of Education. Excerpts from his recent book, Best Practices Guide to Residential Construction, Wiley (November 18, 2005) ISBN-10: 0471648361, ISBN-13: 978-0471648369, appear throughout this website, with permission and courtesy of Wiley & Sons. Best Practices Guide is available from the publisher, J. Wiley & Sons, and also at Amazon.com - Best Practices Guide to Residential Construction, by Steven Bliss. John Wiley & Sons, 2006. ISBN-10: 0471648361, ISBN-13: 978-0471648369, Hardcover: 320 pages, available from Amazon.com and also Wiley.com. See our book review of this publication.
- Daniell, Henry, Chittibabu Guda, David T. McPherson, Xiaorong Zhang, Jie Xu, and Dan W. Urry. "Hyperexpression of a synthetic protein-based polymer gene." In Recombinant Protein Protocols, pp. 359-371. Humana Press, 1997.
- McLean, C. J. "Ocular superglue injury." Journal of accident & emergency medicine 14, no. 1 (1997): 40-41.
- Wang, Angela A., and Christopher H. Martin. "Full-thickness skin necrosis of the fingertip after application of superglue." The Journal of hand surgery 28, no. 4 (2003): 696-698.
Abstract: We present the case of a 39-year-old woman who applied superglue to her fingertip as a treatment for dry skin. She developed full-thickness necrosis of her thumb pad complicated by a secondary superinfection. This necrosis occurred from the degradation of the cyanoacrylate in the superglue compound to formaldehyde, causing local histotoxicity. This injury necessitated a local flap for coverage, which healed uneventfully and without lasting sequelae. - Kennedy, J. P. "New biomaterials by carbocationic processes." In Macromolecular Symposia, vol. 85, no. 1, pp. 79-96. Hüthig & Wepf Verlag, 1994.
- Leggat, Peter A., Ureporn Kedjarune, and Derek Richard Smith. "Toxicity of cyanoacrylate adhesives and their occupational impacts for dental staff." Industrial health 42, no. 2 (2004): 207-211.
- Ritterband, David C., Seth W. Meskin, Daniel E. Shapiro, Jaroslaw Kusmierczyk, John A. Seedor, and Richard S. Koplin. "Laboratory model of tissue adhesive (2-octyl cyanoacrylate) in sealing clear corneal cataract wounds." American journal of ophthalmology 140, no. 6 (2005): 1039-1043.
- Parmetol, a wood preservativerecommended by the manufacturer was used as a fungicidal additive to paint on the Blue Poplar wood sculpture in Amsterdam, by artist Mari Shields [Website marishields.com ] [ - art conservation consult DJF-artist MS 2010]
- Our recommended books about building & mechanical systems design, inspection, problem diagnosis, and repair, and about indoor environment and IAQ testing, diagnosis, and cleanup are at the InspectAPedia Bookstore. Also see our Book Reviews - InspectAPedia.
- Decks and Porches, the JLC Guide to, Best Practices for Outdoor Spaces, Steve Bliss (Editor), The Journal of Light Construction, Williston VT, 2010 ISBN 10: 1-928580-42-4, ISBN 13: 978-1-928580-42-3, available from Amazon.com
- In addition to citations & references found in this article, see the research citations given at the end of the related articles found at our suggested
CONTINUE READING or RECOMMENDED ARTICLES.
- Carson, Dunlop & Associates Ltd., 120 Carlton Street Suite 407, Toronto ON M5A 4K2. Tel: (416) 964-9415 1-800-268-7070 Email: info@carsondunlop.com. Alan Carson is a past president of ASHI, the American Society of Home Inspectors.
Thanks to Alan Carson and Bob Dunlop, for permission for InspectAPedia to use text excerpts from The HOME REFERENCE BOOK - the Encyclopedia of Homes and to use illustrations from The ILLUSTRATED HOME .
Carson Dunlop Associates provides extensive home inspection education and report writing material. In gratitude we provide links to tsome Carson Dunlop Associates products and services.


