 Clogged Pressure Reducing Valve Repair
Diagnose & fix or replace a pressure reducing / water feed valve
- POST a QUESTION or COMMENT about heating boiler pressure reducing valves, water feed valves, check valves: operation and repair
Heating boiler water feeder valve clogged strainer replacement.
This article series illustrates how to diagnoes and fix hot water boiler (hydronic heat) pressure reducing valves and types of manual and automatic water feeder valves used on hot water heating boilers, including when and how to add makeup water to a boiler.
InspectAPedia tolerates no conflicts of interest. We have no relationship with advertisers, products, or services discussed at this website.
- Daniel Friedman, Publisher/Editor/Author - See WHO ARE WE?
Hydronic (hot water) Heating Boiler Pressure Reducer Valve Repair
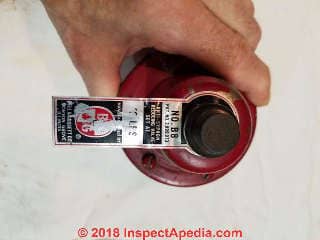
 Here we illustrate the replacement of a clogged strainer in the bottom of an older B&G B-8 pressure reducing valve.
We found this valve on a hot water heating system in a Two Harbors Minnesota home built in the 1960s.
This was an original pressure reducer that had served more-or-less for over fifty years.
[Click to enlarge any image]
Removing the Pressure Reducer Strainer Nut
On a typical B&G pressure reducing valve (aka "water feeder" to the dismay of the manufactuer) there is a strainer in the bottom of the valve. To remove it one needs to remove the strainer nut.
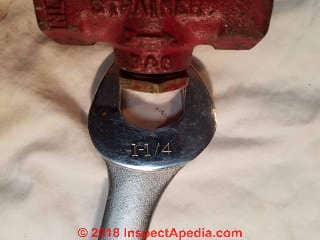
It was plain hell just trying to remove the pressure-reducer strainer retaining nut on this 50-year old valve.
Using an adjustable wrench, as carried by most service techs, is going to give a too-short wrench handle, not enough torque, and you'll probably round off the nut facets.
I used a longer 1 1/4" box wrench. In my photo above I've flipped over the wrench to connect the open-end to the strainer nut so that you can see the size markings. But using the closed-end of a box wrench is most-secure.
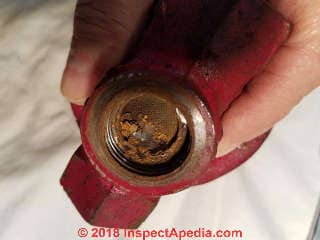
With the nut removed you can see the strainer inside the pressure reducer valve. Along with rust and crud.
I also had a devil of a time getting this clogged old strainer out of the valve - shown in more detail below.
Later when I disassembled the entire pressure reducer I also found that the valve inside the pressure reducer was frozen solid.
Even replacing the strainer wouldn't have fixed this valve.
Details of the jammed water valve in the pressure reducer are shown in this separate article:
PRESSURE REDUCING VALVE DISASSEMBLY - not something that I recommend.
Just below we show the location of the pressure reducer strainer and the steps in replacing it.
Unlike complete disassembly, strainer cleaning or replacement is a recommended service procedure for pressure reducing valves on boilers.
Steps in Replacing or Cleaning a Clogged Pressure Reducer Strainer
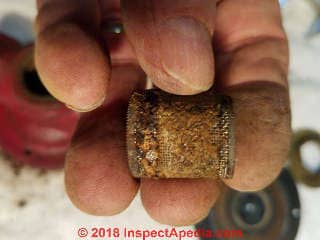
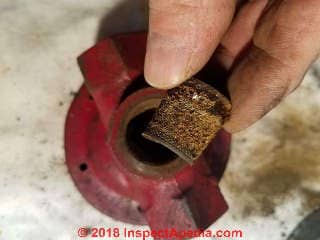 Photo: a very clogged strainer in a B&G B-8 pressure reducing valve.
[Click to enlarge any image]
How to Check for a clogged strainer in the Pressure Reducer/Feeder Valve
If the pressure reducer will not feed enough water into the boiler to reach the desired cold-pressure setting, before messing with re-adjusting the valve's feed pressure nut and screw, consider that the internal strainer in the valve may have become clogged.
- Turn off the cold water supply valve at the inlet side of the pressure reducing valve
- Turn off the heating boiler - set the electrical service switch to OFF to shut down the entire system.
- Remove all pressure and temperature from the heating system to allow safe work on the pressure reducing valve
Watch out: water in the heating boiler may be at dangerous high pressure or high temperature.
Before proceeding to work on the pressure reducer valve you must either reduce the heating system internal water pressure to zero, OR you must isolate the pressure reducing valve from the rest of the the heating system.
Leave the system drain valve open and allow the heating system to cool to a safe temperature - below 100 °F. Otherwise you risk serious injury or death or property damage. - Loosen and remove the strainer nut located on the bottom of the pressure reducing valve
- Remove and clean or replace the strainer found in that opening
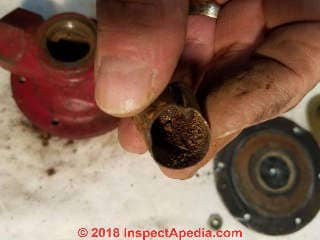
It was impossible to get the strainer out of the pressure reducer without destroying it.
I had to pry it out with a screwdriver and pliers. In my photo above you can see the side of the strainer is a bit bent.
Also as I show below, the strainer was badly clogged with scale and rust. I could have perhaps cleaned it by soaking it in vinegar.
But best would be to install a new strainer.
That's why B&G's PRESSURE REDUCER REPAIR KIT (described below) includes a new strainer and O-ring.
- Reinstall the strainer and nut with its O-ring (don't lose or damage the O-ring or the valve will leak) and tighten the nut to at least 10 inch-pounds of torque, and not more than 100 inch-pounds of torque.
Watch out: don't use Teflon tape when installing the pressure reducer strainer nut and o-ring or the risk is that you will over-tighten and damage the equipment making it and the system unsafe, risking injury or damage. - Close the heating boiler drain and re-fill the heating system with cold water.
- Vent any excess air from the heating system - as you may have introduced air during the drain and refill procedure. Remember to close the bypass valve or fill valve when the heating system has been filled to its cold starting pressure.
- Check the system for water leaks, especially where you have been working and disturbing parts
- Turn the boiler electrical service switch back on, make sure the room thermostat is calling for heat, allow the heating system to resume normal operation.
- Check a last time for leaks.
Watch out: The manufacturers of this type of automagic water feed valve recommend that additional manual control valves be included in the piping system, so in some installations you might also find that the automatic water feeder is not really so automatic.
... the manufacturer warns that the purpose of the pressure-reducing (and automagic water feeding) valve is to fill heating boilers after installation or servicing. The company says
"It is not a safety device and is not intended to be used as as a water feed valve to control boiler water at a safe operating level".
Complete Disassembly of a B&G Pressure Reducer
This information has moved
to PRESSURE REDUCING VALVE DISASSEMBLY
How to Use the Pressure Reducer Valve Repair Parts Kit
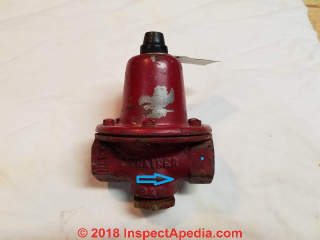 B&G provides a repair parts kit for this valve.
- To use the pressure reducer valve repair kit you will need to shut down the heating system, drain it, cool it, as we described just above at the strainer cleanout procedure. Then
- Remove the valve body cover using a #25 Torx screwdriver that fits the screws around the valve body;
(Older pressure reducing valves use ordinary slotted-head screws like those shown in the article above.)
B&G points out that you can use 1 /8" Allen wrench instead of a #25 Torx driver in an emergency but we can confirm that you will probably strip and damage the screws, just as a Harley Dealer's mechanic did to my Road King (another argument for doing your own work). - Remove the valve spring cap and spring you'll find inside
- Remove the hex nut (this is the lock nut that holds the screw stem in place) by holding the stem assembly stationary while turning the nut counterclockwise. B&G warn that the stem may drop when you remove the hex nut.
- Lift off the spring plate, diaphragm, and valve plate - I'd inspect all of these parts and the others listed below for damage
- Pull the rubber check valve from the valve body and replace this part
- Insert the new valve stem assembly (that came in your repair kit) into the valve body through the strainer opening in the housing, and hold it in place. [A helper may be handy here]
- Place the new valve plate, knob side down, on the stem assembly
- Set the new diaphragm on top of the valve stem, aligning the holes in the rubbery diaphragm material with the screw holes in the valve body - you want the reassembly screws to line up with these holes - otherwise the diaphragm may end up cut or twisted and you'll have ruined the job
- Place the spring plate over the diaphragm on top of the stem assembly
- Thread the hex nut onto the valve stem assembly. A dab of Loctite (thread fastener) must be added to the hex nut before threading it onto the stem.
Watch out: don't use more than a tiny dab of Loctite or you will seize the valve, making it inoperative and the system potentially dangerous - Place the spring, cap and body on top of the valve
- Align the valve body cover holes with those in the body (you got that diaphragm straight, right?) and fasten those stripped (or replaced) Torx T-25 screws into the body
- Reinstall the strainer nut (the strainer is in place, too, right?) with its O-ring into the reducing valve body bottom and tighten it to at least 10 inch pounds and not more than 100 inch pounds.
Watch out: see our warning above about watching for a damaged O-ring (replace it) and about not using Teflon tape on this part, at risk of over tightening - Close the boiler drain and refill and vent air from the heating system with cold water as we described above. Remember to close the cold water bypass valve or fill valve.
- Check for leaks
- Turn the heating system on, st the thermostat to call for heat if necessary, let the system reheat,
- Check again for leaks
- Check the system operating pressures cold, and hot
Pressure Reducer & Flow Control Valve Manuals
- B&G Flo-Control Valves - installation, operation, and service instructions manual [PDF] original source Bell & Gossett, 8200 N. Austin Ave., Morton Grove IL 60053, USA - Tel 847 966-3700 Fax 847 965-8379 . www.bellgossett.com/BG-Literature-Detail.asp?LiteratureID=607
- B&G / ITT Reducing Valves, Instruction Manual V55999: Reducing Valves Installation, Operation, & Service Instructions [PDF] Bell & Gossett Air Separators and other heating system components, Bell & Gossett, 8200 N. Austin Ave., Morton Grove IL 60053, USA - Tel 847 966-3700 Fax 847 965-8379. Original source www.bellgossett.com/literature/files/610.pdf
...
Continue reading at PRESSURE REDUCING VALVES - topic home, or select a topic from the closely-related articles below, or see the complete ARTICLE INDEX.
Or see these
Recommended Articles
- PRESSURE REDUCING VALVES
- PRESSURE REDUCING VALVE (BOILER) CLOG REPAIR
- PRESSURE REDUCING VALVE DISASSEMBLY
- PRESSURE REDUCING VALVE REPAIR KIT
- PRESSURE REDUCING VALVE WATER FEEDER INSTALLATION
Suggested citation for this web page
PRESSURE REDUCING VALVE (BOILER) CLOG REPAIR at InspectApedia.com - online encyclopedia of building & environmental inspection, testing, diagnosis, repair, & problem prevention advice.
Or see this
INDEX to RELATED ARTICLES: ARTICLE INDEX to HEATING SYSTEMS
Or use the SEARCH BOX found below to Ask a Question or Search InspectApedia
Ask a Question or Search InspectApedia
Try the search box just below, or if you prefer, post a question or comment in the Comments box below and we will respond promptly.
Search the InspectApedia website
Note: appearance of your Comment below may be delayed: if your comment contains an image, photograph, web link, or text that looks to the software as if it might be a web link, your posting will appear after it has been approved by a moderator. Apologies for the delay.
Only one image can be added per comment but you can post as many comments, and therefore images, as you like.
You will not receive a notification when a response to your question has been posted.
Please bookmark this page to make it easy for you to check back for our response.
IF above you see "Comment Form is loading comments..." then COMMENT BOX - countable.ca / bawkbox.com IS NOT WORKING.
In any case you are welcome to send an email directly to us at InspectApedia.com at editor@inspectApedia.com
We'll reply to you directly. Please help us help you by noting, in your email, the URL of the InspectApedia page where you wanted to comment.
Citations & References
In addition to any citations in the article above, a full list is available on request.
- [1] Thanks to Mark Cramer, Tampa Florida, for assistance in technical review of the "Critical Defects" section and for the photograph of the deteriorating gray Owens Corning flex duct in a hot attic. Mr. Cramer is a Florida home inspector and home inspection educator.
- Our recommended books about building & mechanical systems design, inspection, problem diagnosis, and repair, and about indoor environment and IAQ testing, diagnosis, and cleanup are at the InspectAPedia Bookstore. Also see our Book Reviews - InspectAPedia.
- In addition to citations & references found in this article, see the research citations given at the end of the related articles found at our suggested
CONTINUE READING or RECOMMENDED ARTICLES.
- Carson, Dunlop & Associates Ltd., 120 Carlton Street Suite 407, Toronto ON M5A 4K2. Tel: (416) 964-9415 1-800-268-7070 Email: info@carsondunlop.com. Alan Carson is a past president of ASHI, the American Society of Home Inspectors.
Thanks to Alan Carson and Bob Dunlop, for permission for InspectAPedia to use text excerpts from The HOME REFERENCE BOOK - the Encyclopedia of Homes and to use illustrations from The ILLUSTRATED HOME .
Carson Dunlop Associates provides extensive home inspection education and report writing material. In gratitude we provide links to tsome Carson Dunlop Associates products and services.


