 Thermostat Wiring Opening Closure
Close wiring opening in wall to improve thermostat accuracy
- POST a QUESTION or COMMENT about Nest Room Thermostats for Air Conditioners & Heating Systems or heat pumps: thermostat operation, wiring, adjustment & repair procedures
Heating & Cooling Thermostat Installation & wiring opening seal-up procedure:
Detailed photographs and text describe how to how seal a drafty opening in the wall at thermostat wires. Sealing air leaks around the thermostat wires improves the accuracy of the thermostat by stopping air leaks that can fool the thermostat about the temperature of the room it's supposed to be monitoring.
This article series provides detailed photographs and text describing how to how to install, make thermostat wiring connections.
InspectAPedia tolerates no conflicts of interest. We have no relationship with advertisers, products, or services discussed at this website.
- Daniel Friedman, Publisher/Editor/Author - See WHO ARE WE?
Thermostat Installation: Close off Wall Opening Behind Thermostat to Improve Thermostat Accuracy
Close off large wall opening around thermostat wires
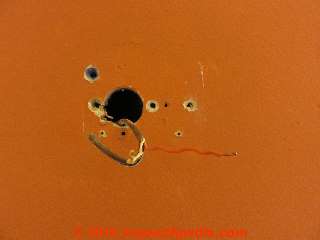
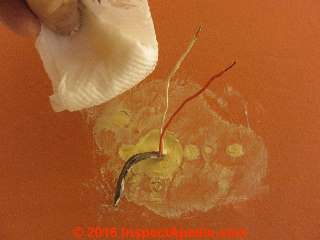
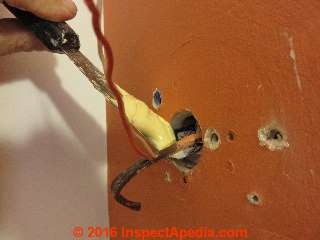
Below: if the wall opening through which the thermostat wires protrude is large, wall convection currents and drafts may foul up the thermostat's ability to accurately report and respond to room temperature. These images, from the installation of a Nest thermostat in a 1970's home show how to deal with that problem.
Above at left we see a stunningly large hole in the wall through which our thermostat wires emerge, and we are confronted by a plethora of old screw holes in the wall that make mounting one more new thermostat a devilish job. It would make a lot of sense to stop at this point and fill in all of these openings.
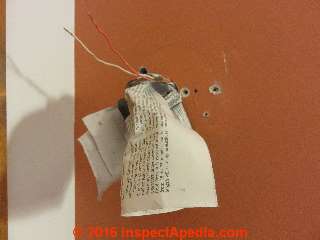
Watch out: When preparing your thermostat wires and before you start screwing the new thermostat mounting plate to the wall, if extra wire slack permits, be sure that you've pushed a loop of thermostat wire away from the wall surface inside the wall cavity.
This extra space and loose thermostat wires inside the wall cavity will reduce the chances that you drive a sharp-pointed thermostat5 base mounting screw through the thermostat wires, damaging them or even breaking or shorting the wires.
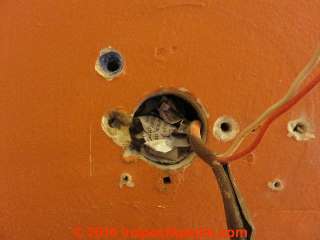
After pushing a loop of extra wire into the wall cavity we stuff some newsprint into the wall cavity to serve as a backer against which we'll apply a wall sealant product. How much newsprint? Enough that it will stay in place and provide a surface that avoids having to jam gallons and gallons of wall putty into that little hole while it drools down the back-side of the drywall or plaster instead of staying where we need it.
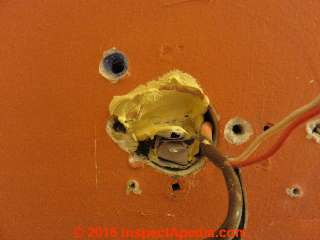
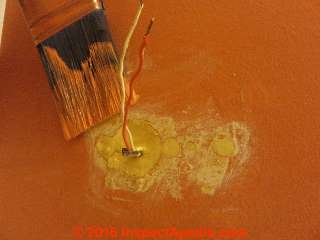
Our second photo shows me starting to apply wall putty to the biggest opening first. I like to use a fast-hardening product such as Dash Patch or a similar wall repair compound that sets in about 10 minutes.
I fill the large wall opening flush with the wall surface, actually slightly protruding past the wall surface, then I fill the smaller holes.
Watch out: As the wall patching compound begins to harden I use my putty knife to scrape away excess wall patch material to leave the patching material just flush with the wall surface. This is a nice detail to avoid having to scrape and sand hardened wall patching products.
Fast-setting wall patch compounds set quickly so you can complete your job in minutes, but if you don't work neatly you'll have a heck of a time trying to sand and scrape off too-high too-messy patch all over your wall surface.
Above, when the wall patch compound is firm but not fully hardened I use a damp paper towel to wipe off remnants of the patch compound to leave a smooth, ready-to-paint surface. No sanding whatsoever is needed if you take this approach. In my second photo I'm painting over this previously ugly, leaky wall with matching wall-paint.
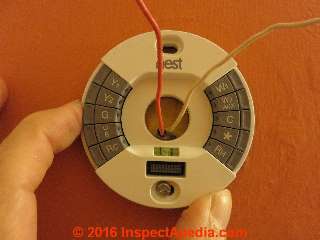
Finally, when the matching wall paint is dry we are ready to hold the new thermostat base plate in place to mark its screw locations. Shown here we are installing a Nest 2 Learning Thermostat.
If you were reading this wall opening article while installing the Nest thermostat, continue reading those instructions at MARK WHERE SCREWS WILL GO.
For all other room thermostat wiring guides see THERMOSTAT WIRE CONNECTIONS.
...
Continue reading at NEST THERMOSTAT INSTALLATION & WIRING, or select a topic from the closely-related articles below, or see the complete ARTICLE INDEX.
Or see these
Recommended Articles
- HUMIDITY RESPONSE, NEST THERMOSTATS
- TEMPERATURE RESPONSE of ROOM THERMOSTATS for more about thermostat accuracy
- THERMOSTAT CALIBRATION for details about adjusting the accuracy of room thermostats
- THERMOSTAT WIRE CONNECTIONS
Suggested citation for this web page
THERMOSTAT WIRING OPENING SEAL at InspectApedia.com - online encyclopedia of building & environmental inspection, testing, diagnosis, repair, & problem prevention advice.
Or see this
INDEX to RELATED ARTICLES: ARTICLE INDEX to HVAC THERMOSTATS
Or use the SEARCH BOX found below to Ask a Question or Search InspectApedia
Ask a Question or Search InspectApedia
Try the search box just below, or if you prefer, post a question or comment in the Comments box below and we will respond promptly.
Search the InspectApedia website
Note: appearance of your Comment below may be delayed: if your comment contains an image, photograph, web link, or text that looks to the software as if it might be a web link, your posting will appear after it has been approved by a moderator. Apologies for the delay.
Only one image can be added per comment but you can post as many comments, and therefore images, as you like.
You will not receive a notification when a response to your question has been posted.
Please bookmark this page to make it easy for you to check back for our response.
IF above you see "Comment Form is loading comments..." then COMMENT BOX - countable.ca / bawkbox.com IS NOT WORKING.
In any case you are welcome to send an email directly to us at InspectApedia.com at editor@inspectApedia.com
We'll reply to you directly. Please help us help you by noting, in your email, the URL of the InspectApedia page where you wanted to comment.
Citations & References
In addition to any citations in the article above, a full list is available on request.
- [1] Proliphix Corporate Headquarters [Website: proliphix.com] , 3 LAN Drive Suite #100, Westford, MA 01886 Phone: +1.978.692.3375 Toll Free (U.S.): 866-IP-LIVING (866.475.4846) Fax: +1.978.692.3378 - Sales: sales@proliphix.com Marketing: marketing@proliphix.com Customer support: support@proliphix.com http://www.proliphix.com/ - quoting from the company's website:
All Proliphix Network Thermostats come with our free Uniphy Remote Management Service. This unique offering lets you monitor and control your HVAC systems by simply pointing your Browser to our secure Proliphix Web Site. Enjoy the convenience of programming a thermostat from any location, using a simple graphical interface. No computer equipment or software is required. And since Proliphix takes care of the network configuration for you, you’ll be up and running in no time. We’ll even proactively monitor your thermostats and send you an immediate email or SMS message when an HVAC problem is detected. - [2] "The Nest Learning Thermostat", Nest Thermostat, 900 Hansen Way Palo Alto, CA 94304, Tel: 855-4MY-NEST, Email: info@nest.com, website http://www.nest.com/, retrieved 1/24/2013.
- [3] Honeywell Controls, the company wants you to use their contact form at this web page: http://www51.honeywell.com/honeywell/contact-support/contact-us.html
Honeywell Consumer Products, 39 Old Ridgebury Road Danbury, CT 06810-5110 - (203) 830-7800
World Headquarters, Honeywell International Inc., 101 Columbia Road, Morristown, NJ 07962, Phone: (973) 455-2000, Fax: (973) 455-4807 1-800-328-5111 - [3a] Honeywell Tradeline T87T Universal Thermostat Installation Instructions for the Trained Service Technician", Honeywell International Inc. Honeywell Limited—Honeywell Limitée 1985 Douglas Drive North 35 Dynamic Drive Golden Valley, MN 55422 Scarborough, Ontario M1V 4Z9, 60-0830—4 G.H. Rev. 8-02, retrieved 12/1/2013 Website: www.honeywell.com
- [4] White Rodgers Thermostats and HVAC controls,
Homeowner information: http://www.emersonclimate.com/en-US/brands/white_rodgers/Pages/wr-homeowner-info.aspx
Contractor information: http://www.emersonclimate.com/en-US/brands/white_rodgers/wr_contractor_info/Pages/white-rodgers-contractor-info.aspx
White Rodgers Product Catalog (don't misspell the company's name as White Rogers Thermostats) -
http://www.emersonclimate.com/Documents/thermostats.pdf - Thermostat Catalog - In addition to citations & references found in this article, see the research citations given at the end of the related articles found at our suggested
CONTINUE READING or RECOMMENDED ARTICLES.
- Carson, Dunlop & Associates Ltd., 120 Carlton Street Suite 407, Toronto ON M5A 4K2. Tel: (416) 964-9415 1-800-268-7070 Email: info@carsondunlop.com. Alan Carson is a past president of ASHI, the American Society of Home Inspectors.
Thanks to Alan Carson and Bob Dunlop, for permission for InspectAPedia to use text excerpts from The HOME REFERENCE BOOK - the Encyclopedia of Homes and to use illustrations from The ILLUSTRATED HOME .
Carson Dunlop Associates provides extensive home inspection education and report writing material. In gratitude we provide links to tsome Carson Dunlop Associates products and services.


