
 Stress-Skin / Structural Insulated Panel Repairs
- POST a QUESTION or COMMENT about stress skin panel construction: installation, troubleshooting, repairs
How to repair rotted or damaged stress-skin insulated panels:
This article offers detailed suggestions for diagnosing and repairing rot, leaks, delamination, or other damage to stress skin insulated panels (SIPs) used in timber frame and other building construction.
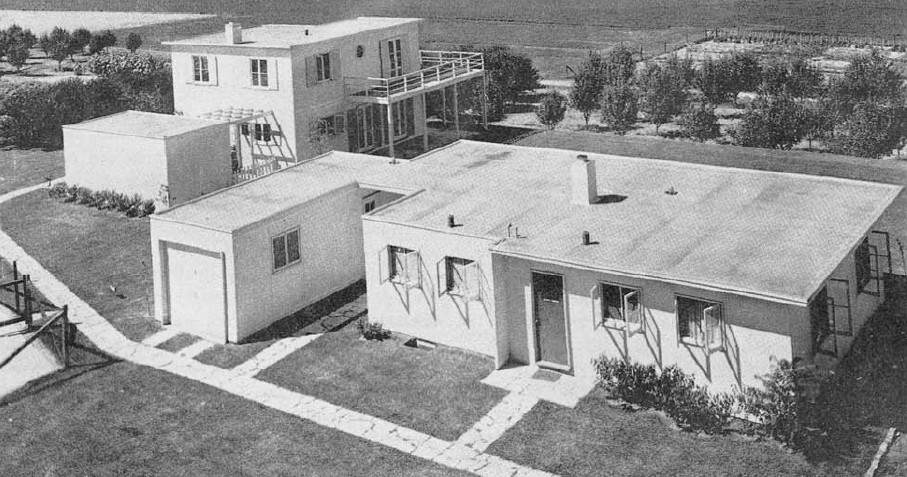
This article series discusses the use of stress skin insulated structural panels for timber frame and other construction. Illustration at page top U.S. Forest Products Laboratory Structural Insulated Panel based prefab houses developed in 1937, built for study and evaluation.
InspectAPedia tolerates no conflicts of interest. We have no relationship with advertisers, products, or services discussed at this website.
- Daniel Friedman, Publisher/Editor/Author - See WHO ARE WE?
Stress Skin Insulated Panel Repairs
Reader Question: how best to repair damaged stress skin panels
Own a 22 year old home with the stress panels that have T1-11. Our home is three stories and the horizontal decorative board to cover the panel joints was not caulked properly by the painters. Naturally water got behind the board and released water down the T1-11 an we have rot.
Only on one end of the home that gets the brunt of the elements, especially winter in Western NC. How do we fix this rot. Do we cut out the T1-11 if it isn't a large area, do we just cover with all new T1-11 and how to do that.
Winter is fast approaching and we just discovered the damage. It is a post and beam type construction with the SIP panels with T1-11 as the outside covering.
We need help and look forward to hearing from anyone that has had this problem. Is rot common with T1-11 as it ages? The rest of the house is fine. - Richard 9/22/12
Reply:
Richard, I've asked our expert Steve Bliss for comment on the subject of damaged SIPs.
From my own experience, which is more with T-111 type plywood exterior siding than its use on SIPs, if the siding is not kept weatherproofed by a coating (I prefer pigmented stains to paints) and if trim is not properly sealed to keep out water, we can expect to find spots of delamination of the plywood as well as rot behind and around poorly-sealed horizontal trim.
Delamination and buckling of the outer skin of the plywood siding seems to occur first where there was already a small flaw, crack, or opening in the outermost ply. Those problems are not unique to plywood siding however.
Steps in exploring for hidden damage in an SIP building
Without having seen the extent of damage on your building, a detailed repair prescription amounts to pretty much wild arm-waving. I think the first order of business is a thorough damage assessment. While there is less of a water path and space within a SIP than a cavity type wood framed wall, water behind the outer ply of T111 invites rot and also insect activity. I'd want to
- pull off the horizontal trim board on the damaged side of the house
- explore the damage behind for the extent of water passage and rot
- If water has penetrated the structure to the interior further inspection and repairs are probably needed
- If the water leaks have invited carpenter ants into the structure, also further inspection and repairs are probably needed
Repair Ideas for limited-damage SIP stress skin panels on a building wall
If you find very extensive water, insect damage, etc. in the wall you may have to remove and rebuild it. I'm guessing you are going to find this extreme approach is not necessary.
If you do not find evidence of any significant water entry or deeper damage to the structure then you have two plausible approaches, depending on the degree of adhesion of the remaining plywood outer skin to the foam core:
- If it is relatively easy to separate the plywood skin from the foam core of the SIP then with a circular saw set to the depth of just the plywood outer skin,
- Cut a horizontal line across the damaged siding at a point above the highest water or rot damage to the wall, and cut a second line lower on the wall, below the extent of damaged plywood there.
- Peel away the damaged plywood;
- Insert Z-flashing appropriately positioned up under the bottom lip of the upper remaining plywood as well as over the upper lip of the lower remaining plywood and then piece in replacement plywood in that horizontal band you've cut and peeled away. If you match the color of z-flashing to the stain of the siding it won't be too ugly and this approach is enormously less troublesome than tearing off and rebuilding the wall.
- Before replacing the horizontal trim, be sure the new trim boards are back primed, sealed on all sides, and sealed well especially along the top edge.
Note: I've found that it is difficult to seal horizontal trim along grooved exterior siding like T-111 unless you work meticulously to seal every single vertical groove along the top of the tim board; Even the smallest opening in the sealant (caulk) eventually leads to rot or insect damage.
- If you find that you cannot remove enough damaged plywood skin from the foam inside the panel, or if the foam itself has become damaged, then set your circular saw deep enough to cut through the panel to just inside the interior skin (building interior side) and
- remove a horizontal band wide enough to excise all of the damaged material;
- replace the removed band with solid foam or foamed-in-place foam and a new plywood skin and
- continue to flash, seal, and trim as I outlined above.
Send us some photos of the conditions you currently face as well as what you find, and we may be able to offer more detailed suggestions.
Reader Question: how do I remove and patch damaged OSB on a stress skin panel?
2015/11/05 Charlie
How do you attach the new osb if the repair is not on part of the timber frame? It seems like all the Windows and out side corners of my repair project need attantion. How do you check the extent of ant infiltration without tearing the whole thing down? No joke this is a problem.
Reply: basic steps in repairing a damaged stress-skin panel
Charlie:
OPINION: Certainly I don't advocate unnecessary demolition - or as I put it to my clients: "I'm not about to run amok with an axe and chain saw" - but generally we pull trim and probe until we've found the edge of damage.
If an area of OSB, that is rotted or insect damaged, does not abut intact structural framing members - studs, rafters, or in your case the timber frame - I'd do the following:
- Decide if we're going to repair from outside (usually the case) or inside -
as that determines what we have to remove. - Avoid cuts into wiring or plumbing:
inspect and if necessary remove interior wall coverings to assure that we are not at risk of cutting into plumbing or wiring - Cut through the OSB or plywood to the foam if you are working with a laminated, insulated stress skin panel (plywood or OSB glued to foam insulation):
you should be able to cut and pick out the damaged OSB or plywood, - Repair damaged foam insulation:
re-fill any damaged solid foam insulation in the panel up to flush with the insulation's original mating surface, then glue-in a replacement panel, skipping the backer strips or section I discussed above. You may find it easy going to spray with an open-celled foam that can be cut with a carpenter's saw; small areas of lost foam insulation less than an inch deep you might choose to ignore. - For ordinary repairing uninsulated structural panels, cut a rectangular opening that removes all of the damaged OSB (or plywood as that'd be the same), leaving edges of sheathing in good condition at all sides of the opening
For ordinary sheathed panels or uninsulated structural panels, cut to fit 1x lumber supports (1x4 may be enough) or if necessary for structural support use 2x lumber (2x4s) to length to fit the four sides of the cut-out rectangle - each piece will need to be long enough so that when you reach through the cut-out opening you can place the supports so that half of the support edge is behind the remaining OSB/plywood wall or roof sheathing and the other half of its width is exposed in the opening. This exposed half serves as a support for step 5.
For ordinary sheathed panels or uninsulated structural panels, against the supports added at the opening in step 4, cut out and mount a replacement rectangle of OSB or plywood that fits snugly in the opening.
Alternatively for small areas of damage - a square foot or two - I might simply cut two pieces of OSB or plywood, an inside support that is 3-4" larger in all dimensions than the opening, and an outside repair piece.
Drill two 1" holes near the center of the inside or backer support so that you can use those to hold the support in position, then insert the backer through the opening, hide it in place, and use construction screws through the external sheathing into the backer to fasten it securely; to be meticulous you could also have run a bead of construction adhesive around the mating face of the backer support so that it is also glued to the interior face of the sheathing.
With the backer strips or solid segment now in place fit and screw in place the repair OSB/Plywood that fits snugly in the opening. - Repair the building wrap or roofing felt:
when replacing housewrap on walls or roofing felt on roofs, be sure to insert the upper edge of the inserted repair piece under the lower edge of housewrap or felt that you cut above the repair opening. - Replace siding, trim, etc.
if those were removed, for example working on a wall or near the lower edge of a roof or at a gable end.
Question: Best repair for rotted T-111 on Stress Skin Panel Walls on a Timberframe House in Ohio
Lee Test
I have a 2 story timberframe house with 6 inch foam SIP panels. The panels have problems similar to another consumer has that I read about at this site. The panels have T1-11 bonded to the foam and primarily my west wall is really in need of being fixed and ultimately covered over.
To date smal spots I've removed the rotted material and have used Minwax exterior stainable wood filler that has seemed to work fairly well. I end up sanding the area, prime with oil based primer and then stain with Sherwin Williams solid stain. A few large areas, 1 ft sq to 3 ft sq I have cut out the areas and inserted pieces of T1-11 with drip edging and some caulking.
Now a I am finding more spots. I'm 69 years old and can't keep pasting this west wall much longer. Would it be appropriate to fix the new rotted spots as I've done in the past and then either apply cedar lap siding to the west wall area or maybe do the whole house in vinyl siding.
I'm worried about underlying moisture causing green mold coming out on the outside of the vinyl. I do have a few decorative areas above and below windows that are about 4 ft wide x 4 ft high that have cedar lapped siding that do not have rotting problems.
These areas have T1-11 as the underlying surface, then tyvek, then the cedar. The cedar has been prime coated with oil based primer than covered with 2 coats of solid stain. With cedar I question the ability of the SIP panels to carry the weight.
Your thoughts? - Lee Test
Reply: Suggestions from InspectApedia & Steven Bliss
Lee, as you'll see in the other stress skin SIP repair discussions above, we have not found any easy path to repair rotted SIP panels;
The patch approach you describe using a filler may not have a long life, especially if you live in a freezing climate; The cut and patch approach is feasible when the damage area is limited; I'd use "ZEE" or F-flashing rather than drip-edge along the upper edges of pieced-in T-111 repair sections and I'd take care to seal, or preferably back-flash and seal the butting vertical edges as well.
Applying a new layer of siding is very tempting as it leaves the foam panels in place; you'd need to install housewrap, carefully placed to drain to the wall bottom, with flashing tape around windows and doors before installing any new layer of siding;
A timber-frame home adds the complication for a side-over job that there are wider un-supported expanses than 16" or 24" stud-spaced homes.
If the contractor wants to add furring strips to support siding between the timber-frame posts I’d worry that the installer is headed for a huge, or as we say here in Mexico, a "Lata" - a can of worms. The furring would have to be heavy enough to span the spaces between your timber-frame posts, and horizontal furring is generally a terrible way to mount any siding system as it tends to trap water.
Unless she or he can run adequately strong furring from wall top to wall bottom to carry the siding; I'm afraid the sider will want to add horizontal strapping between posts to carry the vertical siding on spacing suitable for adding siding.
Two layers of 2x furring + a half inch or more of siding thickness approaches a 4-inch wall build-out. In turn that means that we have to build out all of the wall trim in order to avoid the "sunken eyes" look of homes with recessed trim. (Recessed trim also becomes a leak point). This seems a terrible approach.
In that case, for a wall over which there’s not enough nail base in the old SIP to carry new siding (over house wrap and flashing tape as we agree), you might either
- re-side with plywood siding panels - that adds just 1/2” (over house wrap and flashing tape)
- re-side with lap siding nailed to a new layer of plywood sheathing if you really want to abandon the T-111 look. That adds about an inch instead of 2 inches (you may still need to build-out trim).
As our original article on stress skin structural insulated panels for timber frame homes was written by my friend Steve Bliss, over at our sister site “Building Advisor” (see link at page top), I’ll pass a note on to Steve to see if he has other suggestions.
As with lots of new-fangled building ideas that seem terrific at the time of invention, the passage of time shows what is durable and what’s not.
Finally, the “green mold” problem you describe, if it’s mold, is a cosmetic concern and an indicator of dampness or shade regardless of the mold color. The green goop you most often see on vinyl siding is not mold but algae. Details are at inspectapedia.com/exterior/Vinyl_Siding_Stains.php
Stress Skin Panel Damage Diagnosis & Repair Suggestions from Steve Bliss
Steve Bliss - buildingadvisor.com has some additional comments that we'll post here:
I have more questions than answers and am always reluctant to give specific advice without understanding the problem. A few issues that occur to me:
- Why is the T-111 rotting on the west side? Wind-driven rain? Lack of roof overhang?
Other detailing problems with trim, windows, etc.? Is the rot mainly at the joints, which is the usual problem area for SIPS due to water intrusion or condensation? - What is the condition of the T-111 overall? Is it solid and suitable for a nail-base or is it starting to delaminate?
- If there are leaks, bug, rot at the splines, etc., these should be fixed before covering everything over with new siding.
- How solid is the bond between the plywood and the foam? This is the basis of structural strength in the panel.
If the bond is failing, then you certainly can’t hang siding or anything from it. If the bond is good and the T-111 is mostly sound, then I think it should support horizontal siding, either nailed directly to the T-111 or furred out. - Adding furring at 16” centers is the optimal approach as it creates a rainscreen, but needs to be carefully detailed at top and bottom to allow airflow and drainage without letting bugs in.
As long as the panels are basically sound and the T-111 will still hold nails and screws, the furring approach should be fine. - I don’t think adding horizontal furring will help much. If the panels are sound, it’s not necessary.
If you are relying on nailing all the way through to the timber frame, then you would need 2x4’s for the horizontal pieces and the whole thing is looking like a mess. - A simpler option, if the T-111 will function as a nail-base, using a draining housewrap, such as Benjamin Obdyke’s Home Slicker (see excerpt below).
Bottom line: If the T-111 is intact enough to hold nails and the lamination to the foam is good, the panels should make a fine nail-base for siding. If the T-111 is decayed and delaminating from the foam, then I am skeptical about trying to attach siding to the underlying timberframe.
Excerpt from my article on Sheathing Wrap: - buildingadvisor.com/materials/exteriors/sheathing-wrap/
Draining Housewraps. With growing interest in rain screens, manufacturers have responded to the need for an air space and drainage plane with a variety of plastic housewrap products that are either wrinkled or corrugated to provide an integrated air space.
These include products intended primarily for stucco, such as DuPont StuccoWrap, and others developed for use under siding. These include Pactiv Raindrop 3D, Barricade Drainage Wrap and Barricade WeatherTrek, Benjamin Obdyke’s Hydrogap, and Valeron Vortec.
The small air space created by these products generally range from 1-2 mm (one mm = about 4/100 inch).
Although these materials may allow for a capillary break and some drainage (assuming they are not crushed by the siding installation) it is unlikely that they will provide any measurable airflow to promote drying.
Where better drainage and ventilation are needed, consider using a plastic drainage map, such as Benjamin Obdyke’s Home Slicker HP, which creates a 6-10 mm gap.
...
Reader Comments, Questions & Answers About The Article Above
Below you will find questions and answers previously posted on this page at its page bottom reader comment box.
Reader Q&A - also see RECOMMENDED ARTICLES & FAQs
On 2022-09-02 by InspectApedia-911 (mod) - how electric meter boxes should be properly attached to SIP panels
@leentest2,
I agree that you need help from a licensed electrician, as most likely she'll have to call the electric utility, drop power to the building, then remove the meter box so that any necessary repairs can be made to the SIP panel that supports the electric meter box.
Normally, electrical panels and meter boxes weigh well under the 90 pound limit that would require consulting with a SIP engineer to design a support system.
But there might be a support board built into a SIP where the meter or panel are mounted - something to watch for and to restore if one was used.
With the SIP skin repaired using OSB or plywood, as above on this page, normally you ought to be able to then re-mount the meter box, seal it from water intrusion, and then the electrician will reconnect power.
Meter boxes mount to building exterior sheathing using galvanized or stainless steel screws through the box back into the wall sheathing.
Watch out: indeed I've seen a house fire that started when a homeowner tried to pull a loose meter box off of a wall: one of the mounting screws fell into the meter box, shorted hot to ground, blew the box, scared the devil out of the owner, and started a fire.
Thank you for a helpful question.
We've added
ELECTRICAL WIRING DETAILS for STRESS SKIN SIP BUILDINGS
and would much like to see some sharp photos (one image per comment) of your electrical meter box and its condition.
On 2022-09-02 by leentest2@gmail.com
33 years ago the electrical meter box was attached to the outside of my SIP's with 4 fasteners. 2 at the lower part of the box are secured to the bandboard that sits on top the sill plate. 2 at the upper part of the box were fastened to the T1-11 exterior siding.
These 2 have become corroded to the point they have rusted away and are not holding the box. I can look down and can see the corroded screws and the T1-11 behind the meter box is rotted and needs replaced. Since this is a 200-amp service this DIY project is not one for me to even consider taking on.
My electric company said I needed to get an electric contractor to fix the problem. My experience is not very many contractors in my area have worked on SIP homes. Before I call, I am reaching out to explore how electric meter boxes should be properly attached to SIP panels.
On 2020-09-03 by danjoefriedman (mod)
I agree, Greg, that's a big job. I'd start with the worst side of the home.
On 2020-08-30 by GREG
In 10 years or so notice cedar clapboard curling from sun continually drying out damp clapboard. Installed using manufacturers recommended process, housewrap and ringshank SS nails, which never held well into the 7/16 osb panel exterior. Along with some failed caulk spots at 5/4 cedar trim, condensing from heat loss, the osb is rotted to compost under the house wrap 4' up on wind and sun exposed sides of the home.
Manufacturer said they stopped recommending this type of installation 5 years ago. They now require raised siding as well as a raised roof over any of their panels.
I have a huge job ahead of me that no one wants to tackle. Removing and resetting windows, extension jambs after replacing 4' of panel with a knee wall then raise the siding and replace it. You can't just blame the painters for not having a caulk truck. That just locks in the condensed moisture.
I wish I was warned when they changed their installation requirements and the carpenters should have known the nails don't hold in osb. Any suggestions on how to repair this problem easier?
On 2019-10-03 by danjoefriedman (mod) - how to remove 10 fire damaged SIP panels
Jay
You're facing a repair that I have not done myself. I suspect you'll need to cut through and remove the panels to the centers of the nearest supporting roof or wall framing members that bring you to panels that were not fire-damaged; it's a cut and patch job; Beyond that general remark I don't have any specifics of your building or situation that would let me say more.
Photos and sketches would help.
On 2019-10-01 by Jay Marti
We had fire damage to a post and beam building that is sheathed in SIPS. Any helpful ideas on how to remove 10 fire damaged panels?
On 2019-08-13 by (mod) - advisable to add a layer of 7/16" ZIP system before siding ?
Thank you for an interesting question.
My own inclination, assuming that you are repairing what's essentially a roof deck surface, would be to never install something that's going to give me a lump or bulge or seem under the roofing.
So if I had a very small area of damage I might repair any insulation and then use a filler or even a piece of sheet metal or aluminum to just make a patch.
it would be helpful to see a photograph of a situation.
On 2019-08-12 by donhkemper@gmail.com
I have minor water damage , spot repairable . My question is it advisable to add a layer of 7/16" ZIP system before siding ?
On 2018-06-12 by (mod) - siding delamination
And this siding delamination, on the same Hyde Park New York Medical Building, is probably related to moisture entering the bottom edge of the siding at the Z flashing
IMAGE LOST by older version of Comments code - now fixed. Please re-post the image if you can. Sorry. Mod.
On 2018-06-12 by (mod) - T-111 type siding delamination
Here's a different example of t-111 type siding delamination. I think this occurs where water enters voids that are left between the siding core in the siding exterior wood veneer Dash feature that is a natural artifact of the manufacturing process.
IMAGE LOST by older version of Comments code - now fixed. Please re-post the image if you can. Sorry. Mod.
On 2018-06-12 by (mod) -
Indeed I seem t-111 delaminating, particularly where it's exposed to extra water such as from rain splash of close to ground or at Greeley Seal two joints around windows and doors.
While the choice of sealant is of course important and can be almost overwhelming, it's the application of sealant that I see most often lead to failures. In particular people put salad in the vicinity of a gaffer crack rather than actually taking care to see that it is filling the joint and is Thoroughly applied.
For long-term durability and despite its not being paintable, silicone is still a sealant of choice if it's used as not creating an aesthetic problem.
On 2018-06-12 by Lee Test
Steve, after looking at everything the T1-11 is delaminating from the outside and is still bonded to the foam. Nowhere is the bond between the T1-11 and foam failing.
As suggested, putting on a sheet of T1-11 material is the route we are strongly considering.
If we go this route is there type of material that is better or worse than others. Standard plywood t1-11, SmartSiding or Hardie board?
Also, what type of caulk is best? Is Quad OSI recommended or a general latex caulk?
On 2018-05-12 by Bob
Interesting and helpful.
On 2018-05-12 by Lee Test
@Lee Test,
Steve, as you can see in the pic we have 4 ft cedar lap above and below windows that survived the hail years back. The wall in the pic is the only wall area with the T1-11 rot problem. Below the pic but not in the pic is our heat pump that was pretty well pummeled by the hail but we were able to straighten the fins (took about 3 hrs) and saved the heat pump.
I see no reason that putting cedar lap on this 9ft 6 in span would be a problem.
Behind the SIP panels is the timber frame structure and the panels are nailed to the timber frame underneath the horizontal dark trim board as well as at the vertical corners and where a vertical timber frame post is at the middle of the house wall structure.
On 2018-04-20 by (mod) -
You can find our email at the page top or bottom CONTACT link.
Sorry Lee, when readers post a photo along with a comment they should see a message that the photo awaits moderator approval. That's to protect both readers and our website from malware or from inappropriate content.
On 2018-04-17 by Lee Test
Trying to send photos but I don't think its working.
Do you have a e-mail I can send them to?
On 2018-04-17 by Lee Test
Photos
IMAGE LOST by older version of Comments code - now fixed. Please re-post the image if you can. Sorry. Mod.
On 2018-04-17 by Anonymous
@Lee Test,
IMAGE LOST by older version of Comments code - now fixed. Please re-post the image if you can. Sorry. Mod.
On 2018-04-03 by (mod) -
Thank you for the update, Lee, as your details about finding and fixing areas of leak and damage in SIP panel construction will certainly help other readers.
When I've undertaken such investigations I've wanted to assess the thoroughness and reliability of any approach taken to find hidden damage. The method you use probably won't find every detail but it sounds as if it was effective at spotting the areas of significant leak and rot damage.
You can also use the picture frame icon next to the Comment button to post photos - each will await moderator approval but will then show up for others.
On 2018-04-03 by Lee Test
It's been a long time since I last posted about my SIP panel problem as noted above. Well, with a lot of inspection the damage is on the west wall that was hit by the hail storm years ago and was not noticed at the time.
The hail took out 4 Velux sky light windows, gutters, and roofing. I had 4 companies quote on putting on vinyl and the damaged T1-11 was a topic of discussion. I need to determine how much damage there realy was so I took to the wall and lightly tapped every sq foot with my ball peen hammer.
There was a distinct foot print pattern. I then sawed all the bad spots out and all the bad wood was rotting and delaminating from the outside. All the sheathing was still held very well to the inderlying foam. The SIP panel assoc in FL told me to use either latex caulk or spray foam insulation as an adhesive.
After some testing with some foam boards I found the spray foam was the best adhesive.
I then cut out small sections from 6 inch sq up to 1 ft x 2 ft and removed the wood to the foam.
I applied flashing, the foam and applied holding straps with screws to allow the adhesive to cure for 2 days. Lastly everything was primed with oil based primer and was given 2 coats of Sherwin Williams solid stain.
Now I'm contemplating applying a house wrap and either covering the wall with either cedar lap siding or smartboard 4 x 8 panels.
...
Continue reading at STRESS SKIN / STRUCTURAL INSULATED PANELS (SIPs) - topic home, or select a topic from the closely-related articles below, or see the complete ARTICLE INDEX.
Or see these
Recommended Articles
- ASBESTOS STYROFOAM PANELS
- CELOTEX CemestO BOARD HOMES
- ENERGY SAVINGS in BUILDINGS - home
- FIBERBOARD SHEATHING - home - includes discussion of alternative products & repairs
- FRAMING DETAILS for BETTER INSULATION
- FRAMING DAMAGE, INSPECTION, REPAIR - home
- STRESS SKIN / STRUCTURAL INSULATED PANELS (SIPs)
- STRESS SKIN INSULATED PANEL REPAIR
Suggested citation for this web page
STRESS SKIN INSULATED PANEL REPAIR at InspectApedia.com - online encyclopedia of building & environmental inspection, testing, diagnosis, repair, & problem prevention advice.
Or see this
INDEX to RELATED ARTICLES: ARTICLE INDEX to BUILDING ENERGY SAVINGS
Or use the SEARCH BOX found below to Ask a Question or Search InspectApedia
INDEX to RELATED ARTICLES: ARTICLE INDEX to BUILDING STRUCTURES
Or use the SEARCH BOX found below to Ask a Question or Search InspectApedia
Ask a Question or Search InspectApedia
Share this article:Try the search box just below, or if you prefer, post a question or comment in the Comments box below and we will respond promptly.
Search the InspectApedia website
Note: appearance of your Comment below may be delayed: if your comment contains an image, photograph, web link, or text that looks to the software as if it might be a web link, your posting will appear after it has been approved by a moderator. Apologies for the delay.
Only one image can be added per comment but you can post as many comments, and therefore images, as you like.
You will not receive a notification when a response to your question has been posted.
Please bookmark this page to make it easy for you to check back for our response.
IF above you see "Comment Form is loading comments..." then COMMENT BOX - countable.ca / bawkbox.com IS NOT WORKING.
In any case you are welcome to send an email directly to us at InspectApedia.com at editor@inspectApedia.com
We'll reply to you directly. Please help us help you by noting, in your email, the URL of the InspectApedia page where you wanted to comment.
Citations & References
In addition to any citations in the article above, a full list is available on request.
- Solar Age Magazine was the official publication of the American Solar Energy Society. The contemporary solar energy magazine associated with the Society is Solar Today. "Established in 1954, the nonprofit American Solar Energy Society (ASES) is the nation's leading association of solar professionals & advocates. Our mission is to inspire an era of energy innovation and speed the transition to a sustainable energy economy. We advance education, research and policy. Leading for more than 50 years. ASES leads national efforts to increase the use of solar energy, energy efficiency and other sustainable technologies in the U.S. We publish the award-winning SOLAR TODAY magazine, organize and present the ASES National Solar Conference and lead the ASES National Solar Tour – the largest grassroots solar event in the world."
- Steve Bliss's Building Advisor at buildingadvisor.com helps homeowners & contractors plan & complete successful building & remodeling projects: buying land, site work, building design, cost estimating, materials & components, & project management through complete construction. Email: info@buildingadvisor.com
Steven Bliss served as editorial director and co-publisher of The Journal of Light Construction for 16 years and previously as building technology editor for Progressive Builder and Solar Age magazines. He worked in the building trades as a carpenter and design/build contractor for more than ten years and holds a masters degree from the Harvard Graduate School of Education. Excerpts from his recent book, Best Practices Guide to Residential Construction, Wiley (November 18, 2005) ISBN-10: 0471648361, ISBN-13: 978-0471648369, appear throughout this website, with permission and courtesy of Wiley & Sons. Best Practices Guide is available from the publisher, J. Wiley & Sons, and also at Amazon.com - CSI Section 06 12 16: Stressed Skin Panels
- Stressed Skin Panel Performance After Twenty-Five Years of Service, U.S. Department of Agriculture, Forest Service, Forest Products Laboratory, Madison WI, web search 01/22/2011, original source: http://www.fpl.fs.fed.us/documnts/fplrp/fplrp18.pdf
- Best Practices Guide to Residential Construction, Wiley (November 18, 2005) ISBN-10: 0471648361, ISBN-13: 978-0471648369, appear throughout this website, with permission and courtesy of Wiley & Sons. Best Practices Guide is available from the publisher, J. Wiley & Sons, and also at Amazon.com.
- In addition to citations & references found in this article, see the research citations given at the end of the related articles found at our suggested
CONTINUE READING or RECOMMENDED ARTICLES.
- Carson, Dunlop & Associates Ltd., 120 Carlton Street Suite 407, Toronto ON M5A 4K2. Tel: (416) 964-9415 1-800-268-7070 Email: info@carsondunlop.com. Alan Carson is a past president of ASHI, the American Society of Home Inspectors.
Thanks to Alan Carson and Bob Dunlop, for permission for InspectAPedia to use text excerpts from The HOME REFERENCE BOOK - the Encyclopedia of Homes and to use illustrations from The ILLUSTRATED HOME .
Carson Dunlop Associates provides extensive home inspection education and report writing material. In gratitude we provide links to tsome Carson Dunlop Associates products and services.
 |
HOME | ABOUT | ASK a QUESTION | CONTACT | CONTENT USE POLICY | DESCRIPTION | POLICIES | PRIVACY | |
| © 2026 - 1985 Publisher InspectApedia.com - Daniel Friedman | |||||||||