 Porch & Deck Ledger Connections to buildings
Best Practices for Deck Ledger Boards
- POST a QUESTION or COMMENT about deck ledger board connections, construction, codes & safety
Deck & porch ledger boards:
Most residential decks are supported on one side by a ledger that is bolted or lagged to the home’s band joist. This connection is critical, since a failure here can cause a deck to collapse.
This article explains critical safe-construction details for decks and porches, including avoiding deck or porch collapse and unsafe deck stairs and railings.
InspectAPedia tolerates no conflicts of interest. We have no relationship with advertisers, products, or services discussed at this website.
- Daniel Friedman, Publisher/Editor/Author - See WHO ARE WE?
Photos & Construction Details of Unsafe Compared with Safe Deck & Porch Connections to the Building
Deck Ledger Board Connection to Building Band Joist
[Click to enlarge any image]
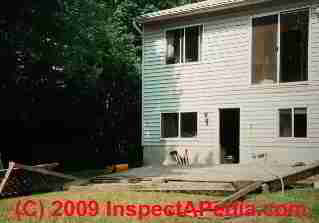
Deck Collapse Case Study (link given below) describes several improper connections between a residential deck and the building that led to the catastrophic deck collapse shown here.
As noted in Best Practices Guide to Residential Construction, Chapter Four, Best Construction Guide for Building Decks and Porches:
Most residential decks are supported on one side by a ledger that is bolted or lagged to the home’s band joist.
This connection is critical, since a failure here can cause a deck to collapse. Failure of the ledger can be caused by too few or undersized fasteners, or by decay in the ledger or band joist. Lags or bolts provide little support when fastened to rotted wood. So proper flashing of the ledger and band joist area is critical.
It is also important that the band joist be nailed adequately to the surrounding structure, since the ledger is only as strong as the structural members it is attached to.
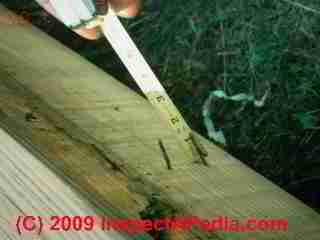
Though deck failures are rare, ledger connections are typically at fault when they occur.
Through-bolts make the strongest connection, but adequately sized lag screws can also work.
With either, it is critical to flash the ledger area and to only use metal components that are compatible with pressure-treated wood.
Our photo (left) shows what can happen if the deck ledger board is simply nailed to the structure.
DECK COLLAPSE STUDY includes additional photos of improper connections between a residential deck and the building that led to a catastrophic deck collapse.
Band Joist-to-House Connection.
Continuing from from Best Practices Guide to Residential Construction (Steve Bliss, J Wiley & Sons) :
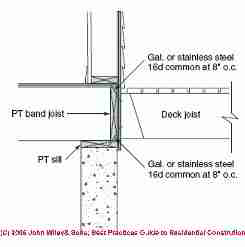
In new construction, if a deck is planned, make sure the band joist is pressure treated and adequately nailed to the sole plate above and the sill or top plate below, using stainless-steel or double-hot-dipped galvanized nails.
In new construction, if a deck is planned, make sure the band joist is pressure treated and adequately nailed to the sole plate above and the sill or top plate below, using stainless-steel or double-hot-dipped galvanized nails.
Fastening with 16d common nails at 8 inches on-center is recommended.
If the nailing cannot be confirmed in a retrofit, extra toenails driven through the exterior can help to reinforce this connection (see Figure 4-6 at above-left).
Ledger-to-Band Joist Connection & Bolt Spacing Requirements
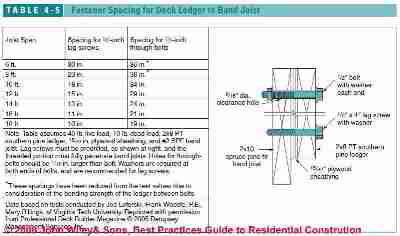
The table immediately below gives the bolt spacing requirements for connecting a deck ledger to the building when the ledger board is bolted directly to the structure.
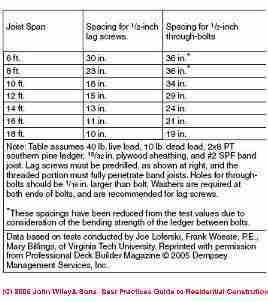
Table of Bolt Spacing for Deck Ledger Spaced Away from the Building
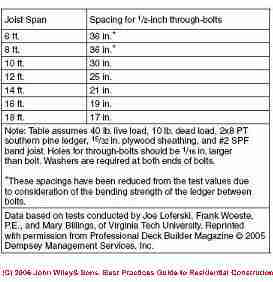
Spacing for bolts and lags used to connect the deck ledger to the building are shown in the table at above-right (ledger bolted directly to the building), and at in the figure at left for deck ledgers that are spaced away from the building.
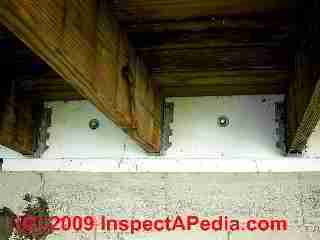
Through-bolts are the most reliable connection, but lag bolts are adequate (photo, above left) as long as they are long enough to fully penetrate the band joist.
For through-bolts, drill holes 1/16 inch larger than the bolt. For lags, drill a full-diameter hole for the unthreaded portion and a smaller hole (65 to 75% of the lag’s diameter) for the threaded portion.
Use washers under the head of the lag bolt or at both ends of through-bolts to keep the head from crushing the wood. Soak the holes with a preservative before inserting the bolts.
Soak the holes with a preservative before inserting the bolts. Spacing for bolts and lags are shown in Table 4-5 below.
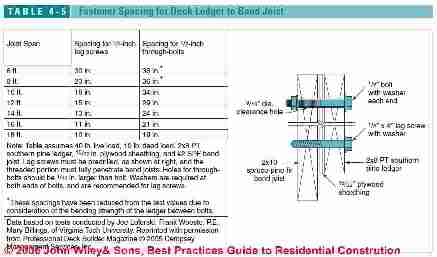
In humid climates, some deck builders prefer to leave a 1/2-inch air space between the ledger and house to assist with drying in the event that the ledger area gets wet. Because this weakens the connection, through-bolts should be used, as shown in Table 4-6 below.
[Click any table or image to see an enlarged, detailed version.]
To prevent splitting, lag screws or bolts should be held back two inches from edges and staggered as shown in Figure 4-7 just below.
Alternative to Deck Ledgers: Self-Supporting Decks & Porches
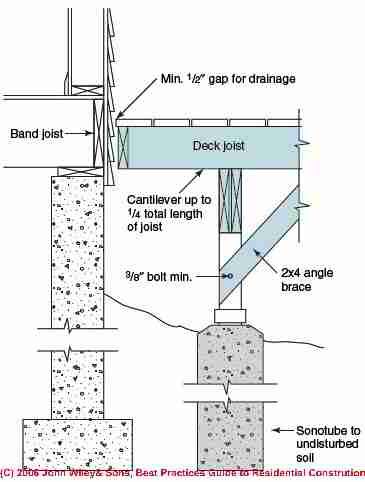
Given all the problems inherent in supporting a deck with a ledger, one approach is to forgo the ledger altogether and support the deck on posts on all sides, keeping it structurally independent of the house.
In the no-deck-ledger approach, the self-supporting deck still may be braced to the house to help it resist racking, but all vertical loads are carried to the ground by posts Figure 4-10 above).
A conservative rule-of-thumb for cantilevered structures states that joists can cantilever one-fourth of their total length, assuming that the cantilevered end is not carrying any loads other than the normal uniform floor loading.
- - Adapted with permission from Best Practices Guide to Residential Construction (Steve Bliss, J Wiley & Sons)
...
Reader Comments, Questions & Answers About The Article Above
Below you will find questions and answers previously posted on this page at its page bottom reader comment box.
Reader Q&A - also see RECOMMENDED ARTICLES & FAQs
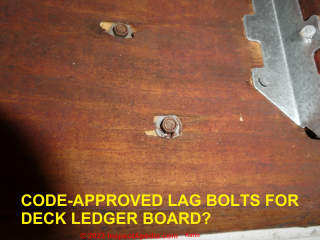
Question: are these deck ledger lag bolts acceptable?
Inspected this deck early today and there were several obvious problems. I noticed they used these types of fasteners for the ledger board to home.
Understood from previous courses that some of these are approved for this application but was not sure if these are. Wondering if you had any idea.
- Dov Ber Kahn, a home inspector in Rockland County, NY has contributed photographs of various building features to InspectApedia. Mr. Kahn is a licensed home inspector in New York and New Jersey, and can be reached at Website: Kahnbhomeinspectors, Tel: 845-445-8234, Email: kdovber@googlemail.com
Reply: Code-approved lag bolte for connecting ledger to rim joist, countersinking not an issue.
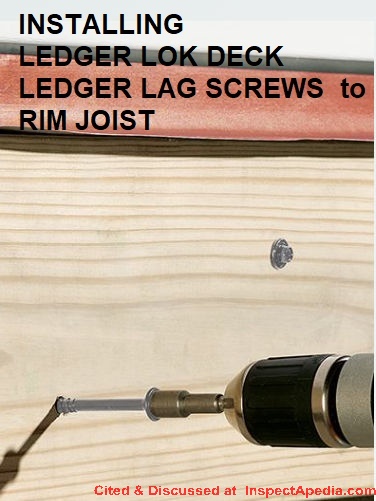
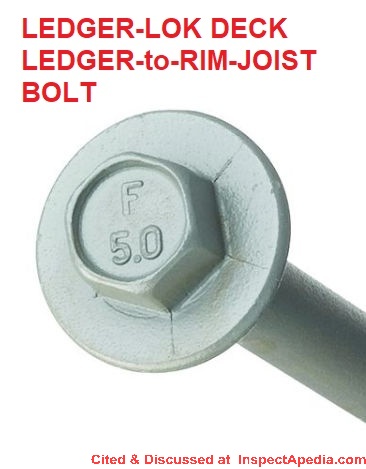
You saw more than I can, but in your photo it looks as if those are lag screws incorporating a built-in washer and with a rating or other information embossed into the bolt head. See the example LedgerLok lag bolt head example given here.
In my OPINION the slight counter-sink of the lag bolts into the leger won't raise a structural or code issue.
The design presumption is that these lag screws bolt into the rim joist of a building.
I've seen people add on a deck and shoot bolts through existing siding into nothing but 1/2" plywood sheathing or even simply fiberboard sheathing on an older home. In that case there is no reliable structural connection and the deck could be unsafe.
And also in my OPINION (I'm not a structural engineer), when I see that the bolt pulls a little into the wood of the ledger board, I'm confident that the bolt is actually biting into a structural member - not just into building sheathing. So I like seeing that detail.
Drill-installed small shank bolts that are code-approved for installing a deck ledger to the building's rim joist, such as LedgerLOK is a code-compliant structural wood screw engineered to fasten a deck ledger board to the rim joist of a house with no predrilling.
We notice that Ledgerlok bolts have an F 5.0 stamped into the bolt head. That may indicate the flat head diameter (or "width").
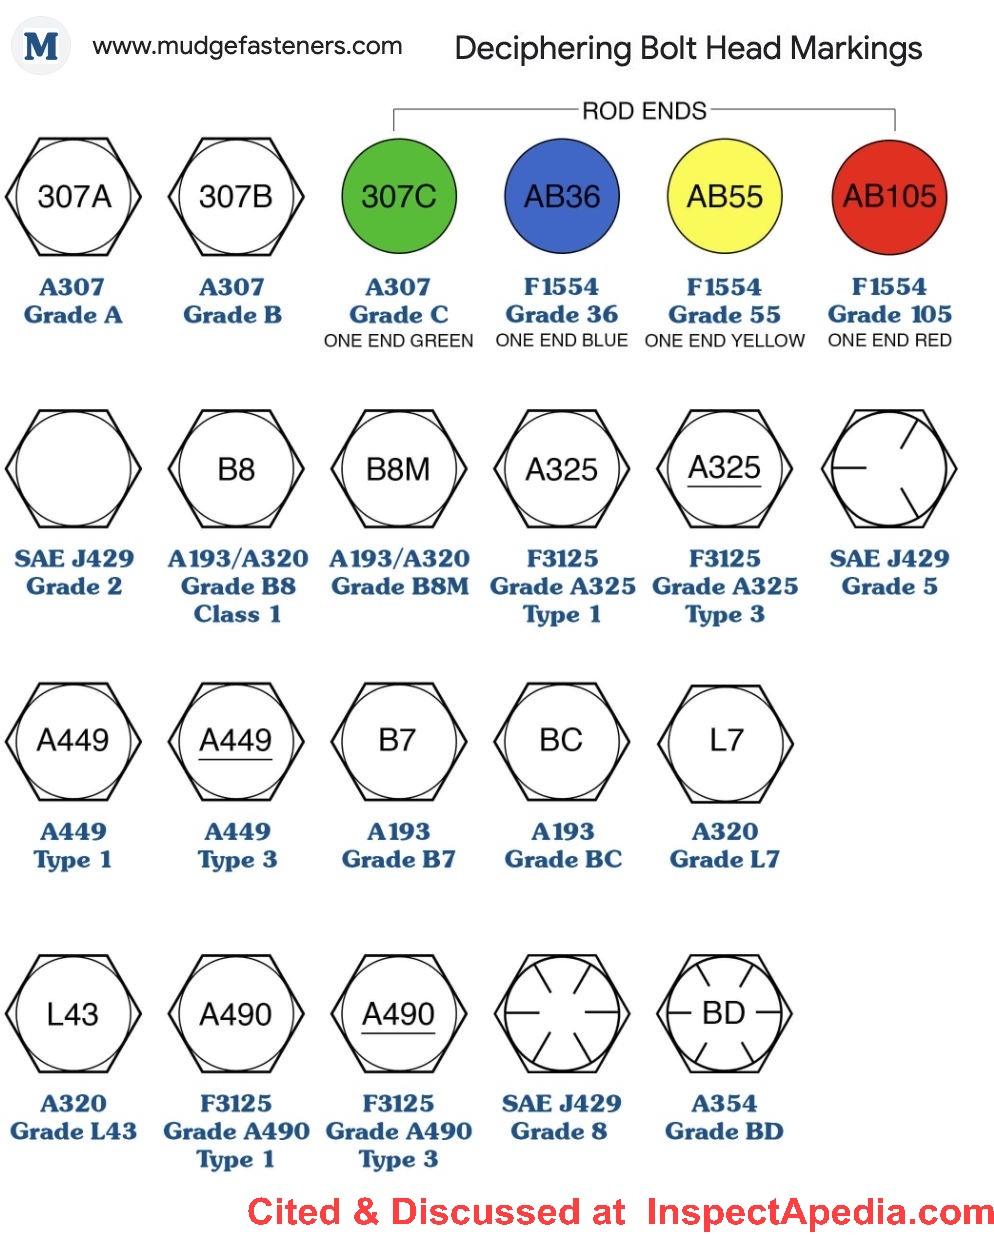
Often other numbers stamped in bolt heads refer to the hardness of the steel. Higher numbers = stronger material.
Bolt head letters can also indicate the manufacturer.
Supporting research
- Details about selecting the proper fasteners for constructing decks and porches and how they are installed can be read
at DECK NAILS, SCREWS, HIDDEN FASTENERS
- LedgerLOK, LedgerLOK TECHNICAL SPECIFICATIONS [PDF] FastenMaster Co., - code-compliant structural wood screw designed to secure the deck ledger to the rim joist of a structure, illustrateda above on this page. This is a structural lag-screw. Web: fastenmaster.com/products/ledgerlok
Excerpt:
The LedgerLOK Ledger Board Fastener has been designed specifically for attaching the deck ledger to a rim joist or band board of the house in a code compliant manner.
When installed as instructed in this bulletin, the LedgerLOK can be used to replace the 1/2" Lag Screws called for in Chapter 5 of the International Residential Code (IRC).
In addition, the proprietary coating on this fastener exceeds the corrosion protection provided by code approved hot-dipped galvanized coatings.
- BOLT HEAD MARKINGS DECODER CHART [PDF] - retrieved 2023/03/27 original source: electronicfasteners.com/wp-content/uploads/2014/09/northamericanmfgidentificationmarkings.pdf
This neat chart de-codes a lot of bolt head markings.
Question: extending the ledger board past the house
Thank you for the informative article. I have a question related to ledger boards. I am designing a low profile deck that will use a ledger board and beam-to-pier framing.
However, the deck is wider than the width of the house it is being attached to.
Thus, the ledger board will extend approximately 4 ft past on each side of the house, where it will terminate and rest on top of a concrete pier (using sonotubes to a depth below the frost line). Is this a feasible design concept?
I would consider doubling up the ledger board to make it a cap beam and to accommodate a 4x4 pier fitting. - (May 8, 2014) Wally said:
Reply:
Wally, you don't state the depth of the framing member. You will want to check framing tables but most likely. A 2x10 or larger spanning just 4 ft and supported by post and pier would be adequate.
If I were building I'd probably overbuild by doubling the lumber to make up a beam, figuring overbuilding a small member is cheaper than bothering an engineer or architect over such a single detail.
I like to flash or cap built-up beams outdoors to extend their life.
Reader comment:
nice - (July 31, 2012) Anonymous said:
...
Continue reading at DECK PIERS & POSTS or select a topic from the closely-related articles below, or see the complete ARTICLE INDEX.
Or see these
Recommended Articles
- DECK COLLAPSE Case Study -collapse of a new code-approved deck
- DECK FLASHING LEAKS, ROT Case Study - older deck with rot collapsed due to improper construction and missing building flashing.
- DECK LAYOUT if you need to know how to lay out and square up the deck plan to set exact pier & post locations.
- DECK LEDGER BOARD INSTALL - for the basics of locating & installing the deck ledger in our online deck design-build guide.
- DECK CONSTRUCTION BEST PRACTICES - home
- DECK DESIGN & BUILD - home
Suggested citation for this web page
DECK LEDGER BOARDS at InspectApedia.com - online encyclopedia of building & environmental inspection, testing, diagnosis, repair, & problem prevention advice.
Or see this
INDEX to RELATED ARTICLES: ARTICLE INDEX to BUILDING DECKS & PORCHES
Or use the SEARCH BOX found below to Ask a Question or Search InspectApedia
Or see
INDEX to RELATED ARTICLES: ARTICLE INDEX to BUILDING STRUCTURES
Or use the SEARCH BOX found below to Ask a Question or Search InspectApedia
Ask a Question or Search InspectApedia
Try the search box just below, or if you prefer, post a question or comment in the Comments box below and we will respond promptly.
Search the InspectApedia website
Note: appearance of your Comment below may be delayed: if your comment contains an image, photograph, web link, or text that looks to the software as if it might be a web link, your posting will appear after it has been approved by a moderator. Apologies for the delay.
Only one image can be added per comment but you can post as many comments, and therefore images, as you like.
You will not receive a notification when a response to your question has been posted.
Please bookmark this page to make it easy for you to check back for our response.
IF above you see "Comment Form is loading comments..." then COMMENT BOX - countable.ca / bawkbox.com IS NOT WORKING.
In any case you are welcome to send an email directly to us at InspectApedia.com at editor@inspectApedia.com
We'll reply to you directly. Please help us help you by noting, in your email, the URL of the InspectApedia page where you wanted to comment.
Citations & References
In addition to any citations in the article above, a full list is available on request.
- Steve Bliss's Building Advisor at buildingadvisor.com helps homeowners & contractors plan & complete successful building & remodeling projects: buying land, site work, building design, cost estimating, materials & components, & project management through complete construction. Email: info@buildingadvisor.com
Steven Bliss served as editorial director and co-publisher of The Journal of Light Construction for 16 years and previously as building technology editor for Progressive Builder and Solar Age magazines. He worked in the building trades as a carpenter and design/build contractor for more than ten years and holds a masters degree from the Harvard Graduate School of Education. Excerpts from his recent book, Best Practices Guide to Residential Construction, Wiley (November 18, 2005) ISBN-10: 0471648361, ISBN-13: 978-0471648369, appear throughout this website, with permission and courtesy of Wiley & Sons. Best Practices Guide is available from the publisher, J. Wiley & Sons, and also at Amazon.com - In addition to citations & references found in this article, see the research citations given at the end of the related articles found at our suggested
CONTINUE READING or RECOMMENDED ARTICLES.
- Carson, Dunlop & Associates Ltd., 120 Carlton Street Suite 407, Toronto ON M5A 4K2. Tel: (416) 964-9415 1-800-268-7070 Email: info@carsondunlop.com. Alan Carson is a past president of ASHI, the American Society of Home Inspectors.
Thanks to Alan Carson and Bob Dunlop, for permission for InspectAPedia to use text excerpts from The HOME REFERENCE BOOK - the Encyclopedia of Homes and to use illustrations from The ILLUSTRATED HOME .
Carson Dunlop Associates provides extensive home inspection education and report writing material. In gratitude we provide links to tsome Carson Dunlop Associates products and services.


