
InspectAPedia® FREE Encyclopedia of Building & Environmental Construction, Diagnosis, Maintenance & Repair |
Question? Just ask us! InspectAPedia
|
 Early Asphalt Shingle Failure Diagnosis
- POST a QUESTION or COMMENT about early or premature roof shingle leaks, wear, or failures
Causes of early failures on asphalt shingle roofs:
This roof failure diagnosis article investigates types and causes of premature or early roof wear or failures.
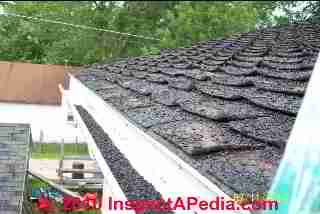
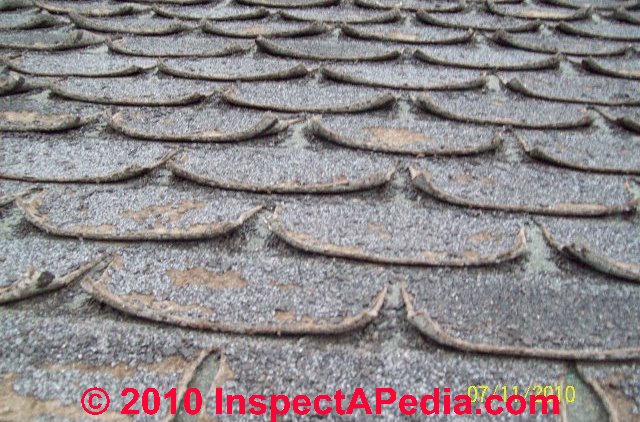
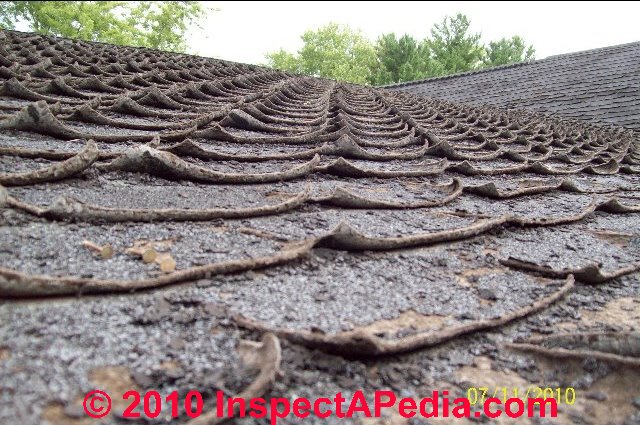
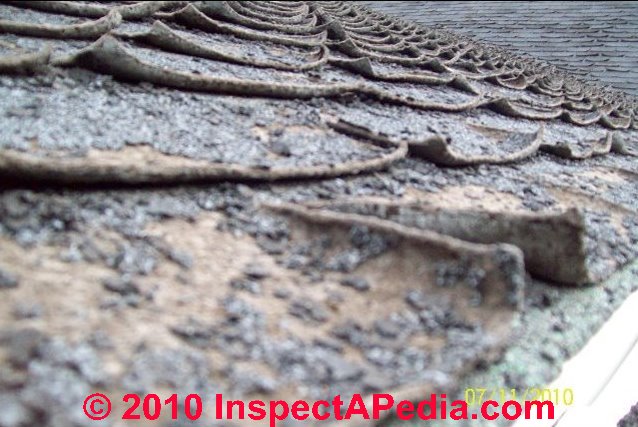
We describe shingle granule loss shingle curling as a sign of wear on asphalt shingle roofs and discusses how to identify & explain the most-common asphalt roof shingle failures. Our page top photo shows shingle edge down-curling. Other photos on this page show shingle corner curling.
InspectAPedia tolerates no conflicts of interest. We have no relationship with advertisers, products, or services discussed at this website.
Six Year Old Roof Shingle Curling & Granule Loss Diagnosis & Commentary
[Click to enlarge any image]
Question about early asphalt roof shingle failure:
I live in Wisconsin and had my roof replaced (total strip down) about 6 years ago. Now my shingles are curling up or fish mouthing. I do not know what you call it but it looks terrible . Can you help me out? A friend said to check on the internet for something with Owens Corning.
I believe they are 30 yr shingles. I do not have any of the paper work but when they put them on they said they only use premium shingles. Check out the rain gutter. It is 3/4 full of shingle fragments and granules. The rest of the roof shingles still look good. Any help would be great. - Louis Tolley, Adams WI

Answer and advice on diagnosing a failing fishmouthed shingle "new roof" job:
The roof shingle wear pattern in your photos is easily mistaken for "fishmouthing asphalt roof shingle" but what we see in your photos is not "fishmouthing" but rather shingle curling, combined with extreme granule loss.

Comparing Shingle Fishmouth Patterns with Shingle Curling Patterns
Fishmouthing asphalt shingles appear as an upwards curve in the center of shingle tabs, usually where the center of a fishmouthed shingle tab crosses over the shingle butt joints in the course below. See the fishmouth shingle photos above on this page.
Shingle tab curling, such as shown in your photos, occurs at the corners of shingle tabs, not in the center of the tab. See CURLING ASPHALT SHINGLES.
How old is This Roof Wear-Out?
Regardless, your roof photos show severe wear and curled shingle tabs that we see at the end of roof life - your photos of this worn roof slope show that every single shingle tab is curled up from a corner – that combined with the significant granule loss would be very unusual on a six-year-old roof. We comment further and provide some roof failure diagnostic questions just below.
From looking at the photographs, and recognizing that we are not looking at the entire roof, some comments and questions arise that should help sort out this "early roof failure" mystery:
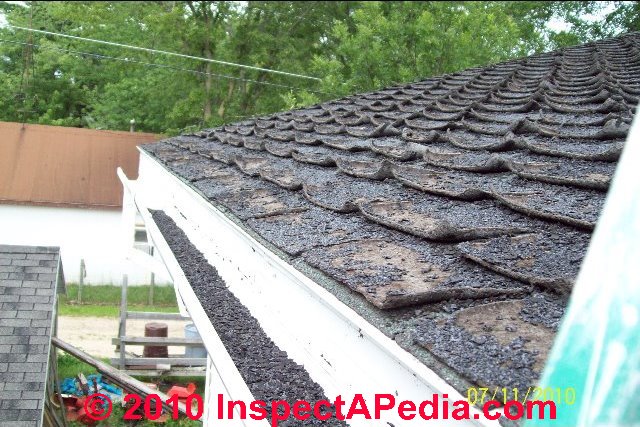
- The roof slopes in your photographs are totally worn out
- This does not look like a six year old roof
- Your comments suggest that other roof slopes are fine.
- Before we assume that the wear difference is due to the building, roof ventilation, weather exposure, or a similar cause, let's consider that the roof is reported to be just six years old - actually we wonder if that's quite right.
Premature Asphalt Roof Shingle Failure Diagnostic Questions
Watch out: First off - don't fall off the roof while you are up there looking around.
Don't walk on these fragile, damaged asphalt shingles - they'll break and leak.
Go back to look at your information on your 6 year old re-roof job with the questions listed below. If you have no records and no documentation of who did the roof, what was the contracted scope of work (all slopes or just some) we can still figure this out by inspection of the whole building.
- What type of shingles were installed in your re-roof job six years ago (your photos of failing shingles look like organic base not fiberglass base)
- Are the same type of shingles present on all roof slopes?
- Are the shingles that are failing or showing wear the same kind of shingle as on the rest of the roof? Same pattern, model, brand, age, batch, package?
- Were all the roof slopes re-roofed or just some slopes? Sometimes only the worst or actively leaking roof slope is replaced, especially if the homeowner is squeezing for the lowest re-roof price, money is tight, or the roofer feels that there are five or more years remaining on other roof slopes
- Did anyone actually inspect the roof before and after the job, other than the roofer?
- Do all of your roof slopes look the same? That is, is the shingle wear the same on all slopes?
- Are all roof slopes exposed to similar wind and weather conditions ? Usually not - which slope(s) show the most shingle wear?
- Are you sure the roofer actually replaced shingles on all of the slopes?
- Did you actually see that work being done?
- If you remove or lift one of these bad shingles at the roof edge, do you see raw roof deck below or other old shingle layers?
- Other asphalt shingle roof wear indicators and conditions (besides fishmouthing) are discussed beginning at ASPHALT ROOF SHINGLES.
Usually when we have inspected early roof failure cases like this it turns out that there was a misunderstanding (or less often, dishonesty) - the roofer did not re-shingle all slopes, maybe just one of them, but the owner thought they all were being done.
Also see our early ridge cap shingle failure discussion at RIDGE & HIP CAP SHINGLES. Readers are also invited contribute roof failure information to the web author for research purposes. web author for research purposes.
...
Continue reading at WARRANTIES for ROOF SHINGLES or select a topic from the closely-related articles below, or see the complete ARTICLE INDEX.
Or see these
Recommended Articles
Suggested citation for this web page
EARLY ROOF FAILURE DIAGNOSTIC QUESTIONS at InspectApedia.com - online encyclopedia of building & environmental inspection, testing, diagnosis, repair, & problem prevention advice.
Or see this
INDEX to RELATED ARTICLES: ARTICLE INDEX to BUILDING ROOFING
Or use the SEARCH BOX found below to Ask a Question or Search InspectApedia
Ask a Question or Search InspectApedia
Try the search box just below, or if you prefer, post a question or comment in the Comments box below and we will respond promptly.
Search the InspectApedia website
Note: appearance of your Comment below may be delayed: if your comment contains an image, photograph, web link, or text that looks to the software as if it might be a web link, your posting will appear after it has been approved by a moderator. Apologies for the delay.
Only one image can be added per comment but you can post as many comments, and therefore images, as you like.
You will not receive a notification when a response to your question has been posted.
Please bookmark this page to make it easy for you to check back for our response.
Our Comment Box is provided by Countable Web Productions countable.ca
Citations & References
In addition to any citations in the article above, a full list is available on request.
- "Certainteed Shingle Applicators' Manual [for] Presidential Shake™ and Presidential Shake™ TL", [... the correct procedures
for installing Presidential Shake™ and Presidential Shake™ TL shingles], CertainTeed Saint Globan, web search 08/02/2011, original source for the CertainTeed Presidential Shake TL triple laminate asphalt roof shingles: see http://www.certainteed.com/products/roofing/309019
Telephone: Building Professionals call: 800-233-8990, Consumers call: 800-782-8777 - Glenn Stewart, Pacific Coast Inspections, PO Box 2344 Aptos, Ca 95001, is a professional home inspector located in Aptos CA. Tel: 866-570-1222, aka "the House Whisperer", www.TheHouseWhispererBlog.com. Email: 1bbglenn@comcast.net
- Our recommended books about building & mechanical systems design, inspection, problem diagnosis, and repair, and about indoor environment and IAQ testing, diagnosis, and cleanup are at the InspectAPedia Bookstore. Also see our Book Reviews - InspectAPedia.
- Best Practices Guide to Residential Construction, by Steven Bliss. John Wiley & Sons, 2006. ISBN-10: 0471648361, ISBN-13: 978-0471648369, Hardcover: 320 pages, available from Amazon.com and also Wiley.com. See our book review of this publication.
- Decks and Porches, the JLC Guide to, Best Practices for Outdoor Spaces, Steve Bliss (Editor), The Journal of Light Construction, Williston VT, 2010 ISBN 10: 1-928580-42-4, ISBN 13: 978-1-928580-42-3, available from Amazon.com
- The Journal of Light Construction has generously given reprint permission to InspectAPedia.com for this article. All rights and contents are ©Journal of Light Construction and may not be reproduced in any form.
- Architectural elements: the technological revolution: Galvanized iron roof plates and corrugated sheets; cast iron facades, columns, door and window caps, ... (American historical catalog collection), Diana S Waite, available used out of Amazon.
- Asphalt Roofing Residential Manual from ARMA the Asphalt Roofing Manufacturers Association Website https://www.asphaltroofing.org/product/residential-asphalt-roofing-manual/ ,
- Building Pathology, Deterioration, Diagnostics, and Intervention, Samuel Y. Harris, P.E., AIA, Esq., ISBN 0-471-33172-4, John Wiley & Sons, 2001 [General building science-DF] ISBN-10: 0471331724 ISBN-13: 978-0471331728
- Building Pathology: Principles and Practice, David Watt, Wiley-Blackwell; 2 edition (March 7, 2008) ISBN-10: 1405161035 ISBN-13: 978-1405161039
- Built-Up Roof Systems, Manual, C.W. Griffin, Mcgraw-Hill (Tx); 2nd edition (July 1982), ISBN-10: 0070247838, ISBN-13: 978-0070247833
- Concrete Folded Plate Roofs, C. Wilby PhD BSc CEng FICE FIStructE (Author), Butterworth-Heinemann, 1998, ISBN-10: 0340662662, ISBN-13: 978-0340662663
- Concrete Shell Roofs, C. Wilby PhD BSc CEng FICE FIStructE (Author),
- Concrete Dome Roofs (Longman Concrete Design and Construction Series),
- Concrete Roofing Tile, History of the, Batsford, 1959, AISN B000HLLOUC (available used)
- Copper Roofing, by CDA
- Copper Roofing, Master specifications for copper roofing and sheet metal work in building construction: Institutional, commercial, industrial, I.E. Anderson, 1961 (hard to find)
- Corrugated Iron, Building on the Frontier, Simon Holloway
- Green Roof Plants: A Resource and Planting Guide, Edmund C. Snodgrass, Lucie L. Snodgrass, Timber Press, Incorporated, 2006, ISBN-10: 0881927872, ISBN-13: 978-0881927870. The text covers moisture needs, heat tolerance, hardiness, bloom color, foliage characteristics, and height of 350 species and cultivars.
- Green Roof Construction and Maintenance, Kelley Luckett, McGraw-Hill Professional, 2009, ISBN-10: 007160880X, ISBN-13: 978-0071608800, quoting: Key questions to ask at each stage of the green building process Tested tips and techniques for successful structural design Construction methods for new and existing buildings Information on insulation, drainage, detailing, irrigation, and plant selection Details on optimal soil formulation Illustrations featuring various stages of construction Best practices for green roof maintenance A survey of environmental benefits, including evapo-transpiration, storm-water management, habitat restoration, and improvement of air quality Tips on the LEED design and certification process Considerations for assessing return on investment Color photographs of successfully installed green roofs Useful checklists, tables, and charts
- Handbook of Building Crafts in Conservation, Jack Bower, Ed., Van Nostrand Reinhold Company, NY 1981 ISBN 0-442-2135-3 Library of Congress Catalog Card Nr. 81-50643.
- Historic Preservation Technology: A Primer, Robert A. Young, Wiley (March 21, 2008) ISBN-10: 0471788368 ISBN-13: 978-0471788362
- Low Slope Roofing, Manual of, 4th Ed., C.W. Griffin, Richard Fricklas,
McGraw-Hill Professional; 4 edition, 2006, ISBN-10: 007145828X, ISBN-13: 978-0071458283
- Roof failure causes in depth (and specific methods for avoiding them)
- Roof design fundamentals and flourishes, based on voluminous industry research and experience
- New technologies and materials -- using them safely and correctly
- Comprehensive coverage of all major roofing systems specifications, inspection, and maintenance tools for roofing work
- Patio Roofs, how to build, Sunset Books
- Problems in Roofing Design, B. Harrison McCampbell, Butterworth Heineman, 1991 ISBN 0-7506-9162-X (available used)
- Roofing The Right Way, Steven Bolt, McGraw-Hill Professional; 3rd Ed (1996), ISBN-10: 0070066507, ISBN-13: 978-0070066502
- Roof Tiling & Slating, a Practical Guide, Kevin Taylor, Crowood Press (2008), ISBN 978-1847970237,
If you have never fixed a roof tile or slate before but have wondered how to go about repairing or replacing them, then this is the book for you. Many of the technical books about roof tiling and slating are rather vague and conveniently ignore some of the trickier problems and how they can be resolved. In Roof Tiling and Slating, the author rejects this cautious approach. Kevin Taylor uses both his extensive knowledge of the trade and his ability to explain the subject in easily understandable terms, to demonstrate how to carry out the work safely to a high standard, using tried and tested methods.
This clay roof tile guide considers the various types of tiles, slates, and roofing materials on the market as well as their uses, how to estimate the required quantities, and where to buy them. It also discusses how to check and assess a roof and how to identify and rectify problems; describes how to efficiently "set out" roofs from small, simple jobs to larger and more complicated projects, thus making the work quicker, simpler, and neater; examines the correct and the incorrect ways of installing background materials such as underlay, battens, and valley liners; explains how to install interlocking tiles, plain tiles, and artificial and natural slates; covers both modern and traditional methods and skills, including cutting materials by hand without the assistance of power tools; and provides invaluable guidance on repairs and maintenance issues, and highlights common mistakes and how they can be avoided. The author, Kevin Taylor, works for the National Federation of Roofing Contractors as a technical manager presenting technical advice and providing education and training for young roofers. - Smart Guide: Roofing: Step-by-Step Projects, Creative Homeowner (Ed), 2004, ISBN-10: 1580111491, ISBN-13: 978-1580111492
- Solar heating, radiative cooling and thermal movement: Their effects on built-up roofing (United States. National Bureau of Standards. Technical note), William C Cullen, Superintendent of Documents, U.S. Govt. Print. Off (1963), ASIN: B0007FTV2Q
- In addition to citations & references found in this article, see the research citations given at the end of the related articles found at our suggested
CONTINUE READING or RECOMMENDED ARTICLES.
- Carson, Dunlop & Associates Ltd., 120 Carlton Street Suite 407, Toronto ON M5A 4K2. Tel: (416) 964-9415 1-800-268-7070 Email: info@carsondunlop.com. Alan Carson is a past president of ASHI, the American Society of Home Inspectors.
Thanks to Alan Carson and Bob Dunlop, for permission for InspectAPedia to use text excerpts from The HOME REFERENCE BOOK - the Encyclopedia of Homes and to use illustrations from The ILLUSTRATED HOME .
Carson Dunlop Associates provides extensive home inspection education and report writing material. In gratitude we provide links to tsome Carson Dunlop Associates products and services.
 | HOME | ABOUT | ASK a QUESTION | CONTACT | CONTENT USE POLICY | DESCRIPTION | POLICIES | PRIVACY | |
| © 2024 - 1985 Publisher InspectApedia.com - Daniel Friedman | |||||||||