
InspectAPedia® FREE Encyclopedia of Building & Environmental Construction, Diagnosis, Maintenance & Repair |
Question? Just ask us! InspectAPedia
|
 Hot Water Heater Noise Diagnosis
Water Heater banging, popping, rumbling sound diagnosis & cure
- POST a QUESTION or COMMENT about water heater noise troubleshooting and water heater scale and lime removal
Catalog of causes & cures of noises heard at or in water heaters, calorifiers, cylinders:
This article explains how to diagnose and cure noisy water heaters such as popping, hissing, crackling or banging.
We describe the different types of sounds heard at a water heater, what they mean, their cause, and their elimination.
We discuss: How to diagnose and cure water heater rumbling, clanking, cracking, resonant shrieking or whistling, or other hot water heater noises. Advice and photo-guide to de-liming and de-scaling hot water heaters - Scale formation in water heaters and methods of prevention. How to remove silt or debris from the hot water heater tank. Rate of deposition of lime and scale in plumbing systems.
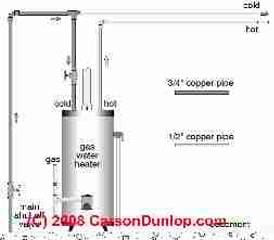
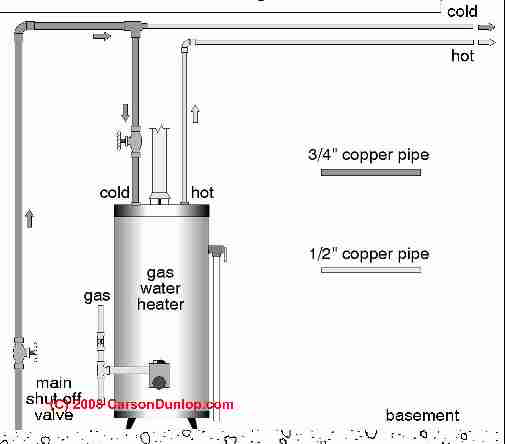
The sketch at page top is courtesy of Carson Dunlop Associates, a Toronto home inspection & home inspection education company. Used with permission.
InspectAPedia tolerates no conflicts of interest. We have no relationship with advertisers, products, or services discussed at this website.
Noise Diagnosis & Repair Guide for Residential Hot Water Heaters
 Here, listed alphabetically, we describe all of the sounds that might come from a water heater, geyser, cylinder, or calorifier.
We give an index into this water heater sound dictionary but you may want to read through the whole list because what one person describes as a hiss another may consider a sizzle. Is it a snap, crackle or pop?
Water Heater / Calorifier / Geyser / Cylinder Noise & Sound Index
- BANGING WATER HEATER
- BOILING WATER HEATER NOISE
- BOOMING WATER HEATER
- BUZZING WATER HEATER
- CLICKING WATER HEATER
- COMBUSTION NOISES
- CRACKLING WATER HEATER
- HUMMING WATER HEATER
- HISSING WATER HEATER
- KNOCKING WATER HEATER
- POPPING WATER HEATER
- POUNDING WATER HEATER
- RUMBLING WATER HEATER
- SCREECHING WATER HEATER
- SCREAMING WATER HEATER
- SHRIEKING WATER HEATER
- SIZZLING WATER HEATER
- TICKING WATER HEATER
- VIBRATING WATER HEATER
- WHISTLING WATER HEATER
[Click to enlarge any image]
List of Water Heater Noises & Their Causes
- Bang or Boom or Pounding: several problems can cause a bang when a water heater first starts heating water. Common water heater banging noises that we'll detail below include
- Dangerous gas or oil fired heater malfunctions
- Scale or lime formation in the water heater, particularly gas or oil fired water heaters where scale on the heater tank bottom causes surging and banging sounds.
The term "lime" is in this case a synonym for "scale" and both refer to a build-up of Calcium Carbonate (CaCO3) as the predominant ingredient in scale in hot water systems. Scale tends to form as minerals precipitate out of heated water at the hottest points in the system such as at the bottom of a gas or oil fired calorifier (water heater) or at the surface of electric water heater elements.
Water that is high in mineral content and water that is heated to higher temperatures both cause an increase in the rate of scale formation.
See WATER HEATER SCALE DE-LIMING PROCEDURE for a description of how we remove scale from a water heater using an acid wash and flushing. - Thermal expansion of hot water can also cause banging and booming sounds as noises may be transmitted through pipes, ducts, even building framing.
- Water hammer, a loud bang when water is shut off, an artifact of water velocity in the building piping system:
See WATER HAMMER NOISE DIAGNOSE & CURE for a detailed explanation of the causes & cures of this sound
also see AOS Bulletin 11: WATER HAMMER [PDF] retrieved 2017/11/17, original source: https://www.hotwater.com/lit/bulletin/bulletin11.pdf
Thermal-expansion water heater start-up bangs: if the water heater was cold, for example because it had been turned off or because you first used up all hot water and then stopped running water, thermal expansion might cause a water expansion problem, though I don't commonly see this as causing a "bang" - some reports claim it might. Your hot water system may need the addition of an expansion tank.
Watch out: water hammer is more than a troubling noise, it can be dangerous in subtle ways. Water hammer is usually caused by the combination of velocity of running water and the sudden closing of a valve through which water was moving.
Water hammer from any source can, however cause leaks at relief valves and rarely, other plumbing leaks. A leaky relief valve can in turn become clogged by mineral deposits rendering it inoperable. That in turn can cause a dangerous BLEVE Explosion.
Gas or oil-fired water heater start-up bangs: Water heater start-up bangs can be caused by other problems including thermal expansion of metal parts, even a flue vent connector or the water heater tank itself, or more serious, water heater start-up exploding sounds may be caused by dangerous burner or fuel system problems or leaks.
See HOT WATER EXPANSION TANKS to address thermal expansion problems.
Or
See WATER HAMMER NOISE DIAGNOSE & CURE to address water hammer problems traced to water velocity
Or
See BLEVE EXPLOSIONS for an explanation of why any pressurized water tank can become a rocket
Watch out: If your water heater makes a banging sound only when it starts AND if your water heater is gas or oil fired the situation may be dangerous. If there is un-burned gas or oil that is being re-ignited when a burner starts then your heater is not operating properly and it is unsafe. The risk is a dangerous gas explosion or an oil burner puffback explosion.
Turn off water heaters that are making these explosion sound, bangs or booms and call for professional repair.
See GAS LEAK DETECTION, LP / NG if there is gas accumulating that is igniting and causing a boom or bang when your gas fired water heater starts-up
See OIL BURNER SOOT & PUFFBACKS if you have an oil burner type water heater that makes a bang when the oil burner ignites or starts-up
See THERMOCOUPLE REPAIR / REPLACEMENT - for help in repairing thermocouple problems that may be preventing proper gas burner operation: the flame won't stay lit
or the broad topic of controlling plumbing noises in buildings
see SOUND CONTROL for PLUMBING.Also see NOISE / SOUND DIAGNOSIS & CURE where we describe how to locate the source of, identify and correct various building sounds and noises indoors or on occasion, noises from outside that penetrate indoors at annoying levels.
Separately at SOUND CONTROL in BUILDINGS we provide a series of detailed articles on reducing unwanted building noise levels through building design, insulation, sound isolation, and noise barriers.
Lime or scale in plumbing systems is caused by hard water as well as silicates, sulfates, and similar materials form water scale that coats the bottom of a hot water tank or the surface of the electrodes in an electric water heater, interfering with proper water heater operation, causing water heater noises, reduction in hot water quantity, increased water heater operating costs, and a shorter water heater life.
Silt and soil debris can also collect in a water heater tank where it can cause similar problems even if the water supply is not hard.Silt and debris can be easily removed from a hot water tank by periodic flushing. In fact if your water heater is quite noisy, it will probably be easier to remove un-wanted mineral deposits from the water tank than it will be later if you wait until the heater is no longer making much noise (because the mineral layer has solidified).
Install a sediment filter on the incoming water supply to avoid this problem in the first place.But lime or water scale are more difficult to remove from a water heater: manually scraping the tank bottom through the drain opening or use of a de-limer chemical will be needed. Below we describe these procedures. Readers should also see our discussion of mineral clogging of water piping, water heaters, and tankless coils, organized
at HOT WATER IMPROVEMENTS.Other gas fired water heater noises are discussed at GAS FLAME & NOISE DEFECTS.
Also see BANGING BOOMING NOISE DIAGNOSIS & CURE
- Boiling noises from the water heater - note that we're referring to an intermittent burbling or bubbling boiling sound.
See our advice at POPPING WATER HEATER
Watch out: If your water heater is actually boiling its temperature is at or over 100°C or 212°F (at sea level) it is too hot, unsafe, and is at risk of causing scalding burns. - Buzzing noises at a gas regulator on water heaters or other appliances may be due to a bad regulator or control.
See GAS REGULATOR NOISES
See BUZZING NOISE DIAGNOSIS - topic home - Clicking sounds in the water heater or geyser: probably thermal expansion among water heater parts or hot water distribution piping.
Modest water heater clicking or tapping sounds may be considered normal if they're occurring in a heat trap installed in the hot water supply piping above / downstream from the water heater itself.
A water heater heat trap is a device intended to prevent hot water from circulating or rising in the distribution piping before there is a call for hot water by opening a tap.
Water heater heat trap details
Hot water rises in vertical containers such as a water heater or cylinder as well as within vertical water heater piping. The heat from rising hot water can easily extend several feet or more past the water heater hot water outlet depending principally on the temperatures involved, the total rise of vertical hot water piping, and the absence of a water heater heat trap.
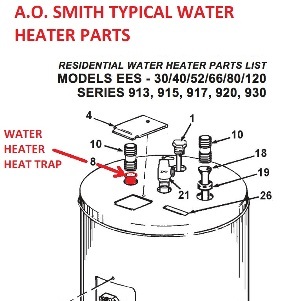
Water heater manufacturers, such as AO Smith whose data we use here for example purposes, provide two types of heat trap inserts at the water heater hot water outlet at the top of the heater: an internal ball-type water heater heat trap or an internal flapper type water heater heat trap, selected depending on the water heater model.
Typically the heat trap is incorporated in or inserted just below a short pipe nipple that is screwed into the water heater top at the hot water outlet as shown in our sketch below.
There item #8 is a heat trap insert that is placed at the heater outlet before the 3/4" x 2" or 3" short nipple (#10) is installed.
Heat traps are used on most tank-type water heaters, regardless of their energy source: electric, gas, oil, solar.
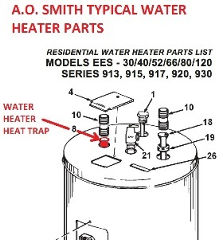
Water heater heat trap information source: A.O. Smith Electric Residential Water Heater Parts List [PDF] Models EES 30.40.52/66/80/120, Series 913, 915, 917, 920, 930, A.O. Smith Water Products Co., 5621 W. 115th St., Aslip IL 60803 USA, Tel: 1-800-433-2545, Website: www.hotwater.com, Email: parts@hotwater.com, retrieved 2018/09/07, original source: https://www.hotwater.com/lit/partslists/psd1762.pdf
Clicking noises are normal during the ignition phase of gas-fired water heaters and gas fired tankless water heaters that use electron ignition - a feature on virtually all modern tankless water heaters and most new gas fired water heaters.
Also check the routing of hot water piping: hot water pipes passing through too-tight openings may click, tap, or even squeak as the metal hot water pipes expand during hot water flow through them.
Also see TICKING - Combustion noises at the water heater: these water heater noises include whooshing and roaring sounds
GAS FLAME & NOISE DEFECTS
and
what I [DF] call indirect-combustion noises at water heaters such as chimney defects, control device vibration at the gas regulator, crackling and popping due to thermal expansion or due to water heater scale formation.
Also see WATER HEATER NOISE RESEARCH - Crackling sounds at the water heater: see Banging water heaters at the top of this list. Most likely there's a scale problem in the water heater.
Crackling on an electric water heater may be caused by scale formation on the heating elements themselves while in gas and oil fired calorifiers or heaters the scale problem is probably on the bottom of the water heater tank. Thicker scale means worse banging, crackling, knocking, popping sound. The heater needs to be de-scaled.
See WATER HEATER SCALE DE-LIMING PROCEDURE
Also see our discussion of crackling noises caused by an aluminum hydroxide slime formation in the water heater, discussed in this alphabetically-organized list below at Rumbling Sounds. - Humming water Heater Noises:
Humming sounds from an electric water heater is most-often caused by turbulence in water inside the heater as water flows around its one or two electric heating elements. Electric water heater experts suggest trying to slightly tighten the electric heater element in its mount to stop or reduce its vibration.
By turning the (loop-shaped) electric heater element in position inside the heater you are changing the direction of water flow across that element as water enters and leaves the heater.
That may stop the noise.
Humming water heater fix tip: If it is impossible to rotate the heating element clockwise (rightie-tightie) you can still make an adjustment by loosening the element - turning it counterclockwise. But watch out for leaks.
If leaks start you'll need to drain the heater, remove the element, apply new teflon paste or tape to the treads, and position it anew in its mount. At that point, just tighten the element enough that it's secure and not leaking (on re-fill of the heater).
As soon as the water heater humming noise stops, quit there. If the noise is still present you'll be able to rotate the element 1/8 of a turn at a time until the humming heater noise stops.
Humming electric motors can be the cause of a humming water heater whose heat source is an oil burner. A humming electric motor is probably not running, unable to start, and should be turned OFF immediately.
Then see ELECTRIC MOTOR NOISE DIAGNOSIS
Humming or vibrating gas regulators can be the cause of a humming gas fired water heater.
See GAS REGULATOR NOISES
Also see HUMMING NOISES in BUILDINGS - topic home
Reader Question: high pitched humming at electric water heater2016/08/21 Azcabin said:
Our new electric water heater (3 months old) is making a very loud high pitched humming noise, any idea why?
Reply: electric water heater element vibration? Try rotating the heater element 1/8 turn.
I don't know for sure what the humming is, Az.
On a few water heater models, particularly those using a rather long heating element, water flowing across the element may cause it to vibrate and may generate a humming sound.
You can probably diagnose this cause of humming electric water heater noise by turning off water into the heater or by making sure that nobody in the building is running hot water. If no water is running through the heater and the noise stops, you've found the probable cause.
If the humming IS traced to the heating element, ask your installer to inspect the element installation; simply tightening it or rotating it as little as 1/8 of a turn should stop the humming noise.
Watch out: left-unattended, a humming vibrating electric water heater element might begin to leak at its mount.
Is there a circulator on your water heating system? If so check the pump for noise.
Watch out: a failing or mis-wired electrical circuit could cause buzzing or humming - that would be unsafe.
- Are you sure it's really humming and not rumbling or hissing - sounds associated with scale deposits?
- Try turning power to the heater off, wait 5 minutes, then turn it on. Let me know what you observe.
- Finally: a new heater and its installation should be under warranty so it makes sense to call the installer for help.
- Hissing water heater or water cylinder noises: If your water heater is an electric unit, these same mineral deposits can cause a hissing noise when the heating electrodes are operating.
For both of the noises above, start by reviewing the discussion following below and titled Why Should You Remove the Scale Deposits, Silicates, and Silt from Your Water Heater Tank? - Knocking sounds in the water heater: see Banging water heaters at the top of this list. Most likely there's a scale problem in the water heater.
- Popping, banging, crackling, gurgling, ringing, rapid surging boiling water, rumbling in the water heater or calorifier: If you hear loud popping, cracking, or clanking noises from your hot water heater when it is operating, the cause might be mineral deposits which have accumulated on the bottom of the water heater tank interior surface.
If your water supply is hard (see DETECT HARD WATER), the minerals in the water tend to precipitate out at the hottest place in the plumbing system. Often this means that the water heater itself will accumulate solid precipitate of minerals.
Our photograph near the top of this article shows our measurement of the thickness of mineral scale removed from the bottom of a six-year-old gas-fired water heater - more than 1/2 cm in thickness! The "lime" scale that forms in water heater tanks is composed principally of calcium and magnesium carbonate.
Also see our discussion of crackling, rumbling, popping water heater noises caused by an aluminum hydroxide slime formation in the water heater, discussed in this alphabetically-organized list at Rumbling Sounds.
The fix: WATER HEATER SCALE DE-LIMING PROCEDURE
- Pounding sounds at the water heater: Usually from scale formation; see the causes and cures at Banging water heaters at the top of this list.
Also see our discussion of crackling, rumbling, popping water heater noises caused by an aluminum hydroxide slime formation in the water heater, discussed in this alphabetically-organized list at Rumbling Sounds. - Rumbling sounds at the water heater: Rumbling noises at a water heater are most-often due to either scale build-up in the water heater (mostly on the heater's bottom surface) or due to build-up of aluminum hydroxide "gel" (slime) in the water heater.
Pounding causes due to scale are discussed at Banging water heaters at the top of this list. A scale problem in the water heater is the most-common cause of this noise complaint.
See WATER HEATER SCALE DE-LIMING PROCEDURE for a detailed water heater de-liming procedure.
Aluminum hydroxide build-up can occur in a water heater and cause crackling, gurgling, popping, rumbling noises in the water heater when the water supply has a high pH (pH of 8 or higher) and where the sacrificial anode in the water heater is made of aluminum.
The high pH of alkaline water reacts chemically with aluminum to form aluminum hydroxide (Al OH) that appears as a blue, gray or green slimy substance collecting on the bottom of the water tank as well as on the surface of the sacrificial anode.
You may see small globules of this ALOH slime when you open the water heater drain, and this aluminum hydroxide slime may also show up as a clogging goop in the aerators or strainers at faucets in the building.
The cure for ALOH deposits in a water heater is usually just flushing out the calorifier (geyser, cylinder) (WATER HEATER DEBRIS FLUSH), and replacing the sacrificial anode with a magnesium alloy anode instead.
If both aluminum hydroxide gel slime and mineral scale are present, you need to remove the scale as well as flush out the ALOH.
Diagnostic tip: if the rumbling noise is occurring in a relatively new water heater, less than six months old, look for ALOH slime clogging as that problem, traced to a too-alkaline water supply, shows up pretty quickly after a new water heater is installed.
If the rumbling noise did not start until the water calorifier was a year or more old then it's more-likely that the problem is due to mineral scale formation.
Of course both problems can be present in the same water heater.
See ANODES & DIP TUBES on WATER HEATERS you'll need to remove the scale using the water heater de-liming procedure we give above.
See AOS Bulletin 14 ALUMINUM HYDROXIDE [PDF] for a description of cures for aluminum hydroxide slime clogging if no mineral scaling is also present, retrieved 2017/11/17 original source: https://www.hotwater.com/lit/bulletin/bulletin14.pdf - Screeching or screaming water heater sounds: look for a partly-closed control valve at the water heater inlet or anywhere in the building piping system.
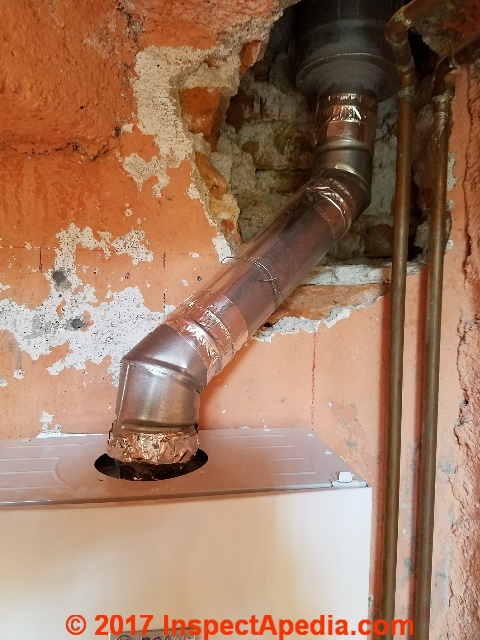
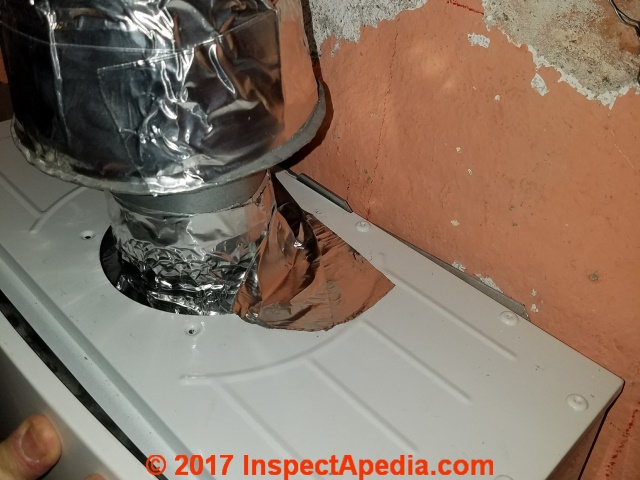
- Shrieking screaming Bosch Compact MiniMAXX gas-fired tankless water heater - in addition to bangs and rattles (scale in water heaters) in 2017 we investigated and obtained repair help from Bosch for a shrieking tankless water heater installed in San Miguel de Allende.
The sound was traced to a resonant frequency air or exhaust movement interacting between combustion air intake and exhaust flue outlet gases.
Two diagnostic recordings of resonant whistling or shrieking water heater sounds are given just below.
BOSCH MiniMAXX CALENTADOR de GAS Resonancia Shrieking WHISTLE NOISE DIAGNOSIS STEP 1 [MP4] 20MB. In this recording we take initial steps to diagnose the cause of a loud, horrible whistling screaming at the tankless water heater. You'll see me partly-closing first the heater's outlet valve, then the heater's inlet water valve - no no avail.
BOSCH MiniMAXX CALENTADOR de GAS Resonancia Shrieking WHISTLE NOISE vs Temperature Setting - DIAGNOSIS STEP 2 [MP4] 11MB - shown above. In this recording we show that setting the temperature up at the water heater causes loud shrieking.
This Bosch heater includes a variable-speed burner and fan that induces more combustion air and increases the tankless water heater's output either when the hot water usage rate goes up in the building or when the water temperature is set to a higher level.
At the increased demand or temperature settings as air and exhaust flow through the heater speeds-up, a high-pitched resonant frequency screaming ensues. Partly covering the air intake at the top of the water heater stops the noise- confirming that the probable noise cause is right at that area of the heater.
The Bosch service technicians found and "fixed" the shrieking sound problem by a combination of re-sizing of the exhaust flue vent connector at the water heater and a partial blockage of the combustion air intake at the water heater top. [Second photo above and close-up photo below]
Watch out: don't even think of trying to fix this noise yourself. Making a mistake risks fatal carbon monoxide poisoning. Consult Bosch customer service if you are having noise problems with your tankless water heater.
Other shrieking screaming sounds in and around buildings are discussed at WATER SUPPLY PIPE WHISTLE NOISE
and also
at SCREAMING or whistling or shrieking A/C compressor/condenser unit sounds - warning about high pitched sound from the compressor/condenser unit
Also see GUIAS PARA EQUIPMIENTO EN MEXICO
- Sizzling or hissing sounds at a water heater, geyser, calorifier, cylinder are usually caused by either condensation on the gas burner or by water leaks in the heater that are dripping onto the burner.
Water heater leaks: Watch out: take care to find the actual leak point at the water heater as the type of leak has different and important implications.
You can distinguish between a water heater condensation problem and a leaky water heater by a few simple steps given at at WATER HEATER LEAK REPAIR - Ticking sounds or tapping sounds in the water heater: Usually thermal expansion. See Clicking water heater sounds earlier in this list.
- Vibrating sounds at the water heater - see HUMMING and also see COMBUSTION noise traced to a humming gas regulator.
- Whistling noise at a water heater - can be caused by air deflection at a combustion air intake or by water velocity in water piping.
See WATER HEATER WHISTLE NOISE - screaming tankless water heater diagnosis
Relationship of Hard Water to Water Heater Noises
The hard water mineral deposits tend to collect as a hard skin on the bottom of the heater, interfering with heat transfer, increasing operating cost, and over longer periods, possibly weakening the bottom of the water heater itself.
Mineral deposits also accumulate on the electrodes of an electric water heater, eventually leading to the failure of the heating electrode. If you never remove the scale from a water heater tank the clanking or cracking noise heard at the water heater during operation may eventually cease when the scale solidifies, no longer trapping hot water and interfering with its movement upwards in the water tank.
However the development of a thick lime or scale layer in the bottom of a water heater also reduces the water heater tank life.
- Water heater manufacturers recommend flushing the heater monthly to remove silt, and where water is hard, regular de liming of the water tank - steps which in our experience we see that almost no one does.
With experience you may discover that flushing is required less often (or more often) in your area. - On occasion when a heater fails (or in rare multi-defect cases, explodes), the leak and failure occur at the bottom of the tank, leading to
a BLEVE explosion and a water tank that becomes a rocket.
Other Water Heater Problems Caused by Hard Water & Scale Deposits are discussed just below.
Cures for water heater scale or lime or mineral deposits
- SCALE REMOVAL, WATER HEATERS
- SCALE PREVENTION, WATER HEATER
- AOS Bulletin 13 MINERAL BUILD-UP [PDF] retrieved 2017/11/17 original source: https://www.hotwater.com/lit/bulletin/bulletin13.pdf
Why Should You Remove the Scale Deposits, Silicates, and Silt from Your Water Heater Tank?
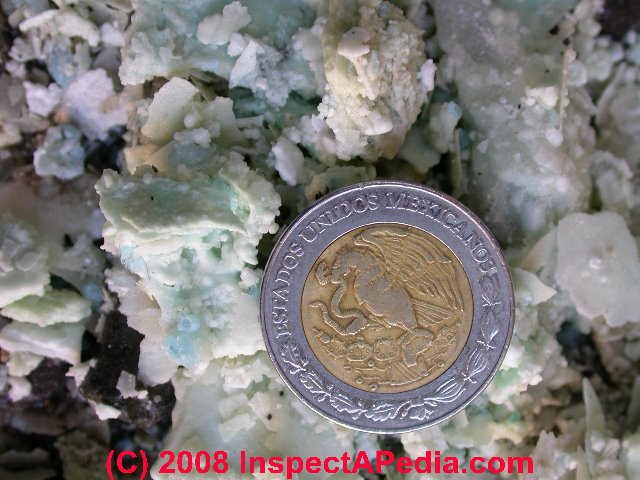
Our photo (left) shows chunks of water heater scale on the ground after removal from the water heater.
A.O. Smith gives six reasons (here we expand and add to them) for water heater tank scale removal, and the company points out that the reasons for scale removal and indeed the procedure for scale removal is (almost) the same regardless of the energy source: electric, gas, oil, solar water heaters.
Our "exception" is that solar water heaters and electric water heaters may have specific internal components (such as electric water heater electrodes) that will also need to be de-scaled or even replaced. [1]
Noisy water heater operation: Water heater noises, as we described above, may be the first thing people notice when the water tank scale layer has become thick enough to interfere with good water heater operation.
But A.O. Smith and other water heater manufacturers cite additional reasons why removing water heater scale is important.
Clean the water heater tank to reduce water heater noise.
Longer water heater "on" time & slower water heat-up rate: you can reduce the cost of making hot water with your oil, gas, or electric-fired water heater by removing scale from the tank bottom.
The scale layer on the tank bottom (or on an electric water heater's electrodes) interferes with heat transfer into the hot water.
This means that the water heater will have to operate longer (and you will spend more on hot water costs) than necessary to re-heat incoming water.
Clean your water heater tank to reduce your water heating cost by improving heat transfer into the water and correspondingly shortening the water heater "on" cycle time.
High water heater costs to operate, repair, replace: for the same reasons as above: running the water heater longer just to get the water hot enough means higher water heater operating expense.
In addition to higher energy costs to heat the water, unnecessary heater replacement, and in the case of electric water heaters, early failure of the heating elements are common results of heavy scale problems.
Hot water quantity has diminished - not enough hot water: by slowing heat transfer into the hot water in the water tank, the apparent hot water quantity will also be reduced, because incoming cold water is not heated as rapidly when occupants are drawing hot water out of the tank.
Thus the incoming cold more quickly dilutes and cools the hot water that remains in the tank during use. Clean the water heater tank to increase hot water quantity.
Extend the water heater life: because scale on the water heater tank bottom insulates the tank bottom from the water inside the tank, the bottom of an oil or gas fired water heater will become hotter as the scale layer gets thicker.
These increased temperatures weaken the water heater tank bottom and shorten the life of the water heater. Similarly, scale deposits on the electrodes in an electric hot water heater shorten the life of the electrodes. Clean the hot water tank regularly to extend its life.
Protect water heater warranty: if a water heater tank fails the manufacturer may not honor the water heater's warranty if the failure is due to the accumulation of excessive scale inside of the water heater tank.
Water heater warranties typically indicate that the tank is warranted against leaks due to rust, corrosion, or chemical action of the water but the warranty will exclude a tank failure due to scale.
User dissatisfaction with the water heater because of less hot water, slower hot water recovery, and higher hot water costs lead to unhappy building occupants who may have no idea that a water heater scale problem is the cause. If dissatisfaction leads a consumer to replace a water heater that could have just been de-scaled, there may also be unnecessary heater replacement expense.
How Often to Remove Scale Deposits from a Water Heater
When the lime thickness reaches the hot water tank drain, there will be about one inch of mineral deposit on the tank bottom. If the water tank has a cleanout opening, when the lime thickness reaches that opening the mineral deposit thickness will be about 2". When you have observed the length of time required for lime to accumulate in your water heater you can set the appropriate maintenance schedule.
How the water heater scale is removed
See WATER HEATER SCALE DE-LIMING PROCEDURE for a detailed water heater de-liming procedure. A summary of the de-scaling procedure is just below.
Step 1: Flush the Hot Water Tank to Remove Silt & Debris
The first step in curing water heater noises or poor hot water quantity is to turn off and flush out the water heater.
See WATER HEATER FLUSH PROCEDURE for the full article on the detailed procedure for flushing out water heaters to remove scale, dirt, or debris - a step that can increase hot water quantity, temperature, and water heater life.
Watch out: don't tackle this water heater cleanout project on a Sunday night when you can't call a plumber or buy a replacement part. Water heaters, their heating source (oil or gas burner or electricity or solar hot water), and particularly their relief valves include critical safety components.
Do not modify or remove relief valves, chimney connections, draft hoods, etc. as you may create dangerous conditions. Turn off all electrical and or gas power to the water heater and let it cool.
This means turning off electricity that controls the water heater oil burner or electric heating elements, or for gas fired water heaters, turning off the gas supply to the device.
Additional tips on draining a water heater tank can be found
Step 2: Remove Scale Deposits from a Water Heater Tank - Scraping the Bottom of the Hot Water Tank
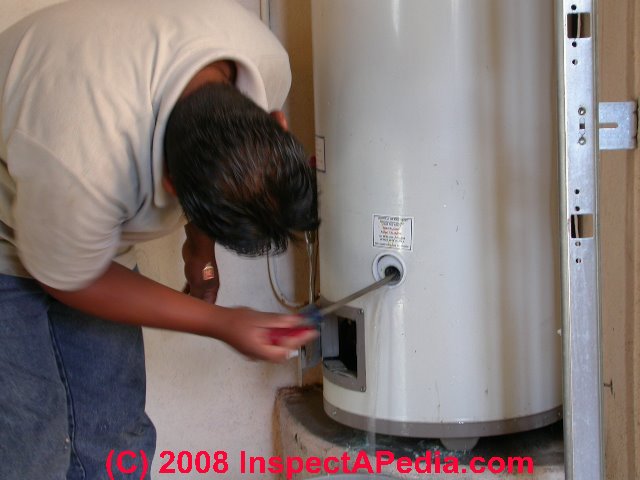
The second step in curing water heater noise or insufficient hot water is to remove scale or lime from the water heater tank. If the unit is an electric water heater, you'll also need to remove scale from the electric water heater elements.
See WATER HEATER SCALE DE-LIMING PROCEDURE for the full article on the detailed procedure for removing lime and water heater scale.
Safety Warning: never turn on a water heater's heat source before the hot water tank has been re-filled. Otherwise you may damage the heater or create a dangerous condition.
Be sure the water heater pressure and temperature relief valve is properly installed and is the proper type.
See RELIEF VALVES - TP VALVES.
Step 3: Prevent Scale Deposits in Water Heater Tanks or on Electric Water Heater Electrodes - Scale formation in water heaters and methods of prevention
The third step in stopping water heater noises, extending water heater life and increasing the amount of hot water that the heater produces, is to prevent un-wanted scale or lime deposits in the water heater tank or on an electric water heater's electrodes.
The rate of deposition of scale inside of a water heater tank depends on
- The hardness of the incoming cold water.
See MEASURE WATER HARDNESS for details about how water hardness is measured. - The temperature to which the water is being heated. Higher water temperatures cause minerals to be deposited faster than lower water temperatures.
- The water quantity used: the more water that flows through the water heater (in gallons of use per day,) the faster it will be clogged with minerals or debris.
At WATER HEATER SCALE PREVENTION we discuss in detail and provide research on the factors determining the rate at which scale and lime form in water heaters or on water heater electrodes.
How Mineral Deposits and Heating May Weaken a Water Heater Tank Bottom, Contributing to BLEVE Explosion
BLEVEs or boiling liquid expanding vapor explosions are discussed
at BLEVE EXPLOSIONS.
Excerpts are below
Water heater tank explosions are rare thanks to the widespread requirement for and use of pressure and temperature relief safety valves. The photo (left) shows a hole in the roof made when a water heater exploded, becoming a rocket that passed up through the building.
But if the safety valve has been damaged, modified, or even omitted (as we saw on our neighbor's water heater), that condition, combined with overheating can cause a water tank to explode, creating a BLEVE - boiling liquid vapor explosion that releases tremendous force and causing extreme damage to a building.
Because repeated heating of the water tank bottom may combine with other conditions (such as corrosion or excessive heating due to mineral deposits on the tank bottom) to produce a weak water heater tank bottom, that is the part more likely to fail in an overheat and overpressure condition.
A failure at the water tank bottom may explain why a BLEVE can produce a water tank explosion that behaves like a rocket, sending the water tank skyrocketing up through a building.
Cures for Hard Water that Clogs Hot Water Tanks, Tankless Coils, and Plumbing Pipes
- WATER HEATER SCALE DE-LIMING PROCEDURE exactly how to get rid of water heater scale, a common cause of water heater noises.
- WATER HEATER SCALE PREVENTION - how to avoid scale formation in water heaters
- More water heater noises and some recommendations are in the Residential Gas and Electric Water Heater Handbook [PDF] provided by A.O. Smith and linked-to
atReferences or Citations
Water Heater Noise & Combustion Noise Research
- A.O. Smith, NOISY WATER HEATERS (Bulletin 1) [PDF] retrieved 2017/11/17, original source: https://www.hotwater.com/resources/product-literature/bulletins/noisy-water-heaters/
This brief publication on noisy water heaters lists six common water heater noises or symptoms and their usual cause and offers six technical bulletins offering more-detailed advice on curing these water heater noises.
However the original article's list some of the "causes" opposite "symptoms" is a bit confusing. Here we have sorted out that information into what is in our OPINION the relationships between water heater sound and its most-common cause.- WATER HEATER CRACKLING due to condensation dripping on the burner [expect this only on gas fired water heaters] -
see
AOS Bulletin 13 MINERAL BUILD-UP [PDF] retrieved 2017/11/17 original source: https://www.hotwater.com/lit/bulletin/bulletin13.pdf
and
AOS Bulletin 14 ALUMINUM HYDROXIDE [PDF] retrieved 2017/11/17 original source: https://www.hotwater.com/lit/bulletin/bulletin14.pdf
and
AOS Bulletin 15 CONDENSATION [PDF] retrieved 2017/11/17 original source: https://www.hotwater.com/lit/bulletin/bulletin15.pdf - WATER HEATER POUNDING - see AOS Bulletin 11: WATER HAMMER [PDF] retrieved 2017/11/17, original source: https://www.hotwater.com/lit/bulletin/bulletin11.pdf
Also see details at WATER HAMMER NOISE DIAGNOSE & CURE at InspectApedia.com] - WATER HEATER POPPING due to abrupt stopping of water flow
See AOS Bulletins 13 & 14 given above. - WATER HEATER RUMBLING due to aluminum hydroxide gel in the tank
See AOS Bulletins 13 & 14 given above. - WATER HEATER SIZZLING
see
AOS Bulletin 51 PUDDLE ON FLOOR [at the water heater] [PDF] retrieved 2017/11/17, original source: https://www.hotwater.com/lit/bulletin/bulletin51.pdf
and see AOS Bulletin 15 given above - WATER HEATER TICKING due to heat trap balls rattling in a pipe nipple [sic] -
see AOS Bulletin 12: HEAT TRAPS [PDF] retrieved 2017/11/17, original source: https://www.hotwater.com/lit/bulletin/bulletin12.pdf
- WATER HEATER CRACKLING due to condensation dripping on the burner [expect this only on gas fired water heaters] -
- Bradford White, INTERNAL NOISES IN WATER HEATER (#123),[PDF] Bradford White Corporation
725 Talamore Dr, Ambler, PA 19002 USA, Tel: 215-641-9400, Website: www.bradfordwhitecorporation.com retrieved 2017/11/17, original source: http://www.bradfordwhite.com/internal-noises-water-heater-123
This brief publication mentions water heater rumbling, bubbling, surging, or boiling noises and explain how sediment in a water heater contributes to annoying water heater noises.
The company also notes that scale on the heating element of an electric calorifier or geyser (synonyms for water heater) can cause a water heater singing or hissing sound. Solutions range from de-scaling the heater element to replacing it. - Burch, Jay, M. Hoeschele, D. Springer, and A. Rudd. Preliminary Modeling, Testing, and Analysis of a Gas Tankless Water Heater: Preprint. No. NREL/CP-550-42917. National Renewable Energy Lab.(NREL), Golden, CO (United States), 2008.
Abstract:
Today's gas tankless water heaters offer significant energy savings over conventional gas storage tank water heaters, but savings depends on the draw pattern. A one-node model incorporating heat exchanger mass is used to address this and other issues.
Key model parameters are determined from least-squares regression on short-term data, including burner efficiency, thermal capacitance, and thermal loss coefficient. The calibrated model agrees with data to ~5% on Qgas, with temperature RMS deviation of ~4..deg..C.
Efficiency with a standard realistic draw is 71%, compared to 81% predicted from standard energy-factors. Adding a small tank controlled by the tankless heater solves issues of oscillations with solar pre-heat, low-flow and hot-water-delay issues. Future work includes model refinements and developing optimal data protocols for model parameter extraction. - Putnam, Abbott, and Lynn Faulkner. "Overview of combustion noise." J. ENERGY. 7, no. 6 (1983): 458-469. Authors: at Battelle's Columbus Laboratories, Columbus Ohio.
Introduction excerpts:
Combustion noise was discussed as early as 1802 in a technical note on singing flames. ... Three specific areas of combustion noise are discussed in some detail, namely, combustion roar, combustion-driven oscillations, and pulse combination.
Combustion roar, in the absence of acoustic distortion effects, is characterized by a smooth noise spectrum related to the reacting chemistry of the flame and the turbulence level of the combustion region.
Combustion-driven oscillations are characterized by a discrete frerquency and a feedback cycle to maointain the oscillation.
Pulse combustion is the positive application of combustion-driven oscillations. In addition, some other combustion noise phenomena are discussed such as the interaction with vortex shedding and the combustion amplification of flow phenomena.
The articles at this website will answer most questions about diagnosing and curing noisy domestic water heaters and about the procedure to remove mineral deposits, lime, water scale, silicates, sulfates, aluminates, or silt and sand from a water heater tank.
Reader Comments, Questions & Answers About The Article Above
Below you will find questions and answers previously posted on this page at its page bottom reader comment box.
Reader Q&A - also see RECOMMENDED ARTICLES & FAQs
On 2019-06-21 - by (mod) -
What's the fuel? Gas/oil?
I suspect that there's a mineral scale problem. See links in this article series about water heater scale removal.
On 2019-06-21 by Joshua Burns
My water heater is 8+ years old. The sound its making is like turning on a garden hose and holding it over an empty tin trash can...it sounds like a stream of falling water also it sounds like boiling water. Do I need to change out the anode tube or a heating element...or something else? We have ready hard water, Im on city water.....
On 2019-05-16 - by (mod) -
What's the heat source: oil, gas, electric? Look for a defective control, low voltage transformer, motor that's not running.
On 2019-05-10 by Armando
Why my a.o smith makes a humming noise.
On 2019-02-13 - by (mod) -
Just a guess it could be related to the rate of hot water use
On 2019-02-13 by Kevin
Gas water heater makes the popping sound that is typical of sediment build up. However, it only makes the sound when the bathtub faucet is turned on (the bathtub faucet water pressure also drops). Eight other faucets in the house and none of them cause the same noise. Any help would be appreciated.
On 2018-11-11 - by (mod) -
Gardenia -
As you don't describe the noise my best advice is to check out the common noises and their causes at WATER HEATER NOISE - the article above on this page.
Or let me know what it sounds like and we may be able to offer more specific advice.
On 2018-04-17 by Gardenia
Our electric water heater is making a loud noise. At first, I couldn't locate the noise inside the house until I reached the garage and able to guess that it was from inside the water heater. My husband's home office is located on the other side of the garage wall. The noise started to diminished but now we are able to expect it to start at 7:33 am lasting 3 minutes on a daily basis.
The noise reminded me of when I lived in San Francisco when every Tuesday or Wednesday at noon, a siren would sound off. (that was in the 80s)
We bought this house last August and start finding nuanses here and there. We have an insurance coverage for the first year but the plumbing contacted volunteered to come out to check it however had never encountered this problem.
What or where should I go to find out? How would I check for a response if there is one?
...
Continue reading at WATER HEATER SCALE DE-LIMING PROCEDURE for electric water heaters or water cylinders, or select a topic from the closely-related articles below, or see the complete ARTICLE INDEX.
Or see WATER HEATER NOISE FAQs - questions & answers posted originally at this page help diagnose more water heater noises
Or see these
Recommended Articles
- BANGING BOOMING NOISE DIAGNOSIS & CURE - topic home
- BUZZING NOISE DIAGNOSIS - topic home
- GAS BURNER FLAME & NOISE DEFECTS
- GAS BURNER SOOT CAUSE & CURE
- GAS BURNER PILOT LIGHT PROCEDURE
- GAS REGULATOR NOISES
- HEATING SYSTEM NOISE DIAGNOSIS for a more broad list of noises traced to heating equipment
- HUMMING NOISES in BUILDINGS - topic home
- NOISE / SOUND DIAGNOSIS & CURE - topic home
- PLUMBING SYSTEM NOISE DIAGNOSIS & CURE - home
- WATER HEATER WHISTLE NOISE - screaming tankless water heater diagnosis
- WATER HEATER SCALE DE-LIMING PROCEDURE
- WATER TANK NOISE DIAGNOSIS
Suggested citation for this web page
WATER HEATER NOISE at InspectApedia.com - online encyclopedia of building & environmental inspection, testing, diagnosis, repair, & problem prevention advice.
Or see this
INDEX to RELATED ARTICLES: ARTICLE INDEX to WATER HEATERS
Or use the SEARCH BOX found below to Ask a Question or Search InspectApedia
Ask a Question or Search InspectApedia
Questions & answers or comments about water heater noise troubleshooting and water heater scale and lime removal.
Try the search box just below, or if you prefer, post a question or comment in the Comments box below and we will respond promptly.
Search the InspectApedia website
Note: appearance of your Comment below may be delayed: if your comment contains an image, photograph, web link, or text that looks to the software as if it might be a web link, your posting will appear after it has been approved by a moderator. Apologies for the delay.
Only one image can be added per comment but you can post as many comments, and therefore images, as you like.
You will not receive a notification when a response to your question has been posted.
Please bookmark this page to make it easy for you to check back for our response.
Our Comment Box is provided by Countable Web Productions countable.ca
Citations & References
In addition to any citations in the article above, a full list is available on request.
- "Why, When & How to Remove Water Sale from Tank Type Glass-Lined Water Heaters", [PDF], A.O. Smith Water Products Company, 5621 W. 115th St., Alsip IL 60803 USA, Tel: 1-800-433-2545, Website: www.hotwater.com, Email: www.hotwater.com/parts, retrieved 15 March 2015, original source: http://www.hotwater.com/lit/training/4800r9.pdf
Quoting:
"..., as the result of cleaning product developments and field testing, A. O. Smith presents a preventive maintenance plan for residential and commercial, gas, oil and electric, tank type water heaters. ... water scale and silt accumulations can cause dissatisfaction and element or tank failure. The amount of calcium and magnesium carbonate (lime) released from water is in direct proportion to water temperature and usage, see chart. The higher the water temperature or water usage, the more lime deposits are dropped out of the water. Water heater warranties usually state that the tank must be free of excessive scale or lime deposit or that heater leaks must be due to rust, corrosion or other chemical action of water. In other words, in most cases where heater failure is due to dropout of water impurities, the manufacturer’s warranty does not apply" - "Residential Gas and Electric Water Heaters: Service Handbook", PDF], A.O. Smith Water Products Company, 5621 W. 115th St., Alsip IL 60803 USA, Tel: 1-800-433-2545, Website: www.hotwater.com, Email: www.hotwater.com/parts, retrieved 15 March 2015, original source: http://www.hotwater.com/lit/training/320991-000.pdf
This handbook provides service information for residential gas water heaters that are atmospherically vented and use a thermocouple as their electrical source and to residential electric water heaters having one or two heating elements and common wiring configurations for these water heater models. - Mark Cramer Inspection Services Mark Cramer, Tampa Florida, Mr. Cramer is a past president of ASHI, the American Society of Home Inspectors and is a Florida home inspector and home inspection educator. Mr. Cramer serves on the ASHI Home Inspection Standards. Contact Mark Cramer at: 727-595-4211 mark@BestTampaInspector.com
- John Cranor [Website: /www.house-whisperer.com ] is an ASHI member and a home inspector (The House Whisperer) is located in Glen Allen, VA 23060. He is also a contributor to InspectApedia.com in several technical areas such as plumbing and appliances (dryer vents). Contact Mr. Cranor at 804-873-8534 or by Email: johncranor@verizon.net
- Thanks to researcher Robyn Goldstein, Rush Manager, Information Express, 650-812-3585, email: service@ieonline.com,for researching the Purdue bulletin No. 74 original citation 03/2010 . Information Express supplies "... institutional document delivery needs - A full service company specializing in the fast, accurate and competitively priced delivery of published articles for all industries"
- Pounds of lime deposited vs. temperature and hot water usage: see Purdue Bulletin #74 (also provided by A.O. Smith in the article below). Purdue's chart shows the number of pounds of lime deposited per year as a function of the water usage in gallons per day, with an assumed 10 grains of water hardness.
- "When, Why, and How to Remove Water Scale from Tank Type Glass-Lined Water Heaters (for non glass-lined tanks, consult water heater manufacturer)" PDF provided by A.O. Smith Water Products Company - hotwater.com/lit/training/4800r9.pdf 800-433-2545 - 01/07/2009.
- [1] A.O. Smith's Form No. 4800 Rev. 8 Why? When? & How? /UN•LIME Specific De liming Instructions for use with Up-N-Down Transfer Kit for Tank Type Heaters. (Normally supplied in UN-LIME shipping cartons), Supersedes Form Nos. 4800 Rev. 7 and 4813-100.
- A.O. Smith's Form No. 4778* All about De liming Coil-Type/Tube-Type Commercial Water Heaters and Hydronic Boilers *Normally supplied when ordering Part No. 4930 Motorized De liming Pump Kit
- Rheem Electric Water Heater "Owners Guide and Installation Instructions", (Australian models) rheem.com.au/images/pdf/owners_dom-elec_121996C_0707.pdf
- "Scale formation in water heaters and methods of prevention", Krappe,
Justus Maximilian, Engineering experiment station. Gas engineering
bulletin; no. 6; Research series; no. 74; On cover: Engineering
bulletin, Purdue university. Vol. xxiv, no.
3a. June, 1940 (Layfayette Indiana) commonly referred to in some references as "Purdue University Bulletin No. 74" - thanks to researcher Robyn Goldstein for the full citation. LCCN: 40028844 & OCLC: 1038544 - Water analysis, water softening, hot-water supply. 27pages. You can obtain this document through your local library.
(full copy file at InspectAPedia 3/31/2010)
Purdue B074 can be hard to locate online.
Also Bradford White Corporation (a manufacturer of water heaters) has published excerpts from that document, available at Purdue_B074_BradfordW.pdf - Other sources of information on calculating the rate of lime deposition from hard and hot water:
- Wilkes University Center for Environmental Quality Environmental Engineering and Earth Sciences Hardwater, Water Hardness "Hard Water Hardness Calcium Magnesium Water Corrosion Mineral Scale" http://www.water-research.net/hardness.htm
- Chemical Engineering, Joseph D. Hagerty Editor, McGraw-Hill, 1989,
ISBN 0685270831, 9780685270837
"To calculate the amount of material that will be deposited in 1000 gal. of water per day, take the number of grains per gallon of each as shown by the ..." also difficult to obtain except as a used copy.
- Our recommended books about building & mechanical systems design, inspection, problem diagnosis, and repair, and about indoor environment and IAQ testing, diagnosis, and cleanup are at the InspectAPedia Bookstore. Also see our Book Reviews - InspectAPedia.
- Carbon Monoxide Gas Toxicity, exposure limits, poisoning symptoms, and inspecting buildings for CO hazards
- In addition to citations & references found in this article, see the research citations given at the end of the related articles found at our suggested
CONTINUE READING or RECOMMENDED ARTICLES.
- Carson, Dunlop & Associates Ltd., 120 Carlton Street Suite 407, Toronto ON M5A 4K2. Tel: (416) 964-9415 1-800-268-7070 Email: info@carsondunlop.com. Alan Carson is a past president of ASHI, the American Society of Home Inspectors.
Thanks to Alan Carson and Bob Dunlop, for permission for InspectAPedia to use text excerpts from The HOME REFERENCE BOOK - the Encyclopedia of Homes and to use illustrations from The ILLUSTRATED HOME .
Carson Dunlop Associates provides extensive home inspection education and report writing material. In gratitude we provide links to tsome Carson Dunlop Associates products and services.
 | HOME | ABOUT | ASK a QUESTION | CONTACT | CONTENT USE POLICY | DESCRIPTION | POLICIES | PRIVACY | |
| © 2024 - 1985 Publisher InspectApedia.com - Daniel Friedman | |||||||||