
InspectAPedia® FREE Encyclopedia of Building & Environmental Construction, Diagnosis, Maintenance & Repair |
Question? Just ask us! InspectAPedia
|
 Heat Anticipator Precise Adjustment Methods
Use an ammeter: adjust / repair
room thermostat, fine tuning
- POST a QUESTION or COMMENT about how & why to test the heat anticipator on a room thermostat
Thermostat heat anticipator testing & fine tuning procedure.
This article explains how and why we fine-tune a room thermostat or wall thermostat by checking its heat anticipator using a mini ammeter.
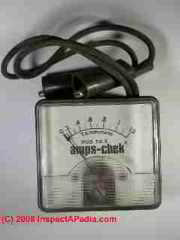
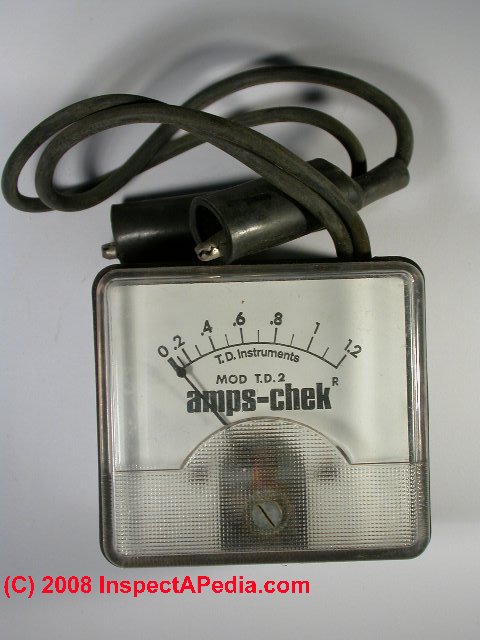
We describe the use of the T.D. Amps-Check mini ammeter specifically designed for thermostat heat anticipator adjustment.
This mini ammeter gives precise amps readings in the 0 - 1.2A AC range. By measuring the current (amperes) flowing through the thermostat contacts on a call for heat we can adjust the heat anticipator precisely to its optimal setting.
InspectAPedia tolerates no conflicts of interest. We have no relationship with advertisers, products, or services discussed at this website.
- Daniel Friedman, Publisher/Editor/Author - See WHO ARE WE?
How to Use a Mini Ammeter to Set or to Check Heat Anticipators and Thermostats for Proper Adjustment
 Why do some thermostats include a heat anticipator?

Since a room heating or cooling thermostat is really just a simple "on-off" switch, some fuzziness needs to be built into the thermostat's control of the air conditioner or heating system, lest it cycle on and off too frequently, oscillating very closely around the set temperature.
Article contents
- WHYdo some thermostats include a heat anticipator?
- HOW TO CONNECT the AMMETER to Check the Thermostat Circuit and the Heat Anticipator & how to set the proper resistance
- SETTING TARGET for adjustable heat anticipator thermostats
- WHAT is GAINED from fine-tuning the thermostat's heat anticipator adjustment?
- WATCH OUT for STATIC cling that can foul up an ammeter reading when measuring a thermostat circuit
- WHERE to BUY mini and low-range high precision ammeters, VOMs DMMs and similar equipment
The job of the heat anticipator circuit in a wall thermostat is to prevent heating or cooling "overshoot" too far past the set temperature, but to permit some overshoot to prevent system on-off oscillation.
When we serviced heating systems and our clients sometimes complained that the thermostat did not seem to be responding as desired to room temperature.
The thermostat might permit the room to get much warmer, or much cooler than the temperature to which the thermostat was set.
This was a reason to whip out our little ammeter to see what was really going on with the thermostat circuit.
A second reason we'd use this ammeter to check the current draw of the thermostat circuit was to allow proper setting of a heating or air conditioning system control set which was made by a different manufacturer from the one who made the wall thermo sat.
For example, if the air conditioning or heating system control being switched on and off by the thermostat was not one of the ones in Honeywell's list of heating controls
(given in HEAT ANTICIPATOR ADJUSTMENT) ,
one of the checks we'd make is to actually measure the heating control circuit ampacity using a special mini ammeter sold just for that purpose, and shown in our photo above.
How to Connect & Use a Low-Range or Mini Ammeter to Check the Thermostat Circuit and the Heat Anticipator
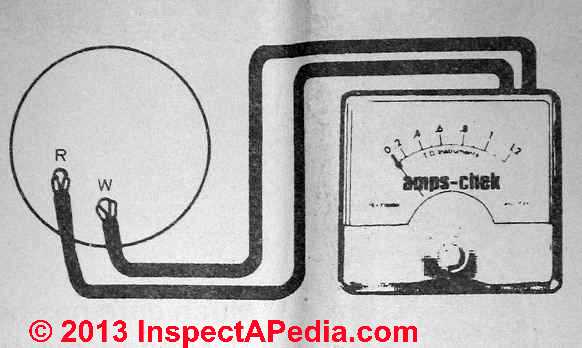 With the heat set "down", power to the equipment on, and the thermostat set to heating mode, the alligator clips are connected to the thermostat wire terminals in the thermostat.
Usually these are "R" (red) and "W" (white wire) or "R" and "Y" terminals on thermostats.
Just connect the ammeter's leads to the thermostat terminals where you see the red and white wires coming from the heating system are already wired.
(You'll have to remove the thermostat cover to perform these steps.)
The current flow (Amps) is read on the meter, and the heat anticipator is set to match the actual current that was just read.
How to Make the Correct Current (Amps) measurement at the thermostat heat anticipator
- Turn power on to the heating system.
- Set the thermostat to call for heat
- Adjust the set temperature on the thermostat to well above current room temperature so that the heating system will operate
- Run the heat for at least five minutes to warm up the system to normal operating temperatures.
- Remove the thermostat cover (if necessary) to expose the R and W terminals. Connect the T.D. Amps-Chek or equivalent ammeter test leads onto the two thermostat terminals that make (connect or close) on a call for heat. These are the R and W terminals on most thermostats.
- Read the current flow indicated on the meter.
- Remember to re-set the room thermostat to the desired room temperature
Watch out: T.D. points out that a few controls, such as motorized gas valves, draw more current while operating than when they are in the fully-open position.
So if your ammeter shows an unusually high reading (say more than 1.2A) you should hold the ammeter leads on the terminals for an entire minute. By that time the motorized valve should be fully open and you should see a lower AMPS reading.
Examples of equipment where you will face this problem include
- motorized gas valves
- motorized zone \valves
- power vent dampers
- heating equipment that uses electronic ignition
Watch out: the amps reading made at the room thermostat can also indicate a system or wiring problem: if the meter continues to read current over 1.2A there is probably a system problem, risking damage to the thermostat itself.
How to Use an Ammeter to Set the Heat Anticipator
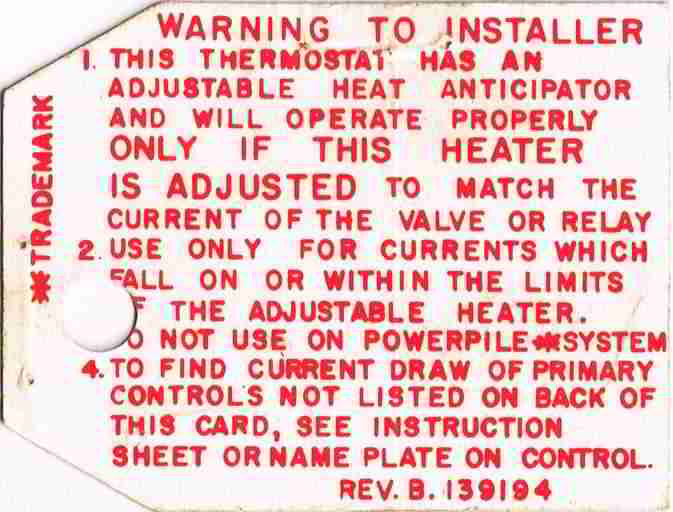
Watch out: as Honeywell warns thermostat installers:
This thermostat has an adjustable heat anticipator and will operate properly only if this [heat anticipator resistor type] tiny in-thermostat heater is adjusted to match the current of the valve or relay.
Set the heat anticipator to the heating boiler or furnace manufacturer's recommendation,
or if you don't know that number, you can either leave the heat anticipator at its factory setting (recommended) or you can use a mini-ammeter to actually measure the heating thermostat circuit and to fine tune the heat anticipator setting, as we discuss further
at HEAT ANTICIPATOR SET & TEST by AMMETER
For the Honeywell T87F the manufacturer's heat anticipator setting instructions are as follows:
If the T87F is used for 3-wire, SPDT, heating only (Series 20 control), set the heat anticipator to 1.2 (far left end of the scale).
A 25V open circuit shunt type heat anticipator is provided in the 137421A Wallplate for this application.
For other control applications proceed as follows:
Adjust the anticipator to match the current rating of [the] primary control.
Rating is usually stamped on the control plate. Move the indicator to the marking that matches this rating.
Indicator may be moved with fingers or pencil point, pin, or wire through hole shown [in our photos this is the triangular opening in the pointer -Ed.].
If the current rating is not given, proceed as follows before mounting the thermostat:
A slightly higher setting to obtain longer burner-on times (fewer cycles per hour) may be desirable for some systems.
- Connect an AC ammeter of appropriate range, sensitivity, and accuracy
(0 to 2 A VAC between the R and W (standard terminal descriptions) terminals on the wallplate or subbase [NOT in the thermostat as some how to or just-ask fellows recommend elsewhere - Ed.]
Watch out: a suitable ammeter may not be your typical electrician's clamp on ammeter as some fellows recommend - you need a meter that is capable of precision in the 0 - 1.2A VAC range.
See HEAT ANTICIPATOR SET & TEST by AMMETER for a detailed AMPS measurement example using the proper type of ammeter. - Let the heating system operate
for at least 1 minute before reading the ammeter, 5 minutes is better to assure that the system is at normal operating temperatures and consistent behavior. - Move the heat anticipator indicator pointer to match
the ammeter reading.
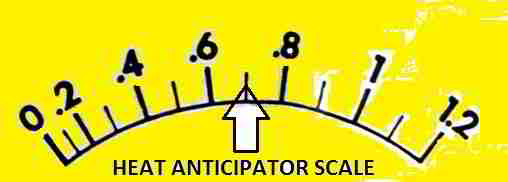
For example in our yellow sketch above, our ammeter measured 0.7A so we moved the pointer (shown as a white arrow) to .7 on the heat anticipator scale.

Should you vary the heat anticipator above or below the measured thermostat circuit amps?
Possibly yes. Depending on how your heating system is performing (burner cycle time too short or room temperature has too much overshoot) you might want to adjust the heat anticipator a bit further.
Watch out: except where specific primary controls tell you othewise, the heat anticipator amps should not be set below 0.3A.
Watch out: on some heat anticipators the movement must be in the opposite direction. See the instructions for your model.
Here is an EXAMPLE of heat anticipator setting advice from instructions packed with an old Honeywell thermostat:
A slightly higher setting to obtain longer burner-on times
(fewer cycles per hour) may be desirable on some systems.
EXAMPLE: if burner-on time is too short with a heater setting of 0.4 adjust to 0.45 setting and check system operation; adjust until the desired burner on time is obtained.
Really? Well those are the company's instructions. What's confusing is that the heat anticipator recommended settings given the table above (from Honeywell) that show that heating systems where we want more heat from the heat anticipator and an earlier turn-off of the boiler the table uses larger numbers such as 1.2A for steam heat and lower numbers such as x for electric heat.
You generally want shorter heat on cycles with heating systems that have a lot of thermal mass (steam radiators) and longer heat-on cycles with heating systems that have little or no thermal mass (forced warm air furnaces).
So what's going on?
Imagine a little electric heater made of wire whose length you can vary by sliding a pointer: if we send the current through more of the wire is it generating more heat? That would be consistent with Honeywell's instructions.
When the heat anticipator puts out more heat the bimetallic room temperature sensor will be fooled into turning off the heat sooner - a shorter "heat-on" cycle.
[Click to enlarge any image for more detail]
For a detailed explanation of how the thermostat heat anticipator actually works
see HEAT ANTICIPATOR OPERATION.
What is the Exactly Correct Heat Anticipator Setting when Using an Ammeter?
Set the heat anticipator pointer to the same AMPS reading on its heat anticipator scale as the actual AMPS or current read on the mini ammeter.
Example: thermostat 24VAC circuit reads 0.7A. Set the pointer to 0.7A on the scale as shown in our sketch at left.
What do we gain from fine-tuning the thermostat's heat anticipator adjustment?
This places the thermostat heat anticipator in exactly the right setting for the equipment to which it is attached. Then we simply removed our test leads and re-set the thermostat to the desired room temperature.
When the heat anticipator is working correctly, it prevents too much temperature "overshoot" when the thermostat is turning heating or air conditioning equipment on or off. Ultimately this means that the thermostat will maintain room temperature more accurately and more closely to the "SET" temperature set by the occupants.
Watch out for static cling that can foul up an ammeter reading when measuring a thermostat circuit
Precaution when using this equipment: if the meter is wrapped in plastic there may be a static charge when you unwrap it. Because it is very sensitive, any static charge on this meter (or many other ammeters or VOMs or multimeters) can cause the dial movement to show an erroneous reading. Just wait 5 minutes before using the meter, allowing the static charge to dissipate.
Where to Buy the Mini-Ammeter Amps-Chek® from T.D. Instruments or equivalent low-range high precision amps measuring instruments
- T.D. Instruments Corporation, The MINI AMMETER used for adjusting thermostats to work precisely (shown at the top of this page) was produced by and may still be available from T.D. Instruments Corporation, 180 Charlotte St., Rochester, NY 14067 - 716-232-4208. We used model T.D. 2, which operates between 0 and 1.2 Amps A.C. If this instrument is not available look for an ammeter capable of operating with precision in the same very low-end range of current draw from 0 - 2 Amps.
- Amptec 720A Micro-Ohmmeter, Amptec Research Co., 14101 Hwy 290 W., Bldg 2000A, Austin TX 78737 USA, Tel: 1-800-350-5105, The AMPTEC 720A Micro-Ohmmeter has the identical ranges, resolution and it offers slightly better accuracy than the obsolete Keithley 580 Ohmmeter.
The AMPTEC 720A is an accurate, affordable, seven range, four wire Kelvin based Digital Micro-Ohmmeter and is available with Auto-Range capability. Website: http://www.amptec.com , NSN 6625-01-555-1150RH. Quoting company literature: The AMPTEC 720A Micro-Ohmmeter has the identical ranges, resolution and it offers slightly better accuracy than the obsolete Keithley 580 Ohmmeter.
The AMPTEC 720A is an accurate, affordable, seven range, four wire Kelvin based Digital Micro-Ohmmeter and is available with Auto-Range capability. Resistance measurements can be made from 10 µOhms to 200 KOhms on seven ranges with 4 ½ digit (20,000 count or 50 ppm) resolution on the AMPTEC 720A. With 0.03% basic accuracy for all the ranges, except the low 200 milliohm range (0.05 %) the 720A micro-ohmmeter has accuracy that includes U.S. N.I.S.T. traceable calibration certification.
The AMPTEC 720A Ohmmeter is used to test electrical resistance on a wide variety of applications such as motors, transformers, contacts, copper coils, components, bonds and a host of metal to wire connection integrity (i.e. splices) tests. - Seaward U.K., Bracken Hill, Southwest Industrial Estate, Peterlee, County Durham, SR8 2SW, United Kingdom, Tel: 44 0 191 586 3511, Fax: 044-191-586-0277, Email: enquiry@seaward.co.uk , Website: www.seaward.co.uk
Seaward Group USA 6304 Benjamin Road, Suite 506, Tampa FL 33634, Tel: 001 (813) 886 2775, Email: sales@seaward-groupusa.com , Website: http://www.seaward-groupusa.com,
providing these product lines: Seaward test equipment, Solar solar voltaic instruments, Clare industrial safety equipment, Cropico precision test instruments measuring electrical resistance, Rigel medical and biomedical test equipment. Seward's Cropico division produces a Microhmmeter for any electrical manufacturing environment. - Gowe® Multifunctional Portable Mini Oscilloscope+multimeter (Voltmeter Ohmmeter Capacitance Tester) Handheld Digital Scopemeter - [Check for suitable precision and accuracy in low range amps measurement applications]
- ALL-SUN/e-sun ; Model Number: EM3212 Pen type mini portable Voltmeter Ohmmeter Ammeter pocket-size digital multimeters - [Check for suitable precision and accuracy in low range amps measurement applications]
- Other DMM/VOM equipment can provide the equivalent function. See the link to VOLTS / AMPS MEASUREMENT EQUIP below.
- See additional references at HEAT ANTICIPATOR OPERATION
...
Continue reading at HEAT ANTICIPATOR OPERATION or select a topic from the closely-related articles below, or see the complete ARTICLE INDEX.
Or see these
Recommended Articles
- HEAT ANTICIPATOR ADJUSTMENT
- HEAT ANTICIPATOR ADJUSTMENT - T87
- HEAT ANTICIPATOR EFFECTS on ROOM TEMPERATURE
- HEAT ANTICIPATOR OPERATION
- HEAT ANTICIPATOR SET & TEST by AMMETER
- HEAT ANTICIPATOR THERMOSTAT SOURCES
- TEMPERATURE RESPONSE of ROOM THERMOSTATS
- VOLTS / AMPS MEASUREMENT EQUIP
Suggested citation for this web page
HEAT ANTICIPATOR SET & TEST by AMMETER at InspectApedia.com - online encyclopedia of building & environmental inspection, testing, diagnosis, repair, & problem prevention advice.
Or see this
INDEX to RELATED ARTICLES: ARTICLE INDEX to HVAC THERMOSTATS
Or use the SEARCH BOX found below to Ask a Question or Search InspectApedia
Ask a Question or Search InspectApedia
Try the search box just below, or if you prefer, post a question or comment in the Comments box below and we will respond promptly.
Search the InspectApedia website
Note: appearance of your Comment below may be delayed: if your comment contains an image, photograph, web link, or text that looks to the software as if it might be a web link, your posting will appear after it has been approved by a moderator. Apologies for the delay.
Only one image can be added per comment but you can post as many comments, and therefore images, as you like.
You will not receive a notification when a response to your question has been posted.
Please bookmark this page to make it easy for you to check back for our response.
IF above you see "Comment Form is loading comments..." then COMMENT BOX - countable.ca / bawkbox.com IS NOT WORKING.
In any case you are welcome to send an email directly to us at InspectApedia.com at editor@inspectApedia.com
We'll reply to you directly. Please help us help you by noting, in your email, the URL of the InspectApedia page where you wanted to comment.
Citations & References
In addition to any citations in the article above, a full list is available on request.
- [21] Trane TCONT800 Series Touch Screen Programmable Comfort Control Ownes Guide, American Standard, Inc., Troup Highway, Tyler TX 75711, January 2005, Telephone: Customer Service: 1-877-3381, website: www.trane.com
- Seaward U.K., Bracken Hill, Southwest Industrial Estate, Peterlee, County Durham, SR8 2SW, United Kingdom, Tel: 44 0 191 586 3511, Fax: 044-191-586-0277, Email: enquiry@seaward.co.uk , Website: www.seaward.co.uk
Seaward Group USA 6304 Benjamin Road, Suite 506, Tampa FL 33634, Tel: 001 (813) 886 2775, Email: sales@seaward-groupusa.com , Website: http://www.seaward-groupusa.com,
handling these product lines: Seaward test equipment, Solar solar voltaic instruments, Clare industrial safety equipment, Cropico precision test instruments measuring electrical resistance, Rigel medical and biomedical test equipment. Seward's Cropico division produces a Microhmmeter for any electrical manufacturing environment. - T.D. Instruments, Amps-Chek® Mini Ammeter, Model T.D.2, range is 0-1.2 amps used for precise checking and adjusting of heating thermostat heat anticipators, sold by heating equipment suppliers. T.D. Instruments Corporation, 180 Charlotte St., Rochester, NY 14067 - 716-232-4208. Thomas H Isaac: Chief Executive Officer. We used model T.D. 2, which operates between 0 and 1.2 Amps A.C. If this instrument is not available look for an ammeter capable of operating with precision in the same very low-end range of current draw from 0 - 2 Amps.
- Our recommended books about building & mechanical systems design, inspection, problem diagnosis, and repair, and about indoor environment and IAQ testing, diagnosis, and cleanup are at the InspectAPedia Bookstore. Also see our Book Reviews - InspectAPedia.
- In addition to citations & references found in this article, see the research citations given at the end of the related articles found at our suggested
CONTINUE READING or RECOMMENDED ARTICLES.
- Carson, Dunlop & Associates Ltd., 120 Carlton Street Suite 407, Toronto ON M5A 4K2. Tel: (416) 964-9415 1-800-268-7070 Email: info@carsondunlop.com. Alan Carson is a past president of ASHI, the American Society of Home Inspectors.
Thanks to Alan Carson and Bob Dunlop, for permission for InspectAPedia to use text excerpts from The HOME REFERENCE BOOK - the Encyclopedia of Homes and to use illustrations from The ILLUSTRATED HOME .
Carson Dunlop Associates provides extensive home inspection education and report writing material. In gratitude we provide links to tsome Carson Dunlop Associates products and services.
 | HOME | ABOUT | ASK a QUESTION | CONTACT | CONTENT USE POLICY | DESCRIPTION | POLICIES | PRIVACY | |
| © 2025 - 1985 Publisher InspectApedia.com - Daniel Friedman | |||||||||