 Guide to Fixing an Air-Bound Hot Water Heating System
Procedure#2, Using a Portable Pump
- POST a QUESTION or COMMENT On how to get rid of air in an air-bound heating systems by using a pony pump and the boiler supply and drain piping
Air Bound Hot Water Heating System Repairs:
How to remove un-wanted, air from noisy or air-bound hot water heating system pipes, radiators, convectors, and baseboards using a portable pump and drain valves on the heating boiler.
Here we detail exactly how to hook up a transfer pump to force water through and air out of an airbound or air-logged hot water heating system. This pumping procedure is also used to add antifreeze to hot water heating boilers.
InspectAPedia tolerates no conflicts of interest. We have no relationship with advertisers, products, or services discussed at this website.
- Daniel Friedman, Publisher/Editor/Author - See WHO ARE WE?
Service Procedures to Fix an Air-Bound Hot Water Heating System
If a hot water heating system develops too much air in the piping you may hear bubbling or gurgling in the heating pipes when the heating system is operating, or worse, so much air may be in the heating piping, radiators, or baseboards that heat may simply not circulate at all.
Airbound Heating System Relief Procedure #2 Using a Pony Pump
The following procedure is most useful when a heating system is already hot (we don't want to introduce cold water that might damage a hot boiler), or when a hydronic (hot water) heating system has been filled with antifreeze (we don't want to spill and waste the antifreeze filler).
Most newer heating systems using forced hot water include a service drain at the hot water riser pipe leaving the boiler or if the system is divided into multiple zones using individual zone valves, each heating zone should have a service drain installed, usually near the zone valve.
This procedure for repairing an air-bound hot water heating system is similar to method #1 above except that we connect our boiler drain to a 5-gallon bucket, and we use a pony pump with a short garden hose in the bucket to pump heating water from the boiler bottom service drain into a service drain on the hot water riser pipe or heating zone water pipe.
Forcing water in this manner uses a pump that can produce higher pressures than a heating system circulator pump - it pushes air through and out of the airbound heating system.
Note: this same procedure is used to add anti-freeze to hot water heating boilers & systems for freeze protection.
Details are
Step 1: Confirm that the heating system appears to be air-bound: heat is on and boiler temperature is up and the circulator pump is running; by touch the technician confirms that one or more sections of radiator, convector, or heating baseboard remain cold even though all radiator or convector or other circulating system valves are in the open position.
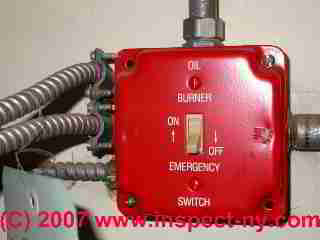
Step 2: Turn off the heating boiler, using the service switch. If necessary,
see ELECTRICAL POWER SWITCH FOR HEAT.
Thanks to reader Gene Friedman for pointing out that we ought to check to confirm that the system is air-bound before shutting the boiler off to begin the air purge process.
Also, as you'll note below at step 6, you may have to turn the boiler back on and set all thermostats to call for heat in order to open the heating system's zone valves and check valves if your system uses those devices.
Watch out: still we'd like to shut down and cool down the boiler before messing with buckets, hoses, and pumps, both to avoid a scalding hazard and to avoid running too-hot water through that cheap pony pump you bought.
So let's cool down the boiler even if later we have to turn it back on to complete the air purge procedure.
Step 3: Connect hose from pony pump output side to boiler hot water riser service drain:
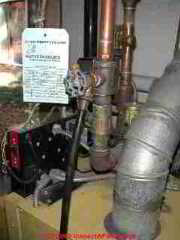
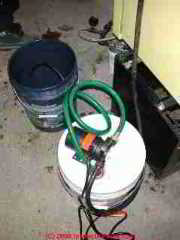
Our photo (above left) shows a hose connected to the hot water riser pipe at the top of a heating boiler.
Connect the other end of this hose to the output side of a pony pump.
The pump will push high pressure water from the boiler bottom drain into the heating system distribution piping through this heat riser service drain, forcing water and air through the heat distribution piping and radiators and back down through the boiler and out at the boiler bottom.
(Some airbound heating system service procedures may reverse the direction of these flows.)
Step 4: connect a short hose from the pony pump input side to a 5-gallon bucket.
This photo (above left) shows the black hose connecting the boiler hot water riser pipe to the pony pump output side.
The pony pump's green hose will be connected to the pump's input side and the other end of the green hose will be placed into the blue bucket.
If you are using this procedure not for air removal but to install antifreeze, the bucket connected to the pump's input side contains the antifreeze product.
Step 5: connect one end of a short garden hose length to the boiler drain valve.
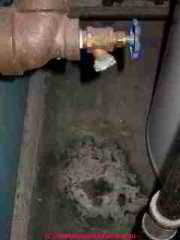 Place the other end of this hose into the same 5-gallon bucket. The black hose (inside the blue bucket in our photo above ) will be connected to the boiler drain (photo at left).
Step 6: make sure that the heating zone valves and check valves are open, then open the boiler drain -
Watch out: At step 2 we turned off power to the boiler and we let it cool down enough to avoid getting scalded. Did you wait for things to cool down?
When you open the boiler drain you should see boiler water flowing into the bucket, covering the ends of both the input hose (from the boiler drain) and the output hose (connected to the pony pump input side).
Watch out: if the boiler drain is horribly corroded or very stiff, maybe you want to buy a replacement along with a roll of teflon tape so that if you're sorry you've ever touched the boiler drain (you opened it and now can't shut it off) you can fix that problem. If you have boiler drain troubles you'll have to finish draining the boiler before you can replace the valve.
No water flowing? Check for closed zone valves or check valves
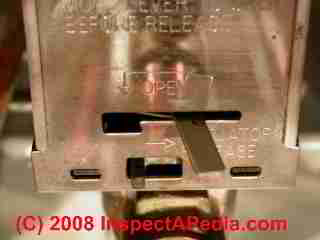
Watch out: While a motorized zone valve (below left) should open automagically if you set the room thermostat for each zone valve to well above room temperature and if the boiler is turned on. But if you are working with the boiler power off (as we advised at step 2), on heating systems using motorised zone valves you will need to place the zone valve in manual-open position.
- be warned that some zone valves don't have this manual-open lever,l in which case we may have to perform this procedure with the heating boiler turned back ON (that's what my service technician does) or worse, one may have to fall back to adding heating zones or installing zone valve bypass piping.
But if you waited for the boiler to cool down to a safe low temperature, as I've been begging you to do, when you turn it back on the zone valves will open up but you won't be dealing with scalding water.
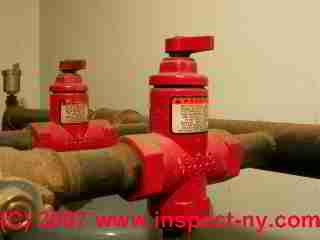
You may also have to open the boiler's check valves (below right) on the zones being purged of air.
See CHECK VALVES, HEATING SYSTEM if you need to manually open these valves.
Below we show the operating lever on a boiler zone valve (below left) and on a flow control check valve (below right).
[Click to enlarge any image] Thanks to reader GITOBY for reminding us to add these details - Feb. 2015.
Step 7: open the service drain on the boiler heat riser pipe.
Step 8: turn on the pony pump. Be sure to keep the ends of hoses in the bucket always covered with heating system water (or antifreeze mix)
Step 9: watch for air bubbles appearing in the bucket. After you see air appearing as bubbles in the bucket, watch for the air to stop.
Also, if you are adding antifreeze to the heating system, this is the point at which you'd use the hygrometer to test the level of freeze protection in the mixture obtained so far.
Step 10: turn off the pony pump when no more air appears in the bucket,
Step 11: close the service drains on the heat riser pipe and at the boiler drain at the bottom of the boiler.
Step 12: Set the proper boiler cold water pressure: The automatic water feeder will put additional water into the boiler until it reaches its starting pressure.
If the boiler pressure is below its normal level the automatic water feeder should correct this problem.
Watch the boiler pressure fill up to its normal cold pressure setting - typically this is around 12 psi on a two story home.
If the boiler pressure is too high and the boiler is cold, use the boiler drain to drop the boiler pressure to the proper starting level.
See WATER FEEDER VALVES, HYDRONIC BOILER
for a description of the typical pressures needed in residential hot water heating systems depending on the height of the highest radiator or baseboard above the heating boiler.
Step 13: turn on the heating boiler and assure that the thermostat is calling for heat. When the system has reached normal operating temperature and pressure, check the radiators, convectors, or baseboard sections that were previously cold - they should now be warm.
If the previously cold radiator (etc) still remains cold, either you have not removed enough air from the system or there is another problem causing loss of heat. In that case
see HEATING LOSS DIAGNOSIS-BOILERS.
Step 14: Check the boiler drain valve and the boiler heat riser service valve to be sure nothing is leaking. In an emergency we screw a garden hose cap on the end of a leaky heating boiler drain or service drain valve.
Step 15: Monitor heating system operation: we never leave a property where we have worked on the heating system without first checking for leaks, inspecting for obvious safety hazards (such as a bad relief valve, blocked flue, improper oil or gas burner operation), and confirming that the heating system runs through it's on-off cycle normally.
How Do we Know That the Air Bleed Valve Operation Has Been Successful?
- If you open a manual air bleeder valve on a hot water heating system and air hisses out, there was air that needed removal. If only water comes out, that device was not the one that is air bound.
- If the heating boiler is already running and hot, quite quickly, in a minute or three, the radiator, baseboard, or convector that was air bound will get hot to the touch.
Feel first at the pipes that enter the radiator, convector or heating baseboard since that's where hot water will begin entering the previously air-bound device.
What size (horsepower) of Pony Pump do We Need to Force Air out of an Air Bound Heating System?
You should not need a very powerful pump to force water through an air-bound hydronic heating system, since the fact that nearly all of the heating pipes are already full of water means the pump does not have to have enormous lift capacity.
 The Little Giant™ MPFVK115 Portable 115 Volt Non-Submersible Steel Transfer Pump is one that we have used successfully in this application.
This is a non-submersible transfer pump made of stainless steel, operating on 115 Volts, and rated for 365 gallons per hour (some sources cite 1365 gph at 0 head or lift), produced by manufacturer Little Giant. Part No. MPFVK115.
Thanks to reader David Gould for discussing pump requirements (2010);
Contact us if you have other suggestions for improving this procedure. We are pleased to give credit and links to contributing reviewers, authors, or critics.
...
Continue reading at AIRBOUND HEAT SYSTEM REPAIR by WATER FEED VALVE or select a topic from the closely-related articles below, or see the complete ARTICLE INDEX.
Or see AIR BOUND HEAT SYSTEM REPAIR by PUMP FAQs - questions & answers about getting air out of air-bound heating pipes, posted originally at the end of this page.
Or see these
Recommended Articles
Suggested citation for this web page
AIR BOUND HEAT SYSTEM REPAIR by PUMP at InspectApedia.com - online encyclopedia of building & environmental inspection, testing, diagnosis, repair, & problem prevention advice.
Or see this
INDEX to RELATED ARTICLES: ARTICLE INDEX to HEATING RADIATORS
Or use the SEARCH BOX found below to Ask a Question or Search InspectApedia
Ask a Question or Search InspectApedia
Questions & answers on how to get rid of air in an air-bound heating systems by using a pony pump and the boiler supply and drain piping
Try the search box just below, or if you prefer, post a question or comment in the Comments box below and we will respond promptly.
Search the InspectApedia website
Note: appearance of your Comment below may be delayed: if your comment contains an image, photograph, web link, or text that looks to the software as if it might be a web link, your posting will appear after it has been approved by a moderator. Apologies for the delay.
Only one image can be added per comment but you can post as many comments, and therefore images, as you like.
You will not receive a notification when a response to your question has been posted.
Please bookmark this page to make it easy for you to check back for our response.
IF above you see "Comment Form is loading comments..." then COMMENT BOX - countable.ca / bawkbox.com IS NOT WORKING.
In any case you are welcome to send an email directly to us at InspectApedia.com at editor@inspectApedia.com
We'll reply to you directly. Please help us help you by noting, in your email, the URL of the InspectApedia page where you wanted to comment.
Citations & References
In addition to any citations in the article above, a full list is available on request.
- Thanks to reader David Gould, BC, Canada, for pony pump requirements discussion, 1/27/2010
- "Residential Hydronic (circulating hot water) Heating Systems", Instructional Technologies Institute, Inc., 145 "D" Grassy Plain St., Bethel, CT 06801 800/227-1663 [home inspection training material] 1987
- "Warm Air Heating Systems". Instructional Technologies Institute, Inc., 145 "D" Grassy Plain St., Bethel, CT 06801 800/227-1663 [home inspection training material] 1987
- Heating, Ventilating, and Air Conditioning Volume I, Heating Fundamentals,
- Boilers, Boiler Conversions, James E. Brumbaugh, ISBN 0-672-23389-4 (v. 1) Volume II, Oil, Gas, and Coal Burners, Controls, Ducts, Piping, Valves, James E. Brumbaugh, ISBN 0-672-23390-7 (v. 2) Volume III, Radiant Heating, Water Heaters, Ventilation, Air Conditioning, Heat Pumps, Air Cleaners, James E. Brumbaugh, ISBN 0-672-23383-5 (v. 3) or ISBN 0-672-23380-0 (set) Special Sales Director, Macmillan Publishing Co., 866 Third Ave., New York, NY 10022. Macmillan Publishing Co., NY
- Installation Guide for Residential Hydronic Heating Systems
- Installation Guide #200, The Hydronics Institute, 35 Russo Place, Berkeley Heights, NJ 07922
- Our recommended books about building & mechanical systems design, inspection, problem diagnosis, and repair, and about indoor environment and IAQ testing, diagnosis, and cleanup are at the InspectAPedia Bookstore. Also see our Book Reviews - InspectAPedia.
- In addition to citations & references found in this article, see the research citations given at the end of the related articles found at our suggested
CONTINUE READING or RECOMMENDED ARTICLES.
- Carson, Dunlop & Associates Ltd., 120 Carlton Street Suite 407, Toronto ON M5A 4K2. Tel: (416) 964-9415 1-800-268-7070 Email: info@carsondunlop.com. Alan Carson is a past president of ASHI, the American Society of Home Inspectors.
Thanks to Alan Carson and Bob Dunlop, for permission for InspectAPedia to use text excerpts from The HOME REFERENCE BOOK - the Encyclopedia of Homes and to use illustrations from The ILLUSTRATED HOME .
Carson Dunlop Associates provides extensive home inspection education and report writing material. In gratitude we provide links to tsome Carson Dunlop Associates products and services.


