
InspectAPedia® FREE Encyclopedia of Building & Environmental Construction, Diagnosis, Maintenance & Repair |
Question? Just ask us! InspectAPedia
|
 Best Practices Guide to Stains, Dyes & Finishes for Building Interior Wood Trim & Floors

- POST a QUESTION or COMMENT about using stains, dyes, and coatings on interior floors, doors, windows & trim
Interior wood stains, finishes coatings guide:
This article explains how to choose and apply different types of stains or coatings on building interior surfaces: trim, doors, floors, etc. This article series discusses and provides a best construction practices guide to the selection and installation of building interior surface materials, carpeting, doors, drywall, trim, flooring, lighting, plaster, materials, finishes, and sound control materials.
InspectAPedia tolerates no conflicts of interest. We have no relationship with advertisers, products, or services discussed at this website.
- Daniel Friedman, Publisher/Editor/Author - See WHO ARE WE?
Best Practices Guide to Choosing & Using Interior Stains & Finishes
Our page top photo shows mahogany trim installed indoors. We (D Friedman) treated all sides of this custom-cut and planed interior trim using raw linseed oil. As described in the book, Best Practices Guide to Residential Construction (Steve Bliss, J Wiley & Sons) Chapter 5, Interior Finish:
With laminated doors, look for products in compliance with the WDMA Standard I.S.1-87. Under this standard, door samples must withstand multiple wetting and drying cycles without significant delamination. Products in compliance typically carry a one- to five-year warranty against delamination. Most warranties also cover any warping and twisting in excess of 1/4 inch across the length or width of the door but require that the door be sealed on all six edges. Oversized doors may have more limited protection against warping.
Finishing stain-grade trim is equal parts art and science. There are a wide range of products and application techniques. With all finishes, careful prep work and control of dust on the job site are critical for a professional quality finish.
Sanding and Prep Work Before Applying Interior Finishes
Starting with coarse grits and working to finer grits, sand all cabinets, doors, and other woodwork to remove any milling marks or chatter, scratches, dirt, or other imperfections. Highly visible surfaces like cabinets and doors should be taken down to a 180 or 220 grit. Use a dusting brush to clean off any visible dust between sandings, and thoroughly clean up after the final sanding. With solvent-based finishes, use a tack cloth to remove any residual fine dust.
Open-Grain Woods & Requirements for Applying Interior Finishes
With open-grain woods, such as oak, ash, mahogany, and walnut, it may take many coats of clear finish to fill the wood pores and achieve a glassy, smooth surface. Where a premium finish is desired, one approach is to apply a paste filler to the sanded wood, which is a thick, paste like varnish with finely ground quartz or talc to add bulk, and usually a pigment as well to match the wood tone.
It is typically applied with a rag and sanded clean the following day. If using a filler that is darker than the wood, first seal the wood with a sanding sealer or thinned coat of the clear finish to keep the wood from being overly darkened. Generally, stains are applied after the filler has been applied and sanded.
Water-Based Finishes Used as Interior Finishes
Water-based stains and finishes tend to raise the wood grain when applied, creating a rough surface. The best way to avoid problems later is to intentionally raise the grain and sand it down before applying the finish. To accomplish this, after sanding the work, wet the wood surface with a sponge or cloth, and allow to dry overnight. Then knock down the raised grain with 180 to 220 grit sandpaper.
With some of the newer water-based formulations, this step may not be required. Instead, a light sanding after the first coat may be all that is needed. Whatever approach is taken to sanding, never use steel wool with water-based finishes, as leftover steel particles can rust and stain the work. Also, do not use a solvent-type tack cloth with water-based finishes, as the solvent residue can interfere with the finish. A clean cloth lightly misted with water can be used to remove any dust or sanding residue.
Stains and Dyes for Interior Trim
Stains for interior trim are either pigmented stains or penetrating dyes. Many ready-made stains at the lumberyard combine both pigments and penetrating dyes. The penetrating dyes work for the small-pore areas and the pigments add contrast to the larger pores.
Using Stains on Interior Wood Trim
Oil-based pigmented stains tend to highlight distinctive grain patterns, particularly in wood with large pores, such as oak and ash, but they also highlight any scratches or defects in the wood. Wood with uneven absorption will look blotchy. Also, because the pigments are large, opaque particles, they tend to act like watered down paints, obscuring the wood itself.
Using Dyes on Interior Wood Trim
Dyes, which must be mixed by the applicator, are very transparent and tend to get absorbed equally into the wood surface, resulting in a more uniform color. They tend to give the wood an even, transparent color while letting the grain pattern show through. Over time, they will fade from exposure to natural light. Dyes are either dissolved in a water or oil solution and must be precisely mixed to obtain controlled colors.
Use of Sealers on Softwoods Before Applying a Stain or Dye
Softwoods, like pine, and light-colored hardwoods, such as maple or birch, tend to absorb stain unevenly, so they benefit from sealing prior to staining. Depending on the desired appearance, you can use a shellac based sealer with a pigmented stain, obscuring the underlying wood, or a pre stain sealer with a penetrating stain. Pre stain sealers allow stain to penetrate the wood surface but with more even absorption. Pre stain sealers can also be useful when staining birch veneer, which tends to absorb stain unevenly, creating a blotchy appearance.
Stains and dyes may be oil, alcohol, or water-based. They may be applied with a sprayer, brush, roller, or rag and are typically applied to the surface, allowed to sit, then wiped off. Whatever type of stain is used, it should be completely dry before application of the clear topcoat. If using a water-based topcoat, check for compatibility with oil-based stains. Using a stain and clear finish from the same manufacturer will help guard against compatibility problems.
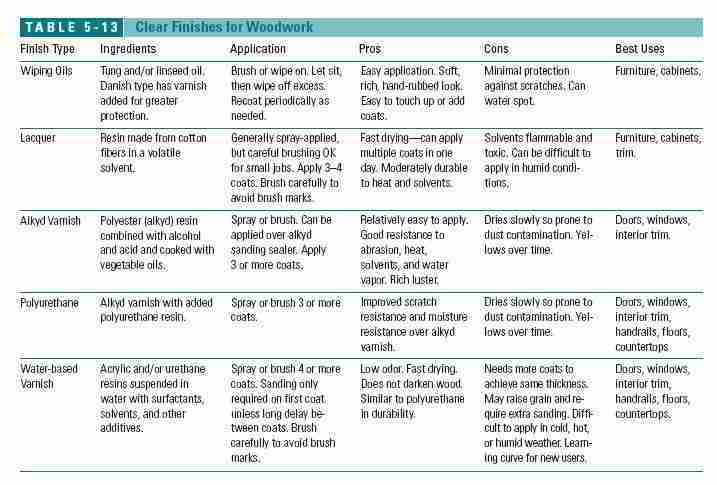
How to Choose Clear Finishes for Interior Wood Trim
The best clear finish depends on the look desired, hardness required, and whether it must resist water (Table 5-13). Some finishes are best sprayed on, but most may be brush applied. Oil-based finishes are generally wiped on with a rag and create a low-luster, hand-rubbed appearance, but provide the least protection.
With most surface finishes, it is best to lightly abrade the finish between coats with 220-grit paper or No. 00 steel wool to increase the bond between coats. After sanding, wipe with a tack cloth for oil- or solvent-based finishes and a water-dampened cloth for water-based finishes. Most professional painters apply three to four coats of clear finish.
- - Adapted with permission from Best Practices Guide to Residential Construction (Steve Bliss, J Wiley & Sons) .
Resources: Manufacturers, Industry Associations, & Sources of Indoor Wall Materials, Flooring, Carpeting, Lighting, Sound Control Materials
Drywall Trims and Accessories
Clinch-On Products, A Deitrich Metal Framing Company www.dietrichindustries.com Nail-on and clinch-on galvanized metal corner beads
Con-Form International/Strait Flex www.straitflex.com Strait-Flex fiber-composite mud-on corner bead for inside and outside off-90 degree angles
Drywall Systems International www.no-coat.com No-Coat prefinished drywall tapes for inside and outside corners, off angles and bullnose trims
Flex-Ability Concepts www.flexc.com Curved metal top and bottom plates for curved wood or metal stud walls
Grabber Construction Products www.grabberman.com Drywall screws, corner clips, and fiberglass mesh tapes
Insta Arch Corp. www.instaarch.com Galvanized steel preformed and custom arches for drywall
National Gypsum Co. www.nationalgypsum.com ProForm tapes and finishing compounds
Pla-Cor www.pla-cor.com ABS corner trims, bullnose, 3-way corner caps, and flexible arches
Phillips Manufacturing Co. www.phillipsmfg.com Metal and vinyl corner beads, bullnose trim, and flexible bullnose and angled arch trim
Trim-Tex www.trim-tex.com Vinyl drywall beads, flexible arch beads, and finishing accessories
U.S. Gypsum Beadex and Sheetrock-brand tape-on metal corner beads and trims. Complete line of drywall finishing compounds
Vinyl Corp., A Deitrich Metal Framing Company www.vinylcorp.com Full line of vinyl beads and trim
Polymer (Urethane), MDF, and Vinyl Trim Producers & Sources
Burton Mouldings www.burton-mouldings.com MDF(medium-density fiberboard), polymer, flex, and wood
Fypon www.fypon.com Polymer moldings and components
Nu-Wood www.nu-wood.com Polymer moldings and components
Outwater Plastics www.outwater.com Polymer moldings and components
RAS Industries www.rasindustries.com Polymer moldings and components
Royal Mouldings (formerly Marley Mouldings) www.royalmouldings.com Polymer, polystyrene, expanded-PVC, CPVC, and acrylic molding profiles and components
Flexible Trim Manufacturers & Sources
Flex Trim www.flextrim.com Flexible polymer moldings
Resin Art www.resinart.com Flexible polymer moldings
Industry & Trade Associations for Carpeting, Lighting, Finishes, Wood Products, Flooring, Painting & Decorating
American Lighting Association www.americanlightingassoc.com
Association of the Wall and Ceiling Industries www.awci.org
Carpet and Rug Institute (CRI) www.carpet-rug.org
Drywall Finishing Council www.dwfc.org
Forest Stewardship Program www.fscus.org
FloorFacts www.floorfacts.com
The Gypsum Association www.gypsum.org
National Oak Flooring Manufacturers Association (NOFMA) www.nofma.com
National Wood Flooring Association www.woodfloors.org
Painting and Decorating Contractors of America www.pdca.org Smartwood/Rainforest Alliance www.smartwood.org
- - Adapted with permission from Best Practices Guide to Residential Construction (Steve Bliss, J Wiley & Sons) .
...
Reader Comments, Questions & Answers About The Article Above
Below you will find questions and answers previously posted on this page at its page bottom reader comment box.
Reader Q&A - also see RECOMMENDED ARTICLES & FAQs
Comment:
(Oct 8, 2014) Apurva Modi said:
Yes, withstanding a wetting and drying process (for any stains used upon) really counts a lot in favoring the most durable and effective stain types, very well protecting sort of delamination off the applied surface. Application techniques while a prep work like control of dust away from the applicable planes is also ensuring the most professional finish work.
Sanding also has much weightage in giving the best finish to the surface; any sort of dirt or rough sense should be immediately eliminated (yes, to achieve good adhesions); many coats of finish on open-grain wood and other techniques like using the grain paste; nice advices!
Reply:
Thank youi, Apurva.
...
Continue reading at CONCRETE STAINS: ID & REMOVAL or select a topic from the closely-related articles below, or see the complete ARTICLE INDEX.
Or see
INTERIOR FINISHES: BEST PRACTICES
PAINT FAILURE, DIAGNOSIS, CURE, PREVENTION - home
Suggested citation for this web page
STAINS & FINISHES, INTERIOR found at InspectApedia.com - online encyclopedia of building & environmental inspection, testing, diagnosis, repair, & problem prevention advice.
Or see this
INDEX to RELATED ARTICLES: ARTICLE INDEX to PAINTS & STAINS & FAILURES
Or use the SEARCH BOX found below to Ask a Question or Search InspectApedia
Ask a Question or Search InspectApedia
Try the search box just below, or if you prefer, post a question or comment in the Comments box below and we will respond promptly.
Search the InspectApedia website
Note: appearance of your Comment below may be delayed: if your comment contains an image, photograph, web link, or text that looks to the software as if it might be a web link, your posting will appear after it has been approved by a moderator. Apologies for the delay.
Only one image can be added per comment but you can post as many comments, and therefore images, as you like.
You will not receive a notification when a response to your question has been posted.
Please bookmark this page to make it easy for you to check back for our response.
IF above you see "Comment Form is loading comments..." then COMMENT BOX - countable.ca / bawkbox.com IS NOT WORKING.
In any case you are welcome to send an email directly to us at InspectApedia.com at editor@inspectApedia.com
We'll reply to you directly. Please help us help you by noting, in your email, the URL of the InspectApedia page where you wanted to comment.
Citations & References
In addition to any citations in the article above, a full list is available on request.
- Steve Bliss's Building Advisor at buildingadvisor.com helps homeowners & contractors plan & complete successful building & remodeling projects: buying land, site work, building design, cost estimating, materials & components, & project management through complete construction. Email: info@buildingadvisor.com
Steven Bliss served as editorial director and co-publisher of The Journal of Light Construction for 16 years and previously as building technology editor for Progressive Builder and Solar Age magazines. He worked in the building trades as a carpenter and design/build contractor for more than ten years and holds a masters degree from the Harvard Graduate School of Education. Excerpts from his recent book, Best Practices Guide to Residential Construction, Wiley (November 18, 2005) ISBN-10: 0471648361, ISBN-13: 978-0471648369, appear throughout this website, with permission and courtesy of Wiley & Sons. Best Practices Guide is available from the publisher, J. Wiley & Sons, and also at Amazon.com - Our recommended books about building & mechanical systems design, inspection, problem diagnosis, and repair, and about indoor environment and IAQ testing, diagnosis, and cleanup are at the InspectAPedia Bookstore. Also see our Book Reviews - InspectAPedia.
- Best Practices Guide to Residential Construction, by Steven Bliss. John Wiley & Sons, 2006. ISBN-10: 0471648361, ISBN-13: 978-0471648369, Hardcover: 320 pages, available from Amazon.com and also Wiley.com. See our book review of this publication.
- Decks and Porches, the JLC Guide to, Best Practices for Outdoor Spaces, Steve Bliss (Editor), The Journal of Light Construction, Williston VT, 2010 ISBN 10: 1-928580-42-4, ISBN 13: 978-1-928580-42-3, available from Amazon.com
- "An Example of Colonial Paneling", Norman Morrison Isham, The Metropolitan Museum of Art Bulletin, Vol. 6, No. 5 (May, 1911), pp. 112-116, available by JSTOR.
- Gypsum Construction Guide, National Gypsum Corporation
- Gypsum Construction Handbook [purchase at Amazon.com] H17, Technical Folder SA920 and PM2, PM3 and PM4, United States Gypsum Company, 125 South Franklin ST., PO Box 806278, Chicago, IL 60680-4124,
- Lath & Plaster Systems [copy on file as /interiors/LathPlaster_Nat_Gypsum.pdf ] - , 092300/NGC, National Gypsum Lath and Plaster Systems, National Gypsum Corporation, 800-628-4662 describing National Gypsum's Kal-Kore brand plaster base
- Metal Lath Specifications, Specification for metal lath and accessories, Lath and Plaster [copy on file as/interiors/Amico_lath-inside.pdf ] - from Amico, a lath and plaster accessory producer.
- The National Institute of Standards and Technology, NIST (nee National Bureau of Standards NBS) is a US government agency - see www.nist.gov
- "A Parametric Study of Wall Moisture Contents Using a Revised Variable Indoor Relative Humidity Version of the "Moist" Transient Heat and Moisture Transfer Model [copy on file as/interiors/MOIST_Model_NIST_b95074.pdf ] - ", George Tsongas, Doug Burch, Carolyn Roos, Malcom Cunningham; this paper describes software and the prediction of wall moisture contents. - PDF Document from NIS
- Pergo AB, division of Perstorp AB, is a Swedish manufacturer or modern laminate flooring products. Information about the U.S. company can be found at http://www.pergo.com where we obtained historical data used in our discussion of the age of flooring materials in buildings.
- Re-Bath, tub lining products is a bath tub relining manufacturer and distributor located in Tempe, Arizona - see rebath.com
- In addition to citations & references found in this article, see the research citations given at the end of the related articles found at our suggested
CONTINUE READING or RECOMMENDED ARTICLES.
- Carson, Dunlop & Associates Ltd., 120 Carlton Street Suite 407, Toronto ON M5A 4K2. Tel: (416) 964-9415 1-800-268-7070 Email: info@carsondunlop.com. Alan Carson is a past president of ASHI, the American Society of Home Inspectors.
Thanks to Alan Carson and Bob Dunlop, for permission for InspectAPedia to use text excerpts from The HOME REFERENCE BOOK - the Encyclopedia of Homes and to use illustrations from The ILLUSTRATED HOME .
Carson Dunlop Associates provides extensive home inspection education and report writing material. In gratitude we provide links to tsome Carson Dunlop Associates products and services.
 | HOME | ABOUT | ASK a QUESTION | CONTACT | CONTENT USE POLICY | DESCRIPTION | POLICIES | PRIVACY | |
| © 2025 - 1985 Publisher InspectApedia.com - Daniel Friedman | |||||||||