 Fluorescent Light Connectors
Types of lamp base or connectors, wiring & replacement
- POST a QUESTION or COMMENT about building electrical systems, power, wiring, and flickering or dimming lights
Troubleshoot and fix or replace defective lamp connectors or sockets for fluorescent light fixtures.:
This article series explains how to diagnose and repair fluorescent lights in buildings.
If the simple repairs we describe here don't cure the problems with your light fixture, switch off the bad-acting light, leave it off, circuit and ask for help from a licensed electrician.
InspectAPedia tolerates no conflicts of interest. We have no relationship with advertisers, products, or services discussed at this website.
- Daniel Friedman, Publisher/Editor/Author - See WHO ARE WE?
Common Types of Fluorescent Lamp Sockets
[Click to enlarge any image]
Bi-Pin Fluorescent Bulbs: rapid / programmed start
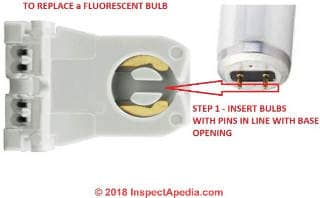
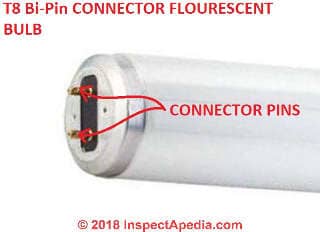
Traditional straight fluorescent bulbs use a turn-type connector whose internal metal clips contact two pins at each end of the bulb.
The electrical industry refers to these as bi-pin bulbs and bi-pin sockets.
The photo above is of a T8 type lamp being held in the position to insert the lamp into the socket holder. You can also see the two brass-colored clips into which the pins will connect.
Bi-pin sockets used to connect traditional "rapid start" or "programmed start" ballasts with bulbs whose connectors look like that in the photo I show below.
The T8 turn-type lampholder takes a 1" diameter bulb and is designed for a medium, bi-pin socket, "non-shunted" for programmed-start ballasts.
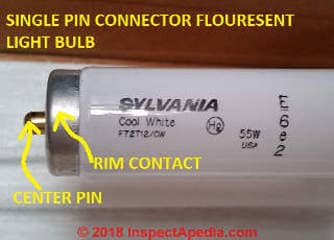
Center Pin Instant Start Fluorescent Bulbs
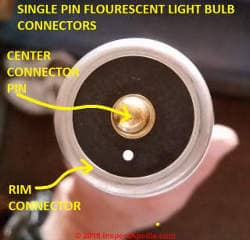
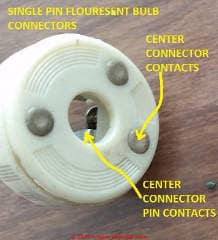
Above, and in more detail below, our photos illustrate the other common type of straight fluorescent lamp socket, center pin, and the bulb and connector's contact points. This is a single pin bulb connects to a single center pin Fa6 base. The pin is 6mm in diameter.
Watch out: don't knock yourself out looking for a separate starter: instant-start fluorescent bulbs use a different type of transformer and they do not use an additional starter.
Center pin bulbs use a ballast / transformer that provides the bulb starting current without needing the additional starter device that we discuss at FLUORESCENT LIGHT STARTER REPLACEMENT
Replace a Bad Fluorescent Bulb Connector or Base
 Watch out: Changing a fluorescent lamp or bulb and changing the fluorescent lamp starter (if your lamp uses a starter) are easy tasks within the ability of most homeowners or occupants.
Electrical wiring is a different story: if you are not trained and comfortable with proper electrical wiring and repair work, hire someone who is qualified. Making a mistake can cause a building fire, shock, injury, or death.
Fluorescent Lamp Socket Defects
Inspect each lamp socket and the metal connectors inside.
[Click to enlarge any image]
Look for
- Loose socket: you may simply need to tighten mounting screws
- Loose wire connection to the socket: the electrical connections may need to be re-made or a twist-on connector replaced or tightened
- Cracked body of the socket: replace the holder
- Missing, burned, corroded metal terminals or contacts; clean or replace as needed
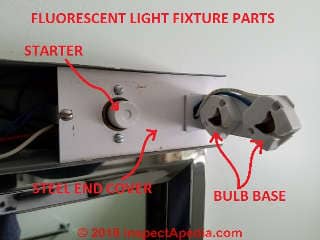
In my photo above you can see that this fluorescent light fixture, an original fixture installed in the bathroom of a Two Harbors MN home built in 1963, used two straight bulbs as there are two base connectors at each end of the fixture.
I have also marked the starter found at one end of the fixture.
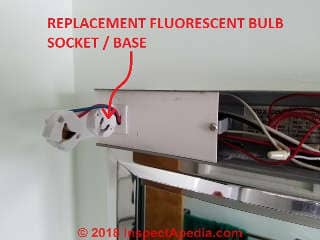
In my next photograph, found just below, you may notice that the two bulb sockets do not match exactly.
The inner socket of the pair is a replacement unit that I installed after finding that the original had lost its internal clips - that meant the inner bulb would not light no matter what other repairs were made.
As long as the replacement base handles bulb pins of the same spacing (the bulb type and diameter), and as long as the wattage and voltage are within limits of the fixture (they will be for just about any residential fluorescent lamp fixture) the repair will work - it did.
The bulb connector clip surface can fail to make good contact with the bulb's connecting pins if the connector is loose in its mount or if its clips are bent, broken, corroded, or lost entirely.
Replacement connectors are inexpensive and are widely available, and their wiring connections are rather simple if you simply replace-in kind by wiring the new connector exactly as the old one was connected.
Two screws mount the replacement connector to the metal strap and its wire(s) connect matching the connections of the wires you removed when you disconnected the old bulb connector-base. You made a note of that, right? OR took photos?
Watch out: there are several turn-type fluorescent lamp connectors: to be sure you're buying the right replacement you can
Measure the length and distance between the pins on your fluorescent bulb
Measure the distance between the connector clips
Take the old connector along to your electrical supplier to match it properly.
Tale care as well that the replacement bulb connector is rated to meet or exceed the voltage and wattage of the light fixture.
Take a careful look at the base of the lampholder: match the base design to the lampholder you are replacing.
You'll see that usually the lampholder base simply slips into a slot cut into the steel of the fluorescent light fixture face.
...
Continue reading at FLUORESCENT LAMP INSTRUCTIONS, PARTS, REPLACEMENTS or select a topic from the closely-related articles below, or see the complete ARTICLE INDEX.
Or see your local telephone listings for licensed electricians or see DIRECTORY OF ELECTRICIANS
ELECTRIC POWER LOSS / FLICKERING LIGHTS
Or see this
Article Contents
- FLUORESCENT LIGHTING GUIDE INDOORS for Indoors and Guide to Using Compact Fluorescent Lights
- FLUORESCENT LIGHTS COMPACT INDOOR
- FLUORESCENT LIGHT REPAIRS
- HOW FLUORESCENT LIGHTS WORK
- ELECTRIC POWER LOSS / FLICKERING LIGHTS
- DIAGNOSE a BAD FLUORESCENT LAMP / BULB
- LED BULB REPLACES FLUORESCENT
- REPLACE a FLUORESCENT LAMP / BULB
- FLUORESCENT LIGHT BALLAST TYPES
- FLUORESCENT LIGHT BULB CODES & TYPES
- FLUORESCENT LIGHT BULB PHOTOS
- FLUORESCENT LIGHT BULB COLOR TEMPERATURE
- FLUORESCENT LIGHT FLICKERING CAUSES
- FLUORESCENT LIGHT STARTER REPLACEMENT
- FLUORESCENT LIGHT TRANSFORMER / BALLAST REPLACEMENT
- FLUORESCENT LIGHT TRANSFORMER / BALLAST TYPES
- FLUORESENT BULB SOCKET TYPES
- FLUORESCENT LAMP CONNECTOR / SOCKET REPLACEMENT
- FLUORESCENT LIGHT FIXTURE BULB / BALLAST DISPOSAL
- FLUORESCENT LAMP INSTRUCTIONS, PARTS, REPLACEMENTS
- FLUORESCENT vs INCANDESCENT BULBS
Suggested citation for this web page
FLUORESENT BULB SOCKET TYPES at InspectApedia.com - online encyclopedia of building & environmental inspection, testing, diagnosis, repair, & problem prevention advice.
Or see this
INDEX to RELATED ARTICLES: ARTICLE INDEX to ELECTRICAL INSPECTION & TESTING
Or use the SEARCH BOX found below to Ask a Question or Search InspectApedia
Ask a Question or Search InspectApedia
Try the search box just below, or if you prefer, post a question or comment in the Comments box below and we will respond promptly.
Search the InspectApedia website
Note: appearance of your Comment below may be delayed: if your comment contains an image, photograph, web link, or text that looks to the software as if it might be a web link, your posting will appear after it has been approved by a moderator. Apologies for the delay.
Only one image can be added per comment but you can post as many comments, and therefore images, as you like.
You will not receive a notification when a response to your question has been posted.
Please bookmark this page to make it easy for you to check back for our response.
IF above you see "Comment Form is loading comments..." then COMMENT BOX - countable.ca / bawkbox.com IS NOT WORKING.
In any case you are welcome to send an email directly to us at InspectApedia.com at editor@inspectApedia.com
We'll reply to you directly. Please help us help you by noting, in your email, the URL of the InspectApedia page where you wanted to comment.
Citations & References
In addition to any citations in the article above, a full list is available on request.
- Our recommended books about building & mechanical systems design, inspection, problem diagnosis, and repair, and about indoor environment and IAQ testing, diagnosis, and cleanup are at the InspectAPedia Bookstore. Also see our Book Reviews - InspectAPedia.
- In addition to citations & references found in this article, see the research citations given at the end of the related articles found at our suggested
CONTINUE READING or RECOMMENDED ARTICLES.
- Carson, Dunlop & Associates Ltd., 120 Carlton Street Suite 407, Toronto ON M5A 4K2. Tel: (416) 964-9415 1-800-268-7070 Email: info@carsondunlop.com. Alan Carson is a past president of ASHI, the American Society of Home Inspectors.
Thanks to Alan Carson and Bob Dunlop, for permission for InspectAPedia to use text excerpts from The HOME REFERENCE BOOK - the Encyclopedia of Homes and to use illustrations from The ILLUSTRATED HOME .
Carson Dunlop Associates provides extensive home inspection education and report writing material. In gratitude we provide links to tsome Carson Dunlop Associates products and services.


