
InspectAPedia® FREE Encyclopedia of Building & Environmental Construction, Diagnosis, Maintenance & Repair |
Question? Just ask us! InspectAPedia
|
 Dishwasher Troubleshooting, Installation & Repairs - Home
- POST a QUESTION or COMMENT about diagnosis & repair help for dishwashers
Residential dishwasher installation checklist & dishwasher troubleshooting & repair guide:
How to diagnose and repair problems with a dishwasher machine.
These quick inspection points and tips are accompanied by links to detailed inspection, diagnosis, and repair for most appliances found in homes, from room air conditioners to washing machines and water heaters.
InspectAPedia tolerates no conflicts of interest. We have no relationship with advertisers, products, or services discussed at this website.
Dishwashers: install, inspect, diagnose, repair
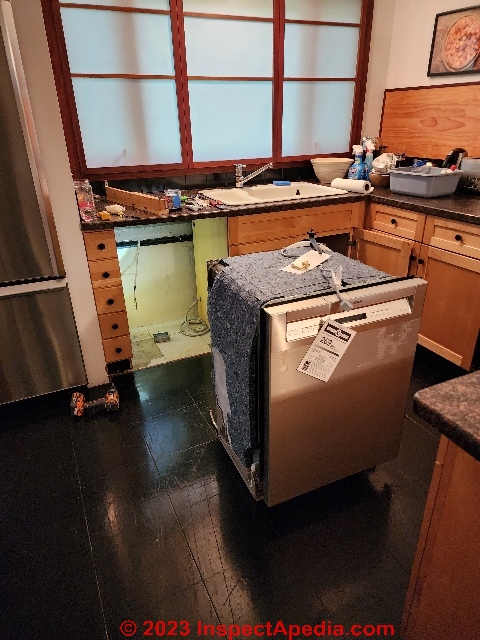
 Photo: a new dishwasher installation in Grand Marais, Minnesota. [Click to enlarge any image]
Starting with the basics of diagnosing dishwasher trouble, as noted in Carson Dunlop Associates' Home Reference Guide:
Dishwashers may be built-in or portable. Some portable dishwashers may be converted to built-in units. Typical life expectancies are eight to 15 years.
Most dishwashers require a 120-volt electrical supply and a supply of hot (140°F) water. Built-in dishwasher units are connected to the waste plumbing system, typically upstream of the trap below the kitchen sink.
Hot water enters the dishwasher through a solenoid (electrically operated) valve. Some dishwashers use a booster heater to raise the temperature to 140°F.
This allows the house hot water to be kept at roughly 120°F. An overflow switch shuts the solenoid valve when enough water has entered the machine.
Water is distributed through the dishwasher by rotating spray arms.
A strainer helps prevent food particles from clogging the pump, located at the base of the washer.
Dishwasher soap and rinse agent are dispensed from cups, usually located on the door. The discharge is controlled by the same timer that controls the sequence and duration of the cycles.
When a wash or rinse cycle is finished, the pump discharges the dirty water into the waste piping below the kitchen sink or through a food waste disposer. Once the rinse cycle is complete, the dishes are dried by either the heating element in the bottom of the tub or a combination heater and fan. On some units, the dryer element can be turned off to save energy.
Article Contents
- DISHWASHER INSTALLATION STEP BY STEP
- DISHWASHER TROUBLESHOOTING DIAGNOSTICS
- DISHWASHER TROUBLESHOOTING ARTICLES
...
Dishwasher Installation Procedure & Checklist
Above: a new Bosch dishwasher, delivered by Home Depot, is in the kitchen, ready for installation of this Poughkeepsie, New York home.
[Click to enlarge any image]
Portions of this dishwasher installation detail & checklist are adapted from a checklist provided by Home Depot stores and used by the author during installation of a Bosch dishwasher.
Watch out: for safety and to avoid risk of costly building damage from leaks or mold, a dishwasher must be installed both following the manufacturer's installation manual and in accordance with local plumbing and electrical codes. Depending on where you live, a licensed electrician or plumber may be required.
Still, installing a dishwasher is a task well within the ability of a handy homeowner who understands basic plumbing and electrical connections, more so if you are replacing an existing dishwasher, because in that case the electrical and plumbing points of connection will already be present.

Above: because an ABS plumbing vent runs across the building foundation wall inside of the dishwasher installation niche, we measured with care the opening depth from cabinet front to the face of the ABS drain line, NOT to the surface of the rear wall. That distance had to be equal-to or greater than the dishwasher's required installation depth - below.
We found that the dishwasher maximum opening depth to clear that ABS drain line gave us 24" and below, the actual depth of the dishwasher itself was 23 1/2" - it would fit with 1/2" to spare - a nice space that might be needed for wiring or drain hose routing.

- Measure twice, cut once:
Measure carefully the existing dishwasher opening width and height and compare those with the minimum opening size required by the new dishwasher that you select.
Keep in mind that the final installed height of the new dishwasher can be adjusted by moving its feet up and down - a step that also permits leveling the dishwasher in its installed position.
Watch out: if your kitchen floor covering has been replaced or new layers of flooring have been added since the old dishwasher was installed, you may have some trouble getting the old dishwasher out and more trouble sliding the new dishwasher into place.
At a recent New York dishwasher installation, the owners' new dishwasher was delivered but could not be installed, nor the old one removed, because multiple layers of flooring had been added in the kitchen. Even screwing the dishwasher's adjustable feet fully "up" didn't give enough room to remove the old unit.
We had to cut away a four-inch wide strip of multiple layers of flooring across the front of the dishwasher opening to get the old unit out and the new one into place. Later we installed a strip of replacement flooring to fill in the gap.

Above: we measured the actual height of the dishwasher above the finished floor (33 1/2"). We had to remove a 1 1/2" wide piece of horizontal wooden trim that had been installed across the opening of the dishwasher for the prior unit in order to have room to slide this newer, slightly taller dishwasher into the opening under the counter top.
Removing that wood trim left just the bare underside of the marble counter top. We had just room to re-install and glue/screw into place a 3/4" thick horizontal wood trim piece across the top of the opening.

Later we'd use the dishwasher's top installation tabs and short screws to secure the dishwasher to that top trim in order to assure that the dishwasher would not tip forward when its door was opened - a dangerous tip that could injure a child.
- Dishwasher installation kit:
Given the small additional cost of buying a dishwasher installation kit that includes necessary water supply and drain connection parts, you should buy the kit for your dishwasher and have it on hand before beginning the installation.
Re-using an old dishwasher drain hose or corroded flexible water supply line, for example, risks costly leaks and building damage after the new dishwasher has been placed in service. - If you are replacing an existing dishwasher:
If you hire an installer for your dishwasher, that service typically covers only the removal of an existing dishwasher and connecting the new one to existing water supply and plumbing drain points.
Watch out: If it will be necessary to cut into surrounding cabinets or a sink top, be sure to address those needs before the day of dishwasher installation, hiring a cabinet or sink top installer or renovation contractor if needed.

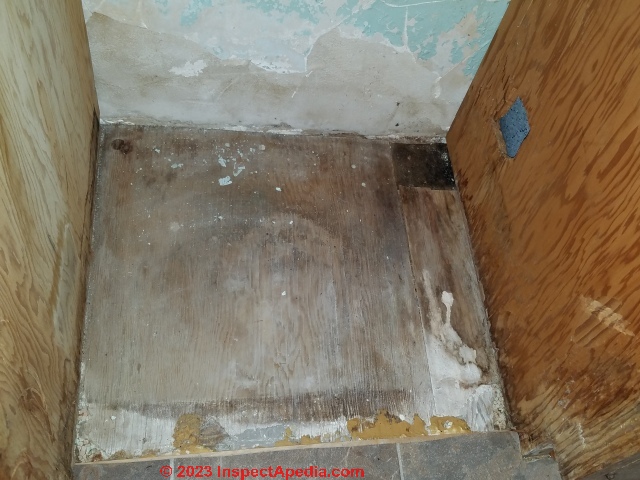
OPINION: an advantage of a do-it-yourself dishwasher installation is that you can take time to clean the dishwasher installation location thoroughly before installing the new one: time that a paid installer may not be willing to spend.
Photo above: we cleaned up loose plaster, water-damaged debris, and mouse poop from this dishwasher installation cutout during installation of a dishwasher in a Two Harbors, Minnesota home.
Also check that the sink trap fitting to which the dishwasher drain will be installed is in good condition - or replace those parts or have them on hand at the time that the new dishwasher will be installed.
- Dishwasher water supply connection at the dishwasher:
A water supply source, including a dishwasher shut-off valve (stop valve) is needed within 4 feet of the dishwasher. (6-feet in some instructions).
Connection of the dishwasher's water supply should be to the hot water supply line under the nearby sink.
The dishwasher water supply shutoff valve should be a metal one, not a plastic or "unitized" valve, and the valve must be in good working condition.
(Unitized valves are not normally found at plumbing fixtures and contain a mechanism that closes the valve in response to excessive water pressure.)
Watch out: if there is no shut-off valve for your dishwasher supply line, the delivery may take place but the installer may not be willing to hook-up the appliance and you'll need help from a licensed plumber to complete the installation.
Watch out: if the dishwasher water supply connection is not readily accessible and visible, such as a supply connection located in a crawl space, your dishwasher installer may not be willing to enter that space to make the connection. ...
... Above and below: We connect the factory-supplied right-angle hose connector to the dishwasher's water inlet and then connect one end of the dishwasher water supply line to the connector. The flexible rubber and braided stainless steel-jacketed water supply line is considerably easier than our prior installation that used flexible copper tubing and flare fittings.
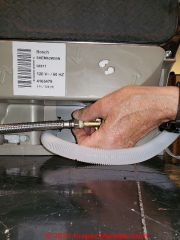
Really? Well yes, but we snorted in disgust at the text, doubtless written by the appliance manufacturer's lawyers, who warn that the dishwasher water supply line was not warranted against leaks and should not be used where it is routed through hidden spaces.
Absurd! Not one dishwasher in the world has water supply and drain lines that are not hidden through at least part of their routing once the dishwasher has been connected and slid into its opening.

- Dishwasher electrical connection:
An electrical hook-up, usually a receptacle, is required within 4 ft. of the back of the dishwasher's "installed" position. Above: our photo shows that the previous dishwasher had been hard-wired in place.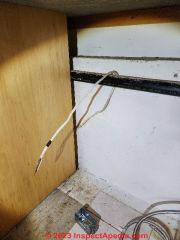
The existing bare electrical wire (above) had been hard-wired to a prior dishwasher, while the new dishwasher, as supplied from the factory (Bosch) is delivered with a line cord terminating in a wall plug (below).

While a hard-wired line conversion kit is available, it's better to simply install the necessary electrical receptacle.Watch out: don't work on electrical wiring live, and if you're not trained and qualified to perform safe, code-compliant electrical wiring, hire a licensed electrician - a step required by law in some jurisdictions. Below we're using a simple voltage tester to confirm that power is OFF to the circuit to which our dishwasher receptacle will be connected.

Below: we installed a 120VAC single-outlet appliance receptacle in a surface-mounted steel electrical box. the electrical wire entering the box also needs to be secured to the wall within 3" of the box (not shown here).

While we could have converted that to a hard-wired hook-up, we'd still have needed an electrical box on the rear wall of the dishwasher opening to complete the connection.
So this was a good time to go ahead and install and secure a proper 120VAC electrical receptacle for the new dishwasher. That's not something that the Home Depot installation crew might have been willing to do. (Shown below.)

In North America, a 110/120VAC grounded electrical receptacle is required to install most new dishwashers.
However your dishwasher's installation instructions might provide extra detailed advice if instead of plugging the dishwasher into a wall receptacle, yours will be hard-wired to an electrical circuit found in an electrical box also within 4 feet of the back of the dishwasher.


- Prepare to slide the dishwasher into place:
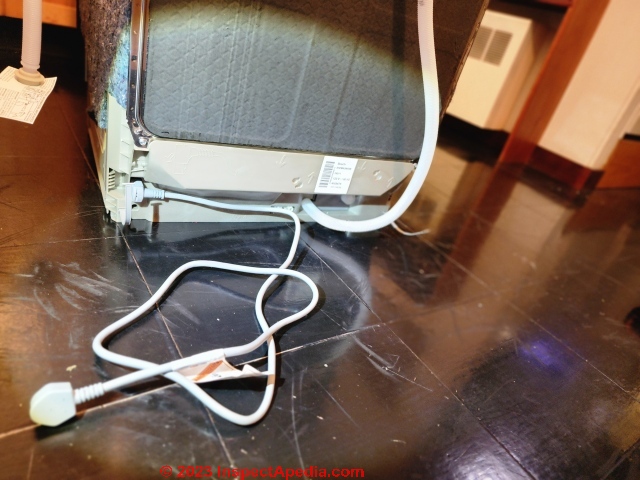
Below, all of its connections have been made to the dishwasher: electrical, water supply, drain line, but to have working space, the other end of water supply and drain are simply routed to the area under the sink, not yet connected there.
Before sliding the dishwasher into place we like to check the level of the floor in both directions - that gives us an idea how much adjusting to level will be needed at the dishwasher's feet.

Older dishwashers had individual foot pads that screw in or out to adjust the machine's height and level both front-to-back and left-to-right.

In that case we might have set the dishwasher's rear feet up or down as needed before sliding it into place.
Watch out: As we slide the dishwasher into place in its opening, we stop several times to reach around into the cabinets (to the right in our photo) to pull through the slack in the drain and water supply lines.
(Photo below, installing a different dishwasher in a Two Harbors MN home, we stop to pull the connecting lines into the under-sink space.)

This avoids kinking up either drain or water supply line - a mistake that will leave you irritated when you test the dishwasher and it doesn't fill or drain because you have to pull it back-out and unkink its supply or drain line.
Below: keep in mind that even if the dishwasher sits dead level front to back and left-to-right while it's on the floor in front of the opening into which it will be set, the floor level inside that opening may be different.
Happily some new dishwashers like the Bosch unit being installed here have a front adjustment screw that actually raises or lowers the back feet, so you can make that adjustment quickly and easily once the dishwasher has been pushed into its opening.


- Center the Dishwasher in its Opening, Level it, & Secure the Dishwasher in place:

Above: we've slid the dishwasher into position, but before securing it in place we take care to center it in its opening and to check that it is level. If not we adjust the front and rear feet as needed.

On this Bosch dishwasher, a single front screw raises or lowers the rear of the unit (photo above) while individual feet at the dishwasher front (photo below) can adjust not only its front height but its left-to-right level.
Turning the center screw clockwise raises the back of the dishwasher while turning it counter-clockwise lowers the back.

Turning a foot "in" or "up" lowers that corner of the dishwasher while unscrewing the foot or turning it counterclockwise or "down" raises that corner of the dishwasher front and side-to side.
With the dishwasher level (you can find a flat spot inside the unit to use your level), we're ready to secure the unit in place.
Earlier we described providing a well-secured horizontal trim board across the front of the top of the dishwasher opening, placed tight against (and glued-to) the under-side of the marble counter top.Below: Close-up of the special connector and screw securing the dishwasher itself to the under-side of the counter top. If your counter top. is stone or marble, take care to select a screw short enough that it won't punch through the board where it would hit the underside of the counter top itself.

Two steel tabs (one is shown above) are provided among the factory-provided installation parts to connect to slots in the top of the dishwasher frame to allow securing the top front of the dishwasher to the underside of the counter top.
If we could not have provided that horizontal top trim board we could instead have secured the dishwasher to the wood cabinet sides on either side of the dishwasher opening.
Watch out: securing the dishwasher in place in its opening is an important safety detail. Otherwise when the dishwasher door is open and especially when someone rolls out the trays of dishes in their dishwasher racks, the whole unit can tip forward, spilling dishes and possibly injuring anyone nearby.


- Dishwasher drain connection:
To avoid having to buy an extension drain line, and to rely only on the drain connection tubing that should come with your new dishwasher, assure that the drain connection point is within 5 feet of the dishwasher.
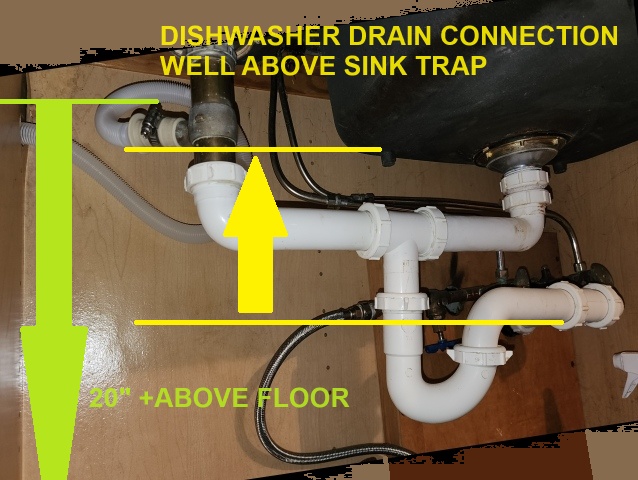
Watch out: To avoid drain clogging problems and assure proper dishwasher operation, while avoiding siphoning plumbing drain trap water while the dishwasher is operating, the dishwasher drain line needs to be looped up to a height above the flood rim of the kitchen sink to whose trap the dishwasher drain will be connected.

For the simplest installation, we route the flexible dishwasher drain tube into a loop that is secured at a point above the top of the dishwasher itself and above the height of the flood rim of the sink - ahead of its connection to the drain trap.
For most dishwasher installations, the high point of the loop in the dishwasher drain tube being routed to a sink drain trap must also be at least 20 inches above the level of the floor on which the dishwasher sits and must absolutely be higher than the actual sink trap itself.
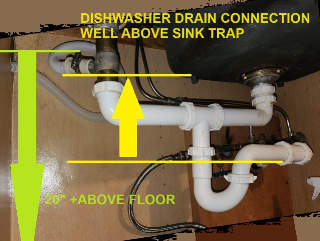
The high loop in the dishwasher drain tube may be in the dishwasher enclosure area rather than under the sink where the drain drops back down to connect to the sink trap - not shown in our photo above where our green arrow notes that the loop high point must be >= 20" above the floor AND the connection to the sink drain tailpiece must also be well above the sink trap itself (yellow arrow and lines).
If you can't meet these measurements and your drain connection point is less than 20 inches above the floor, then you need a dishwasher air gap device like the one shown below.

In some jurisdictions, a dishwasher air gap device or air admittance valve is required by local codes.
An example is the Kraus dishwasher air gap KAG-1SFSB shown above.
Here is the Kraus DISWASHER AIR GAP INSTALLATION GUIDE [PDF] Krause, Web: kraususa.com Tel: 1-800-775-0703 email: customerservice@kraususa.com
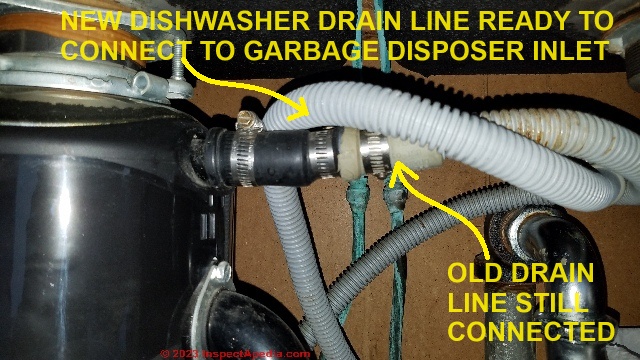
Below we illustrate the alternative of connecting the dishwasher drain to a garbage disposer.
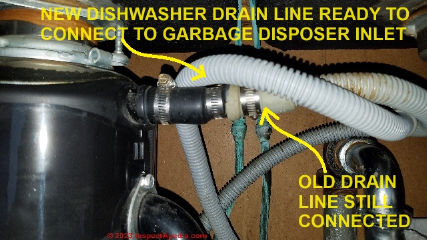
Above: we are in process of connecting the new dishwasher drain line to the inlet on a garbage disposer at a Minnesota home. The old drain line is still connected to the garbage disposer and the new one is simply wedged in place until we're ready to make the connection.
More about the critical role of air gaps on sink drains and dishwasher drains is
at AIR ADMITTANCE VALVES AAVs
If your dishwasher will be installed adjacent to an island sink, you should also
see ISLAND SINK PLUMBING VENTS


- Finish connecting the dishwasher water supply & drain lines:
If you've not already done so, with the dishwasher fully in place, complete its connections under the sink to its water supply line and drain line as we illustrate here.

If an air-gap was required, now is the time to complete that connection - dishwasher to air-gap inlet and air gap drain outlet to the sink trap dishwasher drain connection.
If no air gap was required (you were able to loop and secure the flexible drain line above the flood rim of the sink), just connect the drain to the sink trap fitting.
Below: water supply & shut-off valve connected to a rubber & flexible stainless steel dishwasher water supply line provided in the dishwasher installation kit for the Bosch dishwasher being installed.


- Test the dishwasher after installation:
Once the dishwasher has been installed, run it through several operating cycles to be sure that it works properly and particularly that there are no water supply leaks nor drain leaks.

Watch out: We defer installing the kick plate below the dishwasher until these tests prove successful. That allows shining a flashlight under the dishwasher and along its sides during and after operation so that we can inspect for leaks.

Check for leaks along both sides of the dishwasher as well as underneath its center.
If you find leaks you'll have to pull the dishwasher back out to repair the leaky connections.
Remember to also check for leaks at the dishwasher's water supply line and drain line connections under the nearby sink.
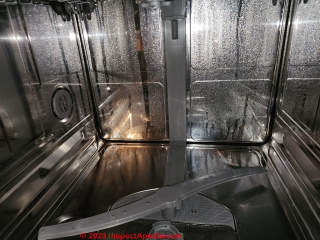
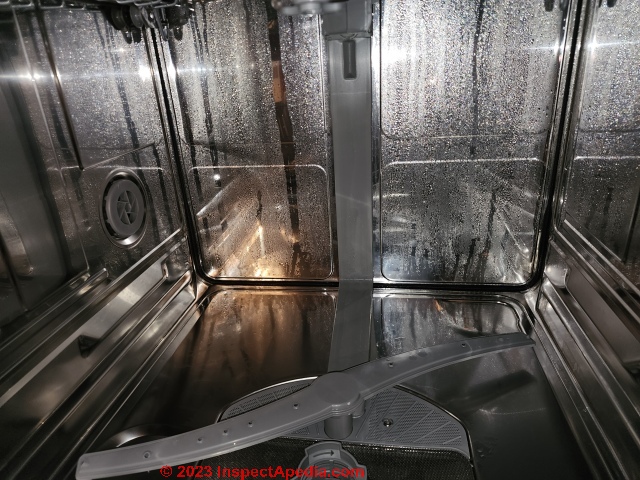
Watch out: Don't mistake normal water on the dishwasher's interior surfaces for an operating problem (photo above).
Some dishwashers like this Bosch unit (Bosch Model # SHEM63W55M20) depend on condensing water on the dishwasher's metal interior surfaces to remove water from the dishes themselves during the drying cycle.
Even brand new from the factory, there was some water on the inside surfaces of this dishwasher - evidence that Bosch tested the unit at the factory before it was shipped to the local distributor. - Register your dishwasher with the manufacturer:

Bosch will be happy if you simply attach a photo of the dishwasher's registration number to a text sent to a telephone number the company provides in its instructions.
This step will assist you later should you have a warranty claim.


...
Dishwasher Diagnostics

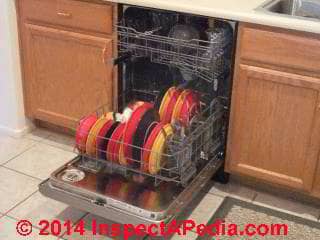
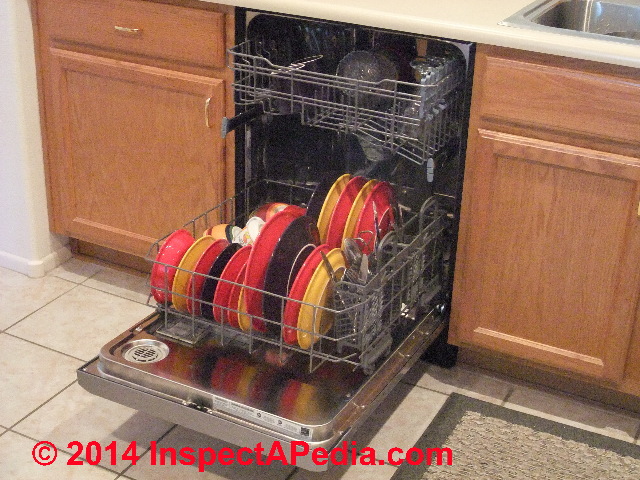
The dishwasher above stopped draining. The problem was not simply a kinked or clogged drain line.
Decades of food waste as well as loose screws had clogged, blocked, and finally broken the impeller pump in the dishwasher base. This Whirlpool dishwasher had been in daily use in its Two Harbors Minnesota home since 2009.
We found broken bits of plastic, sheet metal screws as well as nasty glop inside of the pump assembly.

The bottom of the dishwasher, not visible in these photos, was rusted so much that repairing the dishwasher by replacing its pump assembly was not feasible.
- Dishwasher won't run
Common areas of electrical switches or controls that may prevent the dishwasher from running include these:
If the dishwasher does not operate, the fuse or breaker at the main panel may have tripped, the timer may be faulty, there may be a loose electrical connection, one of the switches may be faulty, a high water level switch may have tripped, or the door interlock switch may be defective.
A specialist should be engaged to diagnose and correct the problem. - Dishwasher door gaskets
must seal tightly to avoid leaks and also to allow the dishwasher door to close and latch properly.
Damaged gaskets can be replaced readily. Door latches that do not close properly may not allow the dishwasher to start. - Dishwasher timer
controls the sequence of the wash, rinse and dry cycles. Commonly, there are several settings for different cycles. - Dishwasher will not fill with water
The solenoid valve may be faulty, the timer or overflow switch may be defective, or the supply plumbing may be shut off. - Dishwasher water does not shut off
The timer or overflow switch may be defective, or the solenoid shut-off valve may be inoperative. - Dishwasher water does not drain out
The pump motor may be defective
The drain hose itself may be clogged
The drain to which the dishwasher is connected may be blocked, the dishwasher's bottom drain strainer may be clogged,
Or the timer may be faulty (try manually advancing the dishwasher timer control if your dishwasher permits that)
Or the dishwasher drain pump may itself be damaged, have a broken impeller, or be clogged as we illustrated in our photos earlier in this article.
See details
at DISHWASHER DRAIN CLOG DIAGNOSIS - Dishwasher heater does not work
The timer may be defective, or the heating element may be loose - Dishwasher leaks
There may be a damaged gasket, a broken door hinge, a faulty overflow switch, loose hose clamps, a plugged air gap, or a drain blockage.
If water leaks out of the dishwasher air gap (if one is installed) you should be able to fix the problem by cleaning the dishwasher drain line and air gap assembly.
See this DISHWASHER AIR GAP CARE & CLEANING GUIDE - Kraus [PDF] - Dishwasher is noisy
The sprayer arms may need adjusting, or the solenoid valve may be defective.
...
Dishwasher Inspection, Diagnosis & Repair Guides
- DISHWASHER DRAIN CLOG DIAGNOSIS
- DISHWASHERS vs SEPTICS
- DISHWASHER SNAFUS
- ELECTRIC MOTOR DIAGNOSTIC GUIDE
- FRIGIDAIRE DISHWASHER MANUAL [PDF]
- WHIRLPOOL DISHWASHER MANUAL [PDF]
Carson Dunlop Associates' Home Reference Book
 To purchase a more extensive printed collection of information about home inspection and maintenance see
- The Home Reference Book, a reference & inspection report product for building owners & inspectors.
Special Offer: For a 10% discount on any number of copies of the Home Reference Book purchased as a single order. Enter INSPECTAHRB in the order payment page "Promo/Redemption" space. InspectApedia.com editor Daniel Friedman is a contributing author.
- The Home Reference eBook, an electronic version for PCs, the iPad, iPhone, & Android smart phones.
Special Offer: For a 5% discount on any number of copies of the Home Reference eBook purchased as a single order. Enter inspectaehrb in the order payment page "Promo/Redemption" space.
...
Continue reading at DISHWASHER SNAFUS or select a topic from the closely-related articles below, or see the complete ARTICLE INDEX.
Or see these
Recommended Articles
- APPLIANCE DIAGNOSIS & REPAIR - home
- DISHWASHER INSTALLATION & REPAIR - home
- DISHWASHER DRAIN CLOG DIAGNOSIS
- DISHWASHERS vs SEPTICS
- DISHWASHER SNAFUS - don't make these mistakes, some of them can kill you
- ELECTRIC MOTOR DIAGNOSTIC GUIDE
Suggested citation for this web page
DISHWASHER INSTALLATION & REPAIR at InspectApedia.com - online encyclopedia of building & environmental inspection, testing, diagnosis, repair, & problem prevention advice.
Or see this
INDEX to RELATED ARTICLES: ARTICLE INDEX to APPLIANCE REPAIR
Or use the SEARCH BOX found below to Ask a Question or Search InspectApedia
Ask a Question or Search InspectApedia
Try the search box just below, or if you prefer, post a question or comment in the Comments box below and we will respond promptly.
Search the InspectApedia website
Note: appearance of your Comment below may be delayed: if your comment contains an image, photograph, web link, or text that looks to the software as if it might be a web link, your posting will appear after it has been approved by a moderator. Apologies for the delay.
Only one image can be added per comment but you can post as many comments, and therefore images, as you like.
You will not receive a notification when a response to your question has been posted.
Please bookmark this page to make it easy for you to check back for our response.
Our Comment Box is provided by Countable Web Productions countable.ca
Citations & References
In addition to any citations in the article above, a full list is available on request.
- In addition to citations & references found in this article, see the research citations given at the end of the related articles found at our suggested
CONTINUE READING or RECOMMENDED ARTICLES.
- Carson, Dunlop & Associates Ltd., 120 Carlton Street Suite 407, Toronto ON M5A 4K2. Tel: (416) 964-9415 1-800-268-7070 Email: info@carsondunlop.com. Alan Carson is a past president of ASHI, the American Society of Home Inspectors.
Thanks to Alan Carson and Bob Dunlop, for permission for InspectAPedia to use text excerpts from The HOME REFERENCE BOOK - the Encyclopedia of Homes and to use illustrations from The ILLUSTRATED HOME .
Carson Dunlop Associates provides extensive home inspection education and report writing material. In gratitude we provide links to tsome Carson Dunlop Associates products and services.
 | HOME | ABOUT | ASK a QUESTION | CONTACT | CONTENT USE POLICY | DESCRIPTION | POLICIES | PRIVACY | |
| © 2024 - 1985 Publisher InspectApedia.com - Daniel Friedman | |||||||||