
InspectAPedia® FREE Encyclopedia of Building & Environmental Construction, Diagnosis, Maintenance & Repair |
Question? Just ask us! InspectAPedia
|
 How to Flush Out Scale & Debris from a Hot Water Heater
- POST a QUESTION or COMMENT about how to flush out or clean out a water heater
How to flush out a water heater - detailed procedure:
How to flush out a water heater to remove dirt, debris, scale, lime. Advice and photo-guide to de-liming and de-scaling hot water heaters - Scale formation in water heaters and methods of prevention. How to remove silt or debris from the hot water heater tank. Rate of deposition of lime and scale in plumbing systems.
This article explains in detail the procedure for flushing out a water heater to remove waterborne mud, dirt, or debris that can cause water heater noises and may shorten the life of the water heater or reduce the amount of hot water available.
InspectAPedia tolerates no conflicts of interest. We have no relationship with advertisers, products, or services discussed at this website.
- Daniel Friedman, Publisher/Editor/Author - See WHO ARE WE?
How to Flush the Hot Water Tank to Remove Silt & Debris
 The articles at this website will answer most questions about diagnosing and curing noisy domestic water heaters and about the procedure to remove mineral deposits, lime, water scale, silicates, sulfates, aluminates, or silt and sand from a water heater tank.
- To drain your water heater tank, for example to replace a part,
see WATER HEATER DRAIN PROCEDURE. - To flush accumulated crud or debris from a water heater (yearly maintenance)
see WATER HEATER FLUSH PROCEDURE. - To de-scale or de-lime your hot water heater,
see WATER HEATER SCALE DE-LIMING PROCEDURE - To diagnose and repair a bad water heater dip tube or anode,
see WATER HEATER ANODES, DIP TUBES - To diagnose particulate debris in the building water supply, faucet strainers, etc. that comes from the hot water tank, and how to fix that problem,
see WATER HEATER DEBRIS FLUSH
This article series starts
at WATER HEATER NOISE DIAGNOSIS, CURE.
Lime or scale in plumbing systems is caused by hard water as well as silicates, sulfates, and similar materials form water scale that coats the bottom of a hot water tank or the surface of the electrodes in an electric water heater, interfering with proper water heater operation, causing water heater noises, reduction in hot water quantity, increased water heater operating costs, and a shorter water heater life. Silt and soil debris can also collect in a water heater tank where it can cause similar problems even if the water supply is not hard.
Silt and debris can be easily removed from a hot water tank by periodic flushing. In fact if your water heater is quite noisy, it will probably be easier to remove un-wanted mineral deposits from the water tank than it will be later if you wait until the heater is no longer making much noise (because the mineral layer has solidified). Install a sediment filter on the incoming water supply to avoid this problem in the first place.
But lime or water scale are more difficult to remove from a water heater: manually scraping the tank bottom through the drain opening or use of a de-limer chemical will be needed. Below we describe these procedures.
Readers should also see our discussion of mineral clogging of water piping, water heaters, and tankless coils, organized
at HOT WATER IMPROVEMENTS.
Other gas fired water heater noises are discussed
at GAS FLAME & NOISE DEFECTS.
Watch out: Safety Warnings: don't tackle this water heater cleanout project on a Sunday night when you can't call a plumber or buy a replacement part. Water heaters, their heating source (oil or gas burner or electricity or solar hot water), and particularly their relief valves include critical safety components. Do not modify or remove relief valves, chimney connections, draft hoods, etc. as you may create dangerous conditions.
Watch out: cleaning and de-liming chemicals such as rust or lime removers can be dangerous if not used according to the manufacturer's instructions.
See Lime Out / Lime Out Extra, lime remover MSDS [PDF]
a Summit Brands product and
see Super Iron Out, MSDS Material Data Safety Sheet [PDF] rust and stain remover, also from Summit Brands.
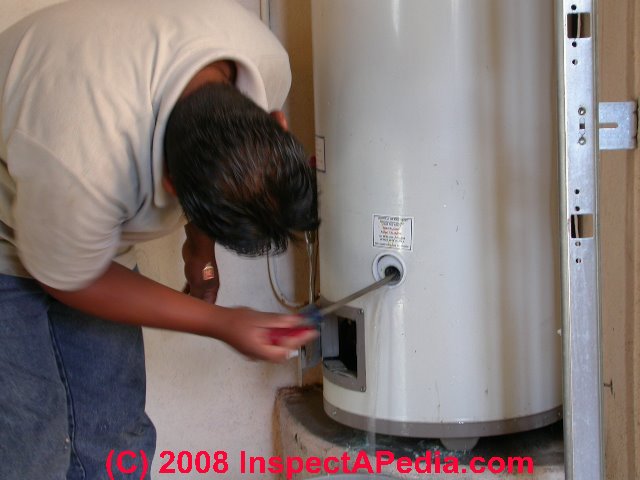
Our photo shows scale deposits removed from a water heater tank. Here are the steps the plumber followed to get this mineral debris out of the tank bottom:
- Turn off all electrical and or gas power to the water heater and let it cool.
This means turning off electricity that controls the water heater oil burner or electric heating elements, or for gas fired water heaters, turning off the gas supply to the device. - Turn off water supply into the water heater.
This normally means turn off the cold water valve (cold water isolation valve) that feeds water into the heater.
Sometimes on an older system the shutoff for the inlet to the water heater may not fully stop incoming water. In that case it will be necessary to turn off the building water supply during the tank draining and cleaning procedure. - Drain the water heater - using a common garden hose routed to outdoors or to an indoor building drain lower than the water heater outlet.
Our photo shows a typical water heater tank drain on a gas-fired water heater.
- Open a nearby faucet,
or as some manufacturers recommend, remove the pressure/temperature relief valve from the water heater tank to let air into the tank and speed the draining process.
Removing the relief valve may also let combustible hydrogen gases formed during deliming (if you use a deliming chemical) vent out of the tank.
Soak the relief valve in de-limer or in vinegar if its sensor or other components are coated with mineral deposits, or simply replace the valve with a new one (to be extra safe) of the same rating.
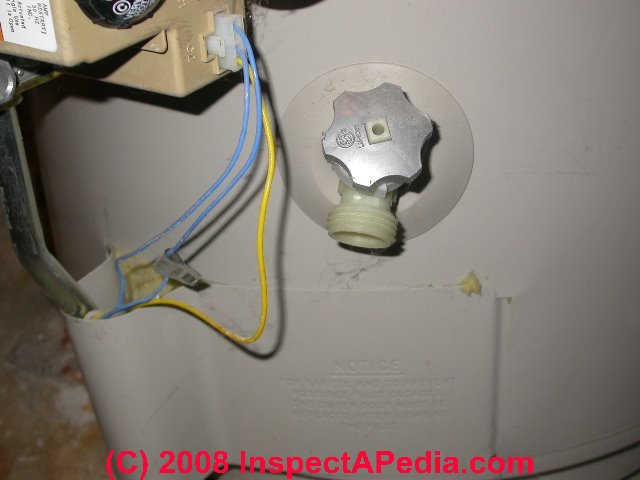
When the water heater tank has been fully drained, remove the drain valve and inspect it for clogging or damage - clean or replace the drain valve as needed. - Flush the water heater
by opening the cold water tank shutoff valve, flushing cold water into the water tank intermittently.
To flush a water heater tank you open the water heater tank valve and let water run until it flows clean. If water does not flow out of the water heater drain valve the valve may have become clogged with mineral or silt debris.
As we suggested above and as we explain in more detail below, removing the water heater drain valve entirely may permit the valve and the tank opening to be cleaned more effectively. - If mostly silt is what is flushed out
of your water heater and no significant scale is observed, when the flush-water runs clean, you can complete the cleaning procedure and return the water heater to operation.
If you see chunks of scale, or if you can loosen scale by probing the water tank bottom with a wire, you'll need to either mechanically remove the scale by scraping or by using a de-limer - steps we discuss below
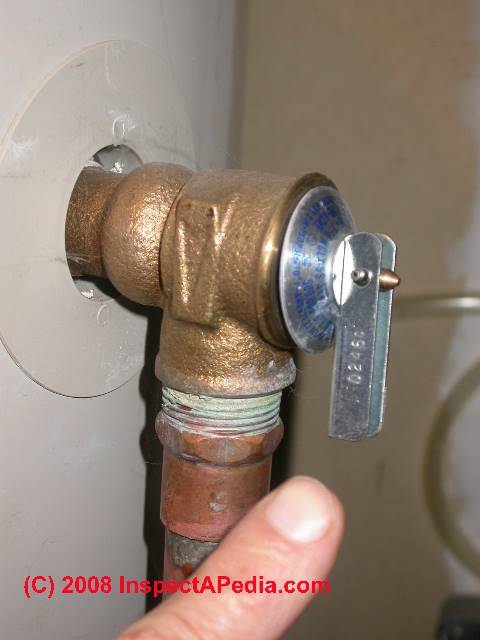
at Water Heater Scale Removal Procedure - Scraping the Bottom of the Hot Water Tank - If you removed the pressure/temperature relief valve, inspect the valve for cleanliness and proper operation.
The test lever should open and close the valve smoothly and the temperature probe should be undamaged.
If there is the slightest doubt about the condition of the valve, or if there is corrosion indicating that the valve was previously leaking, it should be replaced with a new one of the proper rating for your water heater.
Replace the safety valve and its extension tube. - Close the water heater tank drain
- Open the cold water supply valve to slowly refill the water tank.
Refilling slowly helps avoid stirring up any debris left on the tank bottom. Stirred debris in the water tank could clog a shutoff valve or faucet in the building. - Watch out: Do not turn on the water heater yet:
be sure that the water tank has filled and that all trapped air has been run out of the system..
Watch out: If you turn on an electric water heater before it's completely full of water you will instantly burn out the heating element that is in or partly in air.
Let hot water run from a nearby plumbing fixture for at least two minutes after you observe that no more air appears to be coming out of the piping.
(We remove the faucet strainer in case some debris is also coming through the piping at this time, replacing the strainer when we turn off the water.). - Now you can turn on the water heater
and allow it to re-heat the water in the hot water tank. - Check again for leaks
anywhere in the system: at the water heater relief valve, at the water tank drain, at the water heater cold line shutoff valve, and at the tank itself. If leaks are found you'll need to shut down the system, let it cool, remove water pressure and water, and repair the leak.
Additional tips on draining a water heater tank can be found
a
t ELECTRIC WATER HEATERS
How to Let Air Into the Hot Water Tank to Speed the Tank Draining Process
This article explains using or removing temperature and pressure relief valves on residential water heaters to let air into the hot water tank during draining for cleaning or other purposes. For more details about water heater safety valves
see RELIEF VALVE, WATER HEATER
and for a discussion of temperature and pressure relief valves used as safety devices on heating boilers please
see RELIEF VALVE, TP VALVE, BOILER.
It is possible to speed the heater draining and also to ease the flushing procedure if you open a hot water tap nearby so that you can let air into the heater as water leaves it
Some plumbers open the water heater pressure/temperature relief valve for this air-in purpose - but there is risk that you'll later be unable to get the valve to shut fully again - debris can clog the valve seat - sometimes we can stop a relief valve from dripping by tapping on the valve lift rod that protrudes through the valve lift lever
Other plumbers simply remove the relief valve entirely - this is the process recommended by some water heater manufactures such as A.O. Smith. Removing the relief valve makes it easy to inspect this critical safety component itself, and it's easy to clean or replace the safety valve at that time.
When replacing the relief valve use an approved teflon tape or pipe sealant and work neatly and with care so that there will be no leaks at this location.
Safety Warning - a damaged, improperly-selected model, or modified pressure/temperature relief valve is dangerous and could lead to a serious BLEVE explosion
should the water heater later overheat.
After flushing out the water heater tank, the second step in curing water heater noise or insufficient hot water is to remove scale or lime from the water heater tank. If the unit is an electric water heater, you'll also need to remove scale from the electric water heater elements.
...
...
Continue reading at see WATER HEATER DEBRIS FLUSH - the diagnosis and cure of debris in the building water supply traced to a deteriorated water heater dip tube/anode or select a topic from the closely-related articles below, or see the complete ARTICLE INDEX.
Or see these
Recommended Articles
- WATER HEATER DRAIN PROCEDURE
- WATER HEATER SCALE DE-LIMING PROCEDURE for the full article on the detailed procedure for removing lime and water heater scale.
Suggested citation for this web page
WATER HEATER FLUSH PROCEDURE at InspectApedia.com - online encyclopedia of building & environmental inspection, testing, diagnosis, repair, & problem prevention advice.
Or see this
INDEX to RELATED ARTICLES: ARTICLE INDEX to WATER HEATERS
Or use the SEARCH BOX found below to Ask a Question or Search InspectApedia
Ask a Question or Search InspectApedia
Questions & answers or comments about how to flush out or clean out a water heater.
Try the search box just below, or if you prefer, post a question or comment in the Comments box below and we will respond promptly.
Search the InspectApedia website
Note: appearance of your Comment below may be delayed: if your comment contains an image, photograph, web link, or text that looks to the software as if it might be a web link, your posting will appear after it has been approved by a moderator. Apologies for the delay.
Only one image can be added per comment but you can post as many comments, and therefore images, as you like.
You will not receive a notification when a response to your question has been posted.
Please bookmark this page to make it easy for you to check back for our response.
IF above you see "Comment Form is loading comments..." then COMMENT BOX - countable.ca / bawkbox.com IS NOT WORKING.
In any case you are welcome to send an email directly to us at InspectApedia.com at editor@inspectApedia.com
We'll reply to you directly. Please help us help you by noting, in your email, the URL of the InspectApedia page where you wanted to comment.
Citations & References
In addition to any citations in the article above, a full list is available on request.
- Mark Cramer Inspection Services Mark Cramer, Tampa Florida, Mr. Cramer is a past president of ASHI, the American Society of Home Inspectors and is a Florida home inspector and home inspection educator. Mr. Cramer serves on the ASHI Home Inspection Standards. Contact Mark Cramer at: 727-595-4211 mark@BestTampaInspector.com
- John Cranor [Website: /www.house-whisperer.com ] is an ASHI member and a home inspector (The House Whisperer) is located in Glen Allen, VA 23060. He is also a contributor to InspectApedia.com in several technical areas such as plumbing and appliances (dryer vents). Contact Mr. Cranor at 804-873-8534 or by Email: johncranor@verizon.net
- Thanks to researcher Robyn Goldstein, Rush Manager, Information Express, 650-812-3585, email: service@ieonline.com,for researching the Purdue bulletin No. 74 original citation 03/2010 . Information Express supplies "... institutional document delivery needs - A full service company specializing in the fast, accurate and competitively priced delivery of published articles for all industries"
- Pounds of lime deposited vs. temperature and hot water usage: see Purdue Bulletin #74 (also provided by A.O. Smith in the article below). Purdue's chart shows the number of pounds of lime deposited per year as a function of the water usage in gallons per day, with an assumed 10 grains of water hardness.
- "When, Why, and How to Remove Water Scale from Tank Type Glass-Lined Water Heaters (for non glass-lined tanks, consult water heater manufacturer)" PDF provided by A.O. Smith Water Products Company - hotwater.com/lit/training/4800r9.pdf 800-433-2545 - 01/07/2009.
- A.O. Smith's Form No. 4800 Rev. 8 Why? When? & How? /UN•LIME Specific Deliming Instructions for use with Up-N-Down Transfer Kit for Tank Type Heaters. (Normally supplied in UN-LIME shipping cartons), Supersedes Form Nos. 4800 Rev. 7 and 4813-100.
- A.O. Smith's Form No. 4778* All about Deliming Coil-Type/Tube-Type Commercial Water Heaters and Hydronic Boilers *Normally supplied when ordering Part No. 4930 Motorized Deliming Pump Kit
- Rheem Electric Water Heater "Owners Guide and Installation Instructions", (Australian models) rheem.com.au/images/pdf/owners_dom-elec_121996C_0707.pdf
- "Scale formation in water heaters and methods of prevention", Krappe,
Justus Maximilian, Engineering experiment station. Gas engineering
bulletin; no. 6; Research series; no. 74; On cover: Engineering
bulletin, Purdue university. Vol. xxiv, no.
3a. June, 1940 (Layfayette Indiana) commonly referred to in some references as "Purdue University Bulletin No. 74" - thanks to researcher Robyn Goldstein for the full citation. LCCN: 40028844 & OCLC: 1038544 - Water analysis, water softening, hot-water supply. 27pages. You can obtain this document through your local library.
(full copy file at InspectAPedia 3/31/2010)
Purdue B074 can be hard to locate online.
Also Bradford White Corporation (a manufacturer of water heaters) has published excerpts from that document, available at Purdue_B074_BradfordW.pdf - Super Iron Out, MSDS Material Data Safety Sheet rust and stain remover; the manufacturer indicates this product can be used to clean rust sediment from water softeners. Summit Brands. See Iron Removal from Water Softener
- Lime Out / Lime Out Extra, lime remover MSDS, produced by Summit Brands, 7201 Engle Road, Fort Wayne, Indiana 46804–222, Tel: 1–888–476–6688, Email: info@summitbrands.com Email See Water Heater Scale Removal Procedure
- Other sources of information on calculating the rate of lime deposition from hard and hot water:
- Wilkes University Center for Environmental Quality Environmental Engineering and Earth Sciences Hardwater, Water Hardness "Hard Water Hardness Calcium Magnesium Water Corrosion Mineral Scale" http://www.water-research.net/hardness.htm
- Chemical Engineering, Joseph D. Hagerty Editor, McGraw-Hill, 1989,
ISBN 0685270831, 9780685270837
"To calculate the amount of material that will be deposited in 1000 gal. of water per day, take the number of grains per gallon of each as shown by the ..." also difficult to obtain except as a used copy.
- Our recommended books about building & mechanical systems design, inspection, problem diagnosis, and repair, and about indoor environment and IAQ testing, diagnosis, and cleanup are at the InspectAPedia Bookstore. Also see our Book Reviews - InspectAPedia.
- Carbon Monoxide Gas Toxicity, exposure limits, poisoning symptoms, and inspecting buildings for CO hazards
- In addition to citations & references found in this article, see the research citations given at the end of the related articles found at our suggested
CONTINUE READING or RECOMMENDED ARTICLES.
- Carson, Dunlop & Associates Ltd., 120 Carlton Street Suite 407, Toronto ON M5A 4K2. Tel: (416) 964-9415 1-800-268-7070 Email: info@carsondunlop.com. Alan Carson is a past president of ASHI, the American Society of Home Inspectors.
Thanks to Alan Carson and Bob Dunlop, for permission for InspectAPedia to use text excerpts from The HOME REFERENCE BOOK - the Encyclopedia of Homes and to use illustrations from The ILLUSTRATED HOME .
Carson Dunlop Associates provides extensive home inspection education and report writing material. In gratitude we provide links to tsome Carson Dunlop Associates products and services.
 | HOME | ABOUT | ASK a QUESTION | CONTACT | CONTENT USE POLICY | DESCRIPTION | POLICIES | PRIVACY | |
| © 2025 - 1985 Publisher InspectApedia.com - Daniel Friedman | |||||||||