
InspectAPedia® FREE Encyclopedia of Building & Environmental Construction, Diagnosis, Maintenance & Repair |
Question? Just ask us! InspectAPedia
|
 Hot Roof Leak Risks
In-Service Roof Leaks into Hot or Un-Vented Roof Cavities Pose Risk of Extra Damage
- POST a QUESTION or COMMENT about un-vented cathedral ceiling under-roof spaces
Leak Risks & Hidden Damage Risks in Hot roof designs, aka dense-packed insulated sloped roofs:
This article describes the causes of & risks of leaks into enclosed, un-vented, inaccessible or dense-packed roof cavities or cathedral ceilings. There, undiscovered for a time because of the very nature of the construction, leaks into a hot roof risk costly mold, & structural damage.
This article series about roof and ceiling ventilation describes inspection methods and clues to detect roof venting deficiencies, insulation defects, and attic condensation problems in buildings.
InspectAPedia tolerates no conflicts of interest. We have no relationship with advertisers, products, or services discussed at this website.
Roof Leak Risks Need to Be Addressed When Comparing Vented vs Un-Vented Roof Designs
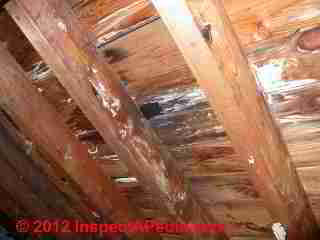
 Our page top photo, which is not of a current "hot roof" or "dense packed" insulated roof, shows the sort of rot that can occur when a roof cavity, or for that matter an attic, is not accessible for inspection and when leaks go unattended. There are two principal moisture pathways into a "packed" sloped roof
- From the building interior via penetrations, following air leaks in the ceiling around light fixtures, electrical boxes, etc. Much more moisture moves on air leaks through penetrations than moves through solid continuous drywall itself.
- From the building exterior: via leaks either due to an error in construction ( a flashing mistake or improper shingling or nailing, for example), or due to luck and the forces of nature - a tree limb falls on the roof, or there is an unusual storm, wind, ice damage.
Watch out: when enthusiasts recount differences between the performance of a "packed" or "hot roof" design (presumably very high-R and "tight") and a ventilated roof design (more trouble, more cost, sometimes poorer insulation and higher energy cost) they sometimes may not have realized, or may fail to report that when a leak into the packed roof occurs, water stays there a long time - inviting rot, carpenter ants, mold.
The result is a very large repair expense.
At the Journal of Light Construction building conference in Boston way back in 1985 we heard from the hot roof camp, we heard research reporting that most moisture leaking into (and thus potentially wetting) building cavities was through penetrations in the interior ceilings such as around light fixtures.
Following those talks, we saw slides of horror stories by a roofer, Henri De Marne's, whose business was going to New England's hot-roofed cathedral-ceiling homes where a leak that occurred from above (damaged roof shingles) had gone unnoticed long enough for the repair to require more than just fixing a leak.
The repairs for the cases he documented required a complete roof tear-off, roof sheathing removal, wet insulation removal, moldy drywall removal, replacing rotted rafters, and then finally, reconstruction.
 Our photo (left) illustrates rotted roof sheathing and rafter damage in a older home that went undiscovered until the ceiling covering was removed.
It would appear that
- An vented attic roof design is at less risk of trapped moisture than any cathedral ceiling design
- An un-vented cathedral ceiling can remain dry provided everything is perfect in construction and over the life of the roof
- A vented cathedral ceiling design, provided sufficient air space is provided to allow adequate air movement, can reduce the risks of the effects of moisture leaks into the roof from below.
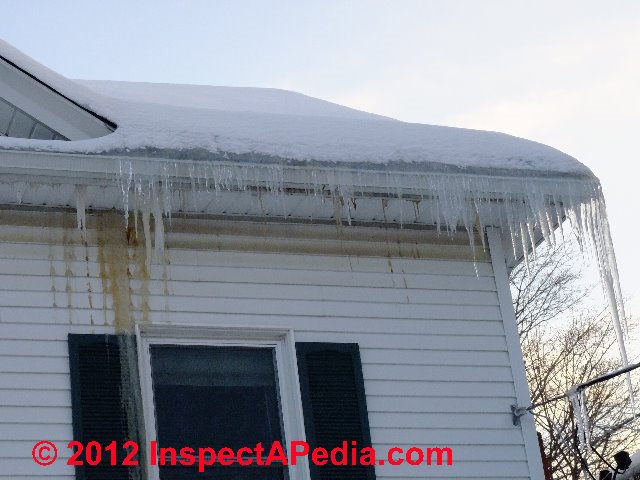
- The common advice that attic ventilation is credited with minimizing ice dams needs to be reconsidered for the case of high-R-value cathedral ceiling roofs as well as for well insulated attics that are also protected against wind wash insulation problems.
Field Reports of Leaks into a Hot-Roof Cathedral Ceiling Design
Hot Roof Leak Field Report: Snow-damage Caused Leak at Plumbing Vent
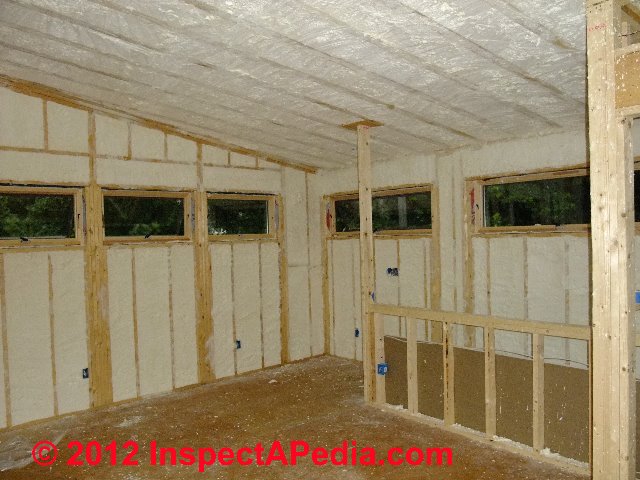
We [DJF] recently constructed a "hot roof" designed second floor addition to serve as an office, using sprayed foam insulation in the addition's ceiling, walls and floor for a super-tight, super-insulated building.
The combination of relatively low slope roof and cathedral ceiling design argued for a well-insulated hot-roof design. We used Demilec™ open celled spray foam as shown at below left. We describe this insulation project and material
at FOAM SPRAY INSULATION TYPES. The trouble began several winters later at a leak point shown in the second photo at below right.
![Snow guard missing led to metal roof leak at broken plumbing vent (C) Daniel Friedman]](https://inspectapedia.com/roof/Snow_Guard_Install_390_DJFs.jpg)
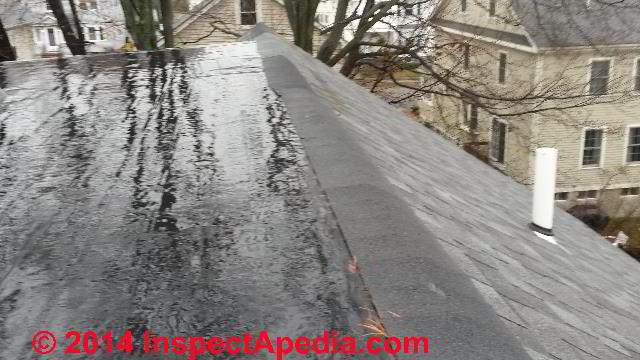
However, considering my field experience with the very high costs of leaks into un-vented hot roofs, we took the extra precaution of installing the most-durable and damage resistant roof we could find: a heavy-gauge standing seam metal roof.
See METAL ROOFING
Watch out: Even with this very "safe" metal roof over our un-vented roof cavity we had trouble. It was my own fault for deferring the installation of snow guards (the building is in New York state). After just a few years of trouble free existence, heavy snows broke off a plumbing vent causing a leak into the roof cavity.
For details about how we repaired this mess
We caught this leak in time (thanks to annual on-roof inspections), and we were able to open and dry the roof cavity from above before repairing the plumbing vent ... and installing the missing snow guards.
See SNOW GUARD GLUE ON INSTALLATION (we are testing both glue-on and clamp-on snow guards on this roof)
Hot Roof Leak Field Report: Owner Chose Hot Roof Design that Later Leaked
 Late last year you and I had a wonderful dialog via email about a roof venting situation at my house (I have pasted the thread below). I am most grateful for your advice.
See ROOF VENTILATION IMPROVEMENTS for that discussion that took place in 2013- Ed.
[Click to enlarge any image]
I ended up going for a "hot roof" and using the great subsidized weatherization program which installed 6" fiberglass batt on the kneewall slope and covered it with 2" thermal barrier polyiso.
So I was happy with what they did except the prior owners goofs came back to haunt me last night with the torrential rain we had.
If you recall my house has a fairly new shed dormer which the prior owners installed with a shoddy and shady contractor.
Leaks Into the Hot Roof Cavity
Last night [9 Dec 2014] with all the rain the roof sprang a leak which came through one of the recessed lighting fixtures beneath the ridge of the roof (not near the kneewall slopes).
I got my renovation contractor to send his roof guy and he took the photos (attached from the roof.
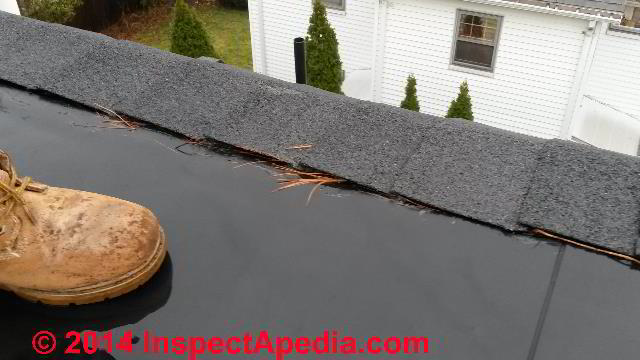
The roof guy said the shed dormer roof is rubber and the rest is asphalt. He said he couldn't do anything now because nothing sticks to rubber when it's wet.
The Building Inspector Demanded a Ridge Vent
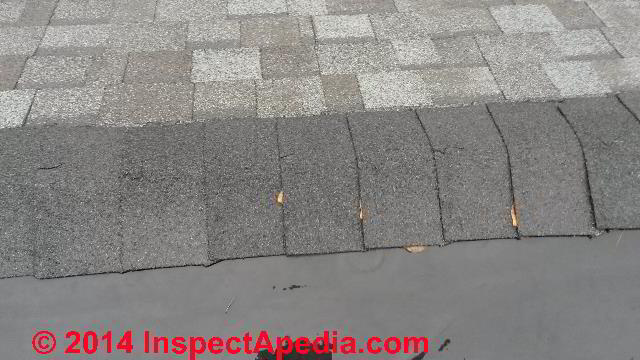
But basically his assessment is that the leak is as a result of the wind blowing rain sideways into the stupid ridge vent the prior owners put in AFTER the shed dormer was completed.
They put it in because the town inspector told them to, even though it doesn't have the "proper" or "baffle" vents which would create a ventilation channel to the soffits (it's packed with fiberglass insulation under the roof). So there's no point to the ridge vent (as we discussed in the thread below).
So, the roof guy that perhaps the best solution would be to cap off the ridge with metal.
Would you be willing to take a quick look at the pictures when you get a chance and let me know what you think I should do to (hopefully) stop the leak? Would capping the ridge vent create further problems? Any other suggestions? - A.G. 10 Dec 2014
Reply: 7 Steps in repairing leaks into a sealed roof cavity
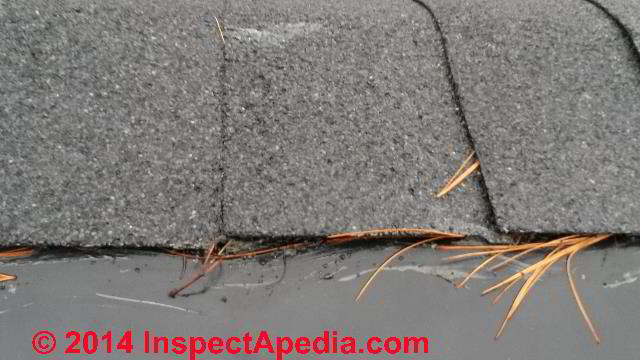
Installing a ridge vent where one should not have been placed - on a sealed-cavity, un-vented, "hot roof" design building was in my opinion a fundamental error that risked compromising the building design and that could indeed cause costly water damage.
Further, as installed and shown in your photo below, there is no working "ridge vent" that I can see.
All I see are cap shingles over a ridge that marks the peak of a roof that is lower slope on one side. But if a ridge vent "slot" was cut into the roof deck below the ridge cap shingles wind-blown rain could certainly leak into the structure.
In an otherwise un-vented hot-roof design, an exit vent at the ridge will not function to ventilate the roof, even if it does not cause a leak. In sum we have accomplished nothing except providing a way for the roof to leak.
Your report of water leaking through a recessed light fixture in the ceiling below confirms that worry.
From the photos you submitted, unless there was some other roof area that is penetrated by anything that thus could have leaked, it is indeed apparent that wind-blown rain swept up-roof and entered at the un-sealed "ridge vent" opening.
Removing, capping, or completely sealing the ridge vent against water entry is, I am sorry to say, the easy part of the repairs that your home requires now.
In my experience unless you properly open, clean and dry the roof cavity, troublesome, costly, and possibly even unhealthy mold contamination is very likely even if no further leaks ensue. A single soaking of a fiberglass-insulated, drywall-covered building ceiling or wall cavity is enough to make mold contamination likely in that area.
Proper remediation for a leaked-into roof cavity would involve in this order:
Step 1: Fix Leaks / seal the roof against further water entry
Your roofer may choose to remove the ridge vent and continue other membrane or metal roofing up over the ridge. Be sure that the new seal is reliable against leaks including wind-blown rain from any direction.
Step 2: Test cuts to find the extent of water entry
We need to find and remove all wet materials in the roof cavity or ceiling below.
Make a series of test cuts into the ceiling below, starting at the area that you know was leaking - up-roof and also down-roof from the pot light from which you report water leaking. You can make test cuts as small as a 2" x 4" but I suspect that water entered the full width of the roof cavity beginning at the ridge, given the roof design and placement of the ridge vent.
Just how far down in the roof cavity water penetrated depends on several factors including the tightness of packing of insulation, the roof slope, variations in water entry as ridge vent openings may have varied, and the total quantity of water that entered the cavity.
You may have to make strip cuts across the full width of the roof to permit an adequate inspection.
A strip cut is made through the drywall, from wall to wall, about 12" wide, to permit inspection of every rafter bay for water entry.
You may need more than one of these, one above the light fixture from which water leaked, and possibly a lower one down-slope depending on what you find around the light fixture and in other rafter bays.
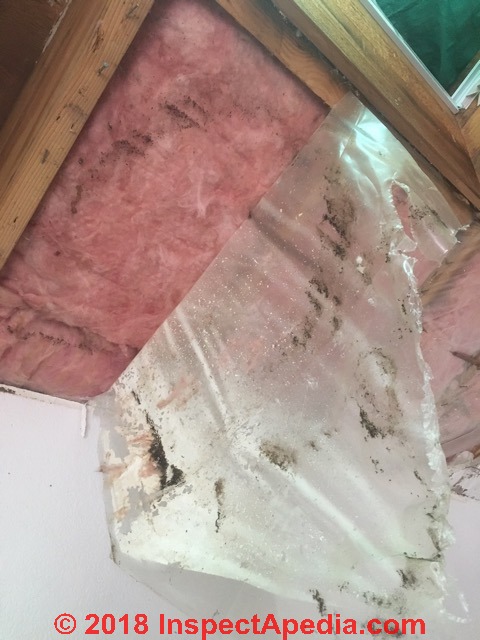
Step 3: Remove all wet or moldy materials from tthe ceiling cavity
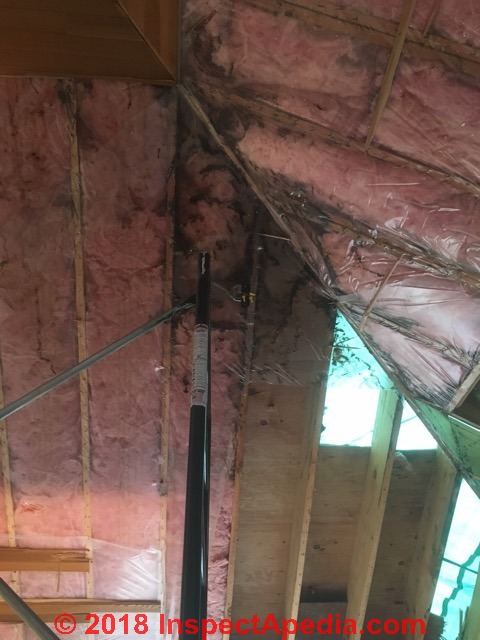
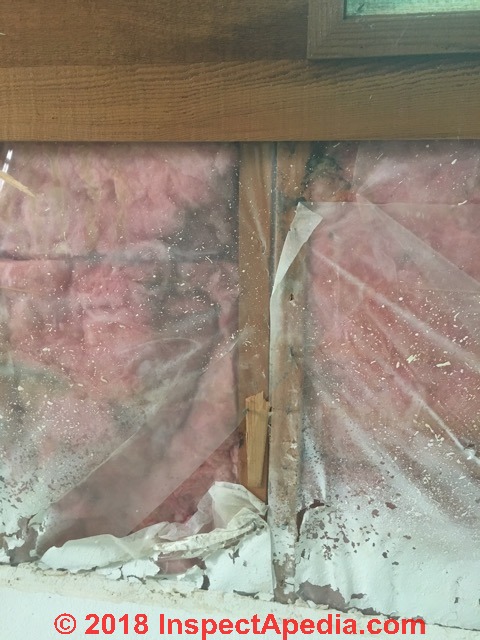
The photos shown here, contributed by an InspectApedia.com reader, illustrate water trapped in a cathedral ceiling or vaulted ceiling that had been covered with cedar paneling.
In 2017 the owner, an InspectApedia.com reader, removed the wood paneling to expose trapped water and moldy insulation.
Stains on the plastic vapor barrier and dark material in the fiberglass insulation confirm that there were either leaks from above or moisture leaks into the un-vented roof cavity from below - trapping moisture and inviting mold growth on both the plastic and in the fiberglass.
Watch out: typically we have 24-48 hours to remove wet drywall and insulation if we are to avoid a more costly mold cleanup-job. Don't panic, but do clean properly so as to avoid more costly cleanup expenses later.
 You need to discover the full extent of what got wet and then to remove and discard, dry and clean the roof cavity, after removing:
- All insulation that got wet - even if the insulation looks "clean" it should be discarded if it was previously wet. Details
are
at FIBERGLASS INSULATION MOLD - Drywall that was wet
- Drywall that is visibly moldy or water stained. Added guidance, if you discover large areas of mold (more than 30 sq .ft. of contiguous moldy material) you will want to see
MOLD ACTION GUIDE - WHAT TO DO ABOUT MOLD
MOLD APPEARANCE - WHAT MOLD LOOKS LIKE
Step 4: Completely dry the roof cavity
Dry out the area that has been exposed by removing wet and moldy materials before beginning further restoration or "put back" of insulation or drywall.
If it was necessary to clean moldy framing or roof sheathing you may want the added insurance of applying a fungicidal sealant.
Step 5: Test the roof seal while the ceiling below is still open for inspection
When the roof cavity is fully dry and before replacing any materials you might want to try spraying water up-roof towards the now-sealed ridge to be double sure that there are no remaining leak openings.
This step may prevent you from having to make this disruptive repair all over again.
Step 6: Replace insulation & drywall
When the roof cavity is clean and dry and not leaking, replace insulation, any vapor barriers, and drywall.
Step 7: Seal any ceiling penetrations
Seal any air leaks into the roof cavity from the interior of the building:
Be sure also to seal around any ceiling penetrations to avoid leaking moisture-laden air into the roof cavity from the building interior - another common source of mold contamination in sealed roof or other roof cavities.
I would like to see photos as well as to read reports of what you discover during the investigation for moisture and mold in the roof cavity. That information may permit further comment.
Additional field report examples of roof ventilation problems & solutions:
See ROOF ICE DAM CURE: COMPARING TWO HOUSES
Watch out for real world snafus, damage, leaks in roofs. In sum, I'm left unsure about the gap between new construction designs and a perfect world where roofs never leak and the roofs I and more importantly, repair and renovation roof contractors have found when we inspected, tore apart, and repaired leaky roofs of both insulated cathedral ceiling homes, and homes with vented roof cavities.
- In hot humid climates an un-vented roof is a defensible approach that may avoid both condensation and heat transfer problems.
- In both warm climates and in cool northern climates an un-vented roof is a defensible approach that avoids risk of chimney effects affecting building heating and cooling costs
- Moisture problems originating outside the building such as due to damage or poor workmanship involve an element of luck and appear to have been excluded by experts and studies in the field, notwithstanding the experience of repair-roofers and home inspectors that those leaks appear on a great many homes, can cause severe rot damage, costly mold damage, and that leaks eventually happen on a great many if not most homes that remain standing for 20 years or more.
- Attic or roof cavity condensation due to indoor moisture sources vary widely as individual building moisture conditions vary (we start our roof inspection by looking for evidence of basement or crawl space flooding) as well as by quality of construction and the number of penetrations in the building ceilings and walls, not to mention the effects of air pressure differences within the building.
Delivering a durable hot dry roof is sound in theory but hard to deliver in practice.
Samuelson (1995) pointed out that "... to guarantee no indoor air movement into the attic, the ceiling has to be airtight and the pressure of the attic needs to be higher than that of the indoor air (i.e. pressurized attic or depressurized living space)"[7] - not normal conditions in most climates. - An under-roof cathedral ceiling or attic ventilation system, to help the building in any way, needs to be properly designed and installed with adequate intake venting at the eaves, outlet venting at the ridge, and with careful sealing of air leaks from the occupied space into the attic or roof cavity (to avoid heat losses or increases in both moisture movement into the roof cavity and increased heating or cooling costs).
- The packed un-vented hot roof system can work very well in the climates where recommended if everything is perfect in construction and if no leaks ever occur in the roof system over its life - that is, if nothing ever goes wrong. If leaks do occur, from either direction, damage is likely to be more severe than in the older vented roof cavity approach.
Our expert Steven Bliss commented to offer a final word on Hot Roof Designs:
I agree with you that, in the real world, this is not such a good idea. If there's a flashing leak or other roof leak, you could have a pretty soggy mess that stays wet for a long time and could cause structural decay.
Plenty of people are building hot roofs, but I wouldn't -- except maybe one with spray urethane which won't absorb much water like cellulose would. [37]
...
Continue reading at HOT UN-VENTED ROOF DESIGN SOLUTIONS or select a topic from the closely-related articles below, or see the complete ARTICLE INDEX.
Or see these
Recommended Articles
- CATHEDRAL CEILING VENTILATION
- CAPE COD ROOF & KNEE WALL INSULATION & VENTILATION
- CATHEDRAL CEILING INSULATION
- HOT ROOF DESIGN PROBLEMS
- HOT UN-VENTED ROOF DESIGN SOLUTIONS
- HARD to VENT ROOF SOLUTIONS for HIPS & CATHEDRAL CEILINGS
- PROBLEMS with PARTIAL ROOF VENTILATION
- ROOF FRAMING TIES & BEAMS proper framing of a cathedral ceiling
- ROOF NOISE TRANSMISSION
- ROOF VENTILATION SPECIFICATIONS pros and cons of hot roof designs
Suggested citation for this web page
HOT ROOF DESIGN vs LEAK RISKS at InspectApedia.com - online encyclopedia of building & environmental inspection, testing, diagnosis, repair, & problem prevention advice.
Or see this
INDEX to RELATED ARTICLES: ARTICLE INDEX to BUILDING VENTILATION
Or use the SEARCH BOX found below to Ask a Question or Search InspectApedia
Ask a Question or Search InspectApedia
Try the search box just below, or if you prefer, post a question or comment in the Comments box below and we will respond promptly.
Search the InspectApedia website
Note: appearance of your Comment below may be delayed: if your comment contains an image, photograph, web link, or text that looks to the software as if it might be a web link, your posting will appear after it has been approved by a moderator. Apologies for the delay.
Only one image can be added per comment but you can post as many comments, and therefore images, as you like.
You will not receive a notification when a response to your question has been posted.
Please bookmark this page to make it easy for you to check back for our response.
Our Comment Box is provided by Countable Web Productions countable.ca
Citations & References
In addition to any citations in the article above, a full list is available on request.
- In addition to citations & references found in this article, see the research citations given at the end of the related articles found at our suggested
CONTINUE READING or RECOMMENDED ARTICLES.
- Carson, Dunlop & Associates Ltd., 120 Carlton Street Suite 407, Toronto ON M5A 4K2. Tel: (416) 964-9415 1-800-268-7070 Email: info@carsondunlop.com. Alan Carson is a past president of ASHI, the American Society of Home Inspectors.
Thanks to Alan Carson and Bob Dunlop, for permission for InspectAPedia to use text excerpts from The HOME REFERENCE BOOK - the Encyclopedia of Homes and to use illustrations from The ILLUSTRATED HOME .
Carson Dunlop Associates provides extensive home inspection education and report writing material. In gratitude we provide links to tsome Carson Dunlop Associates products and services.
 | HOME | ABOUT | ASK a QUESTION | CONTACT | CONTENT USE POLICY | DESCRIPTION | POLICIES | PRIVACY | |
| © 2024 - 1985 Publisher InspectApedia.com - Daniel Friedman | |||||||||