
InspectAPedia® FREE Encyclopedia of Building & Environmental Construction, Diagnosis, Maintenance & Repair |
Question? Just ask us! InspectAPedia
|
 Roof Ice Dam Leak Diagnosis
Fi x an annoying roof leak by tracking down the point of water entry & the leak cause
- POST a QUESTION or COMMENT about how to find the correct cause of roof ice dam leaks
Roof ice dam leak diagnosis & repair:
This article describes & illustrates the steps in pinpointing the point of water entry from a roof ice dam leak. A correct diagnosis of where leaks are occurring is helpful in making the right repair to stop ice dam leaks in the future. Severe roof ice dam backups caused leaks into areas of this home. To be sure of the best and proper repair, aided by the builder we set out to diagnose the exact cause and exact points of roof ice dam leaks at the building.
In companion articles of this ice dam leak article series we point out that air and heat losses into the roof cavity or attic are underlying causes of ice dam formation on roof eaves and in the gutter system. Melting water backing up behind that dam of ice leaks into the building walls, attics and other areas. In cases of severe ice dam formation an ice and water shield membrane at the roof edges may not prevent all building leaks.
InspectAPedia tolerates no conflicts of interest. We have no relationship with advertisers, products, or services discussed at this website.
Roof Ice Dam Leak Case Study: how to track down & fix the causes of building leaks in a new roof built following good construction practices
 Why do Ice Dams Form at Roof Edges or in Gutters
It's helpful to understand the basic concept of ice dam formation and ice dam leaks.
Warmth escaping from the building into or below a roof surface melts the under-side of snow or ice on the roof surface even when outdoor air temperatures are below freezing.Although the roof may appear snow-covered from outside there may be water below that snow or ice.
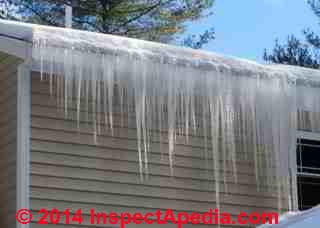
When that water runs down-slope to a colder location on the roof, usually at the roof edges or at its gutter (photo at left) it freezes solid and accumulates forming a "dam" at the roof edge. This ice dam in turn blocks further water run-off from the warmer areas of the roof above.
When that blocked water from melted snow or ice cannot escape off of the roof it can accumulate and can back-up to a depth that causes the water to find an opening to leak into the building. Providing a drainage path for such water accumulations is one way to stop ice dam leaks dead in their tracks.
Along with unusual conditions of heat loss into a roof cavity, roof or gutter ice dams can cause some hard-to-track-down leaks as the following case study will illustrate.
Case Study Examines an Ice Dam Leak in Detail
Here we examine a recent roof installation that suffered ice dam formation and leaks despite the installation of an ice and water shield membrane and attic venting.
An unsually high amount of warm air leaks into the building attic conspired with sloppy insulating work to create severe ice damming on the structure.
 [Click to enlarge any image]
The ice dams were enough to overcome the ice and water shield. The homeowner opined that heat losses be dammed, his roof ought not to leak.
He was right.
Pinpointing where the ice and water shield was not working was a key step in making an ice-dam-leak-proof roof.
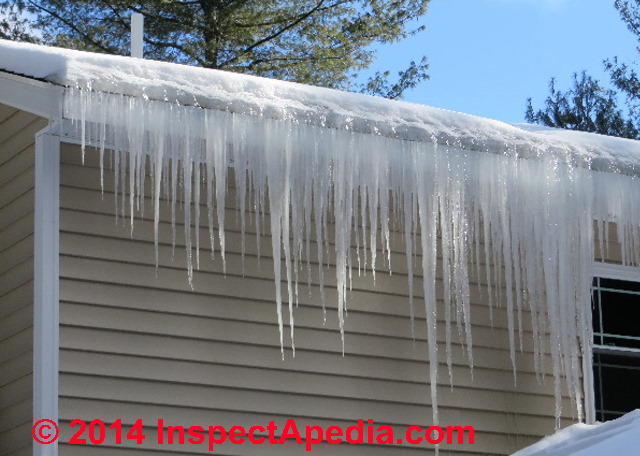
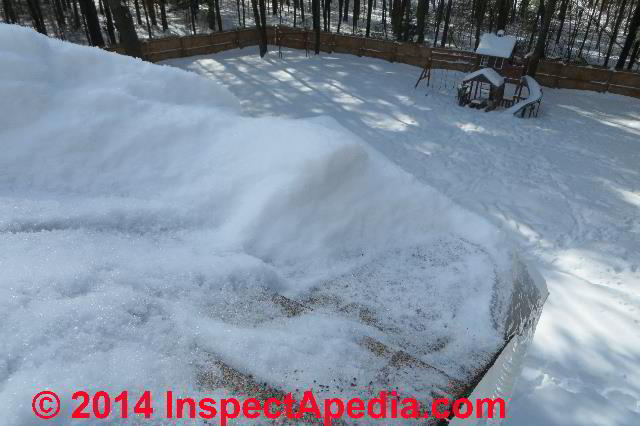
Even before we stepped out of the truck we knew part of the roof ice dam problem: that uneven snow melt and the huge ice dams formed at the roof eaves told us of unusual building conditions: a significant heat loss into the roof space was melting the thick snow-cover and sending a large volume of water down the roof where it was freezing at the roof edges.
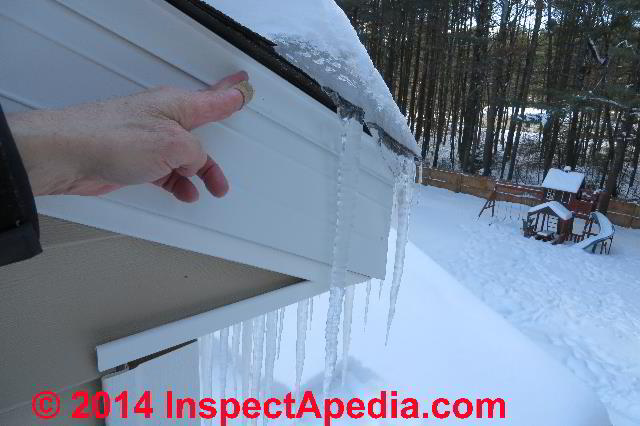
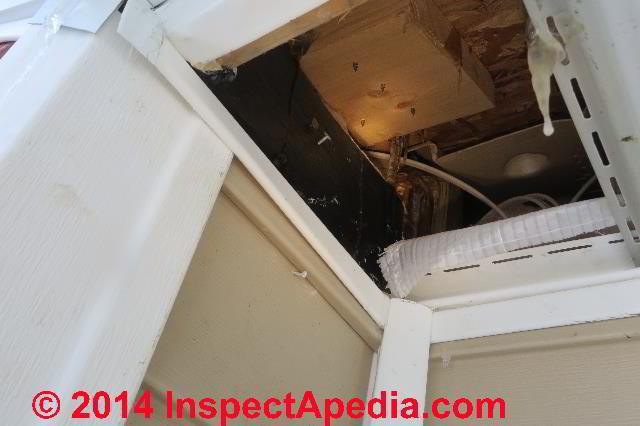
In the photo at above right we could see an opening into the soffit below a roof valley where some preliminary exploration had already been made. But varying weather conditions had left the investigation incomplete.
We needed to inspect these key areas:
Roof Ice Dam Diagnosis Outdoor Inspection Points
- Where was ice forming and where could we see differences in ice levels that might be diagnostic
- What problem areas were likely such as at the ends of valleys or where flashing might be difficult
- Outside what could we learn about the presence of ice and water shield on the roof eaves
- Outside we would open the soffits to see exactly where water was backing up and penetrating the roof structure
Roof Ice Dam Leak Diagnosis Indoor Inspection Points
- Determine the building's prior leak and ice dam leak history
- Determine what prior repair attempts had been made
- Identify the obvious leak points - where leaks were already visible
- Identify and explore high risk points where hidden leaks and wet insulation or mold damage risk were likelyt
- Identify the causes of abnormal heat losses into the attic or roof struccture
Armed with this information we ought to be able to determine the exact trouble spots on the roof that needed attention to waterproof the building regardless of ice dam formation and heat losses into the roof, and depending on owner cooperation we might identify further cleanup work needed indoors along with corrections to the building's insulation and ventilation systems.
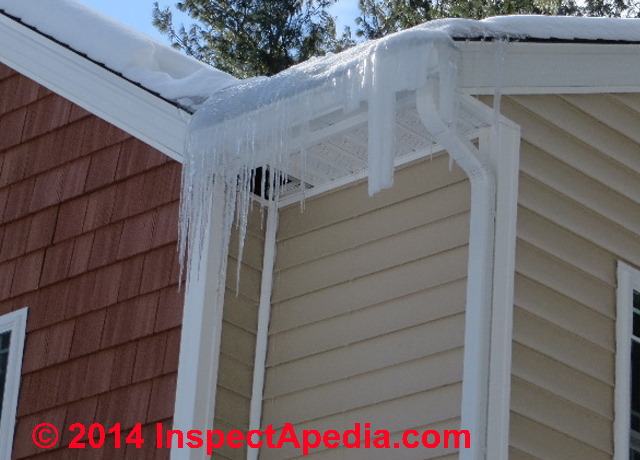
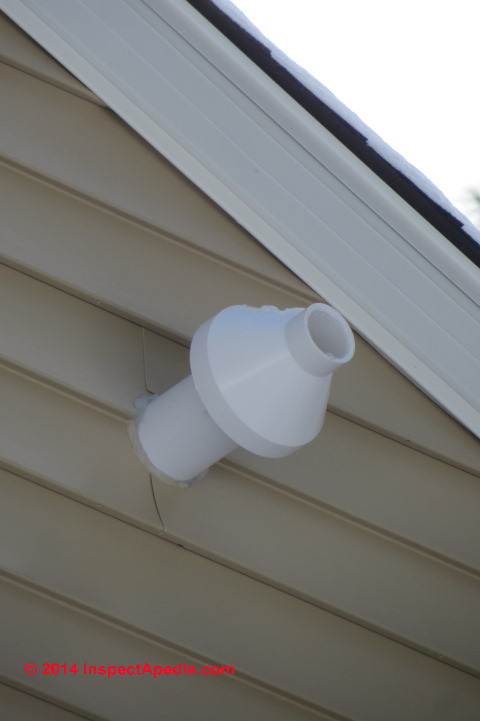
This home was built in the 1970's and is heated by an oil fired warm air furnace. But outside at the rear right gable end we saw a direct-vent for an LP furnace! Heat was added for a second floor addition (one of the areas but not the only one) where roof ice dam leak troubles were found. This was an important clue: we knew that there was an extra heat source in the attic, contributing to ice damming not to mention questions about how well the ducts and heating/cooling system were going to actually work in that un-conditioned space.
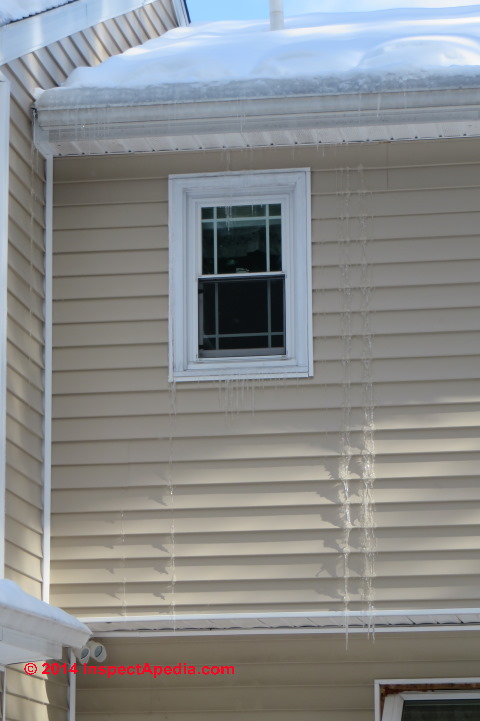
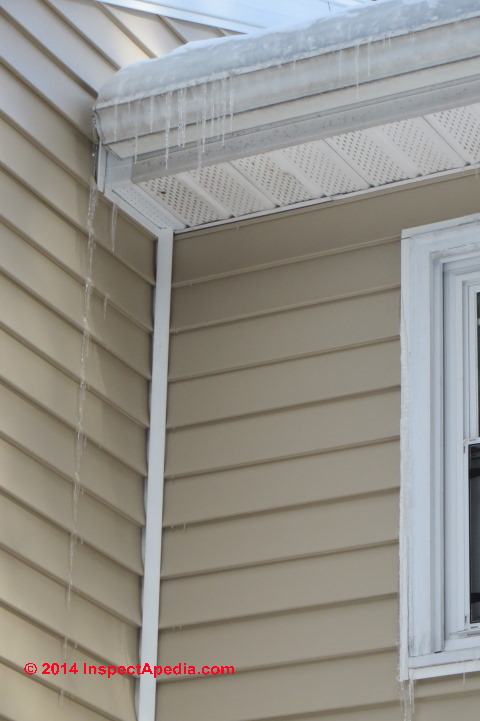
Inspecting the rear wall of the home from outdoors we noticed that ice dams were forming on the older part of the structure too, and that there were leaks into the building's rear wall cavity. This was a condition having little to do with the new right-hand addition - raising a concern for a history of recurrent wall and roof leaks and maybe a hidden mold contamination problem or an insect and rot problem. It was obvious that the ice dam problems on the new addition were not the only roof ice dam leak issues at this home.
But indeed roof ice formation was worse over the newer addition where there was a lot of heat loss into the roof space.
Looking further at the original structure (photo above left) we see that the original roof, also suffering ice dams, is a foot or two lower than the new roof. We would not be surprised to find leaks into the wall between the new and old structures given the ice formed on the siding of the new addition (left side of the photo at above left). Could the problems all be due to the construction of the new second floor addition>
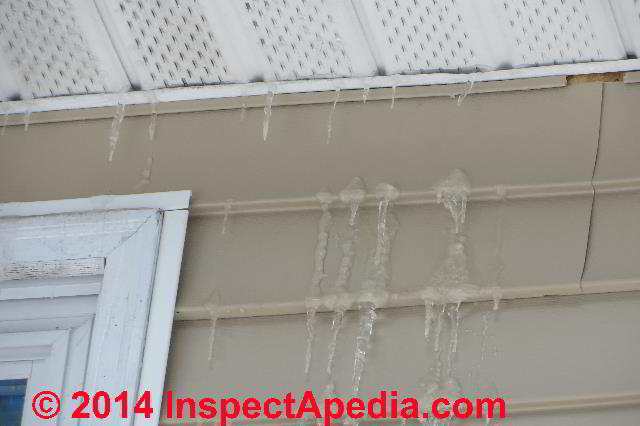
At above right, we took a closer look at leaks sending water through the vinyl siding to the right of the window of the original second floor bathroom. Leaks along this roof edge and into this wall confirm that ice dam leaks on the original rear left roof were also sending water into the wall. There was no further doubt that this home has both new and old roof ice dam leak troubles.
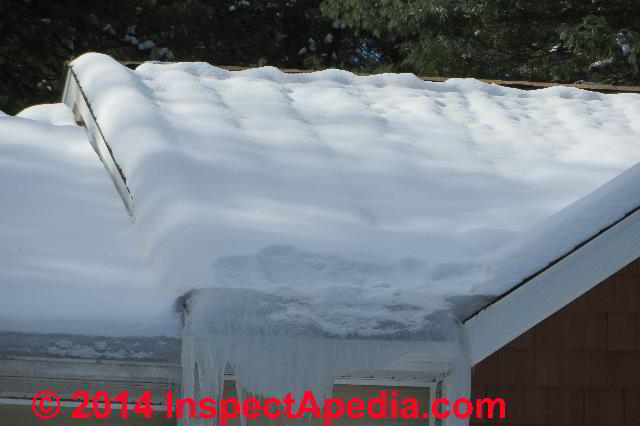
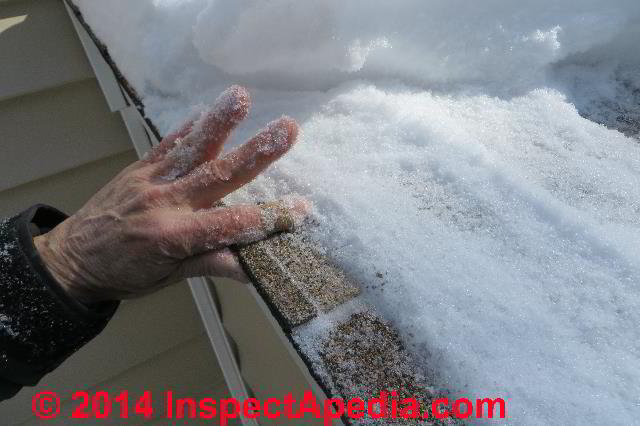
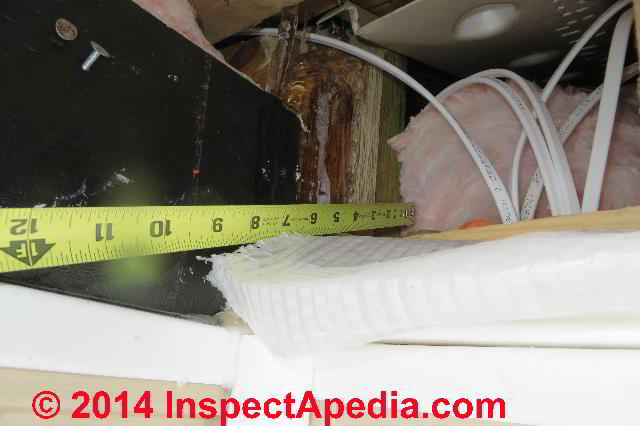
It was time to take a close-up look at the ice dams, roof eaves, and soffit interior. At below left I'm looking at exactly where the ice sits on the roof eaves. The home as a one-foot soffit overhang. Ice starts at about ten inches from the roof eaves. I suspect that there is no insulation over the top plate. If the top plate were cold ice would extend back at least 12 inches, maybe 15 1/inches from the eaves.
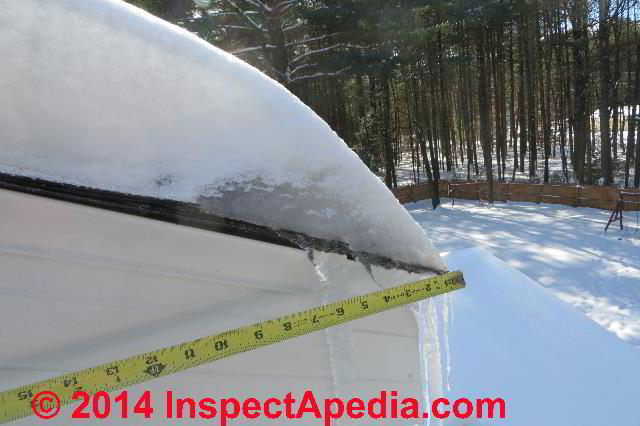
At above right I'm pointing to the up-roof edge of the actual ice dam. You can see it is forming past the face of the exterior wall which is roughly above the "n" in the word InspectApedia.com".
Before poking into the roof or soffits to pinpoint roof ice dam water backup leak points we decided to tak a look indoors.


At above left we see wet insulation, dark stains telling us of a history of leaks or air leaks - this is not new damage; there was even remains of a hornets' nest here, and a bit of carpenter ant frass - not something that often shows up during freezing weather.
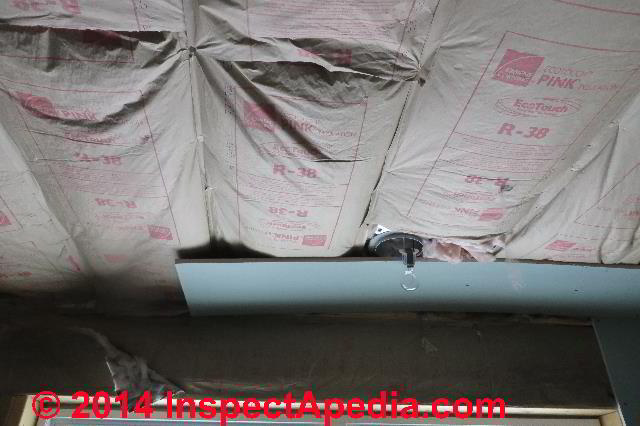
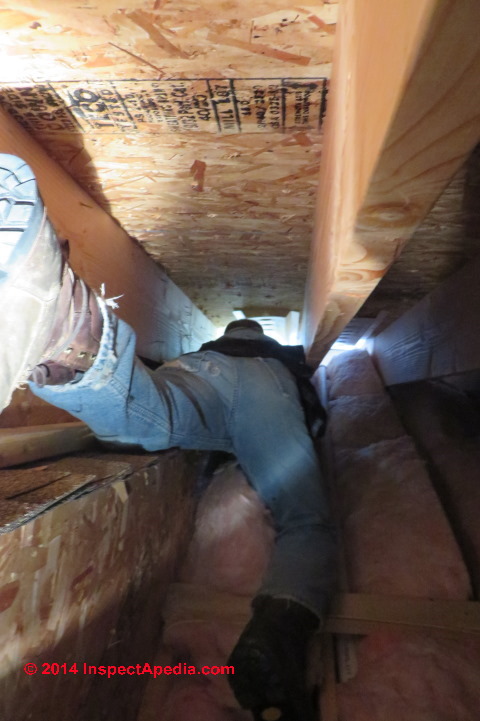
At above right we're looking up into the plumbing rough-in for a new second floor addition bathroom. Warm air from the original family room is blowing right upstairs into the new addition through large cutouts in the subfloor above as well as through pipe and wiring cuts.

Upstairs in the new addition we see wet subflooring and stains at the front right corner of the addition - this is the area below that exploratory soffit opening we saw outside - and is obviously a point of significant ice dam leakage.
Watch out: further demolition is in order: we don't want to leave wet drywall and insulation in place - inviting a future mold problem. But there's little point in demolishing and fixing those materials before the leak itself is repaired.
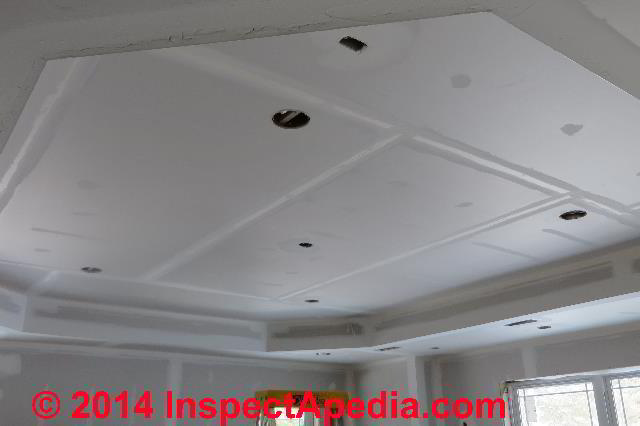
Looking up (above right) we see a principal reason for high attic temperatures and unusually large ice dam formation: this DIY lighting and ceiling finish project involved an unusual number of ceiling and wall light and wiring penetrations: at least 29 openings into the attic were found in this room alone, with multiple recessed lights and electical receptacles throughout the space, none sealed and all acting like chimneys pouring heat and warm air into the attic space.

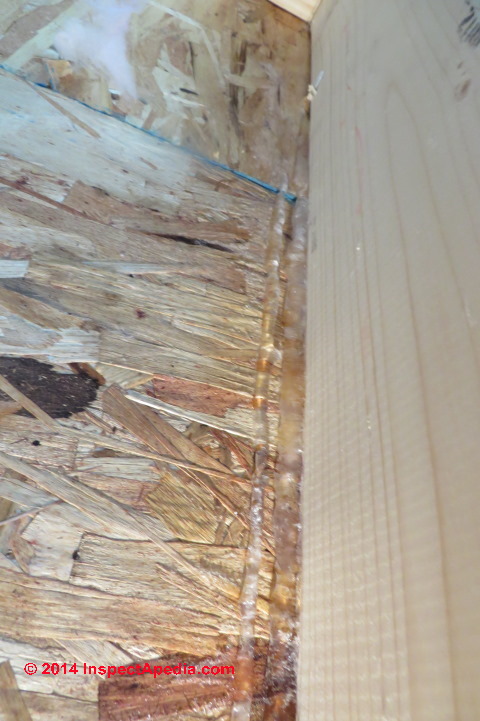
Exploring the un-finished rear left corner of the second floor bath addition we checked for leaks into the wall cavity - a problem that might be traced to ice dam formation on the lower roof of the original structure or to a sidewall flashing leak at the abutment of the addition's sidewall to that lower original roof. We found ice in the wall cavity (above right) from leaks running down the interior face of the exterior sheathing, originating near the top of the wall.
Other rooms in this addition had only the kraft-faced R38 fiberglass insulation installed, with no drywall yet hung on the ceilings (above left). But worse trouble was yet to be seen in the attic space itself (above right) - insulation, when installed from below by pushing it up between the ceiling joists or truss bottoms, is always going to be a bit helter-skelter in the attic.
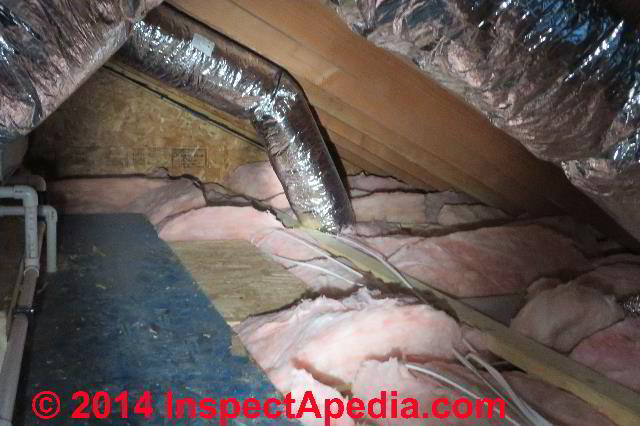
The uneven, topsy-turvy insulation (above right) is far less effective at retaining heat in the occupied space than had it been installed uniformly and neatly. At below left you can see that insulation simply stopped below and around the attic air handler.
The sum of multiple openings, askew insulation, and even areas of completely missing insulation add up to the equivalent of leaving something like a ten foot square hole in the ceiling all winter - no wonder ice dams on the home were huge. Other SNAFUs we noted in passing were crimped HVAC flex duct passing through the un-conditioned space: boding ill for both air conditioning and heating effectiveness from the new LP fueled heater and air conditioner mounted in this attic.
Checking Eaves & Ridge Vent Installation Details in Diagnosing Roof Ice Dam Formation
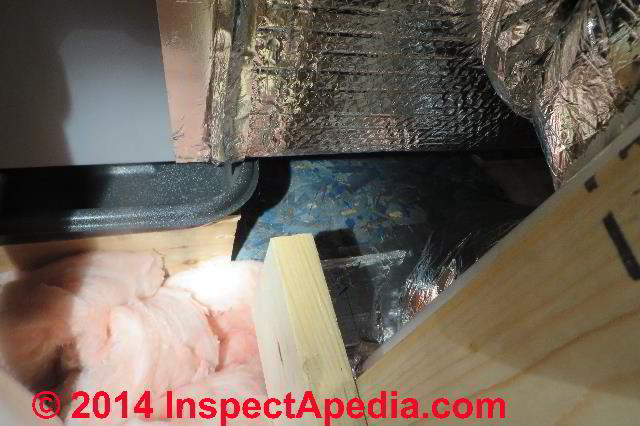
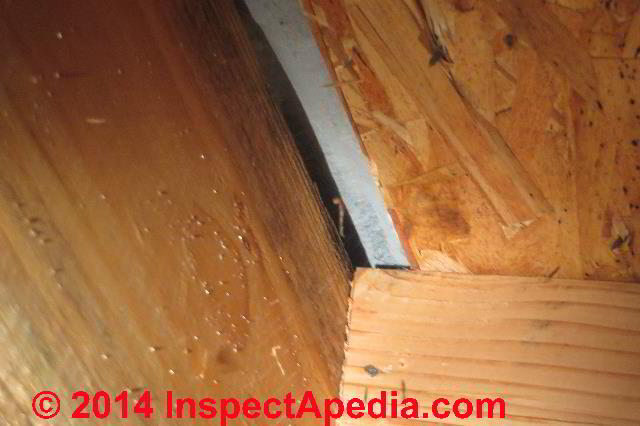
A critical area to inspect in an attic insulation and venting system is the maintenance of an air path over the wall top at the buildiung eaves - typically using baffles (above right).
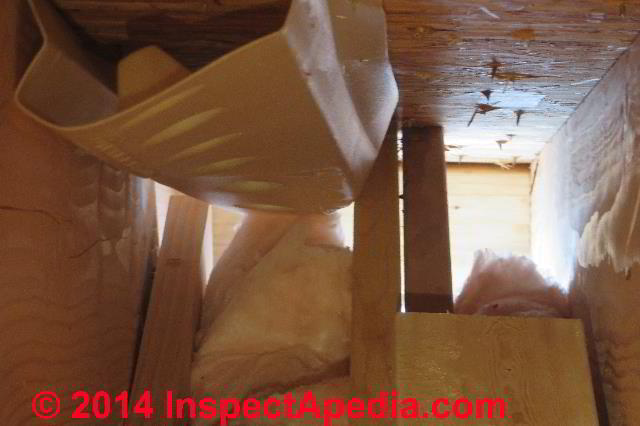
Equally important is the continuation of insulation out to cover the top plate - a discovery hard to make from inside the attic (below left). At below right you can see why I insist that anyone working in an insulated attic should wear a HEPA-rated respirator to reduce the risk of inhaling dust -
see FIBERGLASS HAZARDS.

At the ridge we confirmed that a continuous ridge vent opening of reasonable width had been cut into the roof sheathing and that a ridge vent was in place.
The ice dam problem on this building is not because of blocked attic ventilation. So it's cause more likely an insulation, warm air leaks, and attic temperature problem. We'll explore building temperatures next.
Indoor & Attic Temperature Measurements Study Heat Loss Role in Sever Roof Ice Dam Formation
While it's not as interesting as a true IR thermal camera imaging system, our little hand-held IR temperature measuring device gives approximate surface temperatures and can quickly scan and compare temperatures. The ceilings and walls in the addition were at 68°F which was pretty interesting given that the wall thermostat controlling heat for this area was set to 60°F and was reading 62°F.
So much heat was escaping into the room from other building areas that actual temperatures were quite a bit higher.

Our associate pointed out that where the ceiling-wall drywall joint remains un-taped (above left) additional air and heat leaks into the attic were likely. Here is a summary of our temperature readings. These are important for area or surface temperature comparisons, rather than to be read as absolutely accurate measurements. Unless the radiating surface is black the temperatures will be under-stated.
Table of Comparative Temperature Readings in a Home with Significant Roof Ice Dam Formation & leaks |
||
| Building Area | Compartive Temperature | Comments |
Original Structure: |
39-41 °F | Notably less snow melt seen on roof exterior but ice dam leaks present at rear slope over bathroom |
| Roof underside at ridge | 40-41 °F | Attic temperatures are above freezing, inviting ice dam formation. |
| Roof underside at eaves | 38-39 °F | |
| Second Floor Addition - new structure: | Drywall incomplete, numerous penetrations, poor insulation installation. Ridge & soffit vents present. | |
| Roof underside at center of span | 61-64 °F | Attic temperatures where roof ice dams are most severe are about the same as temperatures in the interior space of the room below, are 20 °F above the attic over the original structure, and are significantly above freezing. |
| Interior ceiling at center | 64 °F | |
| Interior ceilign at front wall/ceiling juncture | 61 °F | |
| Interior surface of an interior partition wall | 63 °F | |
| Inbterior surface of an exterior wall | 63 °F | |
Final Outside Inspection to Pinpoint Roof Ice Dam Leak Points
Back Outside it was time to pinpoint the roof leaks. We wanted to
- Confirm that ice and water shield had been installed and extended at least three feet up the roof - it had been included
- Determine if insulation had been omitted over the top plates of the exterior walls - it had been omitted, a mistake
- See exactly where water was penetrating the roof in order to understand why we found roof edge leaks despite the normal installation of ice and water shield membranes on the lower roof edges.
- Determine the extent of roof shingle removal and re-work that might be necessary to seal against future ice dam leakage regardless of how neat or sloppy building insulation and ventilation might be installed.
Exploring the Addition's Rear Roof Slope Ice Dam Conditions from Outdoors

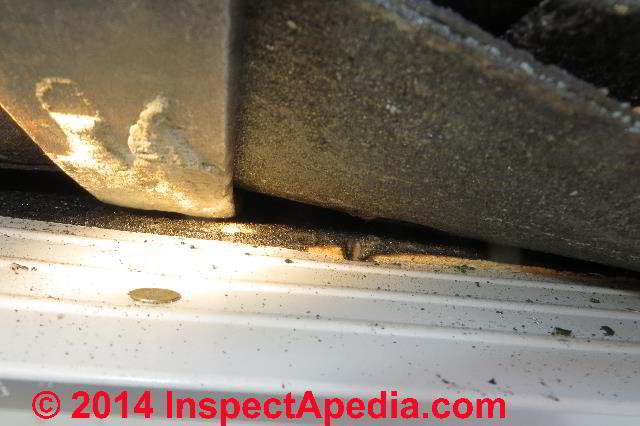
Above we carefully lift the roof shingles along the house eaves to find the presence (or absence) of the ice and water shield membrane that we'd have thought would prevent ice dam leaks no matter how horrible a heat loss into the attic the home is suffering. We found that ice and water shield was indeed present (beneath my flat bar in the photos above) extending from the eaves up three feet - this is on the building's rear slope. The membrane extended to the very edge of the roof sheathing but not below the built-out gable end trim and gable end drip edge flashing (foreground in the two photos).
Watch out: it's difficult to avoid tearing roof shingles when lifting them to explore the roof in cold weather, as you can see in our photo above. This tear at the gable end is below other material and is not a roof leak, but the shingle will be replaced nonetheless. I'd have preferred to extend the ice and water shield barrier to the edge of the gable end, but this construction detail was not the source of any building leaks, and it was the result of sequence of operation - not a concern here.
Above I've swept back snow from the roof edge and eaves to see just where ice is forming. A 1/4" thick sheet of ice extends from the lower edge above the ice dam all the way to the ridge on this roof - confirming that the under-side of the snow is being melted by attic heat, then freezing along the roof surface as well as accumulating as a built-up ice dam at the roof eaves.
The uniform ice formation over the roof convinced me that we were not getting ice dams because of a few individual heat loss points but rather due to an attic well above freeing temperatures.
You can see at above right that the only place where we don't have ice (and thus ice dam forming conditions) on this roof is at the very edge of the gable end that extends out past the building walls.
Rear roof slope ice dam conclusion
Significant ice dam formation at the rear roof slope, but no leaks into the building were occurring on the upper roof rear edge of the building addition. The ice and water shield was working on this slope.
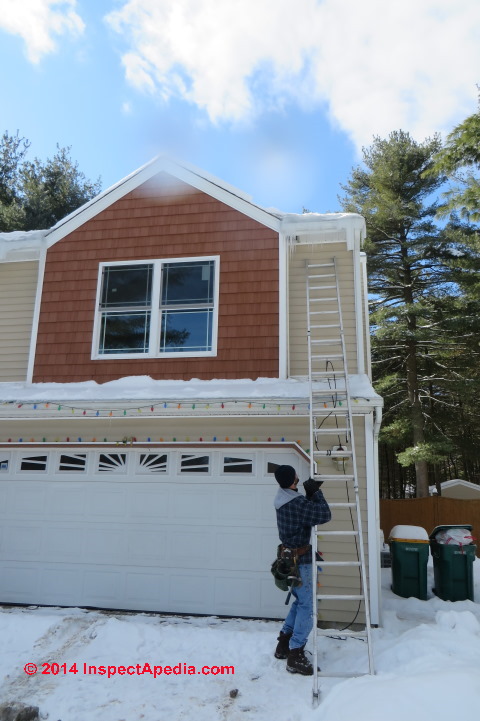
Exploring the Front Roof Slope Ice Dam Leaks From Outdoors
Moving on to where we know there is a problem we proceeded to enlarge the soffit opening to make a close examination of conditions at the second floor addition's front right corner - the roof above the upstairs area where interior leaks were spotted.
Watch out: working from a ladder any time is dangerous, but in winter, with slippery surfaces and cold fingers the danger is increased. Be sure the ladder is stable, secure, and don't work alone. It's handy to have a confederate to hold the ladder and to call the ambulance after you fall.
We removed additional vinyl soffit covering to give good access to look into this area - below the valley at the roof eaves. Here is what we found:
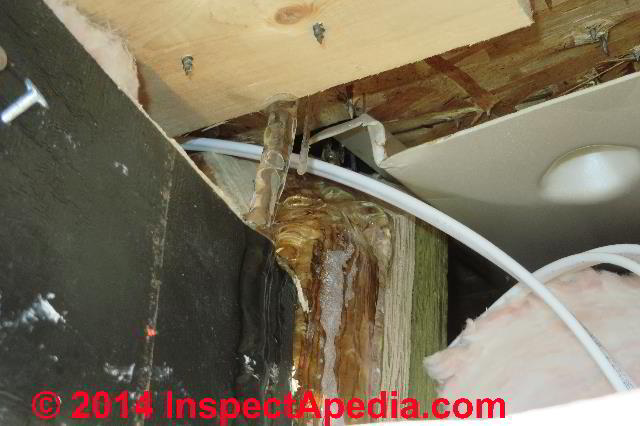

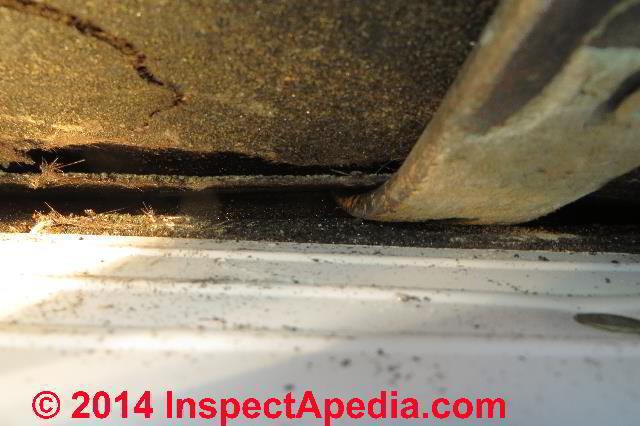
At above left we got help from Mother Nature: a frozen column of water pointing to a leak in the valley about six inches up from the roof eaves. Although this area was covered with ice and water shield on the roof surface, it appears that the large ice dam in the gutters at the eaves conspired with ice dams at the roof edge to push water back up under the ice and water shield.
At above right we see that the building insulation does not extend out over the exterior wall top plate - creating a warm area beneath the roof that pushes the ice dam and leak path back up from the lower roof edge and adds to the heat loss and melt problem in this area. I give another view of this SNAFU below.
Front roof slope ice dam conclusion
Significant ice dam formation at the front roof slope appears to have pushed water under the ice and water sheild, possibly exacerbated by gutter ice. The result is a leak at the front right valley that enters the building walls in this area and that has leaked out onto the floor below.
Emergency Measures to Stop Roof Ice Dam Leaks
Since there is little chance that interior corrective measures to stop heat loss into the attic will happen promptly, temporary emergency relief may be provided using heat tapes to keep drainage openings through the roof ice pending a revision to the ice and water shield detailing in this area when weather permits.
See HEAT TAPES & CABLES for ROOF ICE DAMS
and
see HEAT TAPES & DE-ICING CABLES on FLAT ROOFS where ice dam leaks were successfully halted by use of a roof/gutter de-icing heating tape kit.
...
Continue reading at ROOF ICE DAM CURE: Comparing Two Houses or select a topic from the closely-related articles below, or see the complete ARTICLE INDEX.
Or see these
Recommended Articles
- ATTIC CONDENSATION CAUSE & CURE
- COLD WEATHER ROOF TROUBLE
- ICE DAM PREVENTION on ROOFS
- ROOF VENTILATION SPECIFICATIONS
- ROOF ICE DAM CURE: Comparing Two Houses
- ROOF ICE DAM LEAKS
- ROOF VENTILATION for DEEP SNOW
- SNOW GUARDS & SNOW BRAKES
- WINTER & SNOW-COVERED ROOF VENT RESOURCES & RESEARCH
Suggested citation for this web page
ROOF ICE DAM DIAGNOSIS at InspectApedia.com - online encyclopedia of building & environmental inspection, testing, diagnosis, repair, & problem prevention advice.
INDEX to RELATED ARTICLES: ARTICLE INDEX to BUILDING VENTILATION
Or use the SEARCH BOX found below to Ask a Question or Search InspectApedia
Ask a Question or Search InspectApedia
Try the search box just below, or if you prefer, post a question or comment in the Comments box below and we will respond promptly.
Search the InspectApedia website
Note: appearance of your Comment below may be delayed: if your comment contains an image, photograph, web link, or text that looks to the software as if it might be a web link, your posting will appear after it has been approved by a moderator. Apologies for the delay.
Only one image can be added per comment but you can post as many comments, and therefore images, as you like.
You will not receive a notification when a response to your question has been posted.
Please bookmark this page to make it easy for you to check back for our response.
Our Comment Box is provided by Countable Web Productions countable.ca
Citations & References
In addition to any citations in the article above, a full list is available on request.
- In addition to citations & references found in this article, see the research citations given at the end of the related articles found at our suggested
CONTINUE READING or RECOMMENDED ARTICLES.
- Carson, Dunlop & Associates Ltd., 120 Carlton Street Suite 407, Toronto ON M5A 4K2. Tel: (416) 964-9415 1-800-268-7070 Email: info@carsondunlop.com. Alan Carson is a past president of ASHI, the American Society of Home Inspectors.
Thanks to Alan Carson and Bob Dunlop, for permission for InspectAPedia to use text excerpts from The HOME REFERENCE BOOK - the Encyclopedia of Homes and to use illustrations from The ILLUSTRATED HOME .
Carson Dunlop Associates provides extensive home inspection education and report writing material. In gratitude we provide links to tsome Carson Dunlop Associates products and services.
 | HOME | ABOUT | ASK a QUESTION | CONTACT | CONTENT USE POLICY | DESCRIPTION | POLICIES | PRIVACY | |
| © 2024 - 1985 Publisher InspectApedia.com - Daniel Friedman | |||||||||