
InspectAPedia® FREE Encyclopedia of Building & Environmental Construction, Diagnosis, Maintenance & Repair |
Question? Just ask us! InspectAPedia
|
 Sagging Roof / Rafter Repair
Site-built rafter spreader + mid-span rafter ties smooth wavy roof

- POST a QUESTION or COMMENT about roof framing, support, construction specifications & practices
Roof rafter & decking sagging:
This article describes a DIY repair project using a site-built spreader to straighten sagged roof rafters and decking.
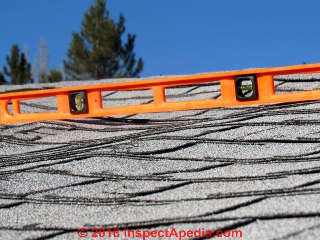
When considering what to do about sags in a roof, start by noticing if the sag is in sheathing between rafters (page top photo0 or sagging along the length of the rafters.
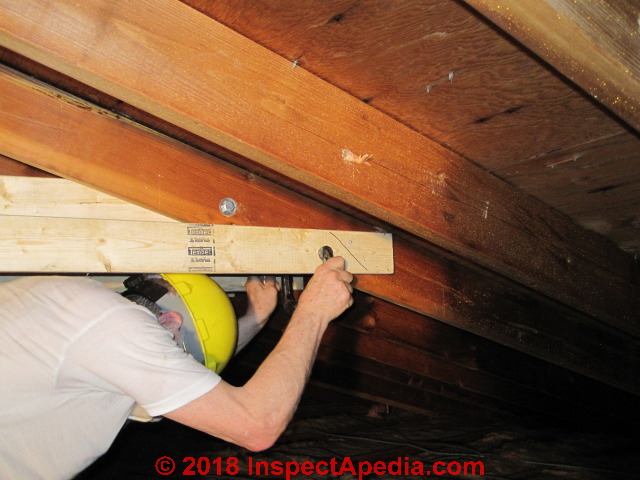
Page top photo: using a simple level, a corresponding engineer illustrated for us bellying in the roof sheathing over a manufactured home in California.
Sagging sheathing between rafters
may be due to rot, delamination, use of fiberboard or other materials that may not perform well over the life of a home, or due use of too-thin plywood roof decking to start with.
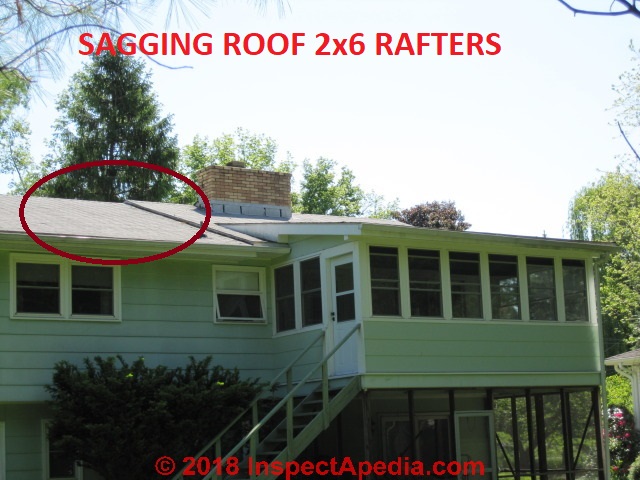
Sagging rafters
may be the result of having framed the roof with lumber of dimensions smaller than current building standards, such as using 2x4s or 2x6's, or there may be damage to the framing from insects or rot.
So you should start by inspecting the roof from the under-side or attic.
Check also for a sagging ridge line and for outwards bow at the top of building walls: these indicate more serious building movement.
Below on this page we illustrate repairs to straighten or flatten the roof on New York home whose roof rafters had sagged with time.
This article series describes & explains the directions of forces in roof structures, illustrating downwards force, horizontal thrust, and the causes of rafter sags, rafters that disconnect from the ridge or top plate, and why a sagging roof pushes the building walls outwards at the wall top.
InspectAPedia tolerates no conflicts of interest. We have no relationship with advertisers, products, or services discussed at this website.
How to Straighten a Sagged Roof Structure
The wood-framed, raised-ranch style home, built in the 1960s in Poughkeepsie, New York, enjoyed this structural de-sagging improvement in 2010.
The owner of the home, himself an electrical engineer who is not intimidated by wood, hammers, and winches, decided that the badly-sagging 2x6 rafter-supported roof needed to be straightened to more of a flat plane.
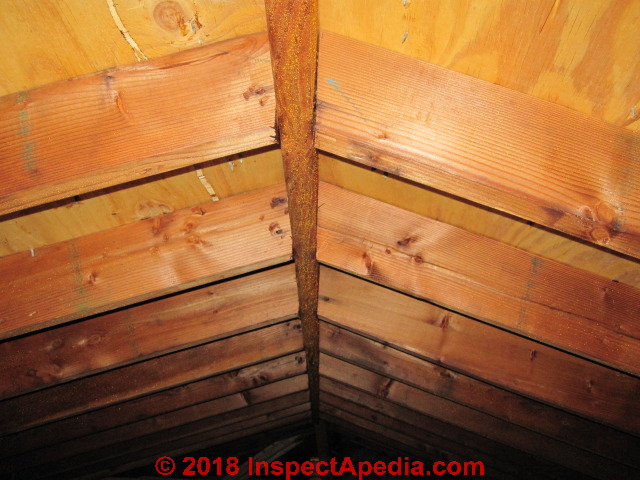
Placement of short collar ties too close to the ridge was a common practice in 1960's era wood framed homes built in the northeastern U.S.
The collar ties were placed high, near the ridge, probably out of convenience for the framer and of course using less lumber than would be required for a mid-span tie.
Collar ties were also kept high under the roof to give usable attic space.
When combined with the use of 2x6 (or in some homes even 2x4) rafters, it was not common to see both sagging ridge lines and sagged or bellied areas in th field of the roof.
When also combined with thin 1/4" plywood or 3/8" thick roof sheathing, we also sometimes find sagging even between rafters.
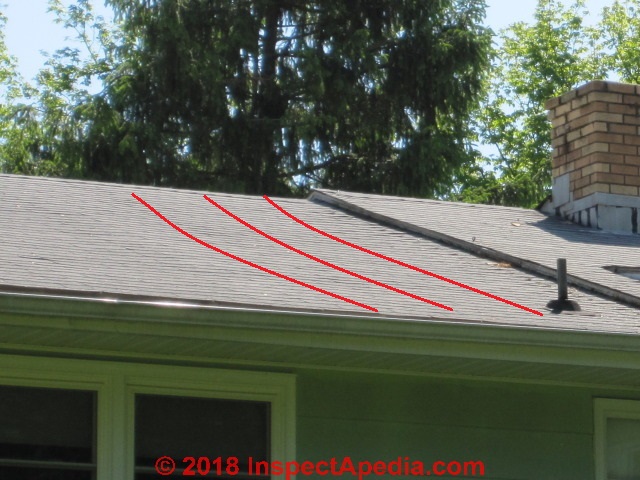
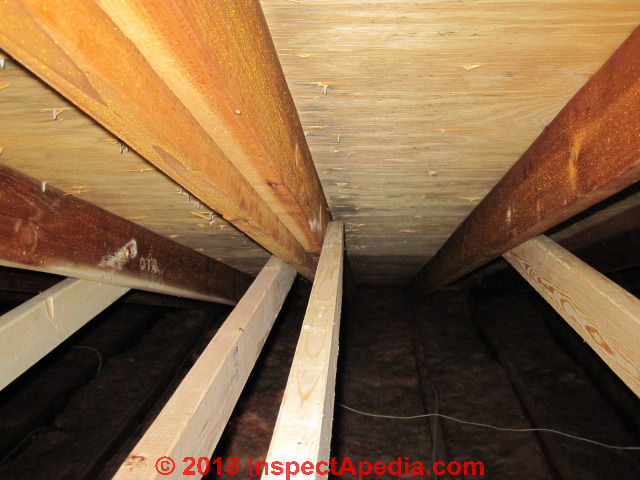
The original rafters of this home had not become disconnected at the ridge nor at the top plate. But the roof rafters and thus its surface had sagged badly enough to be noticeable from outdoors as a rather wavy roof surface. .
Below we mark off the roof sagging that, while evident at the site, is a bit difficult to see in photographs.
How will the belly be removed from this roof?
While a roofing-contractor would perhaps have proposed a complete tear-down of the roof, replacing it with straight, modern-size rafters, the owner preferred to keep the roof sheathing in place and to straighten the roof by applying force from below while adding additional framing members.
The owner had a different idea. These photos illustrate his process.
We're going to push pairs of opposing rafters apart at the center of inwards bend by using a home-made jacking device: basically a pair pieces of 2x lumber that can be lengthened by using a winch to pull two opposing sliding ends together.
With a pair of rafters pushed apart to straighten the sagged roof, a new mid-span cross tie will be nailed in place. I prefer the term "mid-span cross-tie" to "collar tie" because I associate collar ties with placement high, closer to the ridge.
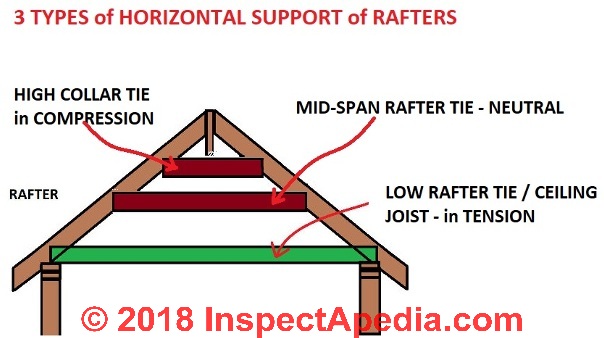
In our sketch above, the mid-span rafter tie is shown as what I'm calling a "neutral" position.
When the roof is first framed the rafters lean against the ridge at their upper end and are tied together by the ceiling joist at their lower end.
If there were no collar ties, or if collar ties are too small and are located too close to the ridge, and if there were also no ceiling joist or an equivalent tension tie were completely missing, the weight of the roof, even before live loads of snow or bundles of shingles, would cause the ridge line to drop down and the top of the building walls to push out.
My photo below shows what happens in this case:

In practice, temporary loads placed on the center of the roof such as from snow, workers, or bundles of shingles during re-roofing will press inwards and the mid-span rafter tie will be under much greater compression.
In this roof sag removal project, because we are pushing the existing rafters apart using a horizontal force of a spreader device in the attic, when we nail a new mid-span rafter tie in place, the older, sagged rafters will want to go back to their old, comfortably saggy position.
They'll press in on the mid-span rafter tie and it will be under considerable compression.
See ROOF FRAMING TIES & BEAMS for details about the types of horizontal rafter supports, collar ties, or rafter ties.
Before we start expanding the roof de-jowler we remove the old short collar ties that were up near the ridge. Removing the old collar ties allows the rafter to more-easily bend to a more-nearly-straight line.
These high collar ties are going to be replaced by new collar ties or cross-ties that are, in most of the attic, nailed to opposing rafters at mid-span.
The owner points out that
... the original nailing of the collar ties to the rafters was inadequate. Some end nailing had worked loose over the years. (I found that out the hard way. One came loose when I grabbed it to keep my balance while ducking under it. I had one foot on the top edge of the ceiling joist below. The other leg went through the living room ceiling sheetrock when the collar tie parted from the rafter.)
Normally collar ties are placed on every third or fourth rafter.
But when straightening the sagged rafters of this roof, because the original collar tie system was inadequate - that is, unable to prevent the rafters from sagging - when straightening the roof, every pair of rafters had to be straightened and then supported in their straight position by new cross ties (placed mid-span rather than high as were the original ties).
The removed-collar ties, placed across the ceiling joists below, gave us more walking surface.

If necessary, jack up any sagging at the ridge.

To permit mounting of the roof sag expander, first bolt holes are drilled in corresponding positions near mid-span for each pair of sagged rafters that are to be pushed apart and back to a more-nearly-straight position.
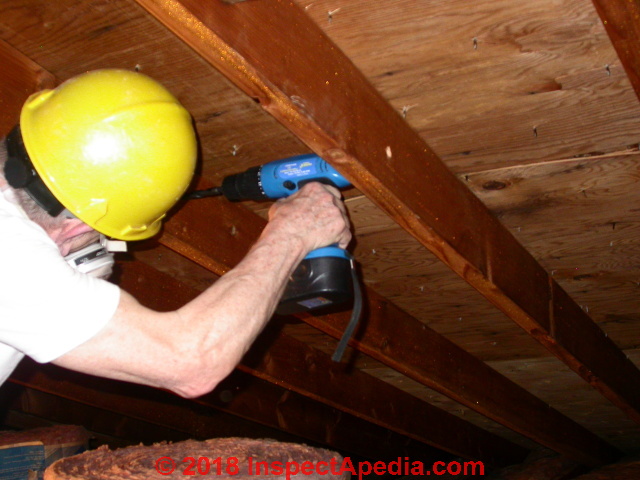
Drilling these bolt holes at the center of the rafter have no impact on the rafter's bending strength.
After measuring to find the mid span location for the cross-ties that will be added, the bolt hole that will be used to secure the rafter spreader (aka roof sag removing tool or de-jowler) is located above the cross-tie nailing location so that the spreader won't interfere with nailing the cross tie in place.
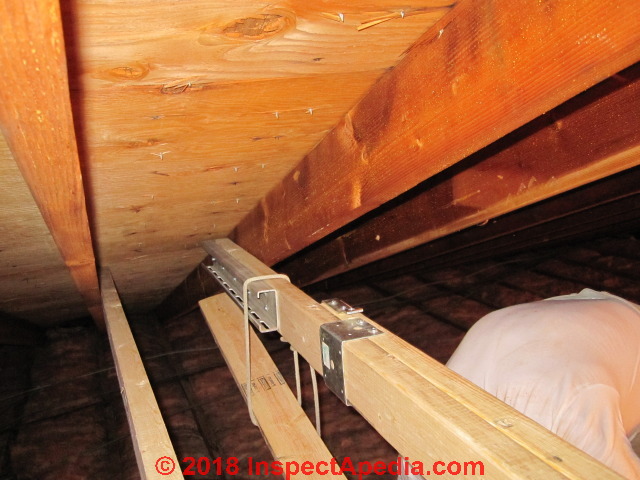
The expanding roof-stretcher used to push out the sag in the roof frame is mounted in place between a rafter pair.
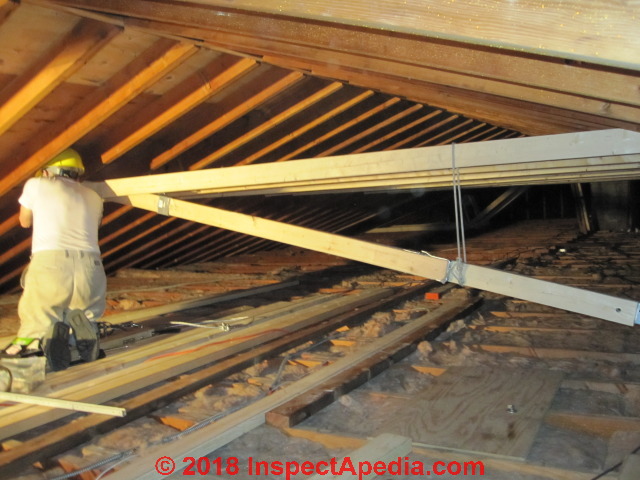
The free ends of the expander are bolted below mid span on a pair of sagged opposing rafters. As work progresses, hanging the roof sag remover tool from one of the new collar ties already in place, eases holding it in place for bolting.

First one end, then the other, of the stretching tool is bolted to the pre-drilled holes in a pair of opposing rafters.
Below: hardware details of the roof expander. You can see the steel bracket used to stiffen the expander end, the steel hardware forming the slider, and ...
A short length of rope is used to suspend the future collar tie just below the expander, helping us get it into place for nailing when the roof is in position.
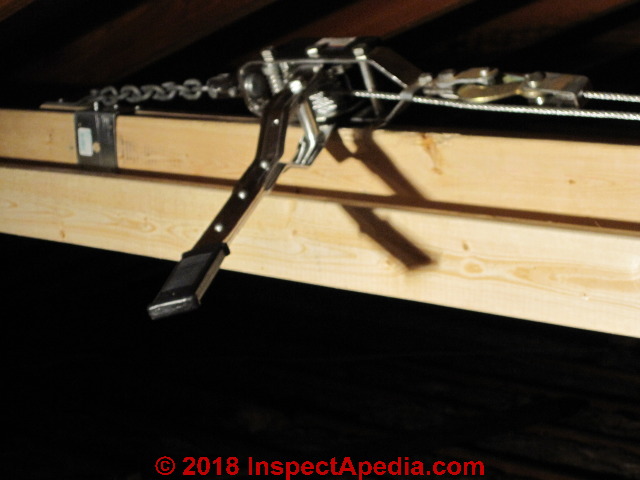
Next the roof sag removing winch is used to pull the expander to a longer length by pulling the two opposed sliding ends of the two 2x4s towards one another - shortening the winch cable and at the same time lengthening the expander, thus pushing the sagged rafters apart to a straighter position.
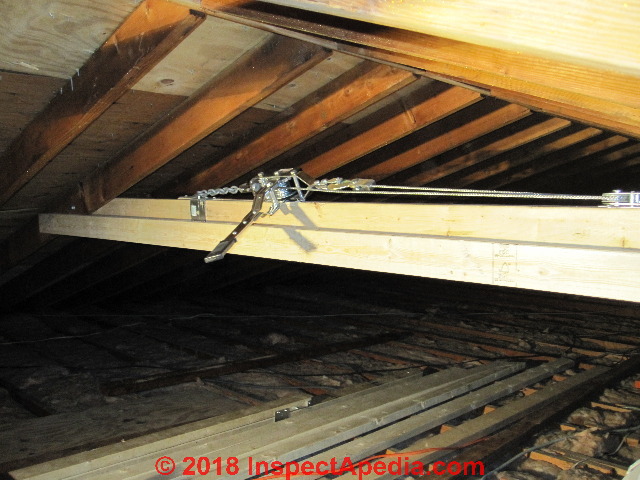
You'll note in the photo below that the spreading force of our roof sag expander was sufficient to bend the expander.

Watch out: the bending spreader was dangerous. The owner notes:
... the jacking fixture shown was marginal for the job and bowed under the stress (as shown in the photo). Scary!!!
If I were to do the job again I would make it double sided and symmetrical so that it would be stiffer and the load would not be offset to cause it to bow.
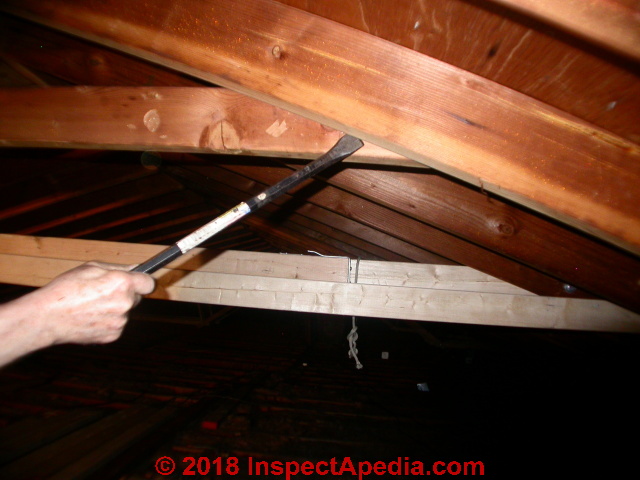
How did we know when to stop expanding or jacking a rafter pair?
A laser level was used to throw a straight line to determine when each pair of jacked rafters were straightened and the new collar tie could be attached.
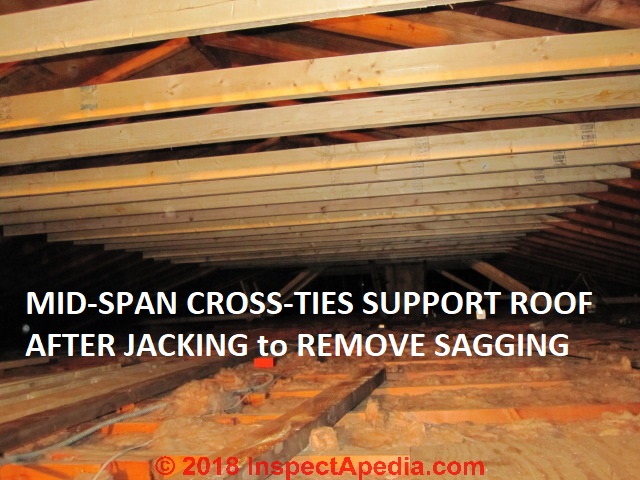
With the roof rafter pair straightened, clamp new mid-span cross ties in place and then nail the tie ends to the rafters.

Notice the rafter spreader bolt: high enough to give room to nail the mid-span cross-tie at the desired location.

As we explain at COMPRESSION vs TENSION in ROOF FRAMING, in typical roof framing the collar ties are in compression as loads on the roof surface try to push it down and inwards.
Because we've literally shoved the opposing roof slopes apart in this Poughkeepsie home's roof's face-lift, the collar ties were under some extra compression as the roof wanted to sigh and return to its original jowly shape.

For this reason the collar tie ends were nailed securely to the rafters.
Below: once a collar tie has been nailed in place, a rope hanger helps us move the roof sag-removing expander to the next rafter pair with less lugging and lifting.

In some areas of badly sagged rafters that will not straighten enough, sister rafters nailed against their older members are pushed up snug against the underside of roof sheathing to provide support.
With the roof pushed into a more-flat position, new mid-span collar ties hold it in place.
A special problem presents itself at the chimney that penetrates the center of the roof and attic. It's impossible to use cross ties or collar ties.

The ridge is pushed level where it is interrupted by the chimney.
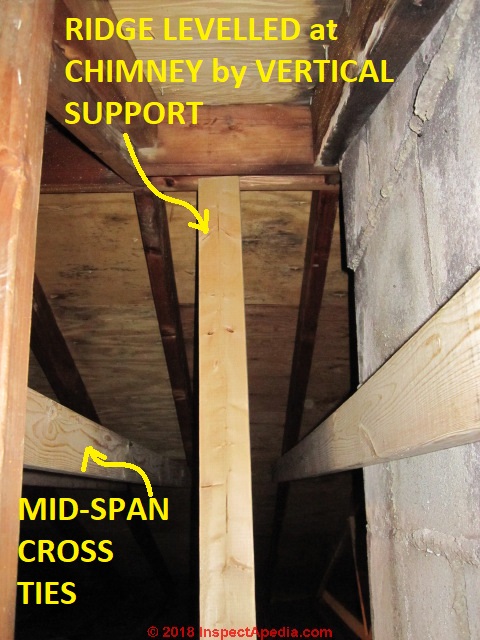
And a different approach is needed at the chimney in order to add rafter support to straighten the sagged roof.
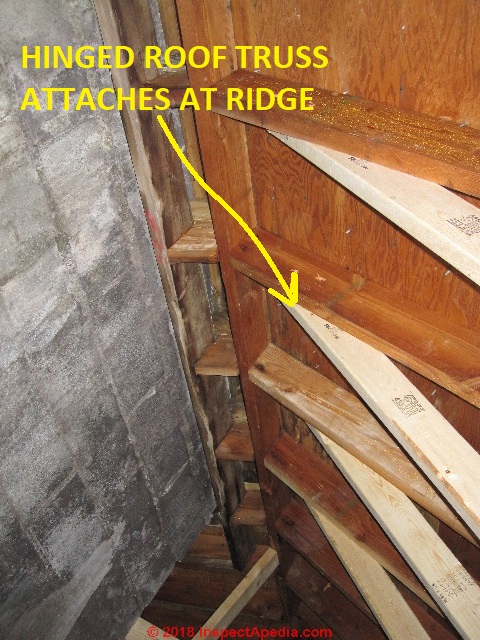
At the chimney, the homeowner designed an inverted truss to straighten the sagged rafters.
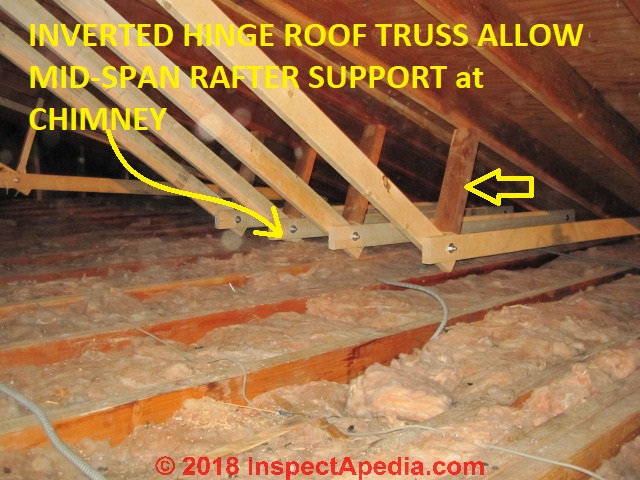
With the inverted hinged truss in place, a vertical wedge can be used to bend the sagged rafter upwards.
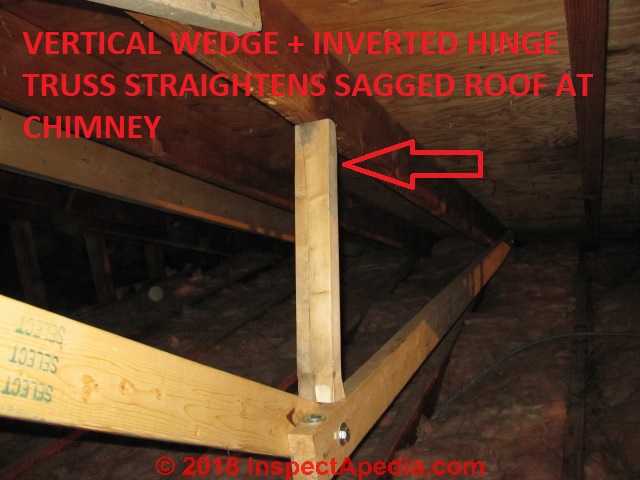
Watch out: extremely-sagged rafters or rafters that are damaged by insects or rot are not candidates for this roof-sag-removal approach: you risk breaking the rafter.
At completion, viewed from outside, the roof slopes look dead flat.

Reader Comments, Questions & Answers About The Article Above
Below you will find questions and answers previously posted on this page at its page bottom reader comment box.
Reader Q&A - also see RECOMMENDED ARTICLES & FAQs
On 2021-08-06 by Jeffrey - How to Make an Improved Sagging Roof Repair Spreader
 Here is all the parts of the spreader tool and how to use it.
[Click to enlarge any image]
Jack Plate - This is screwed on the underside of the rafter and gives a nice seat for the ram rod.
Spindle - Simply a 3/4 inch threaded rod mine is a bit long and it would have worked better being about 12 inches long from the base of spreader.
Ram Rod - The ram rod is placed over the spindle and has a bolt through one end for the spindle to press against.
Ram Nut / Washer - When turned the ram nut will push the ram rod into the jack plate thus spreading the tool and spreading the rafters apart.
Butt Face - This butts up against the underside of the rafter so that jacking presses on the underside of the rafters preventing twisting of rafters while spreading and to give a solid point of contact for spreading.
Side Plate - The side plate is simply screwed into the rafter with structural screws once the butt face is pressed against the underside of the rafter providing a vertical lock of the spreader.
This side plate is fastened horizontally
3 nuts 3 washers and two lock washers are required as well as screws I used construction screws for the end bracket. A nut washer and lock washer on either side of the 4x4 post bracket keeps it in place. It did loosen twice but simply tightening the nut held it back together and was never much of a problem.
I supposed this could be welded if you have access.
There is also a 3/4 hole that goes back into the 4x4 in which the spindle is pressed into about 6 inches with a 1 inch hole drilled about 3/4 of an inch deep to sink the bolt into.
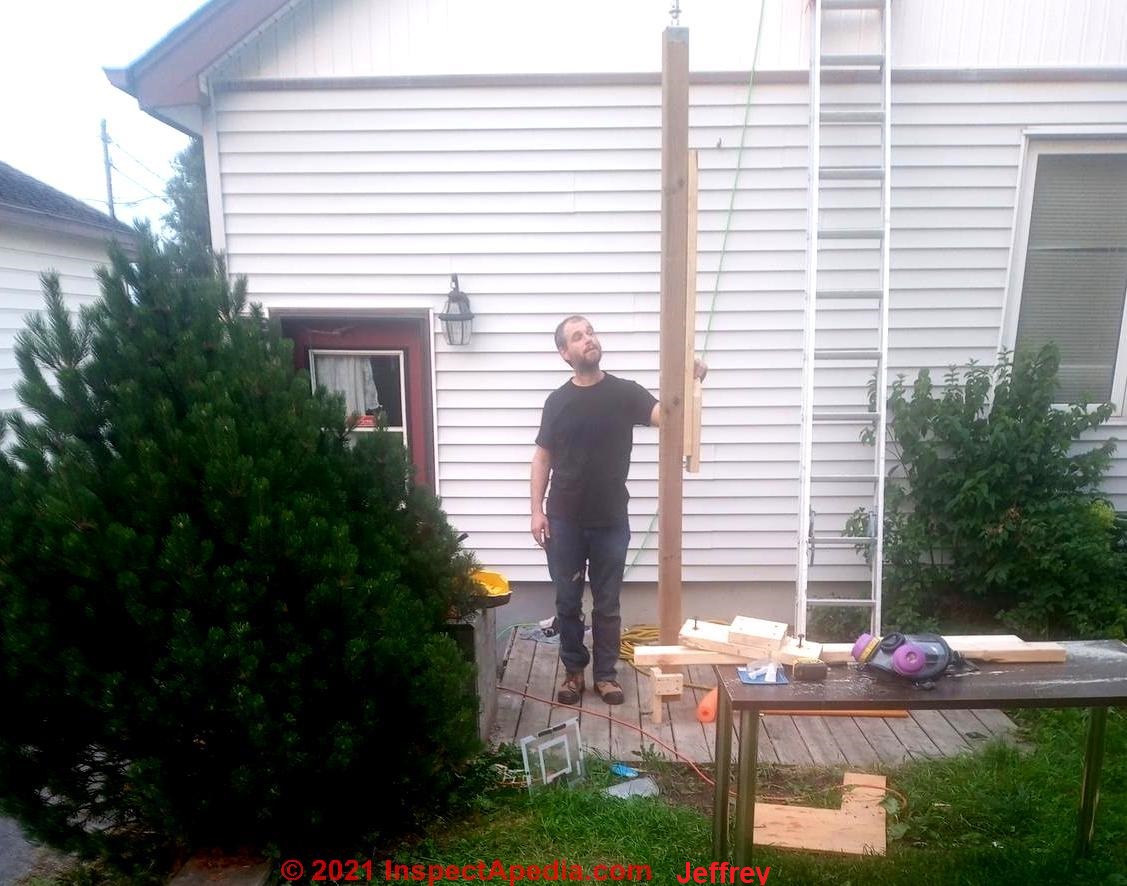
On 2021-08-06 by Jeffrey
Finally finished today here is some pictures of the spreader tool!
@inspectapedia.com.moderator, Me too! It is amazing how much a small seismic jolt can further damage a structure that is in decline.
I feel fortunate that nothing worse occurred than a failed rafter and virtually complete loss of remaining rafter tie support.
For the readers, do not put off having your roof fixed if it needs it, don't think "it will be okay for now" high winds, heavy snow, earthquake or a combination of factors is detrimental to a weakened structure not everyone will be as lucky as I was.
On 2021-08-01 by inspectapedia.com.moderator (mod)
@Jeffrey,
That additional detail was helpful and should serve as a warning to other readers. We look forward to seeing more details from you including that the spreader. Meanwhile stay safe and let's hope you don't have another earthquake.
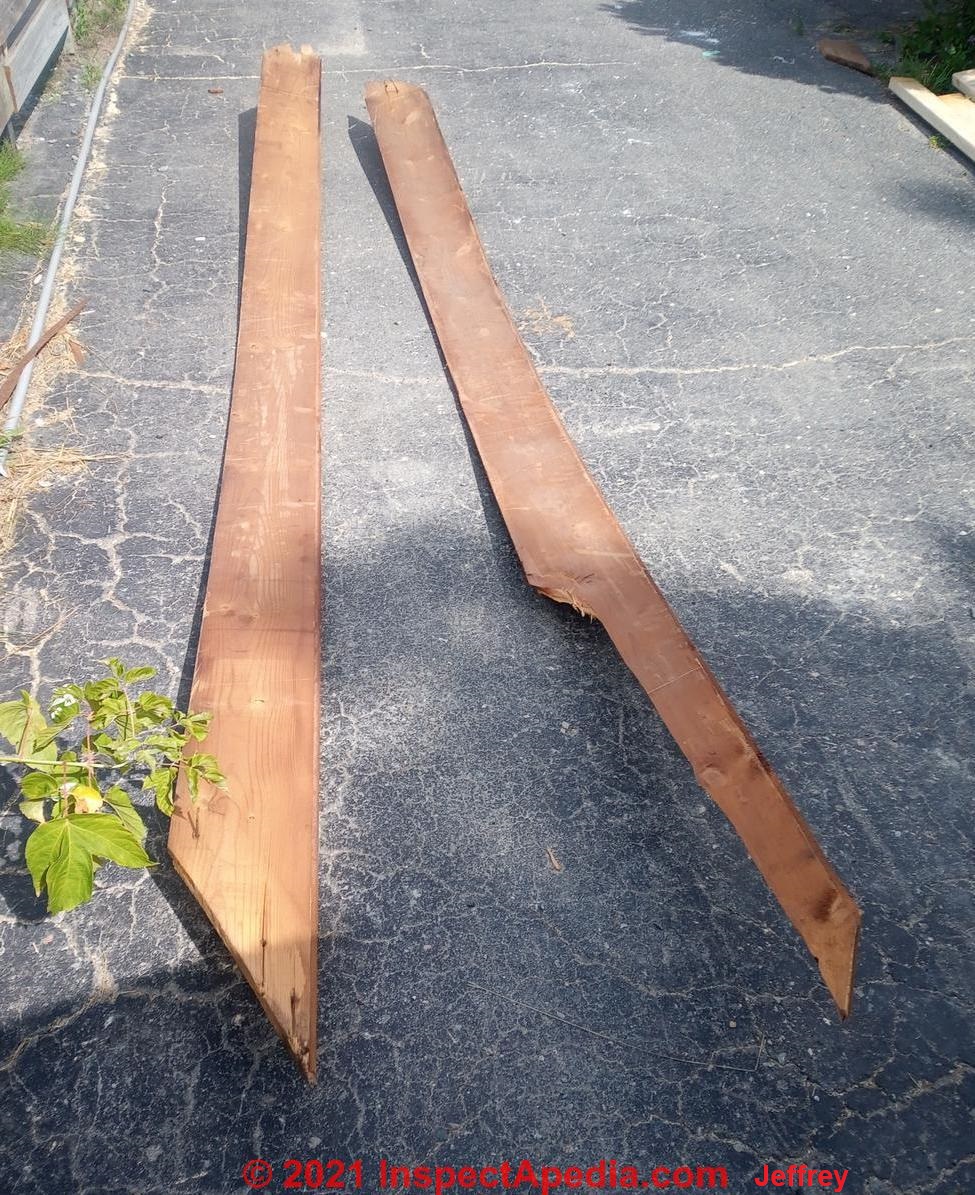
On 2021-07-31 by Jeffrey - photo of 80 year-old intermediate rafter ties
@inspectapedia.com.moderator, Here is a photo of the original intermediate rafter ties, they are over 80 years old and have definitely had their day.
Notice the extreme deflection! During the winter a small earthquake struck our city it wasn't much but given the lack of rigidity in the roof and with snow loaded the ties either blew out their nails and fell or cracked!
There is also one badly cracked rafter that will fully break next big snowfall, it is very clear to me if the state of the roof had been left once that rafter breaks adjacent rafters would be subject to the same fate with the high probability of a cascade failure.
 I certainly will once I can get some good lighting on it. I did three more today, some more tips I have from learning the process. Not every attic is the same but you should always equate the environment as hell - heat, dust and fiberglass fibers are abundant (didn't we already know?) however the extreme nature of the environment becomes much more apparent when longer term exposures happen.
Don't force yourself to stay just to finish set a time allotment and stick by it, yes you want to fix your roof but keep safe!
Don't over stress your spreader on very old rafters! They have sagged so long you won't get all of the sag out and trying to is going to cause you more problems than what you are trying to fix. I pushed the spreader about 3 - 5 inches depending on how bad the sag is past this point the turning difficulty of the nut increased dramatically and popping sounds can start to be heard.
This is definitely the time to stop spreading because you will likely notice natural cracks in the grain start opening slightly. I had a few splinter fragments snap open on the surface so over tightening past this point is definitely becoming dangerous keep within the limits of age!
The spreader is very powerful and could easily be turned to the point of causing structural failures!
One last tip, plan your work flow out beforehand take the extra time to think it out well to limit how long it takes working inside and if you don't feel up to the task don't do it, I already find in myself that bit of anxiety of having to go in because you know what you are going in to and how dreadful it is!
Weigh it against what your peace of mind is worth to your capabilities and if it is too much hire someone never put your safety at risk doing this.
On 2021-07-29 by inspectapedia.com.moderator (mod)
@Jeffrey,
Thank you so much for the helpful comment that updates the sagging roof repair material that we have above. This will help other readers too.
If you can provide high-resolution sharp photos of the spreader and its hardware and of other methods and materials in your roof jacking that would be a wonderful addition to this article.
You can attach one photo per comment, as many comments as you like, or you can find our email at the page top or bottom CONTACT link.
On 2021-07-29 by Jeffrey - improvements on the Aronstein sagging roof spreader / jack
I have taken on replacing the original intermediate rafter ties help support on the roof of my home. They are warped very badly from sagging stresses, cracked, and nails blown out when a shaking pressure on a cracked rafter tie was applied it was possible to shake the entire roof! It was safe to say there is a serious problem that has to be addressed immediately to restore rigidity of the roof structure.
The original rafter ties appear to be tongue and groove 3/4 x 8 inch roof planks spanning the mid level of the rafters. These are being replaced with 2x4x12 angle cut to fit at the top of the original ties and by building code here fastened near center vertically to a load bearing wall that runs the length of the house. I am also installing high collar ties and am using 3 1/2 inch structural screws.
I did the first one today and things went pretty well, there is a lot of set up work that needs to be done and a good system thought out so I think getting any more than the first one done when you starting from scratch is a good start. I put a lot of focus on the spreader since I don't like the design that was used it is dangerous and poorly supported and overall I didn't like the workflow steps with it.
Instead I used a 4x4x12 then cut one end to the angle of the rafters, on the other end I used a 4x4 post bracket and mounted a threaded rod with bolts washers and lock washers on either side of the post bracket. A one inch hole was first drilled to allow the bolt to sink in with the hole continued as 3/4 inch about 6 inches into the post. Next this bracket was placed onto the end of the post so that 6 inches of threaded rod and the nut were pressed in.
The bracket was then fastened on with it's factory holes with 2 inch screws. I could tell right away this was a very durable tool that was able to resist significant side pressures and would offer very little in the way of flex when used. The next part of this tool is just the ram tube that slides over the threaded rod which simply has a bolt that drives the ram tube forward creating spreading. It was very easy to tighten this nut thus operate the spreader which worked very well on the first try.
Some changes I would make to it would be to plate the other side in a similar manner but with a butt end that can wedge onto a jack plate. A jack plate is just a 12 inch 2x4 with a 6 inch 2x4 screwed into the center the ends are then screwed onto the underside of the rafter which gives a nice ridge to catch the spreader ram tube.
Only two deck screws were used to fasten the jack plate! It holds very firmly in place when under pressure and does not require drilling additional holes. I will post some pictures of it later.
I was amazed at how much just one brand new rafter tie made a difference at improving the overall rigidity the roof.
The first tie was put in between the back wall and center of the house as there was no support at all from the back wall to the center all of the ties were broken so I thought this would be a good place to start given my house was built in 1937 I am not looking to eliminate all of the sagging but to improve it within reasonable bounds of it's age.
On 2021-06-14 by (mod) - how do you make a sagging rafter spreader?
@David Clark,
Kesse used 2x4s, a simple cable winch, and the aluminum stiffener hardware and flat bent steel slider clamps to keep the 2x lumber sections together as shown in the photos above on this page;
Simple through-bolts connect each end of the slider to its rafter pair.
What he suggested afterwards was that he'd have used larger 2x lumber or even constructed the sliders in a T-shape to reduce that nervous-making bend that you see in some of the photos.
On 2021-06-14 by David Clark
Hi,
Thanks for the idea, how do you make a spreader?
On 2021-02-14 by (mod) - repairs to 16th century cottage. A vaulted thatch roof with cross ties
Gerard
You ask an interesting rafter-to-wall connection question that's for engineers, though I will have an opinion nevertheless.
Too many holes for too-many fasteners will weaken a connection and risk failure. We see this when someone drives 20 nails into a rafter-to-wall connection rather than 4 or 8 as specified (varying by lumber size).
So 1 or a few lag bolts of adequate strength or through-bolts if possible (thery're pretty strong when the forces are in shear) is better than many. - this is only a conceptual answer as we haven't a shred of detail about your specific case.
Also, if your vaulted thatch roof is failing by sagging and ceiling-level horizontal joist-ties are not feasible at the level of the wall top, two alternative solutions we often see are
- collar ties spaced at mid-span on rafters
- a structural ridge that carries more of the weight of the roof, supported at each end by posts from ridge to foundation.
On 2021-02-14 by gerard cavander Cambridge uk
Hi, good article on sagging roof. I've got a 16th century cottage. A vaulted thatch roof with cross ties but because the walls are about 3 ft higher than the first floor ceiling no use of joists as ties. So the roof is pushing out, one of the posts has broken.
Fun! It's clear I need to put in rafter ties as low as poss so it's helpful I'm only 5' .7"! My question is, is it better to fix the rafter tie to the existing rafters with a single big bolt OR multiple small bolts? I'm thinking that the rafter has to retain strength and not snap where the rafter tie joins it. One big bolt would seem less likely to compromise its strength than lots of little fellers.... Advice most welcome.
Question: what's the best way to shore up this roof structure?
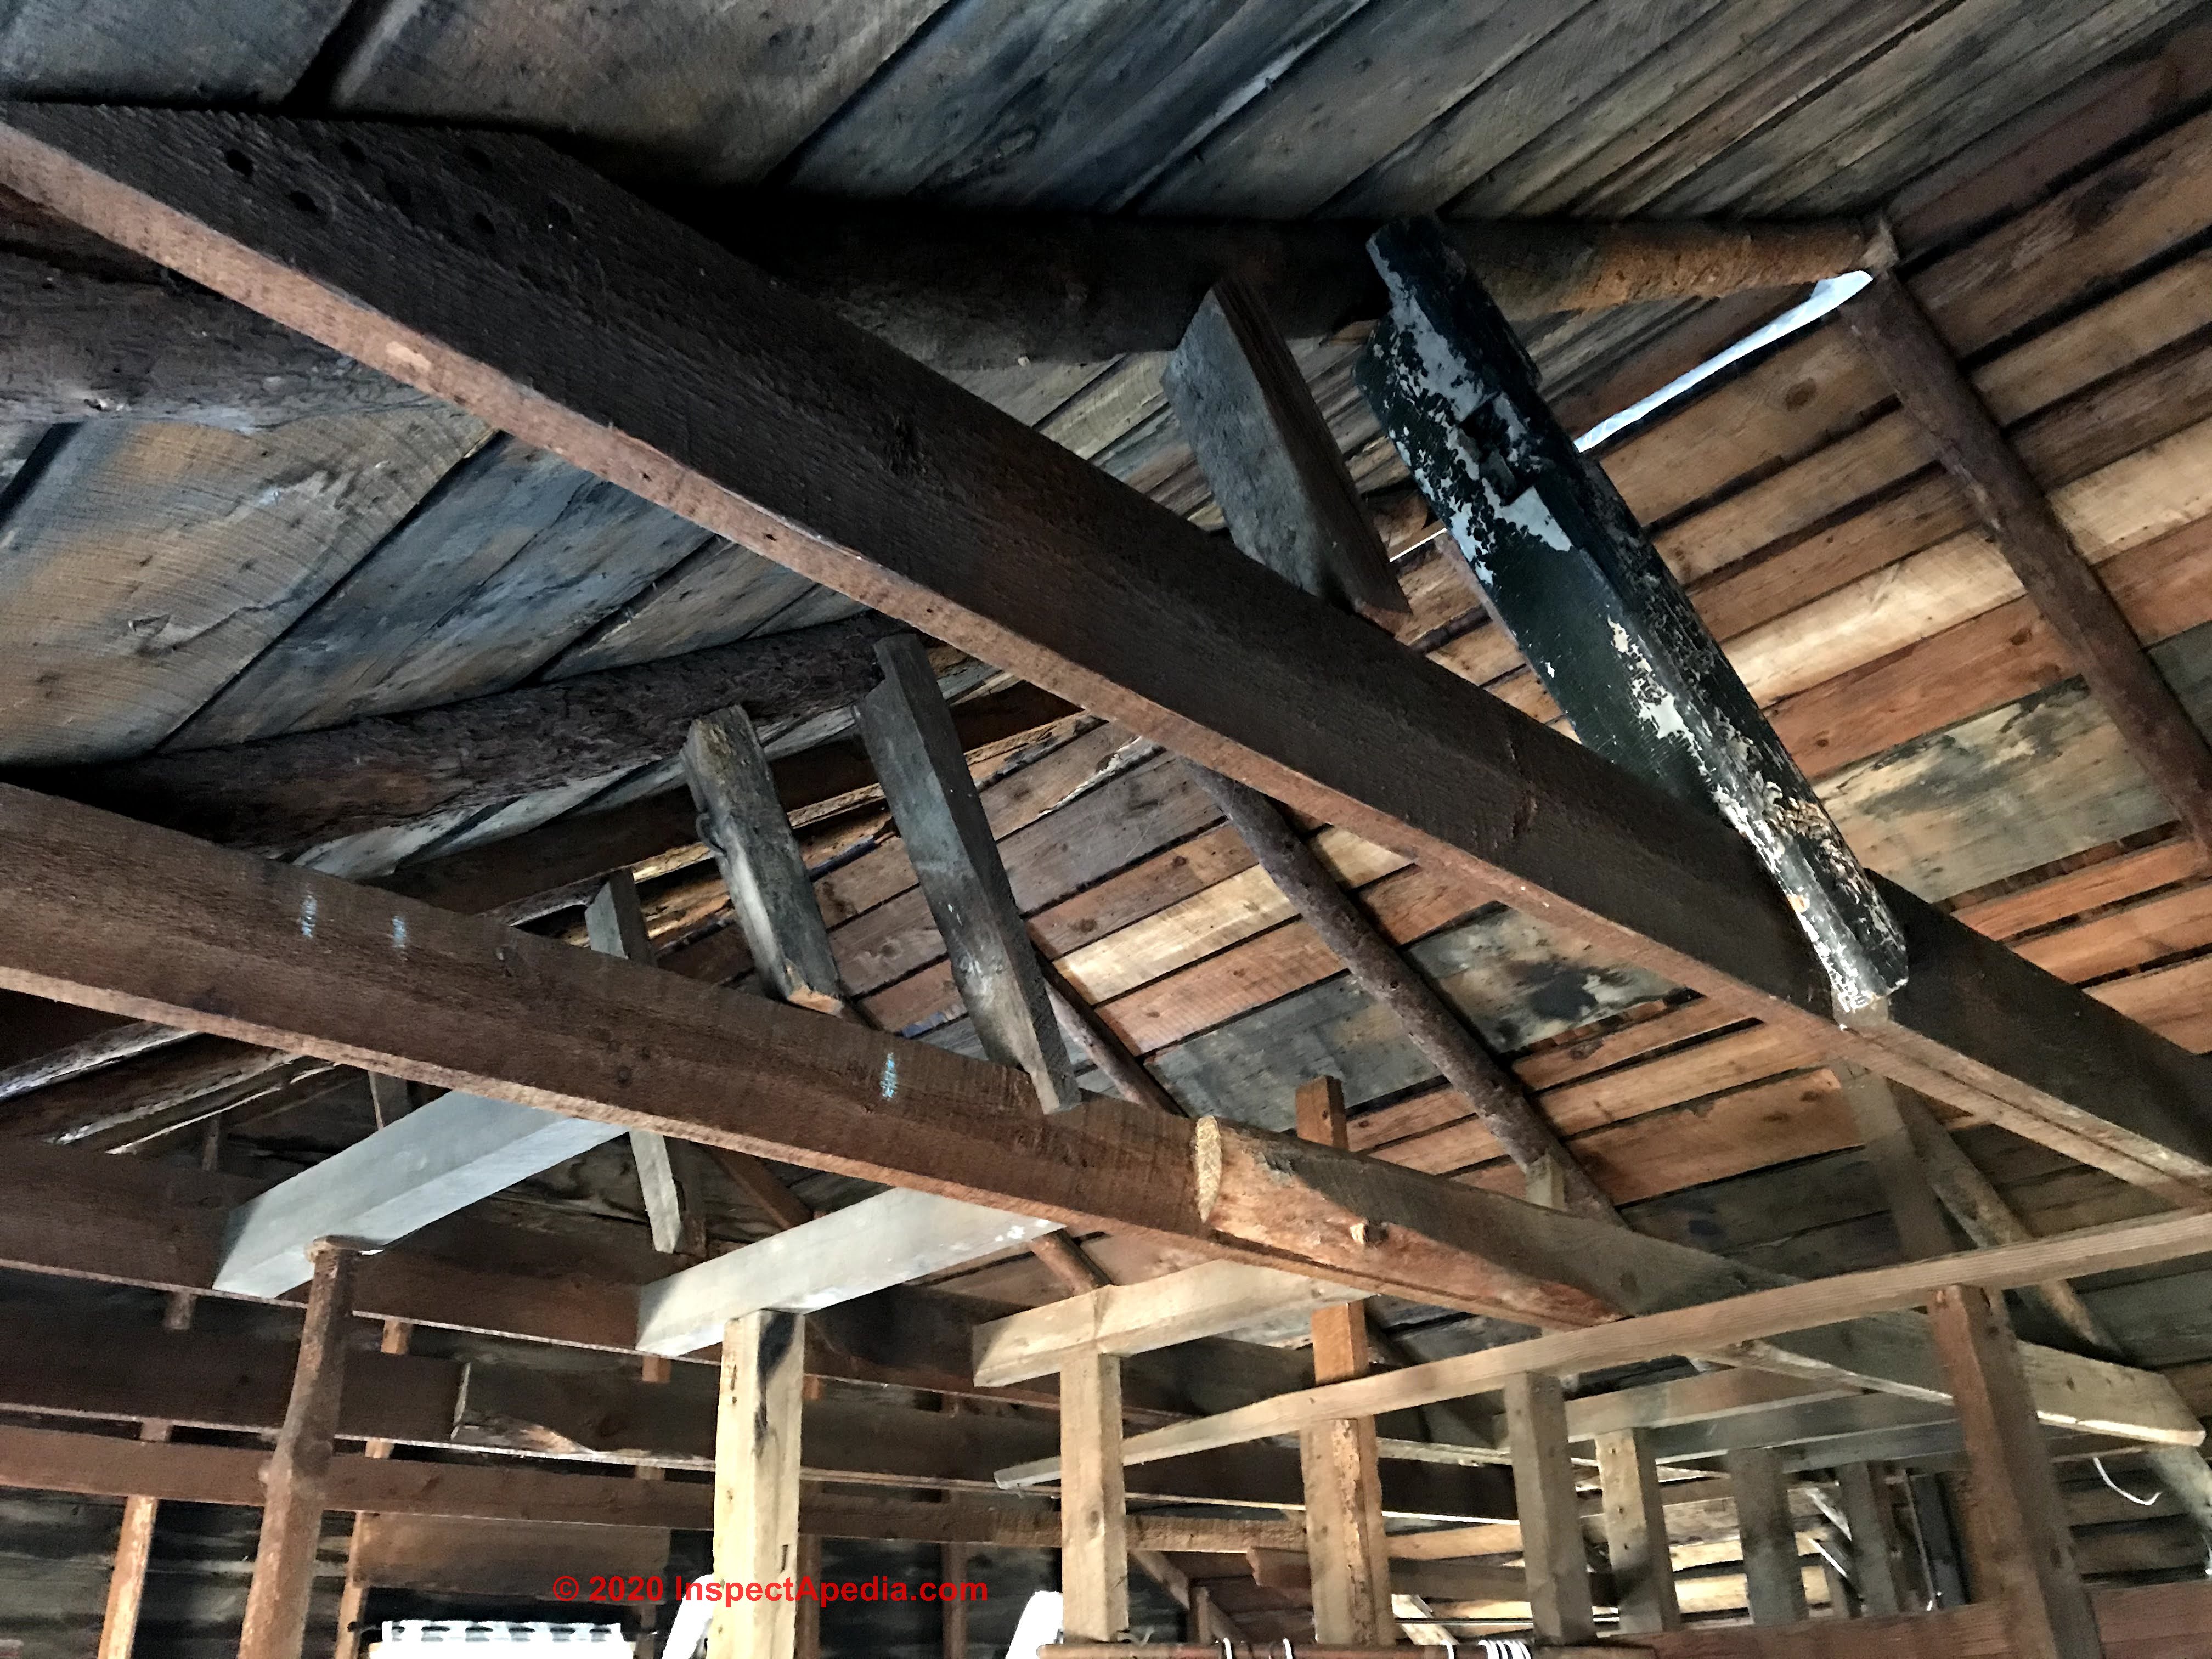 I own a 120 yr old cottage/cabin on Lake Huron.
I'm in the process of replacing the existing metal roof. Current cross section is metal roof atop cedar shakes, which is atop true 1" x 8 - 16" boards, which is atop 5-6" logs.
The new construction would remove the existing metal and cedar shakes, apply new plywood while levelling the roof line as best as it can be levelled, then apply new metal.
The current roof sags somewhat in the center and I'd like to shore up the logs that were placed to support the roof.
The sag is hard to estimate, but might approach 3-5" at the worst place.
My question amounts to what makes the most sense to improve the support for the logs.
The building cross section is 24 feet by 30 feet. Exterior wall to the peak of the roof is about 8-9 feet.
The existing design has logs that extend from the outside perimeter of the building to the peak of the roof. These logs are approximately 5-6" in diameter and are placed about every 2 1/2 - 3 feet apart. The logs are approx 20 feet long. The logs were trimmed at the connecting point to the wall from a round shape to the shape of a rectangle.
Cross members of true 2' x 6' dimension are connected to the logs approximately 3-4 feet above the end of the logs placed on the building perimeter. These cross members are approx 18-20 feet long.
Angled planks have been placed between the cross pieces and the logs - to support the logs from sagging under load.
I have attached a picture of the current build.
The angled planks that bridge the 2 x 6 cross piece to the 5-6" log that supports the roof is my focus.
A couple of options that I'm interested in hearing your feedback on...
1. Use a 4" PT post to replace the existing 2 x's planks that aren't particularly well installed.
Here the open question is how to connect the 4" PT post to the existing log and the existing 2 x 6 cross member
2. Simply replace the existing 2 x's planks with 2 x 6/8" PT planks. Again, connecting to the log and 2 x 6 cross piece (less so) is the open question.
My choice of PT lumber is to retain the current color of the existing logs, cross pieces etc. So that choice is aesthetic not structural.
My sense is that the current design would never pass current building codes and frankly to do so would very likely require a tear off and rebuild. I'm not prepared to do that since it's survived for 120 yrs and will likely continue to survive (if it fails, then I'd do the tear down).
So my goal is to shore it up to prepare for a new metal roof.
I welcome your thoughts and ideas. - Anonymous by private email 2020/10/21
Moderator reply: sorry I'm chicken
You've got over-spaced, over-spanned, unknown-condition, varying sized "log" rafters and home-made "sort-of" wood trusses of various materials, props, and jammed-in struts.
I'm not clear on which "planks" you want to replace or support in this structure.
And I see a veritable forest of supporting posts. So what we have to go-on is one photograph of a crazy-quilt that even I, old, and fearless with nothing to lose, can not see nor know enough about to bet your safety and money on an off-the-cuff repair prescription.
The real rub with a roof like the one in your photo is that not one single piece of the construction is sized nor spaced to current building materials and standards, so nobody can reliably guess at its strength and adequacy; I agree that most builders would ague that it'll be cheaper and faster to build the roof over again.
Or if one could not do that they'd try adding supporting rafters and bottom rafter ties, possibly with a center support beam sized so that you have a few but not dozens of supporting posts.
Such beams and posts need, of course, to carry the load all the way down to the foundation or to piers on earth.
Watch out: in cases like this if you hire a design professional, putting her on the spot with a design that promises to be "safe" against collapse, roof loads, etc., the engineer will feel no choice but to tremendously "over-build" a complete, self-supporting structure inside the existing one - pouring your money over the project to reduce risk.
COMPRESSION BRACING for RAFTERS (Canada) may also be of interest.
On 2020-10-18 - by (mod) -
Dan
We have not written out a detailed description of the spreader however if you step through and enlarge by clicking every one of the photos you will see every part as well as how they are connected together as well as how the spreader is connected to the rafters when it is to be put into use.
All of the hardware is available as off-the-shelf material. Winch, strapping, bolts, C-clamps, etc.
Please take a look and let me know what you think.
The owner did say about the spreader:
If I were to do the job again I would make it double sided and symmetrical so that it would be stiffer and the load would not be offset to cause it to bow.
On 2020-10-18 by Dan
Do you have instructions/part list on how to build that expander?
On 2020-08-22 by (mod)
Bryan:
No, the owner didn't need to add additional support. The home has since been sold.
Your alternative to spreading out a sagging roof by jacking might work but I worry that it simply pushes up the whole roof, breaking other structural connections;
On 2020-08-22 by Bryan
In case you're still answering questions, I have two.
1. The new ties appear to be longer than 8'. If so, have they been supported laterally subsequent to this write-up (or done and just not mentioned)?
2. Instead of the spreading tool, could you use a couple of support beams (4x4 or 6x6) and bottle jacks to raise each rafter in turn as you install the new rafter ties? Assuming of course that their was sufficient support for the force pushing down on the joists.
On 2020-08-12 - by (mod) -
We're glad to help, Helen.
On 2020-08-12 by Helen
Thanks for this article. It was very informative since we also have a problem with sagging roof, and this helped offer a solution that does not require rebuilding the rafters.
...
Continue reading at ROOF BENDING, SAGGING, COLLAPSE or select a topic from the closely-related articles below, or see the complete ARTICLE INDEX.
Or see these
Recommended Articles
- FRAMING DAMAGE, INSPECTION, REPAIR - home
- ROOF FRAMING TIES & BEAMS - home
- WOOD STRUCTURE ASSESSMENT
Suggested citation for this web page
SAGGING ROOF REPAIR at InspectApedia.com - online encyclopedia of building & environmental inspection, testing, diagnosis, repair, & problem prevention advice.
Or see this
INDEX to RELATED ARTICLES: ARTICLE INDEX to BUILDING STRUCTURES
Or use the SEARCH BOX found below to Ask a Question or Search InspectApedia
Ask a Question or Search InspectApedia
Try the search box just below, or if you prefer, post a question or comment in the Comments box below and we will respond promptly.
Search the InspectApedia website
Note: appearance of your Comment below may be delayed: if your comment contains an image, photograph, web link, or text that looks to the software as if it might be a web link, your posting will appear after it has been approved by a moderator. Apologies for the delay.
Only one image can be added per comment but you can post as many comments, and therefore images, as you like.
You will not receive a notification when a response to your question has been posted.
Please bookmark this page to make it easy for you to check back for our response.
Our Comment Box is provided by Countable Web Productions countable.ca
Citations & References
In addition to any citations in the article above, a full list is available on request.
- Paul DeBaggis is a building inspector and certified building code official with special interest in the history of and standards for wood products. (The American Wood Standards Committee). Mr. DeBaggis has served in the Easton MA. Building Department since 2002 , has worked as a building trades instructor, and also writes about land use regulations, building regulations, and standards. He is a past president of Southeastern Mass. Building Officials and is currently writing a book on the Massachusetts building code. Email: paul@jenick.net
- Huber, Gregory D. "Framing Techniques as Clues to Dating in Certain Pre-Revolutionary Dutch Barns: Major and Minor Rafter Systems, Lapped Dovetail Joinery, Verdiepinghs and Other Traits." Material Culture 29, no. 2 (1997): 1-41.
- Liu, Henry. "Calculation of wind speeds required to damage or destroy buildings." The Tornado: Its Structure, Dynamics, Prediction, and Hazards (1993): 535-541.
- Marshall, Timothy P. "Lessons learned from analyzing tornado damage." The tornado: Its structure, dynamics, prediction, and hazards (1993): 495-499.
- Mayo, A. P. "Trussed rafter roofs-Load distribution and lateral stability." Structural Survey 2, no. 1 (1984): 12-15.
- Palma, Pedro, Helena Garcia, João Ferreira, João Appleton, and Helena Cruz. "Behaviour and repair of carpentry connections–Rotational behaviour of the rafter and tie beam connection in timber roof structures." Journal of Cultural Heritage 13, no. 3 (2012): S64-S73.
- "The Mathematics of Rafter and Collar Ties", [Web article], Math Encounters Blog, (November 2010), retrieved 2016/04/15, original source: http://mathscinotes.com/2010/11
/the-mathematics-of-rafter-and-collar-ties/ posted by un-named web author using web name mathscinotes. - Shields, Lance David. "Investigation of Through-Tenon Keys on the Tensile Strength of Mortise and Tenon Joints." (2011), MS Thesis, Civil Engineering, Virginia Polytechnic Institute & State University, original source: https://theses.lib.vt.edu/theses/
available/etd-07112011-100606/unrestricted/Shields_LD_T_2011.pdf - Truesdell, Jordan, P.E., "Rafter Ties and Shallow-Pitch Roofs", Q&A, The Journal of Light Construction, (October 2008) posted as PDF at http://mathscinotes.com/wp-content/uploads/2010/11/JLC.pdf
- Utterback, David. "Common Engineering Problems in Frame Construction." Fine Homebuilding (2000): 110-115.
- "Evaluating OSB for Coastal Roofs," Paul Fisette, Coastal Contractor, Winter 2005, online at coastalcontractor.net/pdf/2005/0501/0501eval.pdf . Fisette cites: "Jose Mitrani, a civil engineer and professor at Florida. International University in Miami, was ... Florida’s official damage assessment team. ... After Hurricane Andrew, Florida code advisers ruled OSB sheathing inferior to plywood
- GluLam Structural Wood Products, U.S. GluLam Inc., 4245 W. 166th St., Oak Forest Il. 60452 - email: bevusg@aol.com, 708-535-6506
- I-Joists: "The Evolution of Engineered Wood I-Joists",
Paul Fisette,
Building Materials and Wood Technology
University of Massachusetts, Amherst, MA 01003, 2000 - see U. Mass online article at umass.edu/bmatwt/publications/articles/i_joist.html - Laminated Beams: Radial reinforcement of curved glue laminated wood beams with composite materials", Kasal, Bo and Heiduschke, Andreas, Forest Products Journal, 1 Jan 2004
- OSB: "Evaluating OSB for Coastal Roofs," Paul Fisette, Coastal Contractor, Winter 2005, online at coastalcontractor.net/pdf/2005/0501/0501eval.pdf . Fisette cites: "Jose Mitrani, a civil engineer and professor at Florida. International University in Miami, was ... Florida’s official damage assessment team. ... After Hurricane Andrew, Florida code advisers ruled OSB sheathing inferior to plywood."
- OSB: Timberco TECO is located at 2902 Terra Court,
Sun Praire, WI 53590 USA, 608-837-2790. TECO provides a reference library of .PDF files that can be downloaded by consumers, homeowners, builders, and architects. The association refers to industry standards for oriented strand board OSB products as:
- "DOC PS 2, Performance Standard for Wood-Based Structural-Use Panels. Certified to CSA 0325, Construction Sheathing, or CSA 0437, OSB and Waferboard, OSB is accepted in the National Building Code of Canada, certified to EN 300, Oriented Strand Boards and recognized for structural use in Europe and certified to meet the JAS standard for structural panels in Japan."
- OSB: "Performance of Wood Shear Walls Sheathed with FRP-Reinforced OSB Panels", J. Struct. Engrg. Volume 132, Issue 1, pp. 153-163, Jan. 2006 provides a study on the development and structural testing of a hybrid sheathing panel designed to improve the lateral resistance of light wood-frame shear walls. "FRP" refers to fiber reinforced polymer material that was sandwiched between more conventional exterior OSB layers.
- Building Failures, Diagnosis & Avoidance, 2d Ed., W.H. Ransom, E.& F. Spon, New York, 1987 ISBN 0-419-14270-3
- Building Pathology, Deterioration, Diagnostics, and Intervention, Samuel Y. Harris, P.E., AIA, Esq., ISBN 0-471-33172-4, John Wiley & Sons, 2001 [General building science-DF] ISBN-10: 0471331724 ISBN-13: 978-0471331728
- Building Pathology: Principles and Practice, David Watt, Wiley-Blackwell; 2 edition (March 7, 2008) ISBN-10: 1405161035 ISBN-13: 978-1405161039
- Design of Wood Structures - ASD, Donald E. Breyer, Kenneth Fridley, Kelly Cobeen, David Pollock, McGraw Hill, 2003, ISBN-10: 0071379320, ISBN-13: 978-0071379328
This book is an update of a long-established text dating from at least 1988 (DJF) - Diagnosing & Repairing House Structure Problems, Edgar O. Seaquist, McGraw Hill, 1980 ISBN 0-07-056013-7 (obsolete, incomplete, missing most diagnosis steps, but very good reading; out of print but used copies are available at Amazon.com, and reprints are available from some inspection tool suppliers). Ed Seaquist was among the first speakers invited to a series of educational conferences organized by D Friedman for ASHI, the American Society of Home Inspectors, where the topic of inspecting the in-service condition of building structures was first addressed.
- Domestic Building Surveys, Andrew R. Williams, Kindle book, Amazon.com ISBN-10: 0471788368 ISBN-13: 978-0471788362
- In addition to citations & references found in this article, see the research citations given at the end of the related articles found at our suggested
CONTINUE READING or RECOMMENDED ARTICLES.
- Carson, Dunlop & Associates Ltd., 120 Carlton Street Suite 407, Toronto ON M5A 4K2. Tel: (416) 964-9415 1-800-268-7070 Email: info@carsondunlop.com. Alan Carson is a past president of ASHI, the American Society of Home Inspectors.
Thanks to Alan Carson and Bob Dunlop, for permission for InspectAPedia to use text excerpts from The HOME REFERENCE BOOK - the Encyclopedia of Homes and to use illustrations from The ILLUSTRATED HOME .
Carson Dunlop Associates provides extensive home inspection education and report writing material. In gratitude we provide links to tsome Carson Dunlop Associates products and services.
 | HOME | ABOUT | ASK a QUESTION | CONTACT | CONTENT USE POLICY | DESCRIPTION | POLICIES | PRIVACY | |
| © 2024 - 1985 Publisher InspectApedia.com - Daniel Friedman | |||||||||