
InspectAPedia® FREE Encyclopedia of Building & Environmental Construction, Diagnosis, Maintenance & Repair |
Question? Just ask us! InspectAPedia
|
 Wood Shingle or Shake Roof Inspection Checklist
- POST a QUESTION or COMMENT about how to inspect wood roofs: wood shingles or wood shakes
Wood shingle or shake roof checklist:
Here we outline key inspection points for wood or cedar shake roofs, addressing shingle type, felt underlayment, shingle exposures, wood shingle keyways or gaps, wood shingle joints, and proper wood roofing shingle fasteners, installation details and good practices.
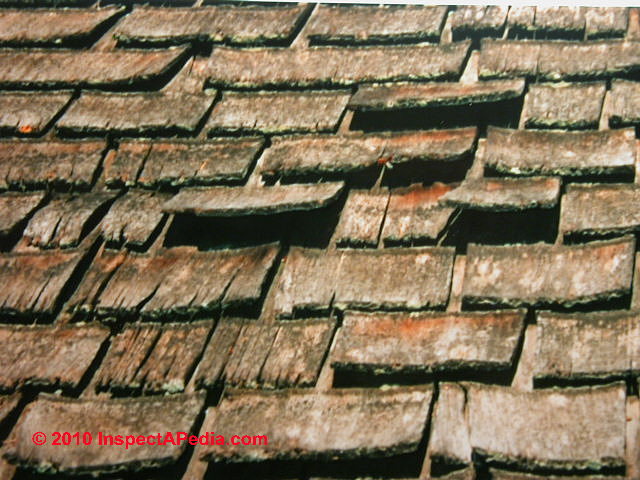
Our page top photo shows a worn-out wood shingle roof.
InspectAPedia tolerates no conflicts of interest. We have no relationship with advertisers, products, or services discussed at this website.
Wood Roof Inspection Checklist
 The wood shingle roof inspection details outlined below are paraphrased from information provided by the Cedar Shake & Shingle Bureau, the recognized wood roofing authority since 1915 and from information provided by Carson Dunlop Associates a Toronto company offering home inspections, home inspection publications, and home inspection education.
[Click to enlarge any image]
- Wood Roof Leaks:
Inspect inside the building for evidence of roof leaks, accessing the attic or under-roof space if it is readily accessible, and if not, inspect for indirect evidence of roof leaks such as leak stains on ceilings or at the ceiling/wall juncture of the building's highest floors.
Common leak points on most roofs include at roof penetrations such as chimneys and plumbing vents and in northern climates, at the roof eaves where ice dam build-up may be a leak source.
Remember to look closely for leaks below roof valleys and at roof-wall abutments where a lower roof slope abuts a higher building section sidewall.
- Visible damage to wood shingles or shakes
to roof shingles or shakes, flashing, or other on roof components: inspect from outside for these conditions.
See WOOD ROOF WEAR / INSTALLATION DEFECTS for details.
Also include noting the presence of encumbrances such as moss on a wood roof [photo] because that material holds moisture and thus can accelerate wood roof wear
See WOOD ROOF MOSS & LICHENS for details. - Shingle or shake exposures
for wood roofs: the maximum weather exposure for wood shakes or wood shingles depends on the shingle size and the slope or pitch of the roof.
Allowable shingle exposure may also vary by the shingle grade - something that you might infer by visual inspection of the shingles, matching against wood shingle grade definitions, or if a shingle identification label can be located.
![moss on a wood roof [photo]](Mossy_Wood_Shingles634-DFs.jpg)
| Roof Slope or Pitch | |||||||||
| 16" | 18" | 24" | 16" | 18" | 24" | 16" | 18" | 24" | |
| 3/12 - 4/12 | 3 3/4" | 4 1/4" | 5 3/4" | 3 1/2" | 4" | 5 1/2" | 3" | 3 1/2" | 5" |
| 4/12 & steeper | 5" | 5 1/2" | 7 1/2" | 4" | 4 1/2" | 6 1/2" | 3 1/2" | 4" | 5 1/2" |
...
| Roof Slope or Pitch | Maximum Wood Shake Exposure on Roofs | |
| 18" | 24" | |
| 4/12 & steeper roofs | 7 1/2" | 10" (Note) |
Notes to the table above
- Note: 24" x 3/8" hand split wood shakes are limited to 7 1/2" weather exposure, or 5" exposure where the Uniform Building Code is in application.
-
Wood shingle or shake keyways or gaps:
the gap or space between adjacent wood shingles should be between 1/4" and 3/8" in width.
For wood shakes the keyway should be 3/8" to 5/8" in width.
The Shingle Bureau points out that the gap observed between shingles or shakes on a wood roof will vary depending on ambient moisture conditions as moist wood shingles or shakes swell (which is why we need a gap, to avoid buckling and splitting).
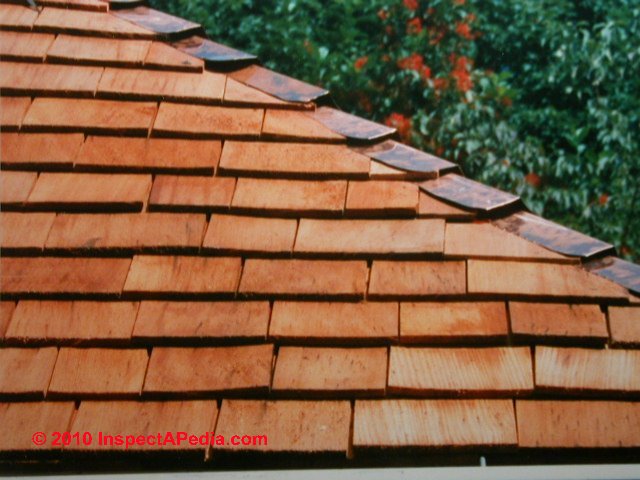
Wood shingle keyways or gaps are illustrated at the top of this page. - Wood shingle/shake joints & gap alignment:
the gaps or keyways described just above for any pair of abutting wood shingles or shakes should have a side-lap offset of no less than 1 1/2" from the joints or keyways in adjacent shingle courses (horizontal rows of shingles across the roof), and in any three shingle courses no two joints should be in direct alignment (gaps should not be over gaps in any three shingle courses). - Shingle type and grade identification:
every bundle of wood shingles or wood shakes sold and delivered is required to include an identifying label, secured under the band that holds the bundle of shingles together.
The label identifies the shingle manufacturer, a reference to model building code approval, the type of wood shingle product, and the grade of the shingle, the approving wood shingle grading agency, and the wood shingle (or shake) product's dimensions.
At an older wood-roofed structure these labels may have long been thrown away, but if you are inspecting a new wood roof installation the labels should be available either on un-used shingle bundles or on occasion we've found the identifying label in piles of roof installation debris.
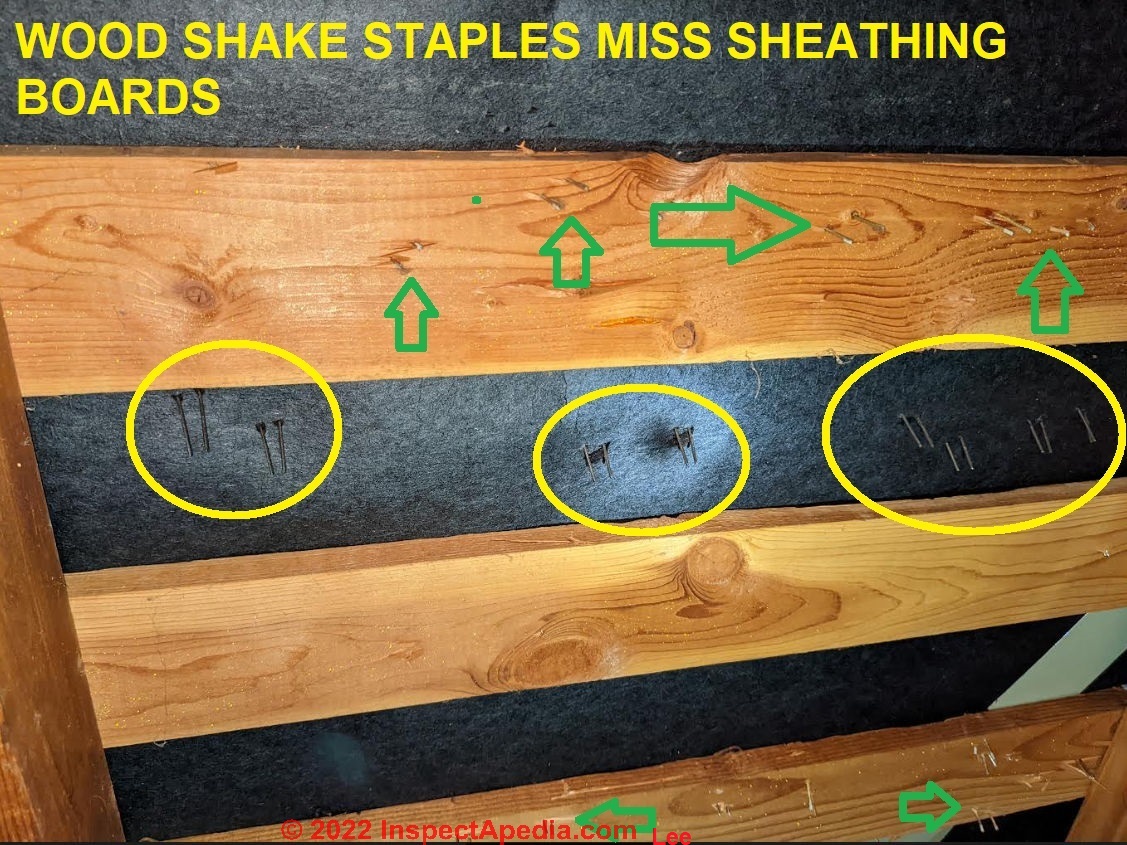
The staples that missed the skip sheathing on this roof might be trouble, and are discussed
at WOOD ROOF INSTALLATION SPECS
- Wood shingle / shake fasteners:
should be corrosion-resistant, hot-dipped zinc-coated ("galvanized") or aluminum or stainless steel nails (or staples as allowed in some jurisdictions) and should conform to ASTM A641.
When stapling wood shingles use two staples or nails per shingle. Staples are 14-1/2 gauge (16-gauge minimum) or equivalent cross sectional area) of minimum length 1 1/4", longer is OK.
(When nailing wood shingles on to sidewalls use 3 nails in shingles that are over 8" wide or in double-course sidewalls, space nails 4" on center.)
Do not use blued steel or copper nails on wood roofs. Nails should be driven flush with the shingle or shake top, but not driven into (and crushing) the shingle or shake.
Wood roof nails should be 3/4" (or 1" per UBC) from the shingle side edge and 1 1/2" (or 2" per UBC) above the butt line of the following shingle course (row). When inspecting an existing wood roof completely installed, do not pry up shingles to inspect the nails as you are likely to cause damage.
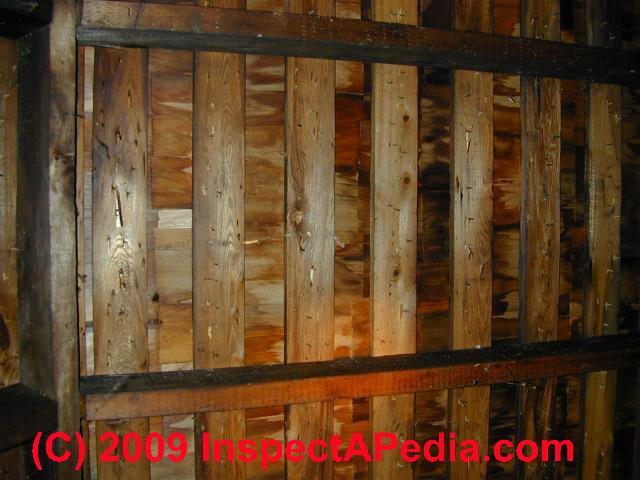
But the nailing pattern may be visible from inside of an un-finished attic, depending on the thickness and type of roof decking. More details about wood roof nails and nailing or stapling patterns are provided
at WOOD ROOF INSTALLATION SPECS. - Wood Shake Roof Felt Underlayment:
on wood shake roofs, a 15# felt underlayment is recommended, using an 18" wide strip of roofing felt.
(The Uniform Building Code specifies use of 30# felt.)
The felt is placed over the top portion of the shake course at a distance above the butt equal to twice the weather exposed amount of the shake.

Carson Dunlop Associates' sketch above shows the typical cedar shake application pattern and spacing.
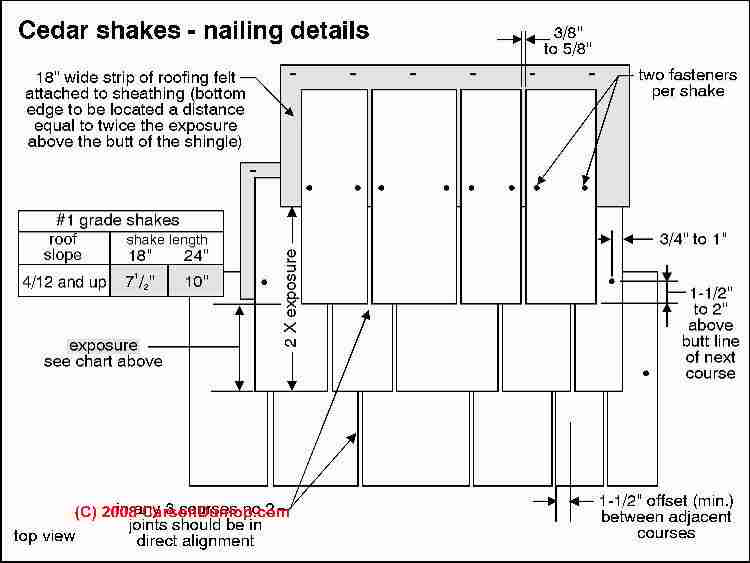
Above Carson Dunlop Associates' sketch shows typical cedar shake nailing details & pattern and exposures. Notice that for this example cedar shake roof a felt interlay is installed between every course of shakes.
...
Continue reading at WOOD ROOF WEAR / INSTALLATION DEFECTS or select a topic from the closely-related articles below, or see the complete ARTICLE INDEX.
Or see these
Recommended Articles
- SIDING WOOD SHINGLE INSTALLATION
- WOOD SHAKE & SHINGLE ROOFING - home
- WOOD ROOF COATINGS & FIRE RATINGS
- WOOD ROOF FLASHING DETAILS
- WOOD ROOF HIP & RIDGE DETAILS
- WOOD ROOF INSPECTION GUIDE
- WOOD ROOF INSTALLATION SPECS
- WOOD ROOF LIFE EXPECTANCY
- WOOD ROOF MAINTENANCE
- WOOD ROOF MOSS & LICHENS
- WOOD ROOF SHAKES INSTALLATION
- WOOD ROOF SHEATHING, UNDERLAYMENT
- WOOD ROOF SHINGLE PROPERTIES
- WOOD ROOF WEAR / INSTALLATION DEFECTS
- WOOD SHINGLES, RE-ROOFING WITH
Suggested citation for this web page
WOOD ROOF INSPECTION GUIDE at InspectApedia.com - online encyclopedia of building & environmental inspection, testing, diagnosis, repair, & problem prevention advice.
Or see this
INDEX to RELATED ARTICLES: ARTICLE INDEX to BUILDING ROOFING
Or use the SEARCH BOX found below to Ask a Question or Search InspectApedia
Ask a Question or Search InspectApedia
Questions & answers or comments about how to inspect wood roofs: wood shingles or wood shakes.
Try the search box just below, or if you prefer, post a question or comment in the Comments box below and we will respond promptly.
Search the InspectApedia website
Note: appearance of your Comment below may be delayed: if your comment contains an image, photograph, web link, or text that looks to the software as if it might be a web link, your posting will appear after it has been approved by a moderator. Apologies for the delay.
Only one image can be added per comment but you can post as many comments, and therefore images, as you like.
You will not receive a notification when a response to your question has been posted.
Please bookmark this page to make it easy for you to check back for our response.
Our Comment Box is provided by Countable Web Productions countable.ca
Citations & References
In addition to any citations in the article above, a full list is available on request.
- Mark Cramer Inspection Services Mark Cramer, Tampa Florida, Mr. Cramer is a past president of ASHI, the American Society of Home Inspectors and is a Florida home inspector and home inspection educator. Mr. Cramer serves on the ASHI Home Inspection Standards. Contact Mark Cramer at: 727-595-4211 mark@BestTampaInspector.com
- John Cranor [Website: /www.house-whisperer.com ] is an ASHI member and a home inspector (The House Whisperer) is located in Glen Allen, VA 23060. He is also a contributor to InspectApedia.com in several technical areas such as plumbing and appliances (dryer vents). Contact Mr. Cranor at 804-873-8534 or by Email: johncranor@verizon.net
- "Choosing Roofing," Jefferson Kolle, January 1995, No. 92, Fine Homebuilding, Taunton Press, 63 S. Main St., PO Box 5506, Newton CT 06470 - 800-888-8286 - see http://www.taunton.com/FineHomebuilding/ for the magazine's website and for subscription information.
- Building Pathology, Deterioration, Diagnostics, and Intervention, Samuel Y. Harris, P.E., AIA, Esq., ISBN 0-471-33172-4, John Wiley & Sons, 2001 [General building science-DF] ISBN-10: 0471331724 ISBN-13: 978-0471331728
- Building Pathology: Principles and Practice, David Watt, Wiley-Blackwell; 2 edition (March 7, 2008) ISBN-10: 1405161035 ISBN-13: 978-1405161039
- Historic Preservation Technology: A Primer, Robert A. Young, Wiley (March 21, 2008) ISBN-10: 0471788368 ISBN-13: 978-0471788362
- Problems in Roofing Design, B. Harrison McCampbell, Butterworth Heineman, 1991 ISBN 0-7506-9162-X (available used)
- Cedar Shake & Shingle Bureau, CSSB, U.S.: Sumas, WA 98295-1178, Tel: 604-820-7700, In Canada:
Cedar Shake and Shingle Bureau #2 - 7101 Horne Street, Mission, BC V2V 7A2 Tel: (604) 820-7700, E-mail: info@cedarbureau.com , website: http://www.cedarbureau.org/
CCSB offers wood shingle installation instructions in the form of a manual - cedarbureau.org/installation/wall_manual/introduction.htm - "Treatment of Cedar Shakes and Shingles," David Flickinger, RRO, p. 74, Professional Roofing, NRCA, October 1999, Rosemont IL.
- Our recommended books about building & mechanical systems design, inspection, problem diagnosis, and repair, and about indoor environment and IAQ testing, diagnosis, and cleanup are at the InspectAPedia Bookstore. Also see our Book Reviews - InspectAPedia.
- Best Practices Guide to Residential Construction, by Steven Bliss. John Wiley & Sons, 2006. ISBN-10: 0471648361, ISBN-13: 978-0471648369, Hardcover: 320 pages, available from Amazon.com and also Wiley.com. See our book review of this publication.
- Decks and Porches, the JLC Guide to, Best Practices for Outdoor Spaces, Steve Bliss (Editor), The Journal of Light Construction, Williston VT, 2010 ISBN 10: 1-928580-42-4, ISBN 13: 978-1-928580-42-3, available from Amazon.com
- The Journal of Light Construction has generously given reprint permission to InspectAPedia.com for this article. All rights and contents are ©Journal of Light Construction and may not be reproduced in any form.
- Building Pathology, Deterioration, Diagnostics, and Intervention, Samuel Y. Harris, P.E., AIA, Esq., ISBN 0-471-33172-4, John Wiley & Sons, 2001 [General building science-DF] ISBN-10: 0471331724 ISBN-13: 978-0471331728
- Building Pathology: Principles and Practice, David Watt, Wiley-Blackwell; 2 edition (March 7, 2008) ISBN-10: 1405161035 ISBN-13: 978-1405161039
- Historic Preservation Technology: A Primer, Robert A. Young, Wiley (March 21, 2008) ISBN-10: 0471788368 ISBN-13: 978-0471788362
- Patio Roofs, how to build, Sunset Books
- Problems in Roofing Design, B. Harrison McCampbell, Butterworth Heineman, 1991 ISBN 0-7506-9162-X (available used)
- Roofing The Right Way, Steven Bolt, McGraw-Hill Professional; 3rd Ed (1996), ISBN-10: 0070066507, ISBN-13: 978-0070066502
- Wood Shingle Roofs, Care and Maintenance of wood shingle and shake roofs, (EC), Stanley S. Niemiec (out of print)
- In addition to citations & references found in this article, see the research citations given at the end of the related articles found at our suggested
CONTINUE READING or RECOMMENDED ARTICLES.
- Carson, Dunlop & Associates Ltd., 120 Carlton Street Suite 407, Toronto ON M5A 4K2. Tel: (416) 964-9415 1-800-268-7070 Email: info@carsondunlop.com. Alan Carson is a past president of ASHI, the American Society of Home Inspectors.
Thanks to Alan Carson and Bob Dunlop, for permission for InspectAPedia to use text excerpts from The HOME REFERENCE BOOK - the Encyclopedia of Homes and to use illustrations from The ILLUSTRATED HOME .
Carson Dunlop Associates provides extensive home inspection education and report writing material. In gratitude we provide links to tsome Carson Dunlop Associates products and services.
 | HOME | ABOUT | ASK a QUESTION | CONTACT | CONTENT USE POLICY | DESCRIPTION | POLICIES | PRIVACY | |
| © 2024 - 1985 Publisher InspectApedia.com - Daniel Friedman | |||||||||