
InspectAPedia® FREE Encyclopedia of Building & Environmental Construction, Diagnosis, Maintenance & Repair |
Question? Just ask us! InspectAPedia
|
 Ridge & Hip Cap Shingles
Installation instructions, specs, inspection, defects

- POST a QUESTION or COMMENT about early or premature roof shingle leaks, wear, or failures
Ridge & hip roof cap shingles:
This article describes the installation of ridge and hip cap shingles and discusses the probable causes of early failures on ridge and hip shingles on asphalt shingle roofs when they fail in advance of other roof areas.
The most common failure at the ridge or hip covering of most roofs, regardless of roofing material, is wind damage and blow-offs due to inadequate nailing. But on occasion, such as in our photo above, we see remarkable wear in the form of granule loss, cupping, or curling at the ridge that has not appeared elsewhere on the roof. Here we discuss why this wear happens and what to do about it.
This roof failure diagnosis article series investigates types and causes of premature or early roof wear or failures. We describe shingle granule loss shingle curling as a sign of wear on asphalt shingle roofs and discusses how to identify & explain the most-common asphalt roof shingle failures. Our page top photo shows shingle edge down-curling. Other photos on this page show shingle corner curling.
InspectAPedia tolerates no conflicts of interest. We have no relationship with advertisers, products, or services discussed at this website.
Hip & Ridge Cap Shingles: Installation, Failure Causes, Diagnosis, Repair

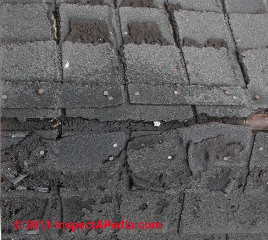
Our page top photograph shows ridge cap shingles that have worn out and actually lost shingle portions that have washed off of the roof.
While this is an old, worn-out roof (on an entry to the Kingston NY library), it may be meaningful that at end of life the ridge cap shingles failed in the pattern seen there: bending stress over the ridge may have ultimately stressed the ridge cap shingles so that they broke at the ridge apex.
[Click to enlarge any image]
At left is a different and interesting ridge cap shingle failure that needed some thoughtful analysis.
Article Contents
- RIDGE & HIP SHINGLE SPECIFICATIONS
- RIDGE & HIP SHINGLE INSTALLATION
- RIDGE & HIP SHINGLE NAILING DETAILS
- RIDGE & HIP SHINGLE CRACK FAILURES
- RIDGE & HIP SHINGLE NAILING DEFECTS
- RIDGE & HIP SHINGLE WIND DAMAGE
Standard Ridge & Hip Cap Shingle Dimensions
The best option for shingling the ridge or hip is to use pre-cut ridge cap shingles provided by the same manufacturer, and in the same color and pattern as the shingles used on the main roof areas.
Pre-cut ridge cap shingles vary in length and width, but the typical size are:
- Length: 12 - 13"
- Width: 9 3/4" - 13 1/8"
- Exposure; 5 5/8" to 9 1/4" "
At a lower-slope or wider ridge roof, the wider ridge cap shingles will be more-suitable.
Ridge / Hip Cap Shingle Exposure Guide
Read the instructions for the specific shingle product you are installing, noting the details specified for the ridge covering .
For example, the instructions for Elk Prestique Raised Profile shingles (cited in detail in that article) give two different ridge cap products, with different dimensions and exposures:
- Elk Z-Ridge 13 1/4" x 9 21/32" ridge cap / hip shingles are to be installed with a 5 5/8" exposure; 3 bundles cover 100 linear feet of ridge-line
- Elk Vented RidgeCrest 13" x 13 1/4" ridge cap / hip shingles are installed with a 9 1/4" exposure; again, 3 bundles will cover 100 linear feet of ridge or hip-line.
Field Cut Hip or Ridge Cap Shingles
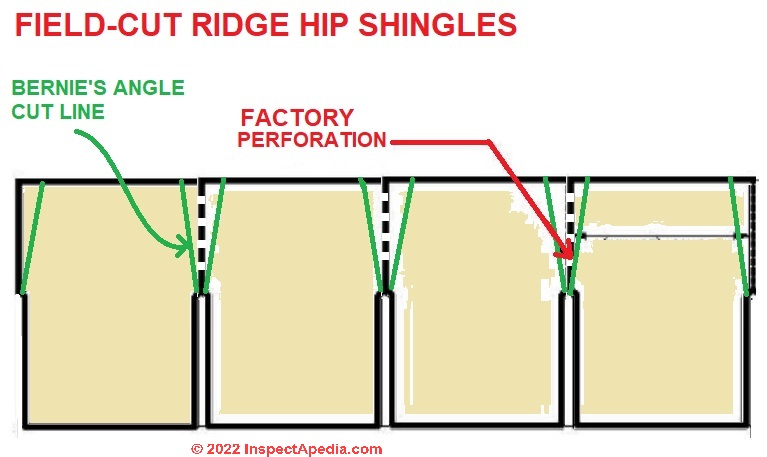 Asphalt shingle roof installers may fabricate ridge or hip cap shingles, usually by cutting roof up standard roof shingles on the jobsite. In fact that's what we [DF] did installing shingles in the 1970''s and 1980's. And this is still standard practice for some asphalt shingle products such as GAF Royal Sovereign Ridge Cap Shingles.
Our illustration, using 4-tab Z RIDGE CAP SSHINGLES as an example, shows the factory-perforated lines in some shingle products that guide cutting to fabricate ridge or hip shingles.
These shingles will yield a ridge cap single that's about 9 7/8" wide x 13" long.
The green lines illustrate what my teacher, Bernie Campbalik, taught us: a slight angle on the cut is a bit more work but avoids showing the dormers of the head shingles along the ridge.
From the ICC report given at the end of this page :
Royal Sovereign Ridge Cap Shingles: these ridge cap shingles are field-cut fro Royal Sovereign three-tab strip shingles. The field-cut ridge cap shingles are compatible with any of the GAF shingles recognized in this report. (GAF ICC 2020)
You can see that if you simply cut a straight line along the perforation between tabs, the head-portion of the shingle will be a bit wider than the exposed-tab portion.
A typical 3-tab asphalt shingle such as the now-discontinued GAF Timbertex Premium shingles, cut into ridge caps, will yield a ridge cap that is about 12" wide at the head (11 1/2" wide at the tab-end) and about 12" long.
That's why we cut on the green lines shown in the illustration.
We simply cut 3-tab shingles into three pieces, tapering the shingle head so that its corners wouldn't be exposed under the succeeding shingle. The ridge or hip shingle exposure was about the same as on the main roof, around 5".
What about cutting just the tabs off of 3-tab shingles to use at the ridge or hip?
Bad idea. Too small.
Simply cutting the tabs off of 3-tab singles to use at the ridge or hip, allowing for the requirement for each successive shingle to cover the nails of its predecessor, gives only a small exposure and is tedious.
Making hip or cap shingles out of the solid upper portion of asphalt shingles was a common practice, also labor intensive, also a bad idea, leaving exposed to the weather shingle material that was not intended for that purpose.
Ridge Cap Shingle Installation Details from Certainteed™
 You will read our own concluding opinion and reasoning about the cap shingle failure photo [above] at the end of the following comments and ridge cap shingle installation details provided courtesy of Certainteed.
Indeed, Certainteed warns in the installation instructions for these shingles:
CAUTION: To prevent cracking, shingles must be warm enough to allow proper forming for hips, ridges and valleys.
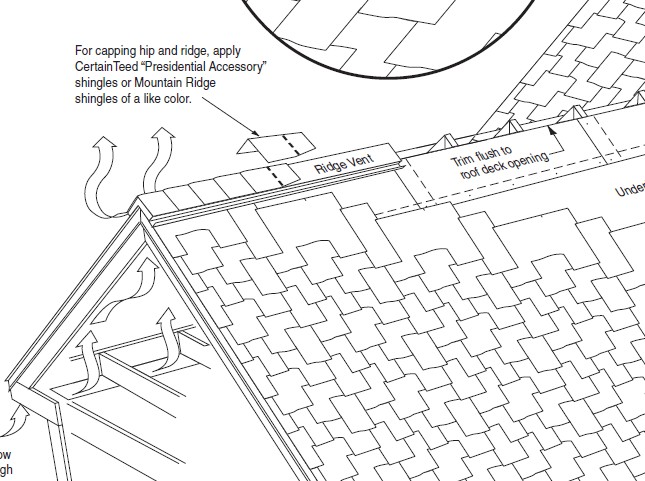
and the company also illustrates how ridge cap shingles should be installed (illustration shown at left, click to enlarge) and recommends:
For capping hip and ridge, apply CertainTeed “Presidential Accessory” shingles or Mountain Ridge shingles of a like color.
Cedar Crest or Mountain Ridge accessory shingles can be used for covering hips and ridges. Apply shingles up to the ridge.
Fasten each accessory with two fasteners. The fasteners must be 13⁄4" long or longer, so they penetrate either 3⁄4" into the deck or completely through the deck.
Use Mountain Ridge accessory shingles to cover hips, ridges or
rake edges. One box will cover 20 linear feet. To prevent damage to
shingles during application, they must be sufficiently warm to allow
proper forming.
FASTENING - IMPORTANT: Use two nails to fasten each shingle. Nails must be minimum 13⁄4" (45 mm) long.
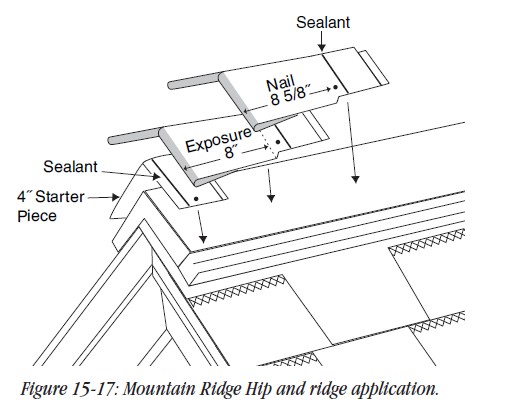
For the 4" (100 mm) starter shingle, place fastener 1" (25 mm) in from each side edge and about 2" (50 mm) from the rake (or eave) edge, making sure the fastener goes 3⁄4" into the deck or all the way through.
For each full accessory shingle, place fasteners 8 5⁄8" (219 mm) up from its exposed butt edge and 1" (25 mm) in from each side edge.
Here’s a Tip… To provide a level surface for hip and ridge caps applied over Presidential TL, a “nailer” made from 1-by boards can be installed or a piece of metal can be formed to support the caps.
Also ridge vents made from sturdy material can serve as a base to provide an even uniform appearance.
Note that the ridge cap shingles in the Certainteed illustration are not a laminate of material. Also note that in the ridge cap failure photo above there is no roof ventilation visible. The company provides plenty of detail about installing hip and ridge shingles, as we continue to quote:
HIP, RIDGE AND RAKE SHINGLE APPLICATION [quoted Certainteed™ text is in italics below]
Apply the primary field roofing up to the hip or ridge from both sides of the roof and trim flush or lap over one side, not more than half the width of an accessory shingle.
Assure that the installed accessory shingles properly cover field shingles on both sides and along rake edges. For a rake edge installation, cut the field shingles flush to the rake edge. Apply accessory shingles ensuring they fit securely against the rake board.
To assist in proper alignment, snap a chalk line parallel to the hip, ridge or rake along the line where the side edges of the accessory shingles should fall.
Prepare a 4" Starter shingle by cutting off the lower 8" color granule butt portion of one accessory shingle.
Apply the 4" starter piece (with sealant nearest the outer edge) over the bottom corner of the hip or rake, or on either end of the ridge, overhanging the corner or end by approximately 1⁄2" and bending the starter shingle along its centerline to form into place (see figures below.) Install a nail on each side about 2" up from the starter shingle’s exposed butt edge and 1" in from each side edge of the shingle.
The 8" piece that was cut off may be used to finish the opposite end of hip, ridge or rake.
Next, apply a full Mountain Ridge shingle over the installed starter shingle, bending it along its centerline and forming into place over the hip, ridge or rake, flush with the bottom and side edges of the starter shingle.
Install a nail on each side of the shingle 85⁄8" up from the bottom edge and 1" in from each side edge. Continue application of the Mountain Ridge shingles along the hip, ridge or rake as shown. Expose Mountain Ridge shingles 8", covering all fasteners.
Using CEDAR CREST MEDIUM-PROFILE HIP AND RIDGE ACCESSORY SHINGLES [quoted text is in italics below]
Cedar Crest hip and ridge shingles deliver a thicker appearance to accentuate the roof lines for a more attractive finish. Unlike other accessory products which have a monotone appearance, Cedar Crest has blended colors that complement the Landmark™ Landmark TL™, Presidential™ and Presidential TL™ shingle colors.
Cedar Crest’s multi layer design gives additional protection at critical stress points and its aggressive sealant helps ensure the caps stay on the roof. Use Cedar Crest accessory shingles to cover hips and ridges.
Carefully separate the three-piece units prior to application, by first folding along the pre-cut lines and then detaching the pieces (see Fig. 15- 19). No cutting is necessary. There are 30 individual shingles (10 three-piece units) in each bundle. One bundle will cover 20 linear feet
. Each 12" x 12" shingle has a shadow line that is a design feature which is visible when applied properly. To prevent shingle damage during application, they must be sufficiently warm to allow proper forming.
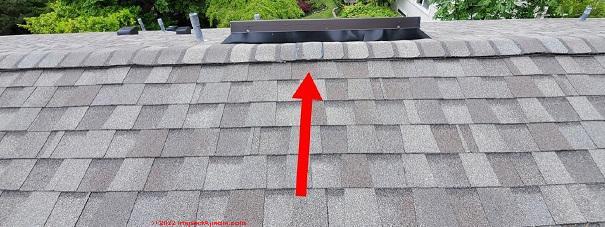
How to Nail the Ridge Cap Shingles - Ridge or Hip Cap Nailing Defects
 ...
... 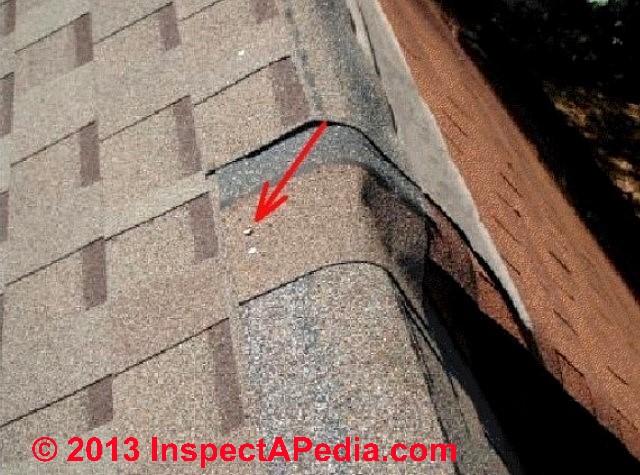
At above left CertainTeed illustrates how to nail shingles at the ridge or hip. At above right our photo shows a ridge cap shingle being asked to serve beyond the call of duty. The home inspector's arrow marked an exposed nail where he advised his client to seal exposed nails on the roof at the ridge. In fact the chances of leaks at a nail at the ridge, the highest point on this roof, are less than chances that the ridge cap shingle, bent over a change in roof height, is going to crack, break, and leak or blow off of the roof as it ages.
[quoted text is in italics below]
IMPORTANT: Use TWO nails to fasten each shingle. Fasteners must be minimum 1-3/4" (45 mm) long. For the starter shingle, place fastener 1" in from each side edge and about 2" up from the starter shingle’s exposed butt edge, making sure fastener goes 3/4" into the deck or all the way through the deck. (see 15-20).
For each full Cedar Crest shingle, place fasteners 8-5/8" up from its exposed butt edge and 1" in from each side edge (see 15-21).
Watch out: be sure that your shingles are laid in direction along each hip or ridge so that the exposed-end of the shingle tab is facing down-wind. This will reduce wind damage. And remember to set the final ridge or hip cap shingle in mastic or sealant to improve wind resistance.
The Malarkey Roofing hip and ridge shingle installation instructions (given at the end of this article) include clear illustrations of these details.
Hip & Ridge Shingle Failures
How to Distinguish Among Ridge/Hip Cap Shingle Failure due to Cracking, Excessive Bending, Poor Nailing, Thermal Splitting, Wind Damage, or Other Wear
Glenn added about the premature ridge cap shingle failure photo shown above that a roofer suggested that this shingle failure at the ridge was due to cracks where the shingles were bent over the ridge, and more serious because the ridge cap shingles were laminates, thicker, more likely to crack when bent.
Certainly bending shingles, particularly cold shingles, over a steep slope ridge can stress and break the shingles. I [DF] was taught to leave my ridge cap shingles indoors on a radiator in cold weather, assuring thus that they would be warm and flexible enough to bend without cracking when brought outside to nail onto the ridge or hip of the roof.
But shingle cracking failure does not physically resemble the cupping and granule loss failure in the photo shown at page top. Cracking shingles show just that - cracks. Indeed once the shingle has cracked the shingle substrate absorbs increasing amounts of water and in a freezing climate the freeze-thaw cycle will accelerate wear of the shingle.
There are several types of shingle cracking that occur: defective product or thermal splitting, cracks due to cold or excessive bending at a hip or ridge, cracks due to excessive roof or structural movement, and cracking that appears as part of normal asphalt shingle wearing and age.
But in premature shingle failure conditions, that is, not normal aging, once cracking has occurred, the shingle wear is non-uniform, appearing first more severely around the cracks. The page top photo shows uniform cupping and swelling of the shingle material - a different problem.
Finally, when asphalt shingles crack due to being bent too acutely over a ridge, or being bent in cold weather, the crack that appears runs parallel to the ridge line - a pattern also not visible in the shingle failure shown at the start of this article.
See details at CRACKS & THERMAL SPLITTING in FIBERGLASS SHINGLES
Concluding OPINION about the ridge cap shingle failure photo shown at the start of this article
We agree that often cracks at the ridge cap shingles lead to their wear, more so if the shingle was thick and hard to bend, and still more so if the shingle was bent in cold weather or under cold conditions rather than allowing it to heat up first. And Certainteed as well as other roofing shingle manufactures warn about proper bending (with heat) to avoid cracked ridge cap shingles and rake edge shingles.
But in the case of the bald, curling ridge cap shingles above, the wear is not showing up as a shingle crack failure as much as curling and granule loss that extends across the entire cap, on both sides, and along all of the shingles along the ridge.
On roofs I installed or later inspected, cracking due to bending tends to be inconsistent - not the same on all cap shingles. And because water penetrates at the crack in the shingle, wear at a shingle crack tends to originate at and spread out from the crack.
The roofer may be correct, but to me, these shingles just don't look like a cracking failure. We don't see wear that originates at and is worse at the apex of the shingles where cracks would appear. In fact the worst granule loss is at the edges of the cap shingles, consistent with a shingle curling and granule loss failure not a cracking failure.
We have contacted Certainteed to ask the company's opinion and advice and will keep readers informed in this spot.
Ridge & Hip Cap Shingle Nailing Defects, Shingle Fall-Off, Leaks
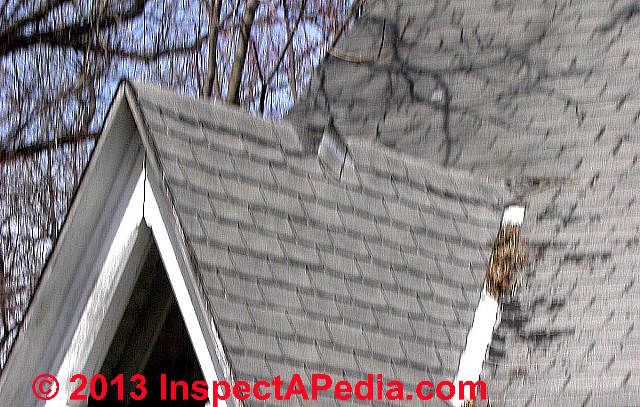
We might expect cracking failures on ridge cap shingles bent over a very steep roof slope such as shown here in our photo above of a home in Port Jervis, NY.
But when you see a cap shingle hinged and falling as shown in the center of this ridge (below), I suspect that nailing was also inadequate.
So we may have a double fault: the shingle cracked at the apex of the ridge, and the shingle fell because of minimal nailing.
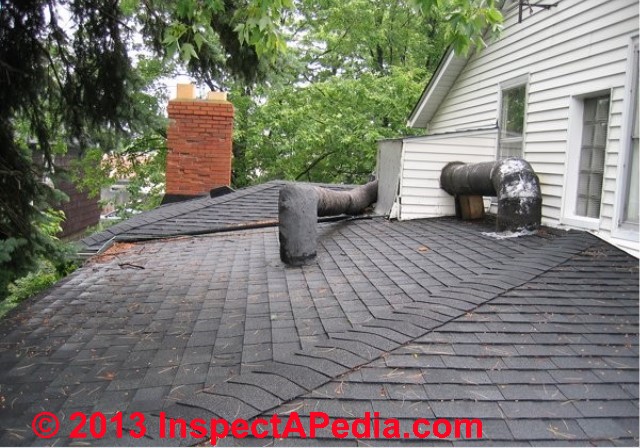
These low-slope roof ridge cap shingles have an easy time - on this very low slope hipped roof they are nearly flat - so I don't expect a hip cap shingle cracking problem to occur.
And the shingles were well nailed - at least none have blown or fallen off of this roof.
But what about installing conventional 3-tab shingles on a very low slope roof, less than 4 in 12? Unless there were hidden precautions such as a continuous ice and water shield barrier below these shingles I expect this roof to have a short, leaky life.
As we explain at LOW SLOPE ROOFING, asphalt shingles can be installed on roof slopes of 2:12 to 4:12 if special procedures are followed for underlayment.
See details at ROOFING UNDERLAYMENT BEST PRACTICES
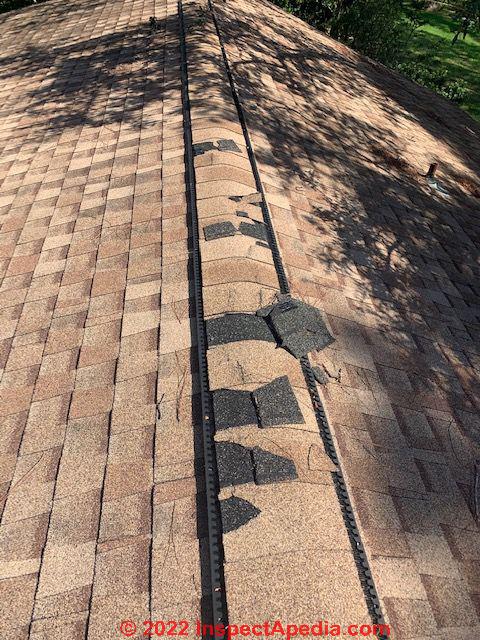
Examples of Ridge Cap Shingle Nailing Defects & Wind Damage
 ...
... 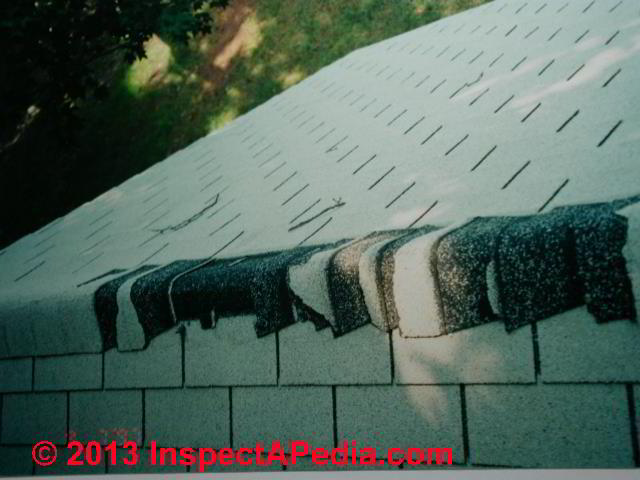
Above we see two different types of ridge cap shingle wind damage. At left I think the ridge caps blew off completely, and in intact pieces, because of inadequate nailing.
Possibly the number of nails was too few, their position incorrect, or the roofing nails may not have been long enough to penetrate through the layers of roofing material and into the roof sheathing to the required depth (the tip of the shingle nail should penetrate to the other side of 1/2" plywood sheathing). A closer look at the shingle nails and nail pattern can answer this question during an on-roof inspection.
At above right we see a different shingle wind damage at the ridge. Here the ridge cap shingles were well nailed - as the nailed pieces remain in place. But strong wind got below and tore off substantial portions of the ridge caps. Why?
I can pose these possible explanations. The open-end of the ridge caps may have been facing into rather than away from the prevailing or most likely storm direction. Or the cap shingle overlapped ends may not have been adequately sealed to the shingle below. In addition to adequate nailing with properly placed and sized roofing nails, in high wind areas the roofer may want to add a daub of sealant at the open end of each cap shingle on the hip or ridge.
Examples of Manufacturer's Ridge & Hip Shingle Installation Instructions
- CertainTeed, INSTALLING SHINGLES on SPECIAL-SHAPED ROOFS [PDF] includes hip roof application, retrieved 2022/05/22 original source: http://www.americanshingles.com.au/assets/AS-PDF-Manuals/9-Shaped-Roofs.pdf
- GAF TIMBERTEX PREMIUM RIDGE CAP SHINGLES APPLICATION INSTRUCTIONS [PDF] (Home Depot, 2022)
- GAF Ridglass® Premium RIDGE CAP SHINGLES INSTALLATION INSTRUCTIONS [PDF] (English, Spanish and French) - retrieved 2022/05/22 original source: https://www.gaf.com/
- GAF SEAL-A-RIDGE SHINGLE INSTALLATION INSTRUCTIONS [PDF] (2019) - original source: https://www.gaf.com/
- GAF-Elk Timberline® Prestique® Grande® 40 High Definition Roofing Shingles Product Information - DISCONTINUED [PDF] (2008) G8 1/4" exposure asphalt shingles, GAF-Elk Corporation 5/08 1361 Alps Road, Wayne, NJ 07470 www.gaf.com Southeast Sales Office: 813-829-8880
- GAF-Ca: Discontinued Products, ELK Roofing - Shafter, CA, Application Instructions for Prestique High Definition & Raised Profile Shingles [PDF] 5/14" exposure roof shingles, retrieved 2020/03/05 original source: http://www.gaf.ca/Other_Documents/Legacy_Products_Discontinued/Prestique_Raised_Profile/Prestique_Raised_Profile_Application_Instructions_2.pdf
- ICC-ES Evaluation Report ESR-1475, GAF SHINGLE ROOF COVERING SYSTEMS [Discontinued Products] [PDF] (2020 as revised), retrieved 2020/05/05 original source: https://www.gaf.com/en-us/document-library/documents/documents/legacyproductsdiscontinueddocuments/sentineldocuments/gaf_shingle_products__icc_esr1475.pdf
- IKO RIDGE & HIP CAP SHINGLE INSTALLATION INSTRUCTIONS [PDF] (2022) retrieved 2022/05/22 original source: https://www.iko.com/na/blog/hip-and-ridge-cap-shingles-from-style-to-installation/
- Owens Corning, ProEDGE HIP & RIDGE SHINGLE INSTALLATION INSTRUCTIONS [PDF] (2020) retrieved 2022/05/22 original source: https://roofingca.owenscorning.com/docs/installationinstructions/install_proedge.pdf
- Malarkey, EZ-RIDGE EZ-RIDGE XT RIDGEFLEX HIP & RIDGE SHINGLE INSTALLATION INSTRUCTIONS [PDF] Malarkey Roofing Products, P.O. Box 17217 Portland, OR 97217-0217
Reader Comments, Questions & Answers About The Article Above
Below you will find questions and answers previously posted on this page at its page bottom reader comment box.
Reader Q&A - also see RECOMMENDED ARTICLES & FAQs
Question: Does this 6 2/3" ridge / hip cap exposure look right to you?
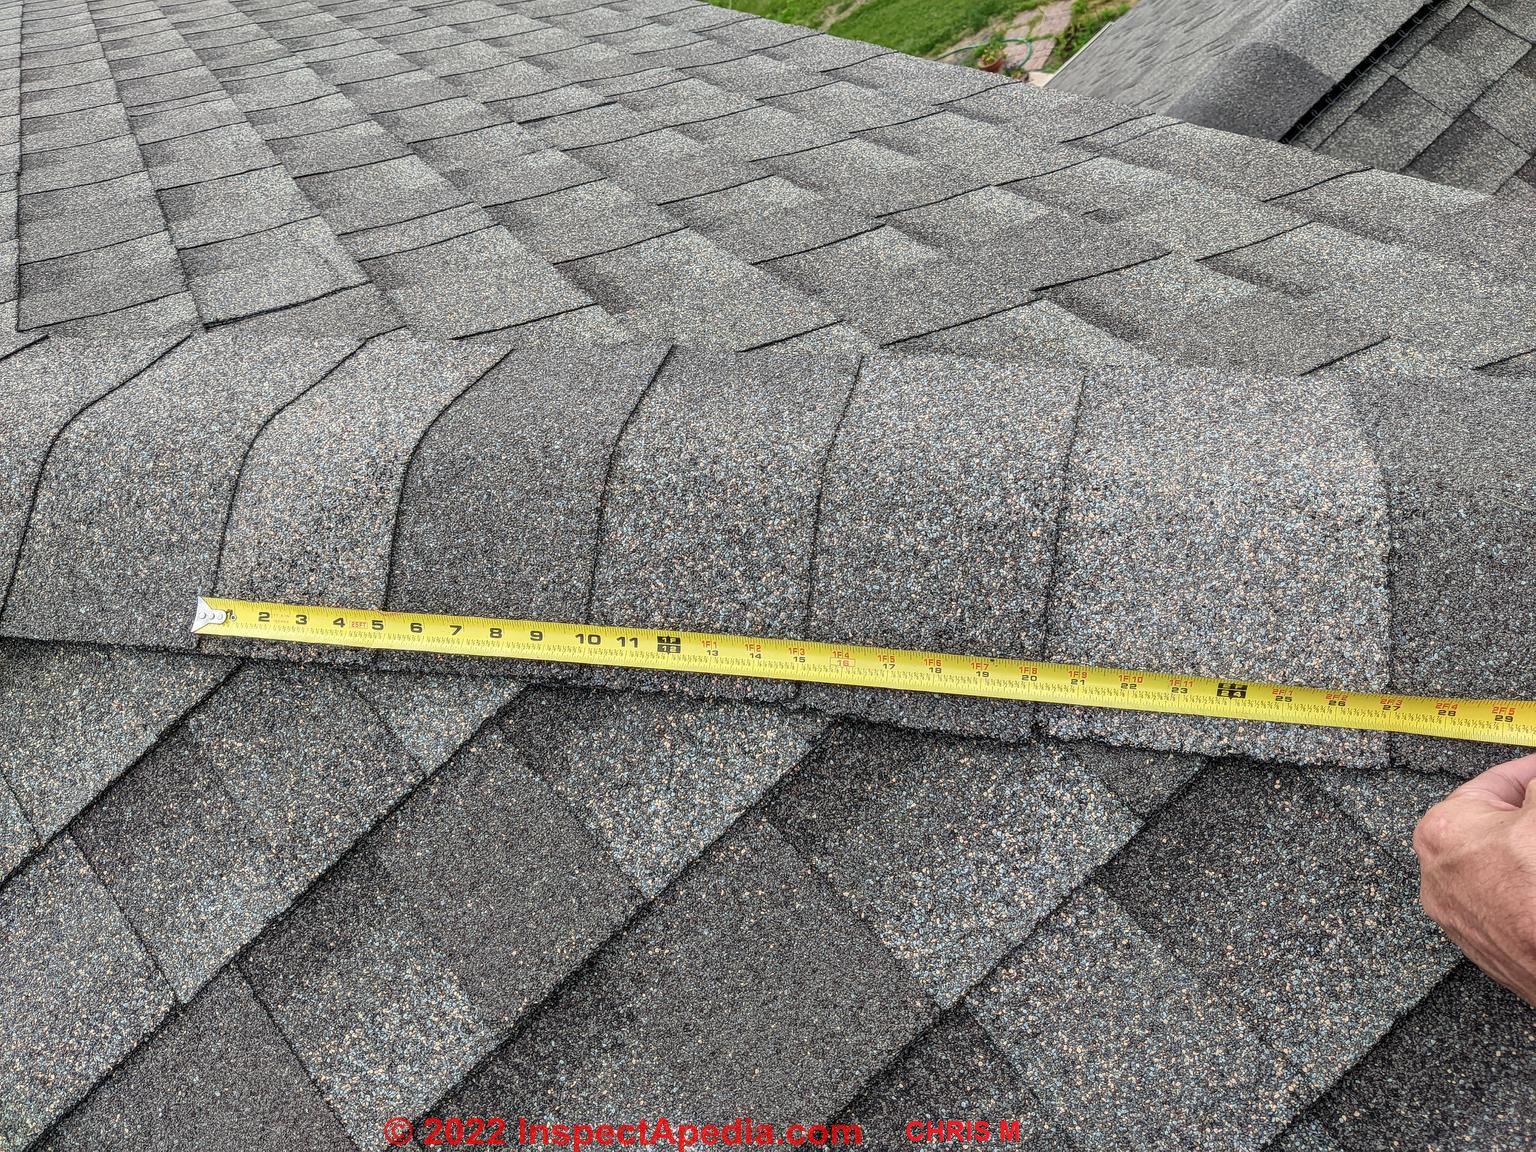
GAF seal a ridge ridge cap shingles have a 6 2/3 exposure. Does this look like a correct installation? - Chris M. 2022/05/22
This Q&A were posted originally at ROOFING INSPECTION & REPAIR
Moderator reply:
Check out the installation specifications for ridge-cap shingles or hip cap shingles found at
RIDGE & HIP CAP SHINGLES - where we include GAF's instructions for hip & ridge shingle installation.
GAF Seal-A-Ridge ridge cap shingles use a 6 2/3" exposure as standard, as per the manufacturer's instructions.
Your photo shows four shingles with about a 5" exposure and the fifth (near your hand) with a roughly 7" exposure - about 1/3" longer than the manufactuer recommended.
In my OPINION, having significantly-more exposure than recommended by the manufacturer may increase the risk of a shingle blow-off, though frankly I'm not convinced that a single shingle with 1/3" more exposure than recommended is significant. More important is that the exposed shingle edges are facing down-wind, away from the prevailing wind-direction or the direction from which storm-winds most-often blow.
Still for a bit of more wind-protection, if you can lift the single tab corners without damaging the shingle, then add a dab of roof cement under the shingle tab, a inch back from the edges those over-exposed corners - where you see the yellow dots I added to your photo.
GAF Ridglass ridge cap shingles can use up to an 8" exposure. In my OPINION having less than that as exposure is pefectly fine provided the shingles are otherwise properly positioned (exposed-edge down-wind and nails of adequate length).
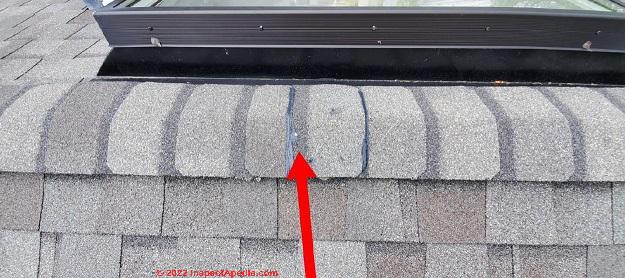
On 2021-06-15 by inspectapedia.com.moderator (mod) - half of ridge shingles face wrong edge to the wind; skylight interferes with ridge cap shingles?
@Ed,
Thank you for the photos in the interesting questions about what's basically two topics
One is the wind resistance of the ridge cap shingles and their installation,
the other is the location of what looks like a skylight right at the ridge, and it's flashing.
If the shingles along the ridge are sealed down adequately (extra mastic under the tabs of every shingle whose exposed edge faces into the wind) it may be that they will have adequate wind resistance so that it's not justified tearing off the half of them that are in the wrong direction.
We can't know o that without further investigation.
With regard to the flashing at your Skylight, I think the roofers were in a bad position there.
It's probably the case that the Skylight is not correctly located.
That's not the roofers fault, and I suspect that the roofer, even if they expected trouble, would have been reluctant to go back to a building owner and say that they couldn't complete a proper roof job because the skylight was incorrectly located. That is, its location makes installing of normal ridge covering impossible to do in a Code Compliance manner.
Without more details I'm not even sure what the best solution would be short of moving the Skylight which nobody is going to want to do. Solution might be some creative flashing in that area extending over the Ridge and out on the other side.
Its location makes it impossible to shingle the ridge or close the ridge without running into the code detail that you cited.
Now we cannot assess the adequacy of the weather proofing at the Skylight from just your photo because we don't really know the details of what flashing and counter flashing are installed.
If I understand your location correctly you got a lot of rain and possibly some snow. It would be the snow buildup at the ridge around that Skylight all of my melting that would be the greatest leak risk. The good news is that affect high on the roof how much less cumulative water than those further down so the leak risk is probably less in that location.
I think what I would do next would be to ask the roofer to draw me a picture of exactly once installed there and how the flashing or ice and water Shield or other materials under the shingles was placed.
And if there is access to attic space, which I suspect there is not, below that area of the ridge, I would want to look at the details I could see in there.
Finally, is this supposed to be a vented cathedral ceiling, or is this a hot roof with no ventilation?
On 2021-06-14 by Ed
I didn't realize it would immediately post when I attached the image, and wouldn't let me add a second image.
So here is another closer one that I meant to send:
[Photo above]
On 2021-06-14 by Ed
I have a new roof replacement with certainTeed shingles.
I will focus on the roof ridge and caps.
Just from the perspective of a layman like myself, this looks like a very shoddy job. So I had the roof inspected by an independent roofer and he wrote up the report PDF which the attached photos are part of.
In image ridge2, you can see how the roofer apparently started in the center of the roof and overlapped in both direction out to the end caps, which has what I would think are a few problems:
(a) Both end caps are exposed to incoming edge-on winds that could lift the shingles (shouldn't all ridge shingles overlap in the same direction, and run downwind of the prevailing wind side (which in our case is quite obviously the lakefront, since a blocking hillside is behind the house)
(b) There is exposed sealant where the center shingling starts, as well as exposed nails
(c) By (King County WA) code none of the ridge shingles should abut any penetration like skylights, chimneys, plumbing pipes, vents. You can see here the skylight (which was also replaced) has some angled flashing that literally butts up against the edge of the ridge shingles. Did the roofers add that flashing just to avoid having to craft shingling in the inches between the ridge edge and where the skylight base really is (which is some inches removed from the ridge iirc)?
So my overall question is:
Is this considered an inadequate and unacceptable job by typical new roofing standards (let alone any King County WA code violations) and demand that they replace this and re-lay the ridge so all shingles are laid overlapping in the same and correct (downwind of the lake side) direction?
On 2020-09-22 by danjoefriedman (mod)
Nancy
You need someone to take a very close lookat just how the shingles were nailed or fastened down, and in what direction (the exposed ends should point down-wind). Properly positioned and nailed the wind ought not blow them off in other than extreme weather conditions.
On 2020-09-22 by Nancy Leopold
Had new roof GAF Architecture shingles and nail over ridge vents installed January 2011. In September 2019 I found many cracked and missing shingles on ridge vent.
Was told not under warranty and that it was due to wind. There was a hurricane the prior year, (maybe 50 mph sustained and possibly up to 85 mph gust), but didn't notice any shingles missing at that time. I paid for repairs. Now exactly one year later and no high winds, many more cracked and missing shingles.
Wondered if problem was in installation, (bend over the ridge vent), or possibly defective shingles. Rest of the roof is fine. The house is a one story ranch with only a very slight pitched roof. No other wind damage anywhere around. I could only attach one pic. There is another that shows better just the cracks in the shingles. Couldn't figure out how to attach multiple pics.
On 2019-06-18 by danjoefriedman (mod)
Mike,
These are minor, common finishing details on roof ridges. At the lower ridge that abuts the lager higher roof,
You might apply roofing mastic under the corners of the shingle lapping the top of the abutting ridge.
On the upper ridge at the end, because we're at the highest point on the roof where there is no accumulated run-down quantity of water during rain, the leak risk is very low. Still it's good to seal any exposed nail heads.
Where there exposed nail heads, when the roof surface is dry and clean, I like to use a silicone sealant as a more-durable seal than mastic where it will be exposed to sunlight.
On 2019-06-18 by mike
I need to repair 2x loose shingles, What is the best way to do this? I will attach pics below.

On 2017-10-25 by Rich
I am replacing the roof on my storage shed and ended up with about a 2 inch overhang at the hip. Am I best off trying to heat and bend the asphalt architectural shingles over the hip, overlapping.them further which would leave a shorter looking tow st the hip or do you have another suggestion. Thank you
On 2016-01-31 by Doug
Roof cap curl
What is under cap
Roof appears good
Question: Why are these ridge cap shingles failing before the rest of the roof in this photo?
See the ridge cap shingle wear photo at left [click to see an enlarged, detailed version].
I’d like to understand why the ridge shingles only, deteriorated.
I was told that this was a Presidential composition asphalt shingle roof about 10 years old.
Do you know any roofers that have seen this condition? Thanks, Glenn Stewart, a.k.a. The House Whisperer
Reply: These Ridge Cap Shingles are from a different shingle model, batch, and possibly brand than the singles used on the body of the roof
A competent onsite inspection by a roofing expert usually finds additional clues that help accurately diagnose a roof or other building problem. But sometimes even experienced roofers and home inspectors as well as home owners can be left baffled by roofing failure patterns.
Nevertheless I am convinced that if we could know enough (or maybe know everything) about any given roof failure condition we would never ascribe the failure to random chance and we could indeed explain what's going on.
In this case we can make a pretty reasonable guess at why your ridge cap shingles look so different, and so worn, compared with the shingles on the main body or field of the roof.
First let's look at the shingles on the body of the roof
The pattern and style of shingles used on the main body or field of the roof in your photos look somewhat but NOT exactly like a laminate-type shingle or at least a style that mimics laminate type shingles. (We'd have to see a closer or edge view of the body shingles to know if they are actually laminated multi-layered shingle tabs or a single thickness design).
From the name you offered and the appearance, these may resemble but in your photo do not appear to be exactly like the Presidential Shake™ triple laminate shingles produced and sold by CertainTeed (Saint-Globan), a major roofing manufacturer. So I'm not sure if the roof shown (above left) is Presidential Shake™ triple laminate shingles or rather a lookalike.
Now let's look at the shingles at the ridge - the ridge cap shingles
But in any case, unlike a conventional three-tab asphalt roof shingle, the style and pattern of shingles on the roof body do not provide a shingle that would be easily cut up in the field to produce the rectangular individual shingles needed to cover a ridge or form a ridge cap at the apex of the roof.
That tells me that the ridge cap shingles are most likely not the same product or material as the shingles used on the roof body.
So we wouldn't be stunned if the performance of the ridge shingles differed from those on the field or body of the roof.
But what is unusual is to see ridge cap shingle failure so much earlier than wear on the field of the roof. I can guess at several explanations:
These ridge cap shingles may not be the same material, batch, and model as the field shingles on the rest of the roof and they may have been stored improperly
The roofer would have either bought special ridge cap shingles or more commonly the roofer would make the needed ridge cap covering by trimming and cutting asphalt shingles from whatever was at hand, sometimes even a different batch of conventional 3-tab roofing shingles. If s/he used whatever was at hand that seemed close in color to the field of the roof, it's plausible that a less costly (and less durable) model of roof shingle was selected to make the ridge cap.
A close look at your ridge cap shingle photo suggests that even the cap shingles may have been cut from laminated shingle material. I think I see multiple shingle edges in view.
On occasion too I've found roofers taking the expedient course of "using up" leftover shingles from a previous job to make the ridge caps. Depending on how old these leftovers were, and more importantly, where and under what conditions they were stored, they might well fail quickly when installed on a roof. Believe it or not, asphalt shingles not yet installed on a roof should be stored in a cool, dry place, out of direct sunlight. You can read this advice on shingle packaging and in installation manuals.
In sum, it looks to me as if the ridge cap shingles may have been a different, and inferior product to the shingles used on the rest of the roof. And worse, they may also have been stored or handled improperly.
While we could observe that there also seems to be no ridge vent on this roof, and while heat, moisture from below, and lack of adequate ventilation are important factors in shingle wear, curling, and even granule loss, the product difference and possibly product storage and age conditions are the most likely explanation of their early failure.
...
Continue reading at ASPHALT SHINGLE INSTALLATION or select a topic from the closely-related articles below, or see the complete ARTICLE INDEX.
Or see these
Recommended Articles
- ASPHALT ROOF SHINGLES - home
- ASPHALT SHINGLE INSTALLATION
- ASPHALT SHINGLE LIFE / WEAR FACTORS
- ASPHALT SHINGLES on LOW SLOPE ROOFS
- ATTIC CONDENSATION CAUSE & CURE
- BEST ROOFING PRACTICES
- EARLY ROOF FAILURE DIAGNOSTIC QUESTIONS
- ROOF LEAK SOURCE DIAGNOSIS
- ROOFING INSPECTION & REPAIR - home
- ROOF VENTING DEFECTS
- SHINGLE EXPOSURE AMOUNT
Suggested citation for this web page
RIDGE & HIP CAP SHINGLES at InspectApedia.com - online encyclopedia of building & environmental inspection, testing, diagnosis, repair, & problem prevention advice.
Or see this
INDEX to RELATED ARTICLES: ARTICLE INDEX to BUILDING ROOFING
Or use the SEARCH BOX found below to Ask a Question or Search InspectApedia
Ask a Question or Search InspectApedia
Try the search box just below, or if you prefer, post a question or comment in the Comments box below and we will respond promptly.
Search the InspectApedia website
Note: appearance of your Comment below may be delayed: if your comment contains an image, photograph, web link, or text that looks to the software as if it might be a web link, your posting will appear after it has been approved by a moderator. Apologies for the delay.
Only one image can be added per comment but you can post as many comments, and therefore images, as you like.
You will not receive a notification when a response to your question has been posted.
Please bookmark this page to make it easy for you to check back for our response.
Our Comment Box is provided by Countable Web Productions countable.ca
Citations & References
In addition to any citations in the article above, a full list is available on request.
- "Certainteed Shingle Applicators' Manual [for] Presidential Shake™ and Presidential Shake™ TL", [... the correct procedures
for installing Presidential Shake™ and Presidential Shake™ TL shingles], CertainTeed Saint Globan, web search 08/02/2011, original source for the CertainTeed Presidential Shake TL triple laminate asphalt roof shingles: see http://www.certainteed.com/products/roofing/309019
Telephone: Building Professionals call: 800-233-8990, Consumers call: 800-782-8777 - Best Practices Guide to Residential Construction, by Steven Bliss. John Wiley & Sons, 2006. ISBN-10: 0471648361, ISBN-13: 978-0471648369, Hardcover: 320 pages, available from Amazon.com and also Wiley.com. See our book review of this publication.
- Decks and Porches, the JLC Guide to, Best Practices for Outdoor Spaces, Steve Bliss (Editor), The Journal of Light Construction, Williston VT, 2010 ISBN 10: 1-928580-42-4, ISBN 13: 978-1-928580-42-3, available from Amazon.com
- Asphalt Roofing Residential Manual from ARMA the Asphalt Roofing Manufacturers Association Website https://www.asphaltroofing.org/product/residential-asphalt-roofing-manual/ ,
- Building Pathology, Deterioration, Diagnostics, and Intervention, Samuel Y. Harris, P.E., AIA, Esq., ISBN 0-471-33172-4, John Wiley & Sons, 2001 [General building science-DF] ISBN-10: 0471331724 ISBN-13: 978-0471331728
- Building Pathology: Principles and Practice, David Watt, Wiley-Blackwell; 2 edition (March 7, 2008) ISBN-10: 1405161035 ISBN-13: 978-1405161039
- Problems in Roofing Design, B. Harrison McCampbell, Butterworth Heineman, 1991 ISBN 0-7506-9162-X (available used)
- Roofing The Right Way, Steven Bolt, McGraw-Hill Professional; 3rd Ed (1996), ISBN-10: 0070066507, ISBN-13: 978-0070066502
- In addition to citations & references found in this article, see the research citations given at the end of the related articles found at our suggested
CONTINUE READING or RECOMMENDED ARTICLES.
- Carson, Dunlop & Associates Ltd., 120 Carlton Street Suite 407, Toronto ON M5A 4K2. Tel: (416) 964-9415 1-800-268-7070 Email: info@carsondunlop.com. Alan Carson is a past president of ASHI, the American Society of Home Inspectors.
Thanks to Alan Carson and Bob Dunlop, for permission for InspectAPedia to use text excerpts from The HOME REFERENCE BOOK - the Encyclopedia of Homes and to use illustrations from The ILLUSTRATED HOME .
Carson Dunlop Associates provides extensive home inspection education and report writing material. In gratitude we provide links to tsome Carson Dunlop Associates products and services.
 | HOME | ABOUT | ASK a QUESTION | CONTACT | CONTENT USE POLICY | DESCRIPTION | POLICIES | PRIVACY | |
| © 2024 - 1985 Publisher InspectApedia.com - Daniel Friedman | |||||||||