
InspectAPedia® FREE Encyclopedia of Building & Environmental Construction, Diagnosis, Maintenance & Repair |
Question? Just ask us! InspectAPedia
|
 Engineered Wood & Solid Wood Damage Floor Repair Methods
- POST a QUESTION or COMMENT about repairs of wood & wood laminate flooring
What are the best methods to repair damage to an engineered wood floor? What about laminate and plastic-surfaced laminate floor repairs?
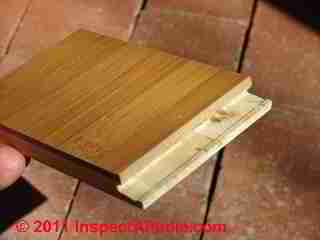
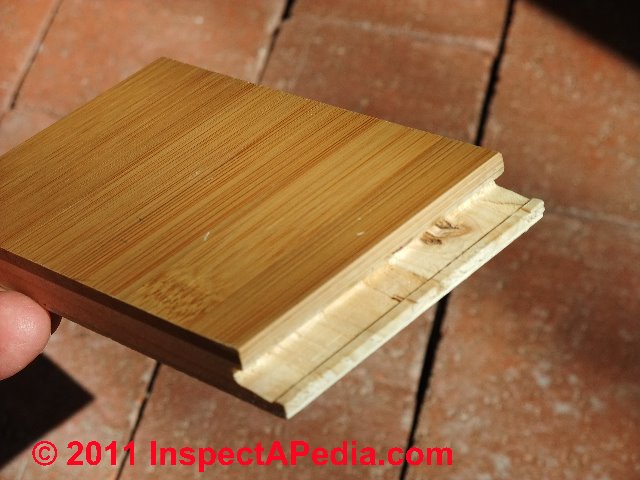
Our page top photo illustrates an engineered wood floor using a thick bamboo top layer. A scratch or gouge into this floor is repairable.
InspectAPedia tolerates no conflicts of interest. We have no relationship with advertisers, products, or services discussed at this website.
How to Make Repairs to Damaged Engineered Wood Flooring
 Question: how can I best fix a hole in a engineered hardwood floor with brushed grain finish?
Hi there, I have a thin wood veneer engineered hardwood floor with deep wire brushed grain. Last night I dropped a chair and the leg of the chair made a bad hole in the floor.
The hole is deep enough that you can see the veneer is pushed in but you can also see pieces of plywood underneath. Do you have any tips on how to fix this?
I've watched a lot of videos on filling dents with wood filler, sanding and spot refinishing but the problem with this is, my floor has lots of texture I can't sand it.
Would my best bet be to fill it with the wood filler and try to replicate the wood grain texture?
The damaged area is about 1/2" x 1"
The chair also left a small white paint scuff before the hole. Is there any way to remove this from the textured floor without sanding?
Please email me if you can help me. Thank you in advance. - 2017/12/07 rawzlynd.brown@gmail.com
[Click to enlarge any image] This question and reply were posted originally at WOOD FLOOR ENGINEERED & SOLID
Reply: steps & alternatives for repairing damaged hardwood or engineered wood floors
Rawzlynd
I agree that using wood filler followed by sanding that scratches the surrounding floor area is likely to make the floor look worse than before.
Any primer on restoring historic wood flooring will give tips that can help restore modern wood floors as well. All restorers advise taking the most-gentle approach possible.
I've had success with several approaches to fixing damaged veneered / engineered wood floor that has a brushed-grain finish.
The use of a matching wood filler followed by light sanding followed by low-speed buffing by hand or with a drill powered buffer pad works best on a floor with a smooth surface.
I have on occasion used automobile re-finishing buffing compounds but even those require low buffer speed and a gentle touch to avoid damaging the surrounding floor.
For your wood-grained textured engineered hardwood floor there are other options between which you'd choose depending on how important is the perfection of the final, restored finish.
 The engineered wood floor shown here includes a top layer of wood glued to a hardboard core. Scratches that do not cut entirely throug this wood layer (about 1/8" thick) can usually be repaired.
If you are not sure what type of flooring you have installed, see WOOD FLOOR ENGINEERED & SOLID.
Removing the Paint-mar from a Floor Surface
First, try removing the white paint from the painted chair leg impact using a series of escalating approaches starting with the most-gentle. Try this series of paint mar removing steps, and stop when you're satisfied.
1. Water-detergent Scrub the paint mark gently with a plastic scrubby sponge and water or water and a drop of detergent. DO NOT over-scrub so as to create a larger area of removed pigment and do not use an aggressive steel scrubber as that will mar the surrounding surface.
2. Alcohol or odorless paint thinner Scrub the paint mark with a plastic scrubby sponge and odorless paint thinner or mineral spirits. This approach can remove both paint and shoe heel marks from most flooring without damaging it.
Watch out: Do not use lacquer thinner nor nail polish remover as those are likely to destroy the surrounding floor finish, thus creating a worse mess than before.
Do not use alcohol if the wood is finished with a lacquer.
3. Mechanical scraping For thick paint deposits on wood floors, you may need to try removing the paint mark with a new, smooth-edged flexible putty knife or with a thin palette knife blade or thin screwdriver, working with care so as not to make deep gouges in the floor material below. Sometimes I soften the paint with steps 1 and 2 or even with gentle heat from a hair dryer. Do not over-heat the floor with a heat type paint remover gun as that will damage the surrounding floor surface.
Watch out: take care when using any sharp-edged or sharp-cornered tool to try to remove paint from a floor. If you do not keep the blade flat on the floor surface the corner of the blade will make more ugly gouges in the floor surface.
When you are satisfied that the paint has been sufficiently-removed from the floor surface clean the area gently with rubbing alcohol (isopropanol 70%) to remove any traces of paint thinner or detergent.
Sand & Stain Shallow Scratches in Wood or Engineered Wood Floors
For shallow gouges or stains in a wood or engineered wood floor and also for laminated wood floors in which the gouge has not penetrated the wood veneer you can clean the gouge, gently sanding it with 2oo then #400 sandpaper, planning to leave the gouge un-filled.
When the scratch or gouge has been cleaned, if it appears as a lighter area than the surrounding floor, use a cotton swab ("Q-tip") to carefully apply a matching liquid stain to the scratch. Using a stain that is a bit lighter than the original floor finish is a smart place to start.
Wipe off the stain immediately and assess your result. If the scratch is still too light, put stain on again, wipe it off of the surrounding floor surface, wait a minute, wipe the gouge and inspect again. Repeat this process until the filled-in stained scratch or gouge matches the surrounding floor.
Protect the area and let the stain dry 12-24 hours.
Watch out: before trying this stain approach be sure that the gouge or scratch surface is very smooth. If there are wood hairs in the scratch these will hold stain such that the stained area will appear darker than the surrounding floor. You will have to clean out some of the stain using odorless paint thinner or mineral spirits.
Watch out: it's better to wipe out stain sooner rather than later since leaving the stain in a gouge or scratch too long can result in the scratch color that is darker than the surrounding floor.
Use a close-match Wax Wood Filler to Match Damaged Engineered Wood Floors
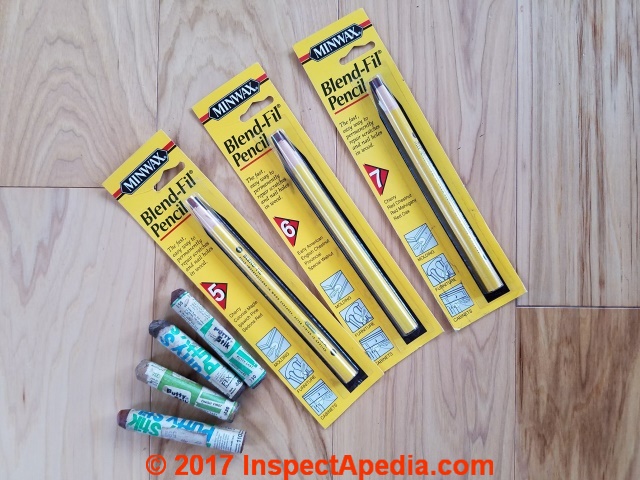 For a larger or deeper area of wood or engineered wood floor damage we try a color-matched floor putty or a wax-based flooring repair kit.
This approach is suitable for both real-wood and engineered real wood flooring repairs using a repair putty or wax filler, mixed to match the color of surrounding floor.
The two wood flooring repair wax products in my photo are shown atop a hickory hardwood tongue and groove floor that we installed in a New York home.
Check with the manufacturer of your particular floor, as that company may be able to provide wax filler sticks or stains that match your floor finish exactly.
The products shown in my photo are a Minwax Blend-Fil® pencil sold in a range of colors, and Putty-Stik wax repairs listed in the references below.
I have had success by taking care not to spread putty out of the hole or gouge
Sanding is not used with wax type damage repair kits and should not be necessary when working with hard-drying wood fillers either provided you take care to apply the filler carefully.
Use a smooth-edged flexible steel putty knife to apply the wax or putty filler to the hole in the floor. Put just enough filler on the knife end to fill the hole with only slight excess.
Apply the filler to the hole moving at an angle that is diagonal to the length of run of the floor board or gouge or hole.
After the damaged hole or gouge in the floor has been repaired, where a wax filler was used, buff the surface gently with a smooth dry cotton cloth.
Watch out: with wax based fillers, take care not to buff too hard, and don't use a power-buffer on the floor repair. Either of those approaches is likely to heat and remove the wax.
If you applied a hard-drying wood filler rather than a wax and if after it's dry the filler is raised above the floor surface, light sanding might be needed, but there is a risk of scratching the surrounding floor.
If you must sand, take great care to restrict any sanding to the very edges of the fill. I wrap 100x and then 200x grit sandpaper around the tip of a wooden tongue depressor and work to keep the sanding within the area of the filler.
Watch out: the solvent used in some wood putty products contains acetone and can mar surrounding wood surfaces. Avoid using a wood filler that contains an acetone solvent base.
Depending on the floor surface texture I have used the edge of a dull knife or similar tool to continue the lines of surrounding wood grain into the patch area. On some floor boards such as yours the spot can match well if it appears to be a wood knot. The color does not have to be exact.
Watch out: wax type wood flooring and gouge fillers will not survive heavy traffic on wood floors and if used in gouges or damage more than 1/4" wide may need to be repaired again from time to time unless you use a harder fill material.
For other floors imprinted with a deeper grain pattern one can fabricate a pattern imprinter that can be pressed into an area of wood filler. That's done by making a plaster cast of a left-over floor board surface. I don't try using the installed floor out of concern for marring the existing floor. In my opinion this approach is not worth the trouble except perhaps when restoring an historic artifact.
Use Melt-in or Burn-in Type Wood Fillers for Floor or Furniture Gouges
Burn-in wood fillers or melt-in wood fillers such as the Taylor Wood Doctor #911 use a heat-softened stick of color-matched material and an electric burn-in knife to soften, melt, and fill the wood filler material that bonds to the wood surface.
The damaged area surface is cleaned out and any wood fibers that protrude above the floor surface are cut away.
Then a burn-in repair color stick is selected to match the surrounding wood. The stick is used to press filler into the gouge or hole in the damaged floor.
An electrically-heated or butane-heated burn-in flooring repair knife that looks much like a wood chisel or like an Exacto knife is used to smooth the filler and remove excess material.
Typically a burn-in floor repair filler is also wet-sanded using 400-grit wet-dry sandpaper wrapped around a smooth-surfaced sanding block.
Watch out: in order to avoid damaging surrounding floor surfaces, take care to restrict the wet sanding to the area of repair with only slight feathering out to the surrounding wood.
By using a very find #400 sandpaper the sanding marks will be shallow enough that you can then buff out the repair using a buffing compound.
Epoxy for Small Holes in Wood Floors?
Use this approach when soundness of the wood floor surface is more important than a perfect match to surrounding floor area. Do not use this approach for plastic-veneer wood floor surfaces.
For very small areas of gouge or lost material and where the color still matches the surrounding floor I sometimes fill the spot with clear epoxy. That will leave a slightly glossy spot that can be roughened with your scrubby sponge or buffer once the epoxy is thoroughly dry.
Watch out: for other readers we want to make clear that while epoxy resins and other synthetic resins are popular in the flooring industry and while they’re used in many industrial coatings, never use epoxy on historic wooden floors or artifacts. The epoxy is durable but is so difficult to remove in the future (should that be necessary) that it is not used in those situations.
I prefer this approach for floor areas that are not in obvious view but I’ve used it with success on both wood and ceramic and clay tile floors in various situations.
Tips for making a small cut-out patch to fill a larger area of laminate floor damage
For still larger, deeper areas of damaged flooring I've used a utility knife to cut a patch out of a left-over length of original flooring, shaping the patch and shaving and tapering its edges until it fits perfectly into the existing damage area. I make the patch a bit thinner than the depth of the opening so that when I glue it in place with epoxy it will be flush with the finished surface.
Repairing low-cost plastic skin-covered laminate floors
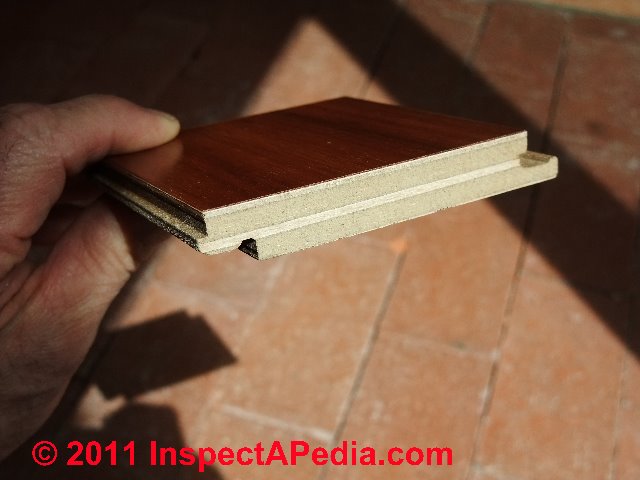
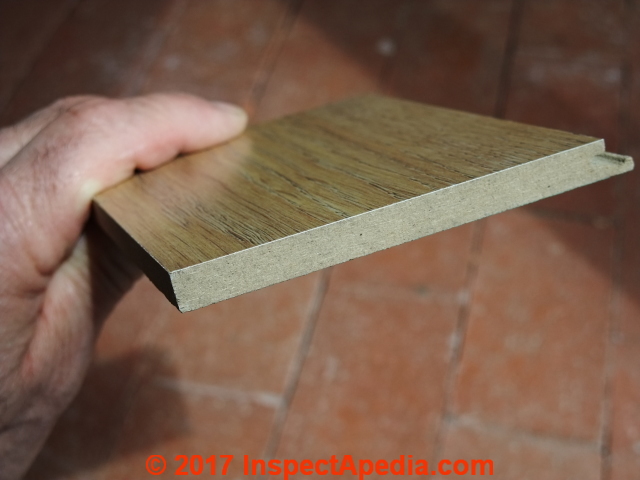 Just below is a laminate floor product that provides a thin vinyl skin with a wood grain image. This particular flooring is produced by Home Legend™
Some lower-cost laminate floor products are made not out of real wood but rather a plastic laminate pre-printed pattern that is bonded to a fiberboard base.
None of the approaches above will work well on those floors because the laminated vinyl or plastic "skin" is very thin. If this floor is damaged by a scratch or gouge that cuts through the skin it is not really repairable.
But we might try to cut and remove the laminate skin from a left-over segment of the original flooring, gluing it in place in a cutout over the damaged area.
Plastic laminate floors that have been scuffed and marred might, after repair, be improved by a light spray of clear semi-gloss polyurethane.
The repair of plastic-laminate flooring is described separately
at LAMINATE FLOOR DAMAGE REPAIR
Should you Try to Cut-and-Replace Damaged Engineered Wood Floor Boards?
Watch out: Unless you are experienced with very careful woodworking and floor repairs you should probably not not try cutting out and removing an actual section of engineered wood laminate flooring in general, as the clip together floor sections will be so badly damaged that getting a replacement board in place neatly is almost impossible except by the most-experienced restorer.
Solid wood plank floor boards can be cut and removed and replaced with matching wood by working with a drill, chisels, and an oscillating blade thin-kerf saw.
If you're determined to push past the warning above, the wood floor repair techniques, discussed in detail
at WOOD FLOOR BOARD REPLACEMENT how to cut out and replace floor boards, can sometimes be used to replace real-wood engineered wood flooring if absolutely necessary.
But some gluing and jury-rigging will be needed to hold the replacement boards in place as the side and end joints of a snap together engineered wood floor cannot be left entirely in place if replacing a board out in the field of an exisiting floor.
Re-coating Areas of Damaged Wood Flooring
Where floor damage repair has left the repaired area with new wood or sanded surfaces that are dull you may need to apply a coating to the repaired area.
Watch out: do not use a spray or paint-on finish that is not chemically compatible with the existing floor finish. Otherwise you may find that the surrounding floor finish bubbles up or softens, creating a horrible mess. Water-based polyurethane and spray polyurethane are often safe but you may need to mask surrounding areas to protect against a matte finish that will show up in areas of over-spray.
Be sure to let any coating dry 12 hours or more. Polyurethane finishes continue to harden over at least 24 hours, so where I have worked hard on a floor repair I keep everyone off of the floor for at least 24 hours.
References & Products for Repairing Wood & Engineered Wood Flooring
- Cleary, Ryan, CONSIDERING THE USE OF EPOXIES IN THE REPAIR OF HISTORIC STRUCTURAL TIMBER, [PDF], University of Pennsylvania ScholarlyCommons, (2014) retrieved 2017/12/07, original source: http://repository.upenn.edu/cgi/viewcontent.cgi?article=1554&context=hp_theses
Abstract:
Wood is one of the earliest and most common building materials on the planet. However wood also quickly decays under normal service conditions, and thus the repair of historic structural elements pose a difficult challenge to preservation professionals who aim to also preserve the authenticity of the element.
Since the 1970s, numerous studies have looked at the use of epoxy with respect to historic timber repair. Epoxy, for the purposes of structural repair, serves as a substitution type repair for deteriorated wood.
In this study focuses on the compatibility of historic structural timber members and epoxy repairs by the means of a reviewing and analyzing the state of the art of epoxy and wood durability and structural functional performance over the past couple of decades as a means to reconsider epoxy use in the preservation of historic structural timber members.
Epoxy repairs to historic timber members are categorized by their application; consolidation, structural adhesive and gap-filling structural adhesive. The intent of this approach is designed to consider how the increase in the unit volume of epoxy to wood ratio affects the properties that affect the structural performance and compatibility of such repairs. - DriTac Adhesive Group, 60 Webro Road Clifton, NJ 07012
Tel: (973) 614-9000 Email, info@dritac.com
DriTac Adhesive Group has developed a repair system to correct the hollow spots and popping conditions for engineered wood flooring. The kit includes a repair adhesive, an injecting syringe, and other small tools. - FLOOR, WOOD ENGINEERED, LAMINATE, INSTALL - Guide to Choosing & Installing Engineered Wood Floors: Wood Laminates. Materials Used in Engineered Wood Floors.
- Grimmer, Anne E., “Dangers of Abrasive Cleaning to Historic Buildings”, U.S. National Park Servivce, Technical Preservation Services, Preservation Brief No. 6, retrieved 2017/12/07, original source: www.nps.gov/tps/how-to-preserve/briefs/6-dangers-abrasive-cleaning.htm
- Horie, C.V. Materials in Conservation: Organinc Consolidants, Adhesives, and Coatings. London: Butterworths, 1990.
- LAMINATE FLOOR DAMAGE REPAIR how to diagnose and fix stained, damaged laminate flooring products
- LOOSE NOISY FLOOR REPAIR - how to repair wood floors that are squeaky, loose, bouncy, or noisy
- Minwax, BlendFil® Pencils, Minwax Company, Upper South River NJ 07548 USA, Tel: 800-523-9299 Website: www.minwax.com
- MOLD CLEANUP - WOOD FLOORING Clean Mold found on wood flooring in buildings.
- Myers, John H., THE REPAIR OF HISTORIC WOODEN WINDOWS, [PDF] U.S. National Park Servivce, Technical Preservation Services, Preservation Brief No. 9, retrieved 2017/12/07, original source: www.nps.gov/tps/how-to-preserve/briefs/9-wooden-windows.htm
- Phelan, Vincent CARE and REPAIR of the HOUSE [PDF], building and Housing Publication BH15, U.S. Bureau of Commerce, Bureau of Standards, (1931), retrieved 2017/12/07, original source: http://nvlpubs.nist.gov/nistpubs/Legacy/BH/nbsbuildinghousing15.pdf
Also see Phelan's "Essential Parts of a House" as Figure 1 in the article above and discussed in detail at HOUSE PARTS, DEFINITIONS - Putty-Stik® wax wood repair sticks, FIX Forest Interiors Corporation, Seattle WA USA
- Sheets, Ron, “CLEANING WOOD FURNITURE”, [PDF] U.S. National Park Servivce, Technical Preservation Services, (1993) retrieved 2017/12/07, original source www.nps.gov/museum/publications/conserveogram/07-01.pdf
- Smith, Muriel L., "CARE and REPAIR of WALLS and FLOORS" [PDF] Extension Service, University of Nebraska Agricultural College & U.S. Department of Agriculture, EC1173 (1933)
- Taylor Wood Doctor #911, Wood Floor Damage Repair Kit,Taylor Tools,
5045 Paris St.
Denver, Colorado, U.S.A 80239
Tel: 303-371-7667
Toll Free: 800-525-3714, Website: www.taylortools.com
This wood repair kit includes a stainless steel scraper, a finishing planer, a hot knife operated by butane to melt color-matched bars into the repair area, edge preparation pens of various colors, and a collection of sixteen thermo-plastic polymer bars that are used to melt into the scratch or gouge. - Tschoepe, Ray, “Simple Wood-Floor Fixes”, Old House Online, 22 Nov. 2010, retrieved 2017/12/07, original source: www.oldhouseonline.com/articles/simple-wood-floor-fixes
- Williams, Donald C., “PRESERVING AND RESTORING FURNITURE COATINGS”, [PDF] Smithsonian Museum Conservation Institute, (2003) retrieved 2017/12/07, original source: www.si.edu/mci/english/learn_more/taking_care/coatings.html
- WOOD FLOOR DAMAGE REPAIR - Catalog of types of damage to different wood floor materials. Wood floor stains, mold damage, odors, buckling, gaps, pet stains & other wood floor problems
- WOOD FLOOR REFINISHING SAFETY
InspectAPedia® FREE Encyclopedia of Building & Environmental Construction, Diagnosis, Maintenance & Repair |
Question? Just ask us! InspectAPedia
|
Reader Comments, Questions & Answers About The Article Above
Below you will find questions and answers previously posted on this page at its page bottom reader comment box.
Reader Q&A - also see RECOMMENDED ARTICLES & FAQs
On 2020-07-10 - by (mod) -
 Sure that laminated floor surface damage is repairable although there may be a bit of trouble involved.
If all that was removed was the surface coating and not sustain itself you may start by identifying the type of coating that was on the floor, such as polyurethane.
You then may be able to spray inappropriate semi-gloss or flat polyurethane finish masking off the surrounding area to just address the area where the coating was removed.
You might need to do a little very fine 400 Grit sanding or polishing
But
Watch out: some paints or cleaners contain a solvent that can dissolve the laminate floor surface, making matters worse than before.
For that reason I'd experiment with a cotton swab and a dab of paint or cleaner in a hidden area of the floor before fooling with damage in the middle of the floor.
Finally, if it were my floor, and worrying about making it worse, I might ignore the "standard laminate floor surface repair advice" given above and instead try to dab on a bit of stain in the area to color it in and leave it alone. Again test the stain first.
On 2020-07-10 by barbararosenthal513
I removed tape from my engineered wood floor and some of the floor finish was removed with it. Can it be repaired? I have several marks
On 2018-11-20 01:54:28.228966 - by (mod) -
It would help me research and respond to this question if you could post a photo of the damage to your floor and also give me the product brand and specific product name so that I can research it's chemistry.
On 2018-11-19 16:03:50.883567 by Faye VanLandingham
Put Weed & Feed granules on garden. Walked through damp grass and transferred shoe imprint onto new engineered flooring. Wiping with damp cloth doesn't faze it. Quite a large area affected with this chemical imprint. Any suggestions other than replacing nearly the entire floor?
On 2018-07-14 15:54:08.658496 by Dana
Small area Water damage for engineered wood
On 2018-01-31 19:17:05.117312 - by (mod) -
working carefully it's often possible to cut a very clean opening in the floor and repair it using matching flooring taken from a less obvious area such as a closet. That work needs to be done by someone with experience in order to avoid a hack job that makes the floor look worse than before
On 2018-01-29 06:36:34.234703 by Cora
I burned a hole thru the living room antique wood floor approx size 3” X 3 “ in th center of my living room how can I fix that hole
...
Continue reading at FLOOR, WOOD ENGINEERED, LAMINATE, INSTALL or select a topic from the closely-related articles below, or see the complete ARTICLE INDEX.
Or see these
Recommended Articles
- ANIMAL STAINS & MARKS in BUILDINGS
- LAMINATE PLASTIC FLOOR
- WOOD FLOOR AGE TYPES HISTORY
- WOOD FLOOR DAMAGE REPAIR
- WOOD FLOOR ENGINEERED & SOLID
- WOOD FLOOR ENGINEERED, REPAIRS
- WOOD FLOOR FINISHES
- WOOD FLOOR INSTALLATION
- WOOD FLOOR MOISTURE
- WOOD FLOOR, PARQUET
- WOOD FLOOR RADIANT HEAT
- WOOD FLOOR SOLID STRIP, PLANK
Suggested citation for this web page
WOOD FLOOR ENGINEERED, REPAIRS at InspectApedia.com - online encyclopedia of building & environmental inspection, testing, diagnosis, repair, & problem prevention advice.
Or see this
INDEX to RELATED ARTICLES: ARTICLE INDEX to BUILDING FLOORING
Or use the SEARCH BOX found below to Ask a Question or Search InspectApedia
Or see
INDEX to RELATED ARTICLES: ARTICLE INDEX to BUILDING INTERIORS
Or use the SEARCH BOX found below to Ask a Question or Search InspectApedia
Ask a Question or Search InspectApedia
Try the search box just below, or if you prefer, post a question or comment in the Comments box below and we will respond promptly.
Search the InspectApedia website
Note: appearance of your Comment below may be delayed: if your comment contains an image, photograph, web link, or text that looks to the software as if it might be a web link, your posting will appear after it has been approved by a moderator. Apologies for the delay.
Only one image can be added per comment but you can post as many comments, and therefore images, as you like.
You will not receive a notification when a response to your question has been posted.
Please bookmark this page to make it easy for you to check back for our response.
Our Comment Box is provided by Countable Web Productions countable.ca
Citations & References
In addition to any citations in the article above, a full list is available on request.
- America's Favorite Homes, mail-order catalogues as a guide to popular early 20th-century houses, Robert Schweitzer, Michael W.R. Davis, 1990, Wayne State University Press ISBN 0814320066 (may be available from Wayne State University Press)
- American Plywood Association, APA, "Portland Manufacturing Company, No. 1, a series of monographs on the history of plywood manufacturing",Plywood Pioneers Association, 31 March, 1967, www.apawood.org
- Best Practices Guide to Residential Construction, by Steven Bliss. John Wiley & Sons, 2006. ISBN-10: 0471648361, ISBN-13: 978-0471648369, Hardcover: 320 pages, available from Amazon.com and also Wiley.com. See our book review of this publication.
- Michael W. Litchfield, Renovation, A Complete Guide, 2nd Ed., Prentice Hall, 1991, ISBN 0-13-159336-6, ISBN-13: 978-0131593367, Pearson P T R; 2 Sub edition (August 1990)
- Pergo AB, division of Perstorp AB, is a Swedish manufacturer or modern laminate flooring products. Information about the U.S. company can be found at http://www.pergo.com where we obtained historical data used in our discussion of the age of flooring materials in buildings.
- Plank House Construction: webslog from plankhouse.wordpress.com/2009/01/25/plank-house-construction/ and where plank houses were built by native Americans, see
Large 1:6 Scale Plank House Construction / P8094228, Photographer: Mike Meuser
06/12/2007 documented at yurokplankhouse.com where scale model Museum quality Yurok Plank Houses are being sold to raise money for the Blue Creek -Ah Pah Traditional Yurok Village project - bluecreekahpah.org - In addition to citations & references found in this article, see the research citations given at the end of the related articles found at our suggested
CONTINUE READING or RECOMMENDED ARTICLES.
- Carson, Dunlop & Associates Ltd., 120 Carlton Street Suite 407, Toronto ON M5A 4K2. Tel: (416) 964-9415 1-800-268-7070 Email: info@carsondunlop.com. Alan Carson is a past president of ASHI, the American Society of Home Inspectors.
Thanks to Alan Carson and Bob Dunlop, for permission for InspectAPedia to use text excerpts from The HOME REFERENCE BOOK - the Encyclopedia of Homes and to use illustrations from The ILLUSTRATED HOME .
Carson Dunlop Associates provides extensive home inspection education and report writing material. In gratitude we provide links to tsome Carson Dunlop Associates products and services.
 | HOME | ABOUT | ASK a QUESTION | CONTACT | CONTENT USE POLICY | DESCRIPTION | POLICIES | PRIVACY | |
| © 2024 - 1985 Publisher InspectApedia.com - Daniel Friedman | |||||||||