
InspectAPedia® FREE Encyclopedia of Building & Environmental Construction, Diagnosis, Maintenance & Repair |
Question? Just ask us! InspectAPedia
|
 Photo Guide to Installing a Nest Thermostat
How install, wire, adjust, program or repair
Nest thermostats
- POST a QUESTION or COMMENT about Nest Room Thermostats for Air Conditioners & Heating Systems or heat pumps: thermostat operation, wiring, adjustment & repair procedures
Nest Heating & Cooling Thermostat Installation & wiring:
This article series provides detailed photographs and text describing how to install, make wiring connections, and then set-up a Nest Learning Thermostat, beginning with removing the old wall thermostat, labeling its wires, preparing the wall for the new thermostat, then installing the Nest Thermostat and getting it working nicely.
InspectAPedia tolerates no conflicts of interest. We have no relationship with advertisers, products, or services discussed at this website.
Nest Thermostat Installation & Wiring Photo-Guide
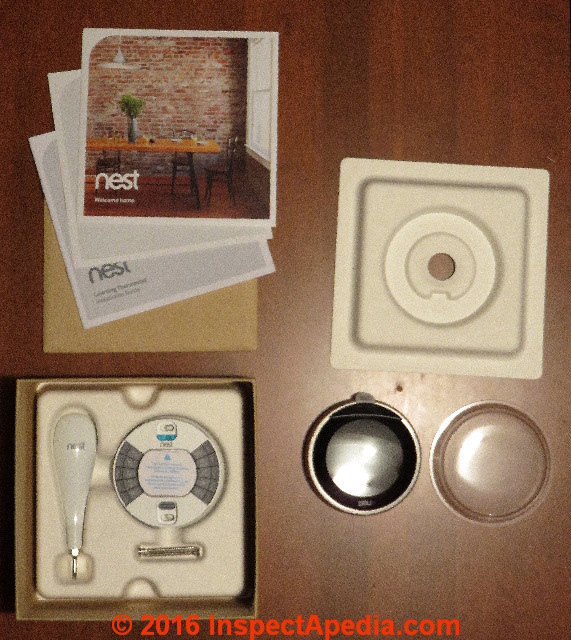 Opening the box containing a Nest Learning Thermostat, you'll find the thermostat itself as well as additional tools and parts that we'll list below. Look for and read the installation instructions provided by Nest as you'll find those 12 steps (listed, illustrated and explained below) simple to follow. Usually.
Here we use a Nest 3 learning thermostat to illustrate how to install this control. But these Nest wiring instructions will work for any of the Nest thermostat line.
[Click to enlarge any image]
Here we expand on and illustrate the Nest thermostat installation instructions to include details that you may encounter and that aren't addressed by typical room thermostat installation guides.
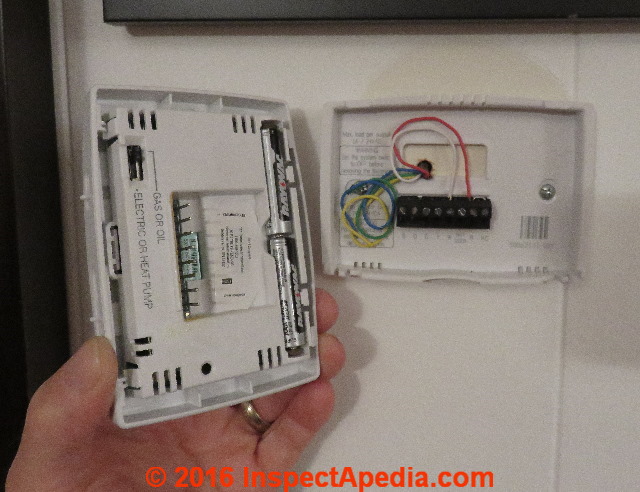
In our photo of what's in the Nest thermostat package you see, from clockwise at upper left: Nest installation instructions and other literature, a cover that's removed to give access to the Nest thermostat itself, the Nest learning thermostat and a clear plastic cover (removed) that prevented scratching, and still in the box, the Nest thermostat wall plate and a cute screwdriver provided by the manufacturer.
In the bottom of this box you'll find an accessory trim plate that might be needed to cover ugly wall conditions where the old thermostat was installed, and you'll see some thermostat mounting screws. You'll also use that trim plate if in your building the thermostat wires are routed through an electrical box.
Article Contents
NEST THERMOSTAT INSTALLATION & WIRING STEPS
- TURN POWER OFF
- REMOVE OLD THERMOSTAT'S COVER
- CHECK THERMOSTAT WIRING for HIGH VOLTAGE
- REMOVE OLD JUMPER WIRES
- LABEL WIRES
- DISCONNECT WIRES & REMOVE BASE
- MARK WHERE SCREWS WILL GO
- ATTACH NEST BASE
- CONNECT WIRES
- ATTACH the DISPLAY
- SWITCH POWER BACK ON
- SET UP & PROGAM the NEST THERMOSTAT - separate article
- SET UP NEST ACCOUNT
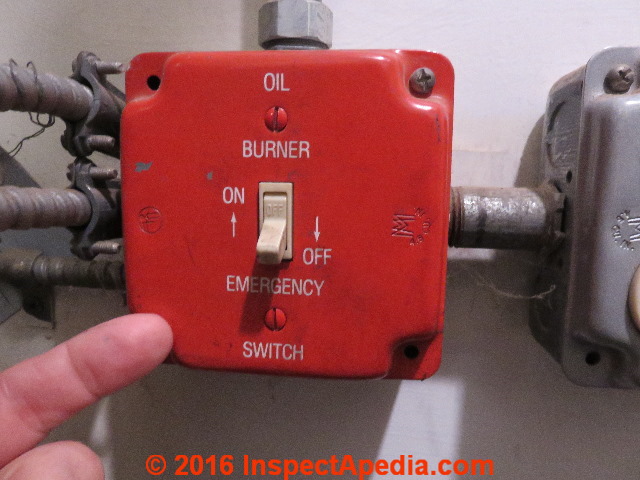
- Switch off Power - turn off electrical power to the heating or cooling equipment that the Nest thermostat is going to control.
Nest points out that this helps prevent tripping a circuit breaker or blowing a fuse on your existing equipment. Typically the actual equipment you're controlling, an air conditioner or heating system operates on 120Volts or 120VAC, while the thermostat itself operates on a lower voltage level: 24 VAC.
The thermostat is itself ultimately a simple "on-off" switch that will turn your air conditioner or heating system on or off in response to room temperature as it compares with the "Set" temperature you've specified on the thermostat. It's also safer to always work with electrical equipment turned off, even if shock hazards seem pretty remote.
In our photo above, in the boiler room we've switched off the service switch to the heating boiler. In most heating system installations, turning off this switch will also turn off power to the low-voltage transformer that actually supplies 24VAC to the wall thermostat.

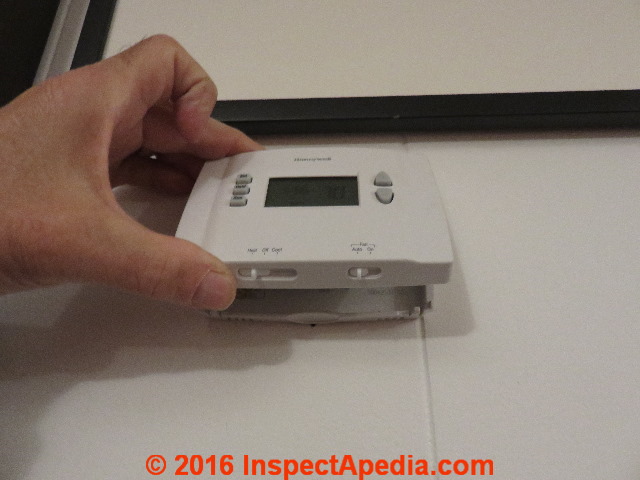
- Remove cover - remove the cover from the existing wall thermostat.
You'll need to do this to see the wires and to label, then disconnect them from the old thermostat in preparation for its removal. Usually the thermostat cover snaps right off but a few older thermostats may sport a small screw to be removed.
Watch out: stop and look at our photo above: see that the temperature (70F) is shown in the display. So we know that power has not been turned off to this system. If power were off the display should be blank - but not always: some thermostats may use an internal battery that will continue to show the display even when power is OFF. Usually an error message will also be in the display.
For the old thermostat that we'll remove in our example, we remove the cover by hooking a thumb or finger under the bottom edge of the thermostat other fingers on the upper edge of the thermostat.
Then our fingers pull the thermostat bottom cover up and away from the wall. Why go to so much trouble?
Well some thermostats are mounted to the wall by simple screws fastened into nothing more than drywall. We don't want to rip the whole thermostat away from the wall if we can help it as that would damage the wall and leave a mess.
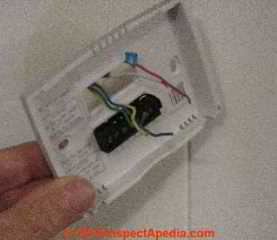
Below I've removed the existing wall thermostat from its base.
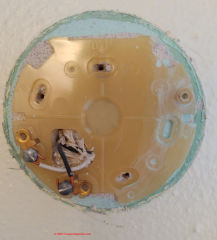
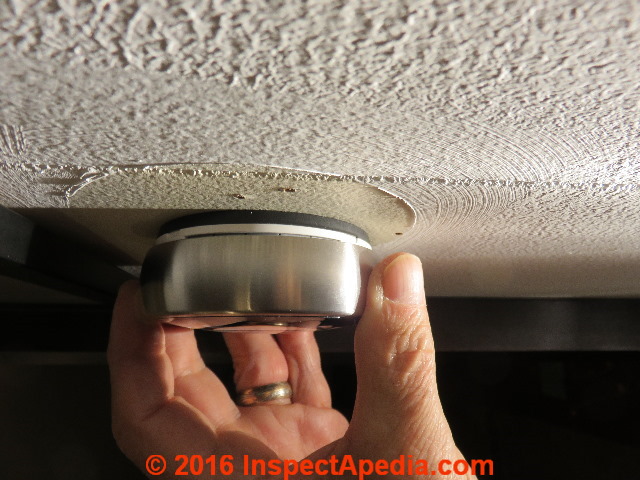
One of our editors replaced a thermostat (circa 1960), one that had seen multiple changes in wall paint color over its lifetime.
She had to use an exacto knife to cut around the thermostat base before it could be removed due to the dried layers of paint holding it to the wall even after the screws were removed.
The below photo shows some of the paint layers revealed after removal.

Next we'll check to be sure we're working with a 24VAC thermostat not a line voltage unit.
- Check your system - check the labeling on the existing thermostat and check its wiring for evidence that yours is a line-voltage or 120VAC or 204VAC thermostat.
Click to enlarge the photo just above and you 'll see two indications that this is a conventional 24VAC wall thermostat:
First: note the small diameter wires in the device.
Second: in the upper left corner of the wall plate we see labeling that indicates 1A/24VAC. Great! This heating system will accept a Nest learning thermostat.
You might also notice that only two wires, a red and a white wire were in use at the old thermostat. This is the most-simple situation. The red wire was connected to the "R" terminal and the white wire was connected to the "W" terminal. Wiring up this Nest thermostat is going to be a snap.
But there are always exceptions...with the older thermostat pictured in the below photo (circa 1960), there was no red wire, only a black and a white, and no markings indicating voltage.
Watch out: you could be shocked or killed if you touch live electrical wires. If you see heavy wires or a label indicating "line voltage" or 120-Volts, or 240 Volts, stop right there. First double check that electrical power has been turned off. If the thermostat display is now blank and if turning the thermostat setting up or down does not cause your air conditioner or heating system to do anything then probably power is off.
If you cannot tell if you've got low voltage (thin wires, 24VAC thermostat wires) or high-voltage (120 VAC or 240VAC thick electric wires with large twist-on connectors or "wire nuts") then stop and contact Nest support or hire a licensed electrician to help you out. If your heat is provided by electric baseboards, chances are your thermostat is a line-voltage 120VAC or 240 VAC thermostat. Stop there.
Watch out: never connect a Nest thermostat to high voltage (120V or 240V) electrical wires. If you do, in addition to the safety warnings already given, you'll destroy the thermostat.
At REPAIR AUTOMATIC OUTDOOR LIGHT FIXTURE we illustrate how to use a low-cost neon-tester to double check that electrical wires are not "live".

- Remove jumper wires - if you see short jumper wires between connectors in the old thermostat you can remove them or just ignore them since they'll stay with the old thermostat when you remove it.
Nest explains and we agree that you can simplify the electrical wiring by tossing un-needed jumper wires; for example, a wire labeled as "R" (usually this is a red wire) can be connected to either a terminal marked RC (red wire for cooling) or RH (red wire for heating).
- Label wires - Nest gives you some nice little stickers that you can wrap around each of the in-use thermostat wires to avoid any confusion when hooking them up to the Nest thermostat later.
Watch out: it's smart to attach labels before you disconnect any wires. That way when the baby cries or the dog pees on the floor in the middle of your Nest thermostat installation project, the distraction won't lead to a wrong-wire connection later. Sometimes the actual-use of wires doesn't match the wire color code. Compare the wire colors against the names of the terminals where the wires are connected on the old thermostat.
At THERMOSTAT WIRE CONNECTIONS - separate article - we review the standard thermostat wiring color codes and connections.
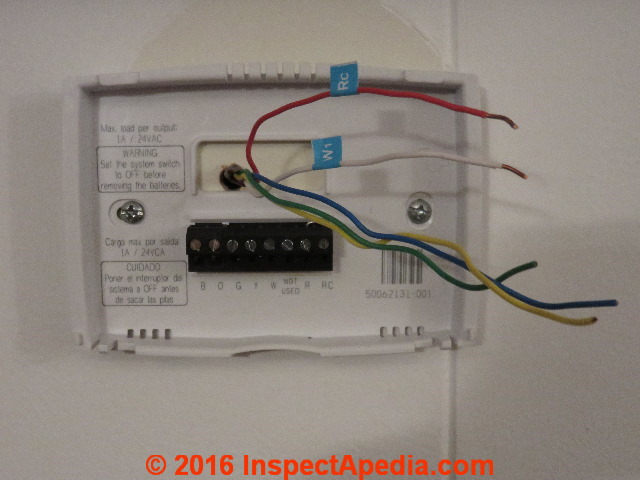
- Disconnect wires & remove base - our photo above shows that we labeled only two wires: the red and the white wire, since no other wires at this wall location were connected to anything in the old thermostat.
We've straightened out all of the wires so that it'll be easy to remove the old thermostat base plate.
Above: we're removing the old thermostat base plate. Notice that even though I confirmed that electrical power was OFF to this thermostat, by habit of being safe I keep the bare stripped ends of the wires from touching one another. [Click to enlarge any image to see a nicer view]
Below are photos for the next Nest learning thermostat installation step: marking where the Nest thermostat base plate mounting screws will go.
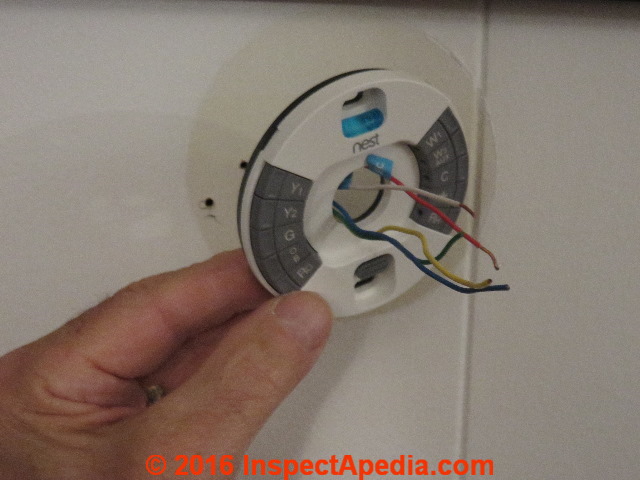

- Mark where screws will go - Above you'll see I'm placing the new Nest 3 Learning Thermostat base plate against the wall: I route the wires through the opening in the center of the base plate, and then using Nest's built-in level, I hold the thermostat level on the wall : the bubble is between the two black lines marked on the blue fluid-filled tube.
Above I'm ready to mark the screw locations that will mount the thermostat on the wall. I'm fastening this thermostat to a wall built of drywall covered by wood paneling. The screws will give a nice firm purchase thanks to the paneling. I make my marks in the center of the oblong screw opening. That will allow slight fine-tuning to get the thermostat base plate truly level on the wall.
This thermostat will work properly even if it is out of level, as it uses a modern thermistor type temperature sensor. Some older thermostats would actually be inaccurate if not kept level on the wall.
So why do we care?
Well for one thing your new beautiful Nest 3 Thermostat display will look crummy if the temperature or text displays are visibly slanted on the wall. And if you're mounting the thermostat to plain drywall, trying to fix an out-of-level thermostat by moving a screw over 1/8" drywall is going to turn into a nasty project - I'll demonstrate that in a separate article.
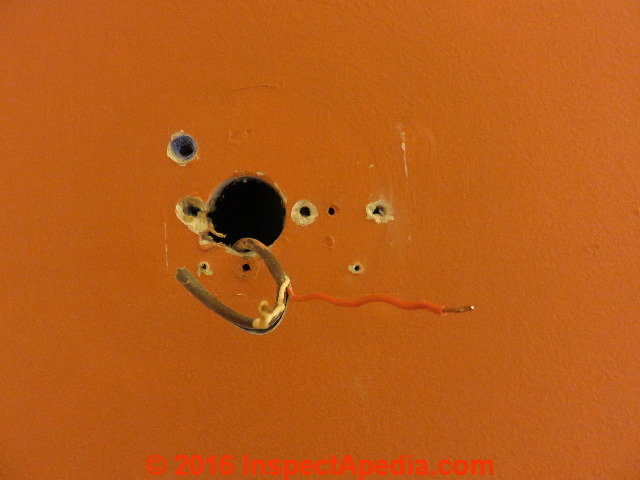
Watch out: if the hole in the wall through which your thermostat wires emerge is anything but quite snug around the thermostat wires, seal it with caulk, chewing gum, or something before you mount the new thermostat base.
Otherwise air currents and leaks through the wall cavity and out at the wiring opening can fool your thermostat into misreading the actual temperature in the room where it's mounted. I'll demonstrate sealing a big hole in the wall around thermostat wires in a separate article.
If your thermostat wires protrude through an opening like the one shown above, be sure to see how to seal that opening best
at THERMOSTAT WIRING OPENING SEAL.
Don't just use a thermostat base plate to "cover" over a messy wall like the one shown above. Air leaks through those openings can still foul up the accuracy of the room thermostat. Below we continue with the attachment of the Nest thermostat base.
Watch out: Power sharing thermostats like Nest may cause false signals if not wired properly. The company provides
NEST THERMOSTAT WIRING INSTRUCTIONS for use with their Energy Kinetics 2000 MANAGER [PDF]

- Attach the Nest base - Nest includes some nice double-helix coarse-thread screws that are suitable for attaching the Nest thermostat base to the wall.
Watch out: When preparing your thermostat wires and before you start screwing the new thermostat mounting plate to the wall, if extra wire slack permits, be sure that you've pushed a loop of thermostat wire away from the wall surface inside the wall cavity.
This extra space and loose thermostat wires inside the wall cavity will reduce the chances that you drive a sharp-pointed thermostat base mounting screw through the thermostat wires, damaging them or even breaking or shorting the wires.
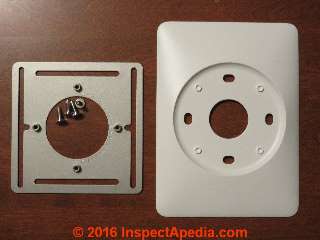
Watch out: helping my brother-in-law David install a Nest in his Chicago home we were using the metal electrical box plate and the trim plate shown below to mount David's Nest thermostat.
Using my fat stubby fingers and fumbling to start one of the screws, I managed to drop a screw through a large wiring opening in the wall and down inside the wall cavity. As I heard the "clink" of the screw hitting the bottom of the wall cavity about five feet below, I felt like a real dope.
David didn't say anything but he did have a sort of smirk on his face. So there's another reason to seal up that big wiring hole in the wall before attaching the thermostat base plate. Happily the finished Nest thermostat installation (second photo below) looked pretty good anyway.


As one of my bosses once said, "This young man never makes the same mistake twice, but apparently he intends to make them all, once."
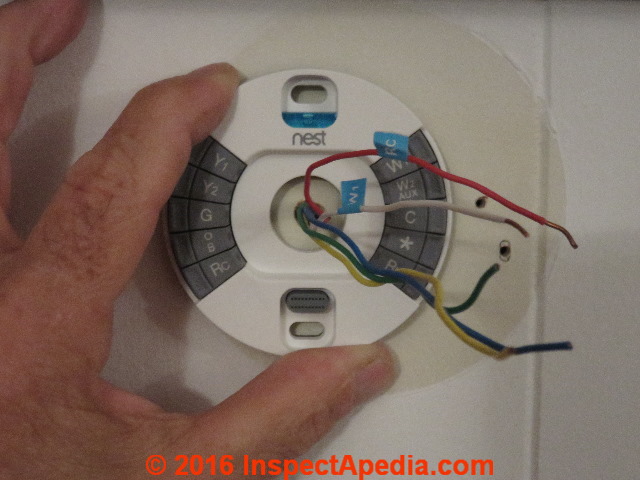
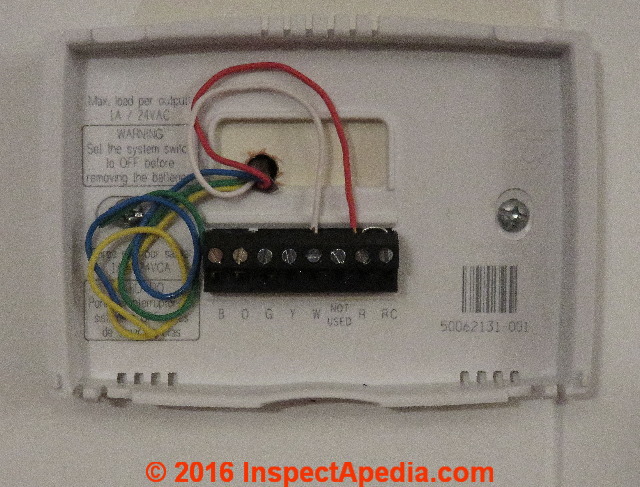
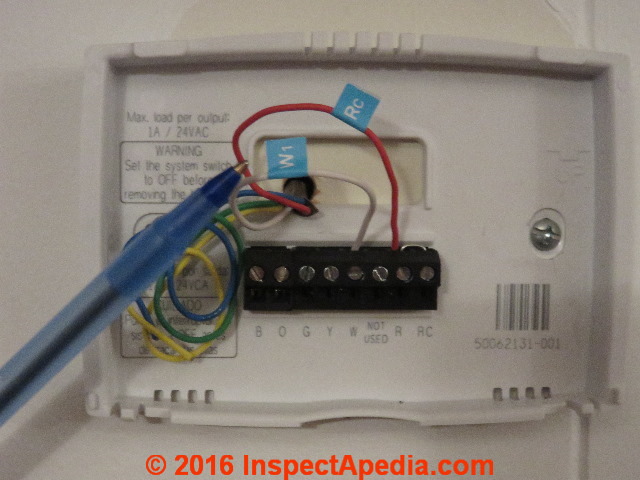
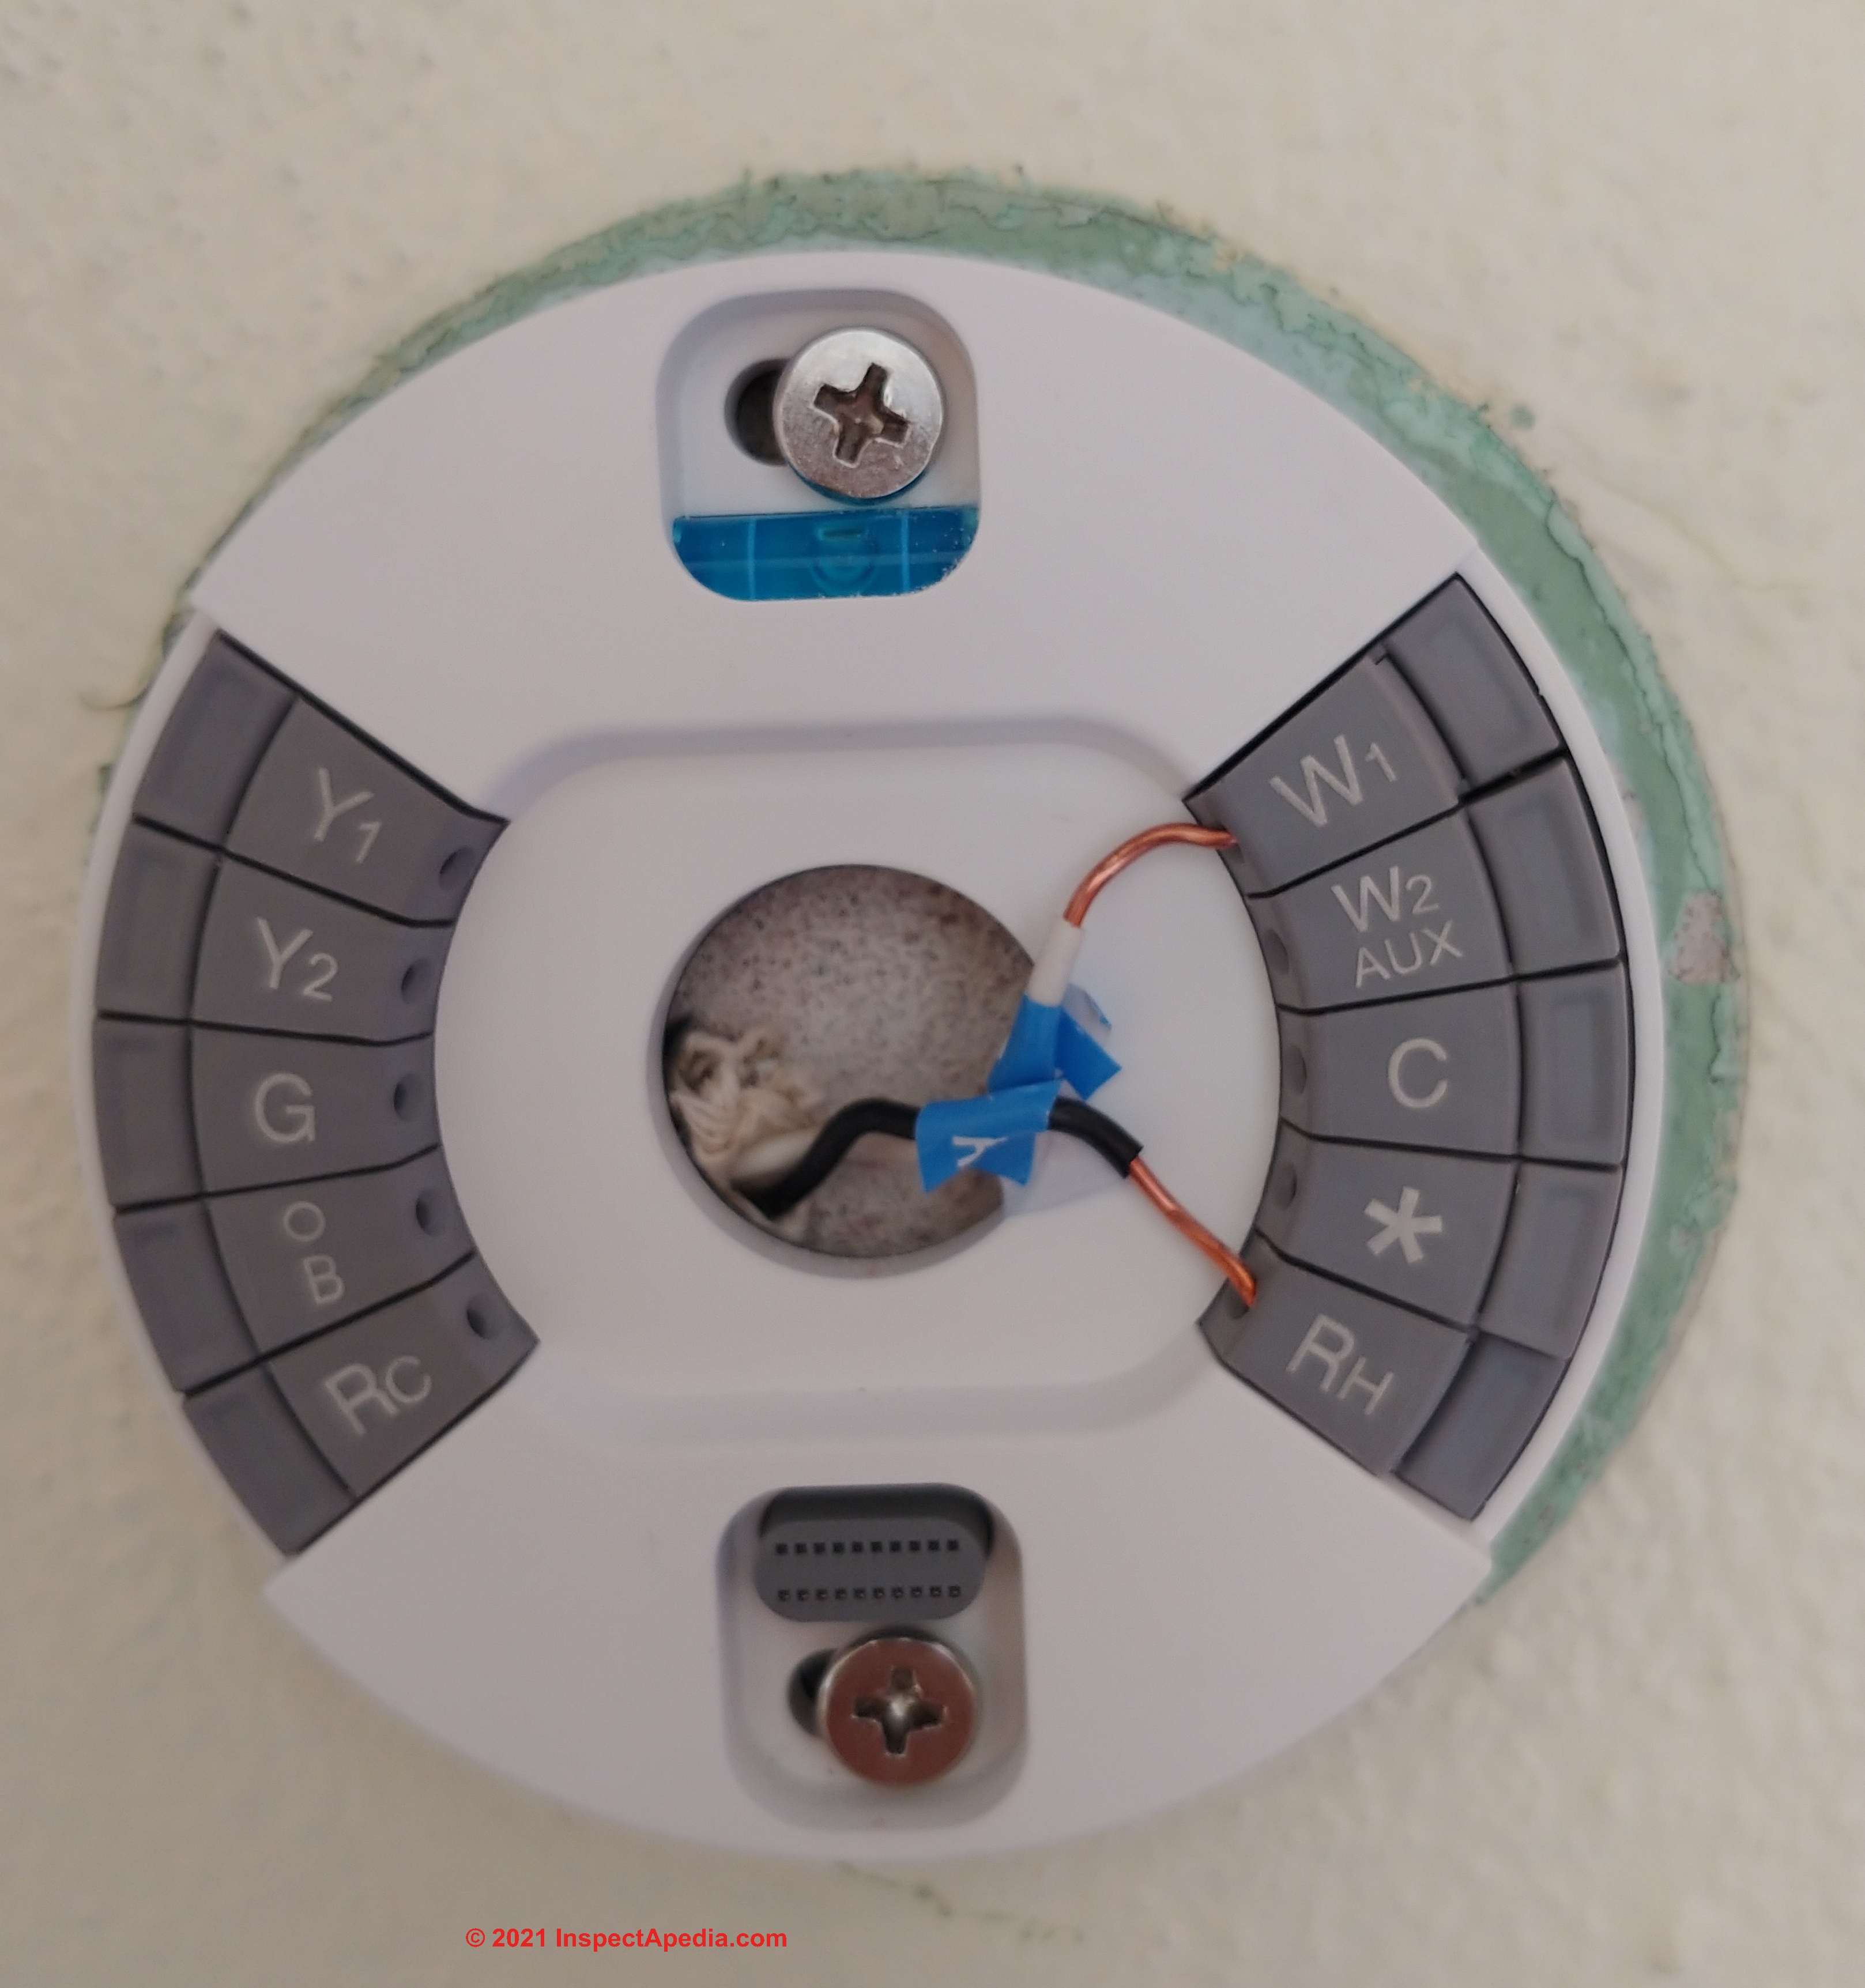
Below we continue by attaching the white wire to the W1 terminal on the Nest thermostat base.
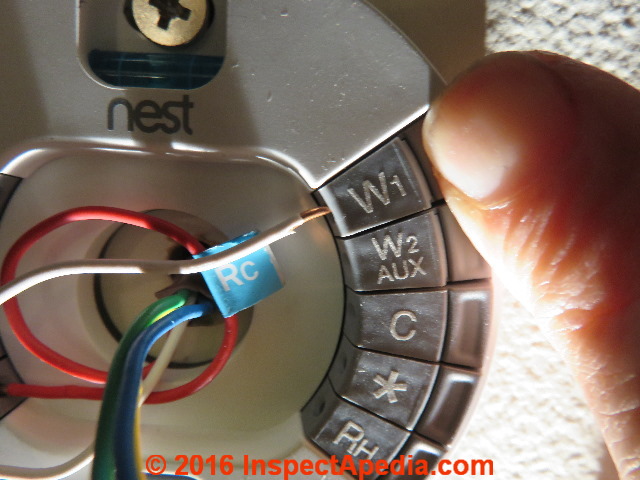
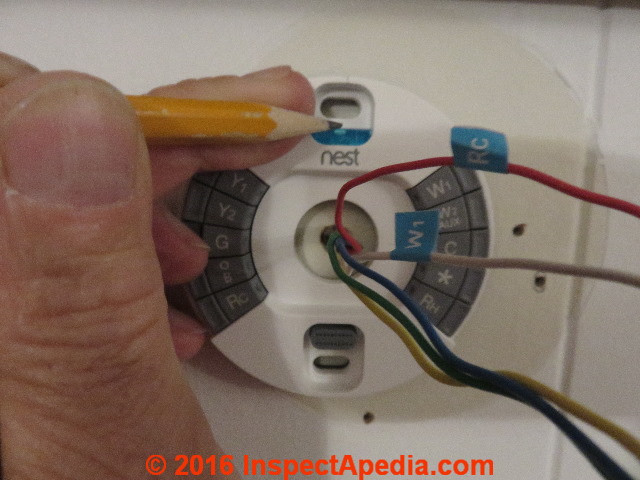
- Connect the HVAC wires to the Nest Thermostat - Above I'm pushing the end of the white wire into the W1 terminal on the Nest thermostat base. Push in the small button to the right of the wiring terminal for easiest wire insertion.
Watch out: as I illustrate below: if the thermostat wire ends are bent and crooked they may not make a nice reliable connection on the thermostat base.
Use pliers to straighten the wire end or if it's nicked and nasty, provided you've got enough extra wire length, just snip off the old end and strip back about 1/4" of insulation to make a new wire end for insertion.

Above: straightening out kinked thermostat wire before trying to connect it.
For a simple 2-wire heating installation at this home, with a Nest, the R or Red wire is connected to the Rc
Again, there was an exception with our older thermostat that had no Red wire, only a black and a white. If there are just 2 wires, and it's a heating system the wires connect to W1 and Rh - there is no Common or Rc wire.
We pushed the white wire into the W1 terminal on the Nest base.
The black wire took the place of a red wire and that was inserted into the Rh terminal on the Nest base as shown in this photo.
Here is what Nest says about the Nest Thermostat Wiring Connections
The Nest Thermostat is designed to work even if your home doesn’t have a common C wire. Rarely, installing a new C wire may be required.
If you need a C or Common Wire and none is already provided for your thermostat,
see COMMON WIRE at THERMOSTATS
Based on Nest’s online compatibility checker data, the Nest Thermostat works with most 24V systems, including gas, electric, oil, forced air, variable speed, heat pump and radiant.
It can control:
- Heating: one, two and three stages (W1, W2, W3)
- Cooling: one and two stages (Y1, Y2)
- Heat pump: with auxiliary and emergency heat (O/B, AUX, E)
- Fan (G)
- Power (C, Rh, Rc)
- Humidifier or dehumidifier (HUM, DEHUM)
- The Nest Thermostat’s * connector can accept only one of these wires: W3, E, HUM or DEHUM
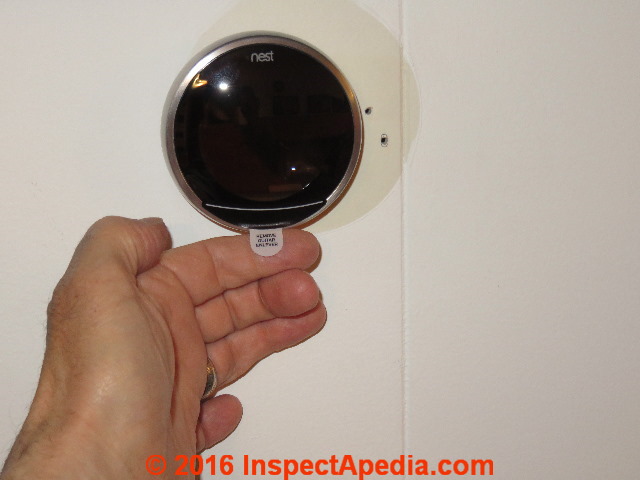
- Attach the display - the Nest display simply snaps onto the thermostat base. But
Watch out: to align the wiring connection plug with care before pushing the display into position.
Watch out: also remember to remove the protective stick-on tab over the sensor on your Nest Thermostat.
Otherwise it won't be able to see very well. [Below] When the Nest thermostat is successfully mounted to the Nest wall plate, the display will be black as we show below, as we've not yet turned on power to the Nest thermostat.
Above is the pull-off tab to be removed from the Nest's room sensor.

- Switch power back on - turn on the same heating or air conditioning main power switch that we turned-off at Step 1.
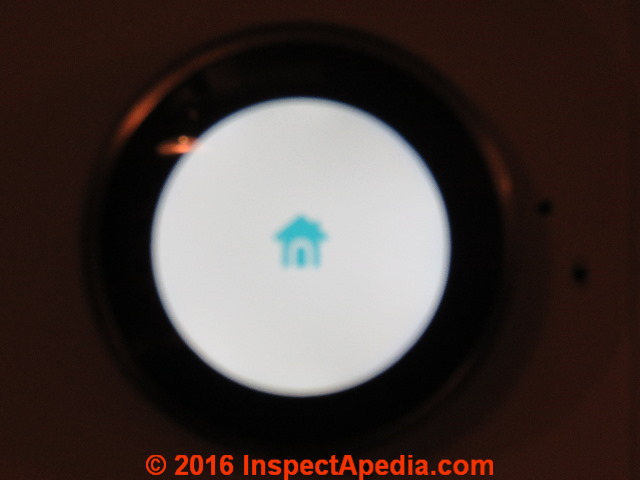
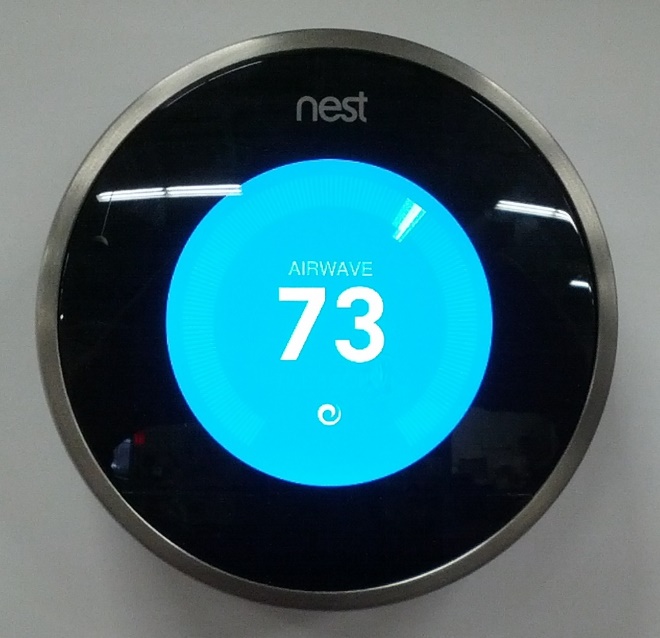
Above: this is what you'll see when the Nest thermostat is first powered-up: the screen lights and the icon appears as shown.
How to Set Up or Program & Initialize a Nest Thermostat
These details are now found at SET UP & PROGAM the NEST THERMOSTAT - separate article
It is worth noting here however that the thermostat's outer bezel rotates in order to select various options that will be displayed on its screen. Once you've rotated to your choice, a simple press on the thermostat will select that option.
Watch out: on more than one occasion, we had to restart our smart phone in order to complete the installation of a Nest product. In this case, specifically for the verification code to be accepted so that the thermostat and phone could 'talk' to each other. Once the phone was restarted, it worked perfectly.
- Setup and Nest Account - [Text in process ] If you have not already done so, Nest's instructions with the Nest 3 instruct you to go to nest.com/account - or currently https://home.nest.com/ to create an account or to sign in to an existing account.
Your Nest learning thermostat will tell you what thermostat control wires it has found connected to itself.
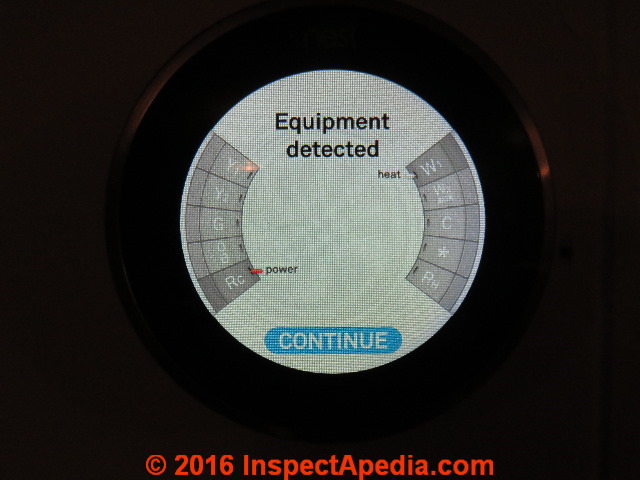
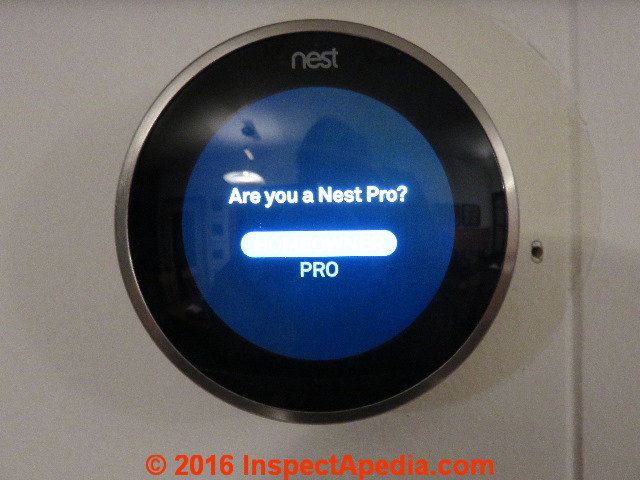
And it will ask you if you're a Nest-Professional installer. I say no.
The Nest thermostat will let you know what type of equipment it thinks it's controlling.

Below we're using a smartphone to check our Nest account and its ability to control a Nest 2 learning thermostat.
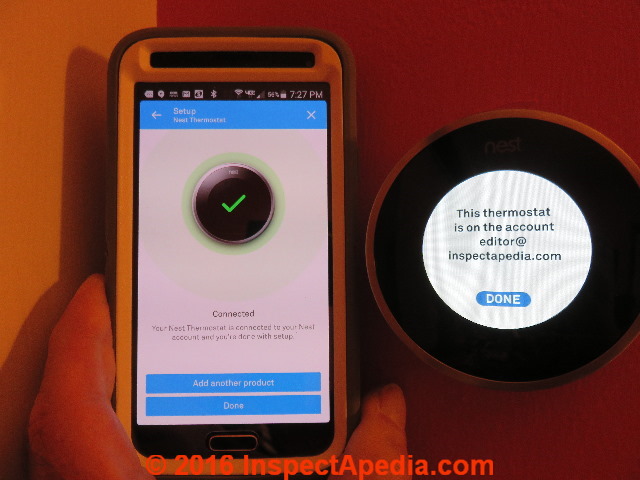
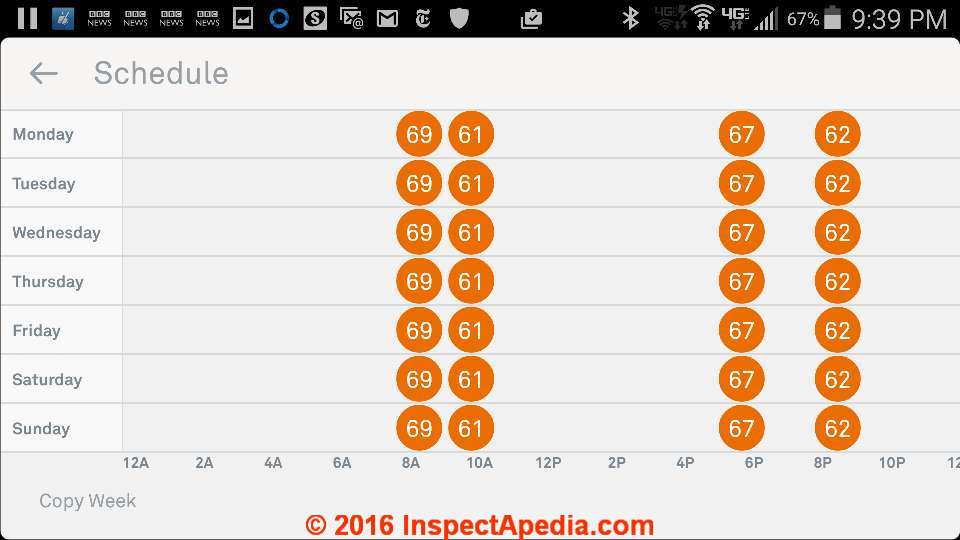
With your nest account activated, by smartphone or from your computer you can both monitor what each Nest thermostat says is going on in your building and you can program the thermostat's set back time and temperature by day.
[Click to enlarge any image]
More about The Nest™ Learning Thermostat
"The Nest Learning Thermostat" is an electronic device that can control room temperatures and possibly other components connected to or installed as part of a home automation system.
We have installed three of these in our test building and will report further on ease of installation, programming, and use as well as using and adjusting the Nest thermostat remotely from your cellphone, computer, or tablet.
Photo: the Nest® Learning Thermostat on demonstration display at a Home Depot store in 2013. [Click to enlarge any image]
Adapting data from the company's website:
Nest learns your schedule, programs itself and can be controlled from your phone. Teach it well and Nest can lower your heating and cooling bills up to 20%.
[The] Nest [smart room thermostat] works with 95% of 24V heating and cooling systems, including gas, electric, forced air, heat pump, radiant, hot water, solar, and geothermal and includes these common thermostat control wire connections: Rc, Rh, W1, W2/AUX, Y1, Y2, G, O/B, Common “C”, and also Nest - a connector that can accept one of: W3, E, HUM or DEHUM. [2]
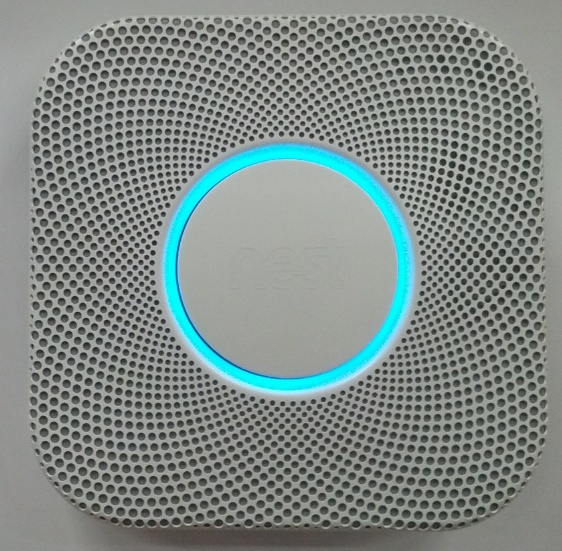
The Nest® Learning Thermostat also communicates wirelessly with Nest's Protect® shown at left, the company's carbon monoxide detector & smoke detector released in 2013 (CO DETECTION OPTIONS).
Really?: this smart thermostat is very appealing but in our OPINION it is a bit pricey at $250./ per thermostat plus $119 for concierge installation of one unit, more-so in buildings with multiple heating zones each of which requires control by an additional individual thermostat. The good news is that most consumers probably don't need to hire a concierge service to install the unit.

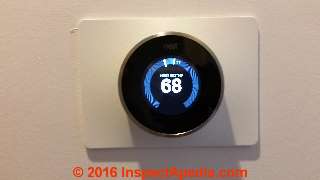
Photo above: the Nest Learning Thermostat in programming mode with a red display indicating a programmed temperature and time.
Separately at NEST CAM INSTALLATION & USE we describe installing and using Nest cams (security cameras) or drop cams for both home security monitoring and for remote monitoring of a building for leaks, loss of heat, water or ice damage, or for intrusion or security issues.
More about how to protect a building from freeze-damage is
at WINTERIZE - HEAT ON PROCEDURE
Watch out: if your smart thermostat needs a C-wire or COMMON wire and none is provided at the thermostat, you'll need to provide one.
See details at COMMON WIRE at THERMOSTATS
Nest Learning Thermostat Wiring, Installation, Manuals & Guides
Below: Nest Thermostat Connectors for conventional heating / cooling
Conventional ConnectionsNest Thermostat
Wiring Terminal |
|
| Terminal ID | Function |
| Y1 | Compressor Relay (Stage 1) |
| Y2 | Compressor Relay (Stage 2), 2nd-speed fan relay |
| G | Fan Relay* |
| O/B | Not Used |
| Rc | 24VAC power from cooling transformer |
| W1 | Heat Relay (Stage 1) |
| W2/AUX | Heat Relay (Stage 2) |
| C | 24VAC Common Wire † |
| * | Stage 3 heat (W3), humidification (HUM), or dehumidification (DEHUM), 3rd-speed fan relay |
| Rh | 24VAC power from heating transformer ‡ |
Below: Nest thermostat connectors for Heat Pump Installations
Heat Pump ConnectionsNest Thermostat Wiring Terminal |
|
| Terminal ID | Function |
| Y1 | Compressor Relay (Stage 1) |
| Y2 | Compressor Relay (Stage 2), 2nd-speed fan relay |
| G | Fan Relay* |
| O/B | Heat Pump Changeover Relay |
| Rc | Not Used |
| W1 | Heat Relay (Stage 1) |
| W2/AUX | Auxiliary Heat Relay |
| C | 24VAC Common Wire † |
| * | Emergency heat (E), humidification (HUM), or dehumidification (DEHUM) |
| Rh | 24VAC power from transformer ‡ |
Notes to the Nest Thermostat Wiring Tables Above
Note that for most installations you will be using only a few of these wire terminal connections. Source of this table is the Nest Pro guide given below.
- NEST LEARNING THERMOSTAT PRO INSTALLATION & CONFIGURATION GUIDE [PDF] original source: http://support-assets.nest.com/images/pro-faq/Nest-Pro-Installer-Guide.pdf
Tip: this Nest thermostat installation guide has details of exactly which thermostat control wire connects to which Nest thermostat terminal for just about every possible configuration of heating and cooling system. - NEST LEARNING THERMOSTAT INSTALLATION GUIDE [PDF] retrieved 2021/04/21 original source: https://nest.com/support/images/000001204/Nest_Learning_Thermostat_Installation_Guide.pdf
Really? this more-general guide for consumers provides no details about which thermostat wires connects to which terminals on the Nest. If you're not confident that your original thermostat wires were correctly labeled you may need to watch a Nest installation video or let the thermostat itself confirm that you've made the right connections, or call the company for help.
Reader Comments, Questions & Answers About The Article Above
Below you will find questions and answers previously posted on this page at its page bottom reader comment box.
Reader Q&A - also see RECOMMENDED ARTICLES & FAQs
On 2022-05-04 by Andrew F Millett - What terminals do we put power to on a Nest thermostat?
I installed a nest thermostat for a customer. Just for heat but we want to feed it for power so it does not require the need to recharge.
What terminals do we put power to ? Thank you for your help. Andy
On 2022-05-04 by Inspectapedia Com Moderator
@Andrew F Millett,
Power is brought to the C or "Common" terminal.
On 2022-02-21 by Earle Baddaloo - confusion about old thermostat wiring to new Nest thermostat
My old thermostat is a Carrier which runs an AC and a High efficiency furnace. The thermostat has two wires, a white and a red. There are two other wires inside the thermostat but they are not connected. I purchased a Nest 3rd Generation and the video says ONLY connect the wires that are connected in your old thermostat. What should I do?
On 2022-02-21 by Inspectapedia Com Moderator
@Earle Baddaloo,
Honestly I'm at a loss. I must be misunderstanding something but I don't quite see how we'd be using a two-wire thermostat with ONLY two wires, red and white (normally Heat and Common) to run BOTH heating and cooling systems unless there are some other switches, controls, or thermostats elsewhere in the building.
You'll see above on this page the standard wiring:
If there are just 2 wires, and it's a heating system the wires connect to W1 and Rh - there is no Common or Rc wire.
So perhaps you can tell us the model of your existing Carrier thermostat and you can post a photo of its wires connected to its terminals, and then ask your heating/cooling service tech to point out what other controls could be in use to give you control over both heating and cooling.
On 2022-01-16 by randy freeman - old thermostat has seven wires my Nest Thermostat only has six connections
My old thermostat has seven wires my Nest Thermostat only has six connections how can I fix this
On 2022-01-17 by Inspectapedia Com Moderator - Nest wiring installation tables will help determine connections
@randy freeman,
The Nest wiring installation tables, including those given here, will tell you where each wire connects. You need to identify all seven of the original wires.
In some Nest installations one of those wires may not be used, or may be a jumper.
On 2021-10-18 by jerry - thermostat will not heat unless I jump A to W.
my nest thermostat will not heat unless I jump A to W. what am I doing wrong?
On 2021-10-18 by inspectapedia.com.moderator - check for broken or shorted wires
@jerry,
Nest pretty much always tells us to remove or eschew the use of terminal jumpers that may have been present on the old thermostat. That's because this smart thermostat figures out which terminals to activate, e.g. heating or cooling, based on building conditions.
So I'd first check to be sure your thermostat wires are correctly identified and that none are shorted or broken or damaged.
On 2020-09-29 by Anonymous
I’m installing a new nest thermostat I have 4 wires blue goes to RH white to W1 green to C and red to power bridge

On 2020-09-28 by Roger
Hooking up a Nest thermostat from a Greenlite thermostat, the Greenlite has a power bridge wire.. where does that wire go on a nest thermostat.
On 2020-07-24 by danjoefriedman (mod)
Sami
Thank you for the helpful question and image.
I need to know a little more about what equipment you're hooking-up to the thermostat, but I suspect they're saying that the thermostat needs to be wired to an external control relay that does the actual on-off switching of your heat pump that switches between HEAT mode and COOL mode.
On 2020-07-24 by Sami
I Talked to Nest Chat Support and they tolled me to Install Orange and Blue to same Terminal in Nest *AB. also they mentioned that I have to use Relay in these 2 wires, does anyone know what Relay they are talking about and how to wire that Relay? Picture attached is how they told me to wire my Heat Pump System..

Question:
Our Nest thermostat is acting up. Last evening the furnace was running and running and not shutting off.
At times, the Nest indicated the R wire was having problems.
It was connected to the panel behind the thermostat cover and seemed fine (a bit frayed, as it has always been). Anyhow, called [our heating service company], and the guy thought the problem was decaying/crossed wires and told us to call on Monday and set up a time to have the wiring redone from the thermostat to the furnace.
We've been reading a lot on line about the need for a "C" wire with Nest devices.
Is that something that should be run from the thermostat to the furnace as well? - Anonymous by private email 2020/02/15
Reply:
This photo

shows that we're running a Nest thermostat similar to yours quite successfully with just 2 wires, red and white - wired to the nest W1 (white) and Rc (red)
But indeed it's possible that your old thermostat (TT) wires are shorted together somewhere.
The thermostat is nothing at all but a simple "on-off" switch that responds to temperature.
So if its 2 wires are shorted together anywhere that's the same as always calling for heat.
Also see the diagnostic steps
On 2020-02-03 - by (mod) -
Phil
I'm left as much in the dark and as worried about my wallet as you must be.
I know that some honest and smart service technicians may not be great communicators, but insist on the specifics.
What part(s) are broken and need replacement?
How do we know what's wrong? What did he or she see or do or test?
Of your $1000. bill how much of that is parts and how much labor?
On 2020-02-02 by Phil
Heater wouldn’t shut off. Tech came and said something that affects the zones needed to be replaced. Said it would cost 1,000 to replace it. I have no idea what would cost that much that had something to do with zones. Any idea what that might be?
On 2020-01-10 - by (mod) -
Let's start by stepping through the diagnostic list in the article above on this page
On 2020-01-10 by William Lessor
I have a battery operated digital heater thermostat. That won't shut off. I have pushed the reset button. And it still on shut off
...
Continue reading at NEST THERMOSTAT SET-UP & PROGRAMMING, or select a topic from the closely-related articles below, or see the complete ARTICLE INDEX.
Or see these
Recommended Articles
- ADD a COMMON WIRE at THERMOSTATS
- CONVERT LINE to LOW VOLTAGE THERMOSTAT if you want to use a Nest thermostat to control line voltage 120V or 240V heating equipment
- NEST LEARNING THERMOSTATS - home
- HUMIDITY RESPONSE, NEST THERMOSTATS
- Nest C-WIRE WASSERSTEIN C-WIRE KIT INSTALLATION DETAILS
- Nest C-WIRE KIT FAILURE, DEFECTIVE AC ADAPTER TEST
- NEST THERMOSTAT INSTALLATION & WIRING - you are on this page
- NEST THERMOSTAT SET-UP & PROGRAMMING
- NEST THERMOSTAT SET-UP COOL vs HEAT
- NEST 2 vs NEST 3 THERMOSTATS
- NEST THERMOSTAT WIRING INSTRUCTIONS for use with their Energy Kinetics 2000 MANAGER [PDF]
- THERMOSTAT TROUBLESHOOTING - Separate article: What to check if a thermostat is just not working
- THERMOSTAT WIRE CONNECTIONS - how to wire up all types and brands of heating & cooling thermostats- how to wire up all types and brands of heating & cooling thermostats
- THERMOSTAT WON'T TURN OFF
- THERMOSTAT WON'T TURN ON
Suggested citation for this web page
NEST THERMOSTAT INSTALLATION & WIRING at InspectApedia.com - online encyclopedia of building & environmental inspection, testing, diagnosis, repair, & problem prevention advice.
Or see this
INDEX to RELATED ARTICLES: ARTICLE INDEX to HVAC THERMOSTATS
Or use the SEARCH BOX found below to Ask a Question or Search InspectApedia
Ask a Question or Search InspectApedia
Try the search box just below, or if you prefer, post a question or comment in the Comments box below and we will respond promptly.
Search the InspectApedia website
Note: appearance of your Comment below may be delayed: if your comment contains an image, photograph, web link, or text that looks to the software as if it might be a web link, your posting will appear after it has been approved by a moderator. Apologies for the delay.
Only one image can be added per comment but you can post as many comments, and therefore images, as you like.
You will not receive a notification when a response to your question has been posted.
Please bookmark this page to make it easy for you to check back for our response.
Our Comment Box is provided by Countable Web Productions countable.ca
Citations & References
In addition to any citations in the article above, a full list is available on request.
- In addition to citations & references found in this article, see the research citations given at the end of the related articles found at our suggested
CONTINUE READING or RECOMMENDED ARTICLES.
- Carson, Dunlop & Associates Ltd., 120 Carlton Street Suite 407, Toronto ON M5A 4K2. Tel: (416) 964-9415 1-800-268-7070 Email: info@carsondunlop.com. Alan Carson is a past president of ASHI, the American Society of Home Inspectors.
Thanks to Alan Carson and Bob Dunlop, for permission for InspectAPedia to use text excerpts from The HOME REFERENCE BOOK - the Encyclopedia of Homes and to use illustrations from The ILLUSTRATED HOME .
Carson Dunlop Associates provides extensive home inspection education and report writing material. In gratitude we provide links to tsome Carson Dunlop Associates products and services.
 | HOME | ABOUT | ASK a QUESTION | CONTACT | CONTENT USE POLICY | DESCRIPTION | POLICIES | PRIVACY | |
| © 2024 - 1985 Publisher InspectApedia.com - Daniel Friedman | |||||||||