
InspectAPedia® FREE Encyclopedia of Building & Environmental Construction, Diagnosis, Maintenance & Repair |
Question? Just ask us! InspectAPedia
|
 ADA Grab Rail Design Specifications for Seniors
& Others of Limited Mobility
ADA Grab Rail Design Specifications for Seniors
& Others of Limited Mobility

- POST a QUESTION or COMMENT about choosing & installing grab bars or grabrails.
Grabrail design specifications for older adults or for people with limited mobility:
This article series lists safety features and optimal stairway designs for older building occupants. These same specifications should assist anyone who has limited ability to climb stairs such as people suffering from arthritis.
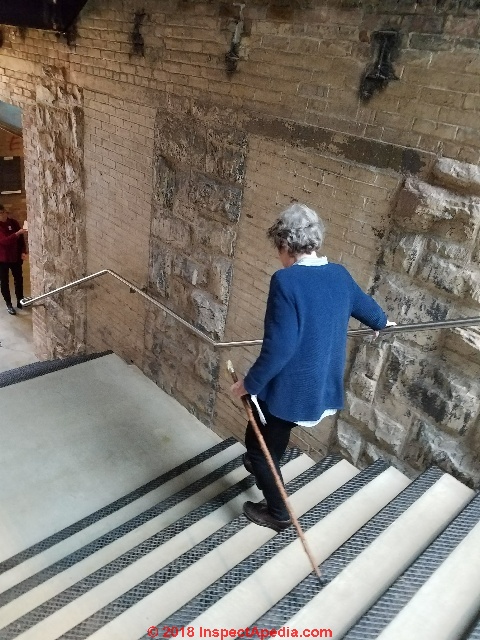
Page top photo: an older stair-user at Portofino near Genoa, Italy, facing a steep climb, angled stairs, and an open stair guard is nonetheless making use of a secure handrailing.
InspectAPedia tolerates no conflicts of interest. We have no relationship with advertisers, products, or services discussed at this website.
Optimum & ADA Grab Bar Installation Details for Seniors & People with Limited Mobility
 Handrailing & Grab-Rail design for seniors: secure, continuous, graspable handrailings, grabrails or grab bars, require more than a secure mounting and must also be at the proper height, length, spacing from the wall and cross-section size.
[Click to enlarge any image]
These grab bar installation details are adapted and expanded from the US ADA grab bar specifications found in CHAPTER 6: PLUMBING ELEMENTS AND FACILITIES of the 2010 ADA Specifications cited in detail at the end of this article.
Watch out: don't get buried in the avalanche of guardrail, handrail, and grab bar specifications. A handrailing is not a grab bar.
Grab bar installation locations and heights etc. that are discussed here are treated separately from handrailing heights and spacings along stairs and from guardrailing heights and enclosures on balconies, decks, and porches.
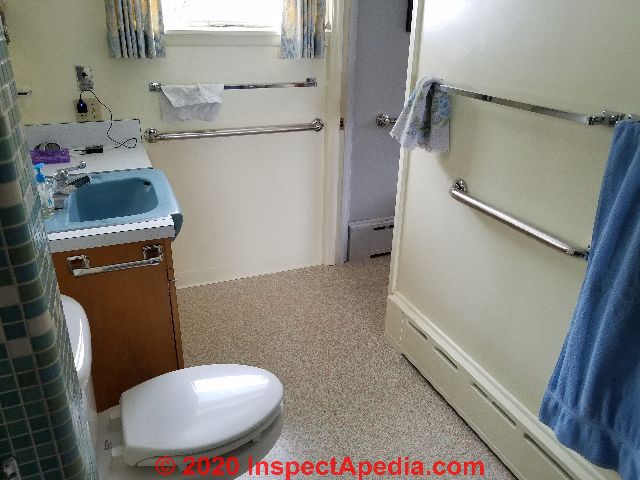
Grab Bars at Water Closets.
Photo above: grab bars installed by the author [DF] in 2019 in a northern Minnesota home. [Click to enlarge any image]
Space limitation as well as lack of other mounting locations led to our use of a smaller grab bar affixed to the side of the cabinet next to the toilet - shown above.
Watch out: a typical vanity base cabinet side wall may be too thin to hold a grab bar securely in place. For this installation we added a 1x4 wooden strip on the interior of the cabinet wall to give a stronger purchase for the grab bar mounting screws.
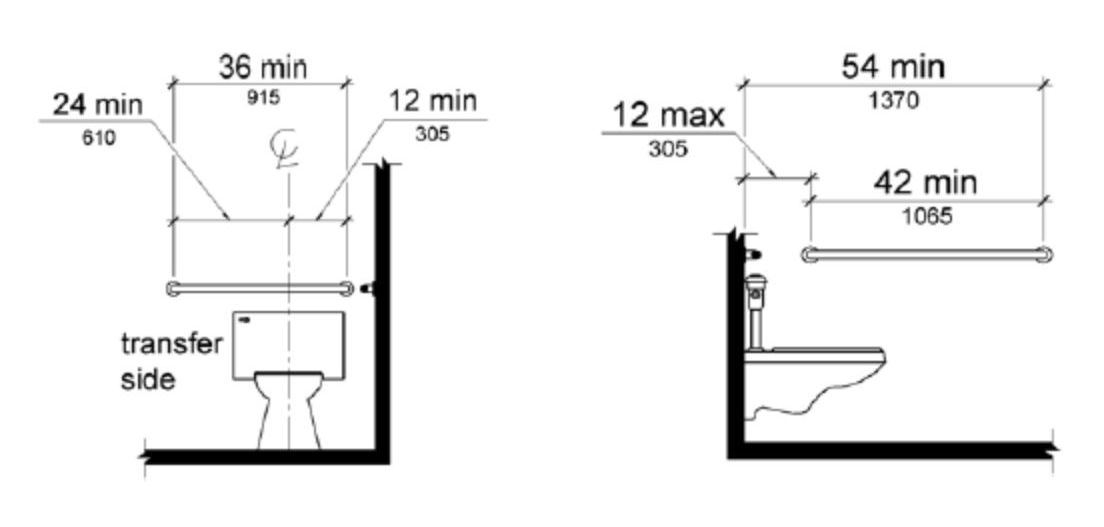
Figure 29(a) Back Wall.
A 36 inches (915 mm) minimum length grab bar, mounted 33-36 inches (840-915 mm) above the finish floor, is required behind the water closet.
The grab bar must extend at least 12 inches (305 mm) from the centerline of the water closet toward the side wall and at least 24 inches (610 mm) from the centerline of the water closet toward the open side.
Figure 29(b) Side Wall.
A 42 inches (1065 mm) minimum length grab bar is required on the side wall, spaced a maximum of 12 inches (305 mm) from the back wall and extending a minimum of 54 inches (1370 mm) from the back wall at a height of 33-36 inches (840-915 mm).
The toilet paper dispenser shall be mounted below the grab bar at a minimum height of 19 inches (485 mm). The height of the toilet seat shall be 17 to 19 inches (430 - 485 mm) above the finished floor.
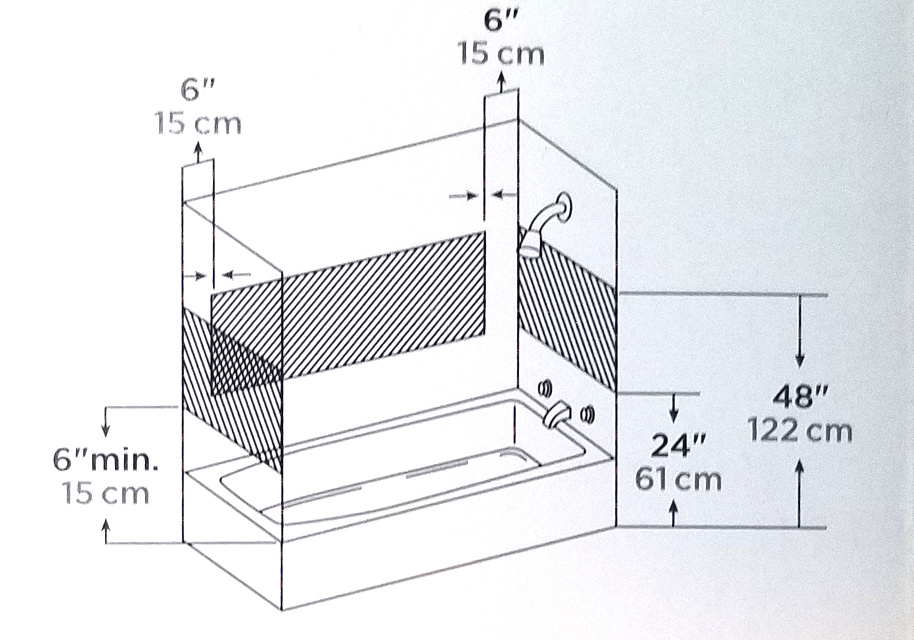
Horizontal grab bar height on bathroom walls
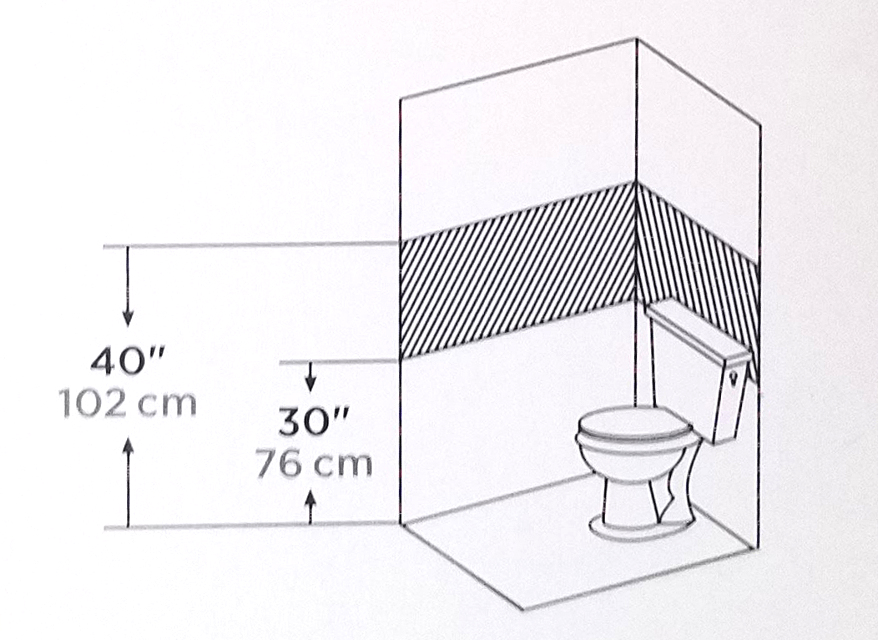
The ADA Standards require a height between 33 and 36 inches from the finished floor of the bathroom, shower or tub.
Illustrations of toilet, shower and bath tub grab bar heights shown here are adapted from instructions provided by Delta, cited below.
Typical installation instructions on a grab bar package such as the Delta product shown here, suggest the grabrail or bar height as follows:
-
Grab bar height around toilet: between 30" (76cm) and 40" (102cm) above the floor
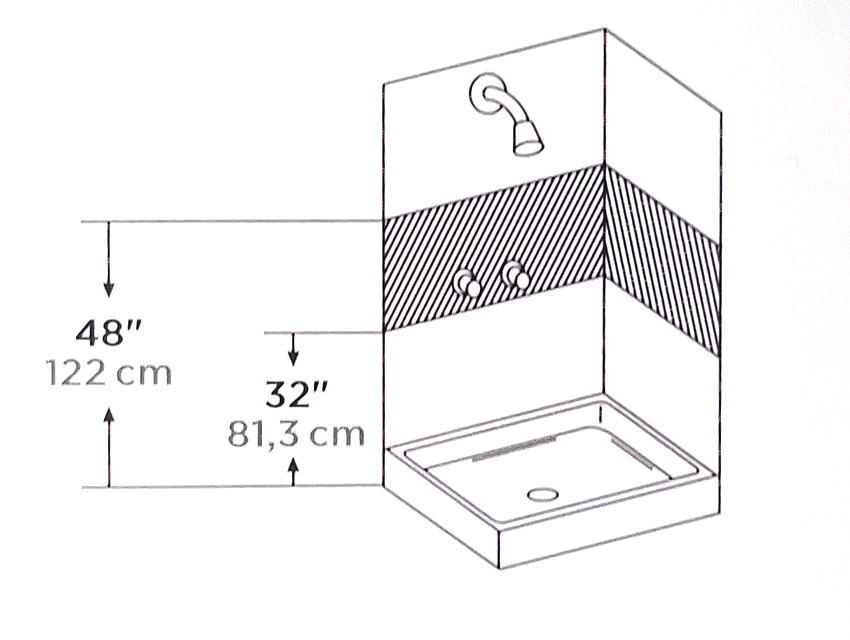
- Grab bar height in a stall shower: between 32" (81.3cm) and 48" (122cm) above the shower floor
For vertical grab bars such as used in a transfer shower, the bottom of the vertical bar must be 3 to 6 inches above the horizontal bar on that wall.
- Grab bar heights around bathtub walls:
between 21" (61cm) and 48" (122 cm) above the inner tub bottom surface, but also taking care to assure to preserve an open space of not less thamn 6" (15 cm) between the top of the tub walls and the under-side of the grab bar.
Source of the concealed-mount grab bars shown below and of the illustration adaptations used above:
- Delta concealed mount grab bars instrucdtions, Liberty Manufacturing Co., 140 Business Park Drive, Winston-Salem, NC 27107, Website: www.libertyhardware.com, LHMC is a Masco Company. These grab bars were manufactured in China.
Horizontal grab bar spacing from wall
609.3 Spacing. The space between the wall and the grab bar shall be 1½ inches (38 mm). The space between the grab bar and projecting objects below and at the ends shall be 1½ inches (38 mm) minimum.
The space between the grab bar and projecting objects above shall be 12 inches (305 mm) minimum.
EXCEPTION: The space between the grab bars and shower controls, shower fittings, and other grab bars above shall be permitted to be 1½ inches (38 mm) minimum. - source: U.S. ADA 2010 cited in detail at the end of this article.
Optimal handrailing height is 910mm (35.8 in) - 970 mm (38.2 in) along stairs. (
Horizontal side wall grab bar length
 Horizontal grab bars need to be 42" (1065 mm) minimum length. (ADA)
A 42 inches (1065 mm) minimum length grab bar is required on the side wall, spaced a maximum of 12 inches (305 mm) from the back wall and extending a minimum of 54 inches (1370 mm) from the back wall at a height of 33-36 inches (840-915 mm). -
source: U.S. ADA, describing grab bars for water closets, retrieved anew 2018/10/26, original source: https://www.ada.gov/descript/reg3a/fig29des.htm
Really? While that's the US ADA specification for horizontal sidewall grab bars, in a private residence where a grab bar might be needed along a shorter wall area it seems obvious that you might install what fits along a shorter wall, i.e. a shorter horizontal bar.
For example, in the photo shown here, taken during a retrofit grab-bar installation in a bathroom, the free wall area width was less than 42-inches. We installed the longest grab-bar that we could fit into that area.
Really? Where the ADA recommends 42-inch brab bars spaced 12-inches from a back wall, you can pretty much guarantee that in a retrofit job at least one end of that grab bar will not hit a wall stud.
Grab Bar Cross Section Dimensions
609.2 Cross Section.
Grab bars shall have a cross section complying with 609.2.1 or 609.2.2. 609.2.1
Circular Cross Section. Grab bars with circular cross sections shall have an outside diameter of 1¼ inches (32 mm) minimum and 2 inches (51 mm) maximum. 609.2.2 Non-Circular Cross Section.
Grab bars with non-circular cross sections shall have a
cross-section dimension of 2 inches (51 mm) maximum and a perimeter dimension of 4 inches (100
mm) minimum and 4.8 inches (120 mm) maximum. - source: U.S. ADA 2010
609.3 Grab Bar Spacing.
The space between the wall and the grab bar shall be 1½ inches (38 mm). The space between the grab bar and projecting objects below and at the ends shall be 1½ inches (38 mm) minimum.
The space between the grab bar and projecting objects above shall be 12 inches (305 mm) minimum.
EXCEPTION: The space between the grab bars and shower controls, shower fittings, and other grab bars above shall be permitted to be 1½ inches (38 mm) minimum.
609.4 Position of Grab Bars.
Grab bars shall be installed in a horizontal position, 33 inches (840 mm) minimum and 36 inches (915 mm) maximum above the finish floor measured to the top of the gripping surface,
except that at water closets for children's use complying with 604.9, grab bars shall be installed in a horizontal position 18 inches (455 mm) minimum and 27 inches (685 mm) maximum above the finish floor measured to the top of the gripping surface.
The height of the lower grab bar on the back wall of a bathtub shall comply with 607.4.1.1 or 607.4.2.1.
609.5 Grab Bar Surface Hazards.
Grab bars and any wall or other surfaces adjacent to grab bars shall be free of sharp or abrasive elements and shall have rounded edges.
609.6 Grab Bar Fittings.
Grab bars shall not rotate within their fittings.
609.7 Grab Bar Installation.
Grab bars shall be installed in any manner that provides a gripping surface at the specified locations and that does not obstruct the required clear floor space.
609.8 Grab Bar Structural Strength.
Allowable stresses shall not be exceeded for materials used when a vertical or horizontal force of 250 pounds (1112 N) is applied at any point on the grab bar, fastener, mounting device, or supporting structure.
Grab Bar Mounting Hardware Safety
 In my OPINION, the optimum lengths for retrofit or add-on grab bars installed in wood-framed residential structures would be such that the grab bar mounts can be secured to the existing wall studs.
Typically wall studs are framed 16" o.c. or occasionally 24" o.c. Using a grab-bar whose length is a multiple of 16 helps assure that the grab bar will be safely-secured to a stud.
Watch out: Simply screwing the grab bar fasteners directly into drywall or securing the mounting screws to plastic wall anchors is not a safe and secure grab bar mount.
For mounting through drywall or plaster walls where one end of the grab bar can not be secured to a wall stud we used 1/4" toggle bolts - shown above.
At best this is a compromised installation.
A better job would have required removing the drywall, installing a 2x4 or 2x6 backer between nearest wall studs, well-secured to the studs, and then restoring drywall and then mounting the grab bar through the drywall to the backer.
 Daniel Friedman at In spectApedia.com")
Watch out: in a grab bar retrofit installation such as the one shown here using toggle bolts, avoid an excessive number of drilled holes or screws beyond what's necessary (probably two) to secure the grab bar. Those extra holes weaken the drywall in the mount area, making the grab bar less safe.
 Daniel Friedman at In spectApedia.com")
Above: we were able to get three structural screws into a stud for this bathroom grab bar. Two more toggle bolts were installed, probably one too-many. I'd have omitted the toggle bolt at center left in the photo.
The toggle bolt at upper right in this guardrail bracket was used because we couldn't catch the stud with a structural screw.
This bathroom grab bar is probably adequate for maintaining one's balance but could fail if a heavy person attempted to use it to pull theselves up from the floor.
Grab-rail & Handrail installation tips
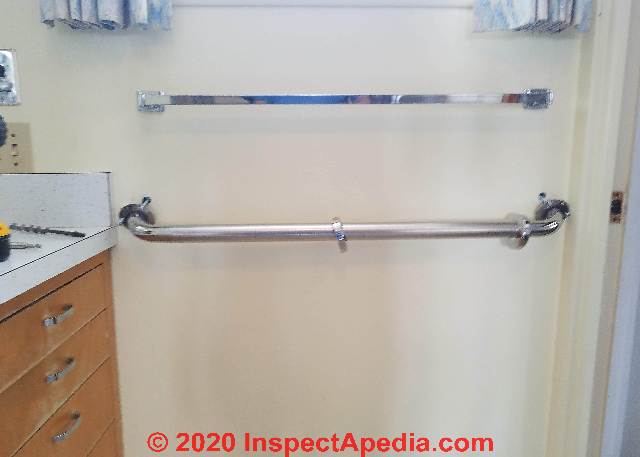
While it's also possible to buy components to construct an exact-length grab-rail or handrail, usually I buy a pre-fab steel handrail with textured surface in standard lengths ranging from 18" to 48".
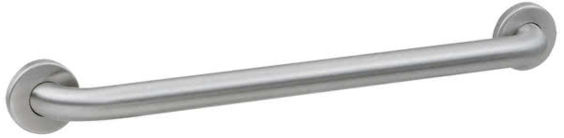
Shown above: Bobrick B-5806X42 42" Stainless Steel Satin Finish Handicapped Restroom Grab Bar - under $30. U.S.D.
For a private residence grab rail such as in a bedroom or bathroom I choose the pre-fab grabrail length closest to the dimensions needed along the wall that also locates the mounting bracket so that I am dead sure I can tie into a wall stud.
 Daniel Friedman at InspectApedia.com")
I use a stud finder (above) and then also drive a finish nail into the wall where I think the stud is located; you can feel if it's into the wood.
I drive a paneling nail or 6d finish nail into the stud area at the height and horizontal location to be used for the rail mount 3 or 4 times to find the center and edges of the stud, figuring that as long as I make those tests at the spot where the rail is going to be attached the little extra holes will be covered by the mounting bracket.
I use suitable construction screws that go 1 1/2" into solid wood, so if the wallboard is 1/2" that means using a 2" screw.
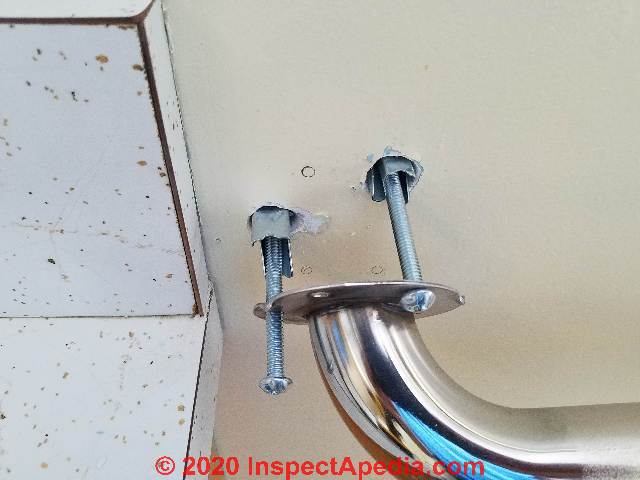
Where the wall construction does not permit catching a stud with more than one screw, we have to use toggle bolts to be sure that the grab bar will have sufficient strength.
 Daniel Friedman at In spectApedia.com")
Above: after using a stud finder and making a test hole to be sure we could get at least on structural screw into a wood stud we used the grab bar base as a template to mark the location of two more holes that would have to be large enough to accept our toggle bolt.
In the photo above you can see our stud finder was not precise, and that our 1st Test Hole just barely missed the edge of the wall stud, so we moved teh bracket over 3/4" to get our screw close to the center of the stud.
Below: the larger holes drilled for using toggle bolts allow accurate leveling up of this grab bar as its mounting bolts and screws are tightened.
 Daniel Friedman at InspectApedia.com")
More about choosing the size and using toggle bolts as wall anchors is
at WALL ANCHOR CHOICES
I also read and follow the grabrail manufacturer's insructions, figuring they have the most expertise and vested interest in a safe grabrail installation.
Special Warning When Mounting Grab Rails on Pocket Door Walls
Watch out: learn from our mistakes during the installation of a bathroom grab rail on a wall into which a sliding pocket door is recessed.

At first installation we thought that the grab rail was wonderfully-strongly secured to the wall. But we mistook for a stud the wood of the sliding pocket door, in the "open" position or recessed into the wall.
The grab rail seemed great but when we tried to slide the pocket door to a closed position it wouldn't budge.
How embarrassing!

I [DF] had to remove the grab rail mounting screws, slide the pocket door closed, repair the many holes I'd drilled into it, then re-install the grab rail while the door was out of the way.

Watch out: where a pocket door wall is the location of a grab rail, you'll also need to be sure that your mounting toggle bolts are no longer than absolutely necessary, so that the mounting bolts don't obstruct the sliding of the pocket door.
Handrail & Grab-rail texture
Handrail & Grab-rail texture may also be a factor in graspability, and clearance distance between rail and wall is important as is the presence of (usually code-specified) rail extensions. If the stairway width allows, provide handrailings on both sides of the stairway.
AFIFI assigns the following fall-safety rating factors where higher numbers are safer:
- Handrailing on both sides of the stairway, R=1.00
- Handrailing on one side of the stairway, R=0.67
- Handrailing is missing, R=0.00
Grab-rail specifications for seniors or physically-limited occupants
 U.S. ADA Stair & Railing Specifications
- Americans with Disabilities Act Title III Regulations Part 36 Nondiscrimination on the Basis of Disability in Public Accommodations and Commercial Facilities
(current as of January 17, 2017) - as of 2018/10/26, complete text was available at https://www.ada.gov/regs2010/titleIII_2010/titleIII_2010_regulations.htm - 2010 ADA STANDARDS for ACCESSIBLE DESIGN [PDF] - complete text, 279pp., retrieved 2018/10/26, original source: https://www.ada.gov/regs2010/2010ADAStandards/2010ADAStandards.pdf
- 2010 ADA Toilet Grab Bar Specification -
GRAB BARS LOCATION - TYPICAL TOILET / WATER CLOSET NOT IN A STALL - excerpted from 609 Grab Bars beginning on p. 181 in the ADA document given above.
In order to comply with the specifications reach range, the toilet must be centered 18" to an adjacent side wall or partition.
The sidewall must be a minimum length of 54". If flush controls are not automatic, they must be located on the wide, open side of the toilet.
The outside diameter gripping surface of the handrail or grab bar must be 1-1/4" to 1-1/2", or the shape must provide an equivalent gripping surface.
If handrails or grab bars are mounted adjacent to a wall, the space between the wall and the grab bar must be 1-1/2".
The grab bars must be mounted between 33" and 36" above the floor.
ADA grab bar location rear wall. ADA grab bar location side wall.
Rear Grab Bar: ADA compliant grab bars must be mounted 33"- 36" above the floor.
If the toilet is not in a stall, the rear wall grab bar must be at least 36" long with the end closer to the side wall mounted at least 12" from the centerline of the toilet and extend at least 24" on the transfer side.
Side Grab Bar: The side bar must be at least 42" long and mounted a maximum 12" from the back wall. The end of the grab bar must extend a minimum of 54" from the back wall. - ADA APPENDIX A 1191 ACCESSIBILITY GUIDELINES [PDF] - complete text, U.S. Americans with Disabilities Act, 1990, U.S. Department of Justice, & revised Title II & Title III 2010, Website: www.ada.gov, Tel: 1-800-514-0301, TTY: 1-800-514-0383
The Department´s 2010 title III ADA regulation published September 15, 2010, should be used beginning March 15, 2011. - ELDERLY & VETERANS HOME SAFETY - home safety & security checklist & home safety for older occupants.
Home safety advice for the disabled and for veterans. Definition of Aging In Place systems and support for the elderly. Sources of home monitoring systems for the elderly. Sources of medication reminder and prescription refill services for the elderly.
Sources of inspectors for home safety inspections. Sources of financing for home safety and accessibility improvements - Afifi, Mona, Belinda Parke, and Mohamed Al-Hussein. INTEGRATED APPROACH FOR OLDER ADULT FRIENDLY HOME STAIRCASE ARCHITECTURAL DESIGN [PDF] Automation in Construction 39 (2014): 117-125.
Abstract
The older adult population requires special consideration in terms of interior architectural design. This paper presents a methodology which aims to investigate the risk of falling associated with the architectural design of staircase elements, in order to suggest best practices to create elderly-friendly design that enhances safety for older adults.
The proposed methodology uses the concept of evidence-based assessment to evaluate staircase elements such as handrail and step design.
This paper also presents a scenario-based rating system that assesses the degree of the risk of falling for different types of architectural staircase design.
The proposed rating system was incorporated into a mathematical model and a Design Assessment Tree (DAT) that calculate the degree of risk associated with architectural staircase design to facilitate a building information modeling (BIM) approach.
A hypothetical case study is presented to illustrate the effectiveness of the proposed methodology and highlights the essential features of the proposed model. - Afifi, Mona, Belinda Parke, and Mohamed Al-Hussein. "Evidence-Based Assessment of Geometrical Staircase Configurations for Older Adults." In AEI 2013 @ Building Solutions for Architectural Engineering, pp. 584-593. ASCE. [AEI Architectural Engineering Institute (AEI)
Abstract:
Maintaining safety for older adults aged 65 years and older is a challenge that could be addressed by applying conscious design. Accordingly, the concept of creating a home environment which enhances safety for older adults becomes essential.
Considering that staircases vary widely in their geometrical configurations, this paper presents an evidence-based assessment for geometrical staircase configurations from the perspective of reducing the risk of falling for older adults. The methodology is divided into two stages:
1) identifying the most common geometrical home staircase configurations, which include U-shape stairs, quarter turn stairs, straight stairs with landing, straight stairs without landing, helical stairs, spiral stairs, and composite stairs;
2) investigating the associated risk of falling for each geometrical staircase configuration through developing an evidence-based comparison for the proposed geometrical staircase configurations.
The output of this paper is a hierarchical listing for geometrical staircase configurations which is arranged from lowest to highest reduction in risk of falling for older adults. - Canada Mortgage and Housing Corporation CMHC, "Preventing Falls on Stairs", retrieved 28 April 2015, original source: http://www.cmhc-schl.gc.ca/en/co/acho/acho_012.cfm
- Gunatilaka, Ajith, Angela Clapperton, and Erin Cassell. PREVENTING HOME FALL INJURIES: STRUCTURAL AND DESIGN ISSUES AND SOLUTIONS [PDF] Hazards 59 (2005): 1-17. Australia.
- Kose, Satoshi. "Housing for an Ageing Society: Adapting Housing Design toward Universality is the Minimum Requirement for Inclusion." In Aging, Disability and Independence: Selected Papers from the 4 th International Conference on Aging, Disability and Independence, pp. 19-39. 2008.
- Stevens, Margaret, C. D'Arcy J. Holman, Nicole Bennett, and Nick De Klerk. "Preventing falls in older people: outcome evaluation of a randomized controlled trial." Journal of the American Geriatrics Society 49, no. 11 (2001): 1448-1455.
- Templer, John, John Archea, and H. Harveoy Chen. "Study of factors associated with risk of work-related stairway falls." Journal of safety research 16, no. 4 (1986): 183-196.
- Watzke, James R., and Bryan Kemp. "Safety for older adults: The role of technology and the home environment." Topics in Geriatric Rehabilitation 7, no. 4 (1992): 9-21.
...
Continue reading at STAIR DESIGN for SENIORS - topic home, or select a topic from the closely-related articles below, or see the complete ARTICLE INDEX.
Or see these
Recommended Articles
- ACCESSIBLE DESIGN
- ADA STAIR & RAIL SPECIFICATIONS - details about handrailing continuity and extensions
- BATHROOM DESIGN, ACCESSIBLE
- ELDERLY & VETERANS HOME SAFETY
- GRABRAIL GRAB BAR SPECIFICATIONS - you are on this page
- GRASPABILITY of HANDRAILINGS
- HANDRAILS & HANDRAILINGS
- HANDRAILING STRENGTH requirements & testing standards
- KITCHEN DESIGN, ACCESSIBLE
- RAMPS, ACCESS
- SLIP TRIP & FALL HAZARD LIST, STAIRS, FLOORS, WALKS
- STAIR CODES & STANDARDS - downloads
- STAIR CONSTRUCTION IDEAL DIMENSIONS
- STAIR DESIGN for SENIORS
- STAIR PLATFORMS & LANDINGS, ENTRY
- STAIR RAILS, STAIR GUARDS
- STAIR TREAD NOSE SPECIFICATIONS
- STAIRWAY CHAIR LIFTS
- WALL ANCHOR CHOICES
Suggested citation for this web page
GRABRAIL GRAB BAR SPECIFICATIONS at InspectApedia.com - online encyclopedia of building & environmental inspection, testing, diagnosis, repair, & problem prevention advice.
Or see this
INDEX to RELATED ARTICLES: ARTICLE INDEX to STAIRS RAILINGS LANDINGS RAMPS
Or use the SEARCH BOX found below to Ask a Question or Search InspectApedia
Ask a Question or Search InspectApedia
Try the search box just below, or if you prefer, post a question or comment in the Comments box below and we will respond promptly.
Search the InspectApedia website
Note: appearance of your Comment below may be delayed: if your comment contains an image, photograph, web link, or text that looks to the software as if it might be a web link, your posting will appear after it has been approved by a moderator. Apologies for the delay.
Only one image can be added per comment but you can post as many comments, and therefore images, as you like.
You will not receive a notification when a response to your question has been posted.
Please bookmark this page to make it easy for you to check back for our response.
Our Comment Box is provided by Countable Web Productions countable.ca
Citations & References
In addition to any citations in the article above, a full list is available on request.
- Best Practices Guide to Residential Construction, by Steven Bliss. John Wiley & Sons, 2006. ISBN-10: 0471648361, ISBN-13: 978-0471648369, Hardcover: 320 pages, available from Amazon.com and also Wiley.com. See our book review of this publication.
- Eric Galow, Galow Homes, Lagrangeville, NY. Mr. Galow can be reached by email: ericgalow@gmail.com or by telephone: 914-474-6613. Mr. Galow specializes in residential construction including both new homes and repairs, renovations, and additions.
- [3] Stephenson, Elliott O., THE ELIMINATION OF UNSAFE GUARDRAILS, A PROGRESS REPORT [PDF] Building Standards, March-April 1993
- [4] "Are Functional Handrails Within Our Grasp" Jake Pauls, Building Standards, January-February 1991
- [5] Access Ramp building codes:
- UBC 1003.3.4.3
- BOCA 1016.3
- ADA 4.8.2
- IBC 1010.2
- [6] Access Ramp Standards:
- ADA (Americans with Disabilities Act), Public Law 101-336. 7/26/90 is very often cited by other sources for good design of stairs and ramps etc. even where disabled individuals are not the design target.
- ANSI A117.4 Accessible and Usable buildings and Facilities (earlier version was incorporated into the ADA)
- ASTM F 1637, Standard Practice for Safe Walking Surfaces, (Similar to the above standard
- [7] The Circular Staircase, Mary Roberts Rinehart
- [8] Construction Drawings and Details, Rosemary Kilmer
- [9] Falls and Related Injuries: Slips, Trips, Missteps, and Their Consequences, Lawyers & Judges Publishing, (June 2002), ISBN-10: 0913875430 ISBN-13: 978-0913875438
"Falls in the home and public places are the second leading cause of unintentional injury deaths in the United States, but are overlooked in most literature. This book is unique in that it is entirely devoted to falls. Of use to primary care physicians, nurses, insurance adjusters, architects, writers of building codes, attorneys, or anyone who cares for the elderly, this book will tell you how, why, and when people will likely fall, what most likely will be injured, and how such injuries come about. " - [11] The National Institute of Standards and Technology, NIST (nee National Bureau of Standards NBS) is a US government agency - see www.nist.gov
- "A Parametric Study of Wall Moisture Contents Using a Revised Variable Indoor Relative Humidity Version of the "Moist" Transient Heat and Moisture Transfer Model [copy on file as/interiors/MOIST_Model_NIST_b95074.pdf ] - ", George Tsongas, Doug Burch, Carolyn Roos, Malcom Cunningham; this paper describes software and the prediction of wall moisture contents. - PDF Document from NIS
- [12] Slips, Trips, Missteps and Their Consequences, Second Edition, Gary M. Bakken, H. Harvey Cohen,A. S. Hyde, Jon R. Abele, ISBN-13: 978-1-933264-01-1 or ISBN 10: 1-933264-01-2, available from the publisher, Lawyers ^ Judges Publishing Company,Inc., www.lawyersandjudges.com sales@lawyersandjudges.com
- [13] Slips, Trips, Missteps and Their Consequences, Gary M. Bakken, H. Harvey Cohen, Jon R. Abele, Alvin S. Hyde, Cindy A. LaRue, Lawyers and Judges Publishing; ISBN-10: 1933264012 ISBN-13: 978-1933264011
- [14] The Stairway Manufacturers' Association, (877) 500-5759, provides a pictorial guide to the stair and railing portion of the International Residential Code. [copy on file as http://www.stairways.org/pdf/2006%20Stair%20IRC%20SCREEN.pdf ] -
- [17] Steps and Stairways, Cleo Baldon & Ib Melchior, Rizzoli, 1989.
- [18] The Staircase, Ann Rinaldi
- [19] Common Sense Stairbuilding and Handrailing, Fred T. Hodgson
- [20] The Art of Staircases, Pilar Chueca
- [21] Building Stairs, by pros for pro, Andy Engel
- [22] A Simplified Guide to Custom Stairbuilding, George R. Christina
- [23] Basic Stairbuilding, Scott Schuttner
- [24] The Staircase (two volumes), John Templar, Cambridge: the MIT Press, 1992
- [25] The Staircase: History and Theories, John Templar, MIT Press 1995
- [26] >Steps and Stairways, Cleo Baldon & Ib Melchior, Rizzoli, 1989.
- [27] "The Dimensions of Stairs", J. M. Fitch et al., Scientific American, October 1974.
- [28] Stair & Walkway Standards for Slipperiness or Coefficient of Friction (COF) or Static Coefficient of Friction (SCOF)
- ANSI A1264.2
- ANSI B101
- ASTM D-21, and ASTM D2047
- UL-410 (similar to ASTM D-21)
- NSFI 101-B (National Floor Safety Institute)
- NSFI Walkway Auditing Guideline (WAG) Ref. 101-A& 101-B (may appear as ANSI B101.0) sets rules for measuring walkway slip resist
- OSHA - (Dept of Labor CFR 1910.22 does not specify COF and pertains to workplaces) but recognizes the need for a "qualified person" to evaluate walkway slipperiness
- ADA (relies on the ANSI and ASTM standards)
- [29] A. Sacher, International Symposium on Slip Resistance: The Interface of Man, Footwear, and Walking Surfaces, Journal of Testing and Evaluation (JTE), ISSN: 1945-7553, January 1997 [more focused on slipperiness of polished surfaces
- [30] Algae is widely recognized as a slippery surface - a Google web search for "how slippery is algae on steps" produced more than 15,000 results on 8/29/12)
- [31] Slipperiness of algae on walking surfaces, warning, Royal Horticultural Society, retrieved 8/29/2012, original source: http://apps.rhs.org.uk/advicesearch/profile.aspx?pid=418
- [32] Slipperiness of algae: "Watch your step, wet rocks and algae are slippery" Oregon State University warning 1977 retrieved 8/29/2012, original source: http://www.worldcat.org/title/watch-your-step-wet-rocks-and-algae-are-slippery/oclc/663683915
- [33] Coefficient of friction of algae on surfaces [like stair treads]: Delphine Gourdon, Qi Lin, Emin Oroudjev, Helen Hansma, Yuval Golan, Shoshana Arad, and Jacob Israelachvili, "Adhesion and Stable Low Friction Provided by a Subnanometer-Thick Monolayer of a Natural Polysaccharide", Langmuir, 2008 pp 1534-1540, American Chemical Society,
retrieved 8/29/2012,
Abstract: Using a surface forces apparatus, we have investigated the adhesive and lubrication forces of mica surfaces separated by a molecularly thin, subnanometer film of a high-molecular-weight (2.3 MDa) anionic polysaccharide from the algae Porphyridium sp. adsorbed from aqueous solution. The adhesion and friction forces of the confined biopolymer were monitored as a function of time, shearing distance, and driving velocity under a large range of compressive loads (pressures). Although the thickness of the dilute polysaccharide was < 1 nm, the friction was low (coefficient of friction = 0.015), and no wear was ever observed even at a pressure of 110 atm over 3 decades of velocity, so long as the shearing distances were less than twice the contact diameter. Atomic force microscopy in solution shows that the biopolymer is able to adsorb to the mica surface but remains mobile and easily dragged upon shearing. The adhesion (adsorption) of this polysaccharide even to negatively charged surfaces, its stable low friction, its robustness (high-load carrying capacity and good wear protection), and the weak (logarithmic) dependence of the friction force on the sliding velocity make this class of polyelectrolytes excellent candidates for use in water-based lubricant fluids and as potential additives to synovial fluid in joints and other biolubricating fluids. The physical reasons for the remarkable tribological properties of the ultrathin polysaccharide monolayer are discussed and appear to be quite different from those of other polyelectrolytes and proteins that act as thick “polymer brush” layers. - [34] Jinjin Li, Yuhong Liu, Jianbin Luo, Pengxiao Liu, and Chenhui Zhang, "Excellent Lubricating Behavior of Brasenia schreberi Mucilage" Langmuir 2012 28 (20), 7797-7802
- [35] Jason R. Stokes, Lubica Macakova, Agnieszka Chojnicka-Paszun, Cornelis G. de Kruif, and Harmen H. J. de Jongh, "Lubrication, Adsorption, and Rheology of Aqueous Polysaccharide Solutions, Langmuir 2011 27 (7), 3474-3484
- [36] "Coefficients of Friction for Ice", The Physics Factbook™, Glenn Elert, Ed., retrieved 8/29/12, original source: http://hypertextbook.com/facts/2004/GennaAbleman.shtml
- [37] "Coefficients of Friction for Ice", The University of the State of New York Reference Tables for Physical Setting/Physics. New York: The State Education Department, 2002. Op. Cit.
- [38] Serway Physics for Scientists and Engineers 4th edition (p. 126.)
- [39] "How Slippery Is It", retrieved 8/29/12, original source http://www.icebike.org/Articles/howslippery.htm
- [40] John E. Hunter, "Friction Values", The Source, Society of Accident Reconstructionists, Winter 1998. Study of frictional values of car tires involved in collisions on snow or ice covered roadways.
- [41] Frictional Coefficients of some Common Materials and Materials Combinations, The Engineering Toolbox, retrieved 8/29/2012, original source: http://www.engineeringtoolbox.com/friction-coefficients-d_778.html [copy on file as Friction and Coefficients of Friction.pdf ]
- [42] Stairways and Ladders, A Guide to OSHA Rules, OSHA, U.S. Department of Labor, 3124-12R 2003 - Web Search 05/28/2010 original source: http://www.osha.gov/Publications/osha3124.pdf. OSHA regulations govern standards in the construction industry and in the workforce Quoting from OSHA whose focus is on workplace safety and so excludes discussion of falls and stair-falls in private homes:
OSHA estimates that there are 24,882 injuries and as many as 36 fatalities per year due to falls from stairways and ladders used in construction. Nearly half of these injuries are serious enough to require time off the job--11,570 lost workday injuries and 13,312 non-lost workday injuries occur annually due to falls from stairways and ladders used in construction. These data demonstrate that work on and around ladders and stairways is hazardous. More importantly, they show that compliance with OSHA's requirements for the safe use of ladders and stairways could have prevented many of these injuries. -osha.gov/doc/outreachtraining/htmlfiles/stairlad.html
- [43] International Building Code, Stairway Provisions, Section 1009: Stairways and Handrails, retrieved 8/29/12, original source: http://www.amezz.com/ibc-stairs-code.htm [copy on file as IBC Stairs Code.pdf]
- [44] Model Building Code, Chapter 10, Means of Egress, retrieved 8/29/12, original source: http://www2.iccsafe.org/states/newjersey/NJ_Building/PDFs/NJ_Bldg_Chapter10.pdf, [copy on file as NJ_Bldg_Chapter10.pdf] adopted, for example by New Jersey. International Code Council, 500 New Jersey Avenue, NW, 6th Floor, Washington, DC 20001, Tel: 800-786-4452
- Our recommended books about building & mechanical systems design, inspection, problem diagnosis, and repair, and about indoor environment and IAQ testing, diagnosis, and cleanup are at the InspectAPedia Bookstore. Also see our Book Reviews - InspectAPedia.
- Best Practices Guide to Residential Construction, by Steven Bliss. John Wiley & Sons, 2006. ISBN-10: 0471648361, ISBN-13: 978-0471648369, Hardcover: 320 pages, available from Amazon.com and also Wiley.com. See our book review of this publication.
- Decks and Porches, the JLC Guide to, Best Practices for Outdoor Spaces, Steve Bliss (Editor), The Journal of Light Construction, Williston VT, 2010 ISBN 10: 1-928580-42-4, ISBN 13: 978-1-928580-42-3, available from Amazon.com
- In addition to citations & references found in this article, see the research citations given at the end of the related articles found at our suggested
CONTINUE READING or RECOMMENDED ARTICLES.
- Carson, Dunlop & Associates Ltd., 120 Carlton Street Suite 407, Toronto ON M5A 4K2. Tel: (416) 964-9415 1-800-268-7070 Email: info@carsondunlop.com. Alan Carson is a past president of ASHI, the American Society of Home Inspectors.
Thanks to Alan Carson and Bob Dunlop, for permission for InspectAPedia to use text excerpts from The HOME REFERENCE BOOK - the Encyclopedia of Homes and to use illustrations from The ILLUSTRATED HOME .
Carson Dunlop Associates provides extensive home inspection education and report writing material. In gratitude we provide links to tsome Carson Dunlop Associates products and services.
 | HOME | ABOUT | ASK a QUESTION | CONTACT | CONTENT USE POLICY | DESCRIPTION | POLICIES | PRIVACY | |
| © 2024 - 1985 Publisher InspectApedia.com - Daniel Friedman | |||||||||