
InspectAPedia® FREE Encyclopedia of Building & Environmental Construction, Diagnosis, Maintenance & Repair |
Question? Just ask us! InspectAPedia
|
 Best Practices Guide to Selecting & Installing, Doors, Windows & Skylights
- POST a QUESTION or COMMENT about choosing, installing, & maintaining or repairing windows & doors - best practices guide
Best construction practices guide to windows & doors:
In this article series we discuss the selection and installation of windows and doors, following best construction and design practices for building lighting and ventilation, with attention to the impact on building heating and cooling costs, indoor air quality, and comfort of occupants.
We review the proper installation details for windows and doors, and we compare the durability of different window and door materials and types.
Discussed: Window materials & construction. Wood, vinyl-clad, solid vinyl, fiberglass, aluminum composit window & door properties. Window certifications & standards. Hurricane, wind & storm resistant windows & doors. Window efficiency features & energy ratings. Window shading, solar gain control. Window flashing & sealing guide. How to install flange-type windows.Skylights: choosing, installing, design issues, energy efficiency. Doors, Exterior Flashing Details. Window & door manufacturers list: where to buy windows & doors, flashings, skylights.
InspectAPedia tolerates no conflicts of interest. We have no relationship with advertisers, products, or services discussed at this website.
Best Practices Guide to Selecting, Inspecting, Diagnosing, Repairing Skylights, Windows & Doors
 This article includes excerpts or adaptations from Best Practices Guide to Residential Construction (Steve Bliss, J Wiley & Sons) , by Steven Bliss, courtesy of Wiley & Sons.
Window Types, Guide
Details are at WINDOW TYPES, GUIDE. Excerpts are below.
Windows have a bigger impact on the quality of life in a home than almost any other building component. They affect heating and cooling costs, natural lighting levels, ventilation quality, and the comfort of occupants year-round.
[Click to enlarge any image or table]
Subjected to high ultraviolet (UV) exposure, extremes of weather, and hundreds of operations over their service lives, windows must be well-engineered from durable materials if they are to provide satisfactory service.
It is well worth investing the time and money to select the right windows for the job and to install them properly.
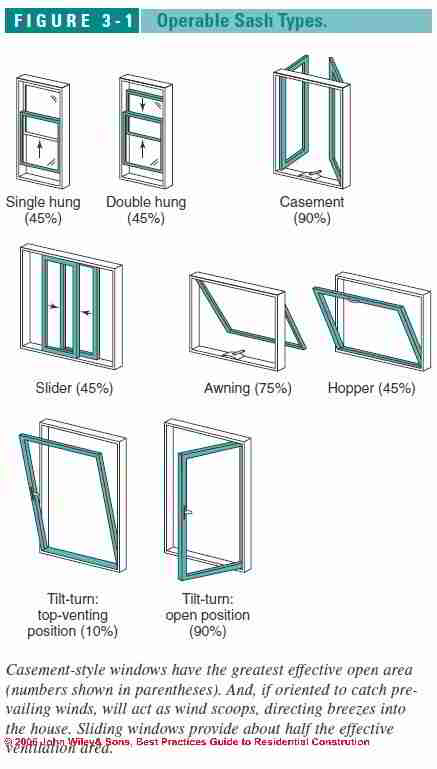
The most common types of operable windows are double-hung, casement, and sliding.
Awning-style windows are commonly used either near grade to let light into basements or high on a wall for privacy.
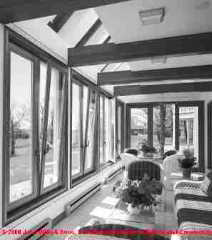
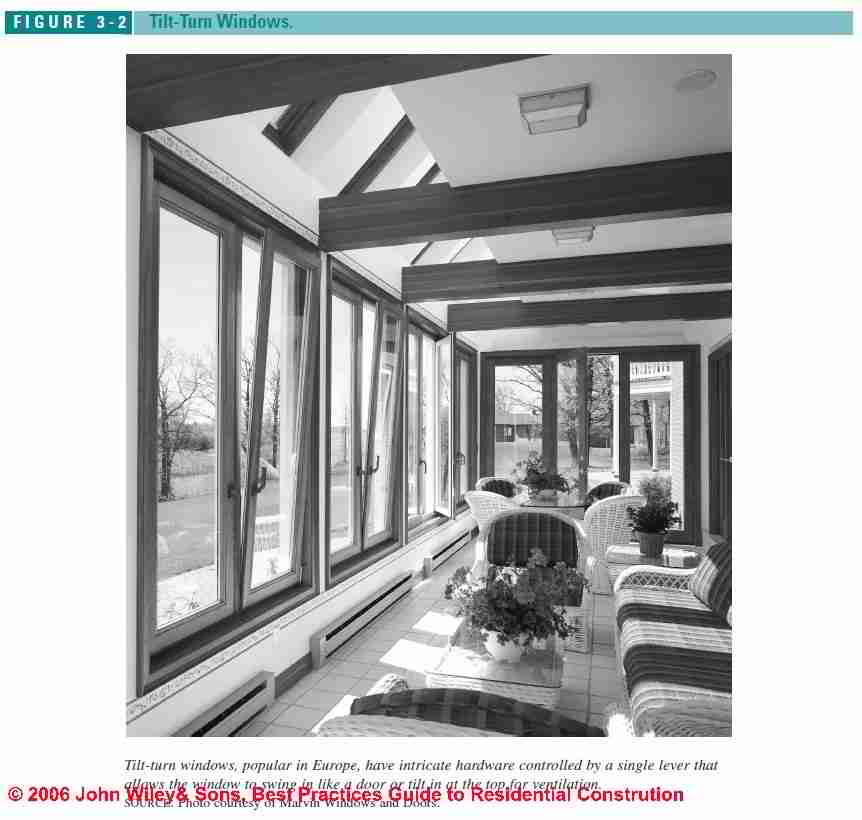
Tilt-turn windows, European imports that swing inward like a door on hinges, are often used in large sizes as emergency exits.
Windows with compression-type seals are the tightest, and windows that swing open provide the best ventilation (see Figure 3-1 above-left).
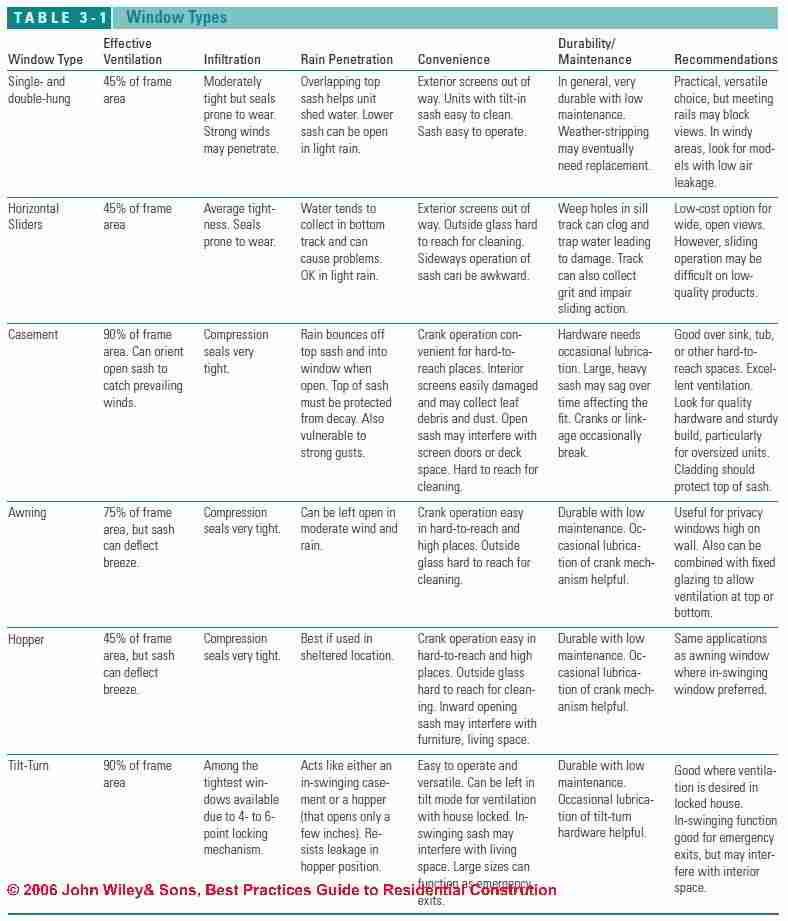
Common window types and their characteristics are summarized in Table 3-1 below. [Click any table or illustration for an enlarged, detailed version.]
Single- and Double-Hung Windows
The most common windows in the United States, doublehungs have upper and lower sash offset so both can slide up and down. Only the lower sash moves in the less common single-hung window. In older homes, the operable sash were connected by rope to heavy iron counterweights to hold the upper sash in place and to assist with raising the lower sash.
Modern double-hung windows ride up and down in metal or plastic tracks called jamb liners and use hidden springs in place of sash weights.
On many of the newer models, the sash are designed to tilt in for easy cleaning.
Because the top sash overhangs the bottom, and both are recessed in the frame, double-hung windows shed rain well and can be left open at the bottom in a light rain. They use exterior screens that are out of the way and inconspicuous. However, ventilation is limited to half the area of the frame, and visibility is somewhat hampered by the meeting rails, which often sit near eye level.
Also, because they rely on slide-by rather than compression-type weather-seals, many double-hungs have air leakage rates nearly twice that of casements. With improvements in materials and designs in high quality units, however, the performance gap has narrowed, at least when the windows are tested (with brand-new weather seals).
Although probably not the tightest windows in a high wind location, in general, double-hungs offer a versatile, moderately priced, and trouble-free option.
Sliding Windows: design features
 Sliders can offer large horizontal expanses of glass and operable
sash that do not interfere with interior or exterior
space. They are more common in western states, while
double-hungs and casements prevail on the East Coast.
Sliders can offer large horizontal expanses of glass and operable
sash that do not interfere with interior or exterior
space. They are more common in western states, while
double-hungs and casements prevail on the East Coast.
Our photo (left) shows sliding windows (photo-right) and casement windows (photo-left) in a cabin in Two Harbors, MN.(DF)
Designing a window that slides sideways presents a few challenges.
First, the lower track must rely on weep holes to drain away water, and second, any grit that collects in the lower track tends to impair the sliding action.
If the weeps clog up, water may find its way into the sill or framing over time. Also, pushing a stuck window sideways is an awkward motion that tends to strain the back.
Also see STORM WINDOW WEEP HOLES.
As with double-hung windows, ventilation is limited to 50% of the framed opening, and slide-by weather-seals are less effective than compression seals.
To avoid problems with sliders, look for high-quality windows that slide freely. Also, consider alternatives such as a picture window with a casement along one side for ventilation.
Casement Windows - Natural Building Ventilators
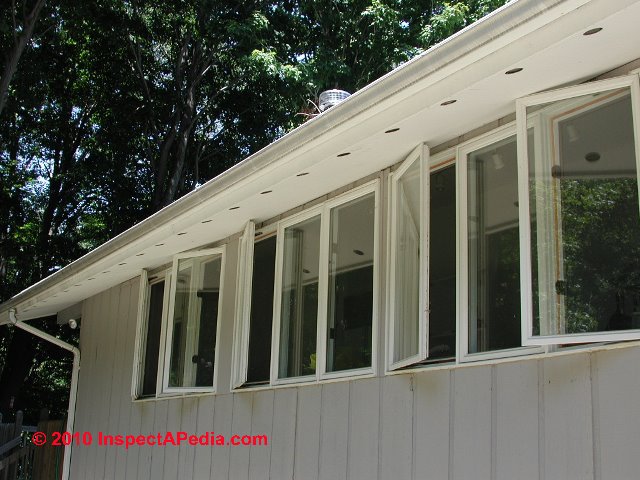 Casement windows provide a more contemporary look than traditional
double-hungs and can provide large uninterrupted views.
If oriented to open into the prevailing winds, the sash acts
like a big wind scoop, directing breezes into the house.
Casement windows provide a more contemporary look than traditional
double-hungs and can provide large uninterrupted views.
If oriented to open into the prevailing winds, the sash acts
like a big wind scoop, directing breezes into the house.
And when closed, the compression seals create a tight fit that only gets tighter with oncoming winds.
Casement windows are not without problems, however. The outward swinging sash is vulnerable to water damage if the top is not fully clad, and the sash can clash with screen doors or encroach on deck spaces.
Or worse. Our casement window photo at left (DF) shows spectacularly poor planning: these windows cannot open more than a few inches without jamming against the soffit overhang!
Also, hardware problems such as stripped crank handles or broken linkages are not uncommon, particularly on lower-end units or large units with heavy sash. An occasional squirt of lubricant on the crank mechanism and hinges can go a long way toward preventing problems.
Large, heavy sash can also rack slightly out of square over time, requiring a push from the outside to fully close. Sometimes this can be fixed by tweaking the hardware, but a new sash may be required.
For best results with casement windows, choose units with sturdy sash construction, heavy-duty hardware, and sash that are protected on top from the elements.
Awning Windows and Hopper Windows: design features
Awning windows swing outward from top hinges, and hopper windows swing inward from bottom hinges. Awning windows s are useful for privacy windows and other high-up locations like clerestories, while hoppers are often used in basements.
A principal advantage of awning windows is that they can be left open for ventilation with less risk of water entry should a rain shower occur. Our photo (left) shows a modern awning-style window in a newly-renovated building in Buenos Aires, Argentina (-DF).
Both awnings and hoppers can be combined with fixed glazing to add ventilation below a picture window.
Because they rely on cranking mechanisms, these windows have some of the same problems as casements.
But without the heavy vertical sash, they are less prone to malfunction.
For hard-to-reach locations, a pole, pull-chain, or motorized operators can be used to open and close awning or hopper style windows.
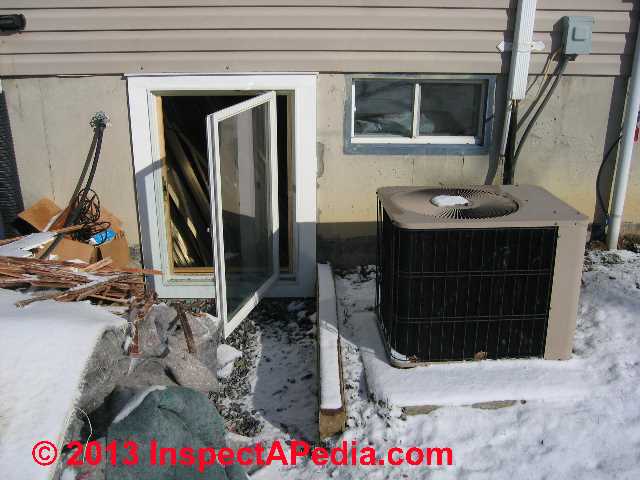
Tilt-Turn Windows & Emergency Exit or Egress Windows for Basements
 Developed in Europe, tilt turn windows rely on intricate
hardware controlled by a single lever that allows the windows
to either swing in like a door or tilt in at the top like
a hopper.
Developed in Europe, tilt turn windows rely on intricate
hardware controlled by a single lever that allows the windows
to either swing in like a door or tilt in at the top like
a hopper.
In tilt mode, the sash are open only a few inches, allowing the windows to provide ventilation in a locked house (see Figure 3-2 at left).
When closed, the lever locks the window tightly in four to six locations, providing the tightest fitting windows available as well as excellent security against would-be thieves.
And with their easy-to-operate in-swinging mode, large-sized tilt-turn windows often do double duty as emergency exits.
Our photo at left illustrates a hinged casement type window in use as an emergency exit for a building's basement. Inside the builder provided steps to provide access to this window from the basement floor level.
at SALVAGE BUILDING CONTENTS we described using this window and its exit path to toss cut up segments of soaked carpet and carpet padding outdoors without having to drag these messy items through the home following a basement flood.
While tilt-turn windows offer several useful features, they are not commonly seen in the United States, perhaps because of the in-swinging sash and relatively high cost. Also, they do not typically come with screens, making them problematic in areas with summer pests.
While not heavily marketed in the United States, they can be found here in wood, aluminum, aluminum-clad, and solid vinyl frames, the least expensive option.
Escape Windows: Specifications for Emergency Exit Windows
 Special egress windows are generally required for basements in which there is only a single access stairway. An enlarged, accessible window may be required to allow use of a basement room as a bedroom.
Reader Chelan offered these comments
Is there somewhere to mention that windows in living areas, especially bedrooms, must comply with relevant Life Safety Code as to location and sizing for "second means of escape"?
I just inspected a garage being converted to a two-bedroom dwelling that had no windows meeting NFPA 101(2009):24.2.2.3.3, i.e., not large enough and too high from the floor.
Escape windows cannot be less than 20 inches wide, 24 inches high, clear opening of 5.7 square feet, nor more than 44 inches from the floor to the sill. They must also be operable from the inside without use of tools, keys or special effort. - Chelan 9/12/2014
Thanks for the suggestion, Chelan.
Please see details about emergency egress / rescue windows found now a
Guide to Window Materials and Construction
Details are at WINDOW MATERIALS & CONSTRUCTION. Excerpts are below.
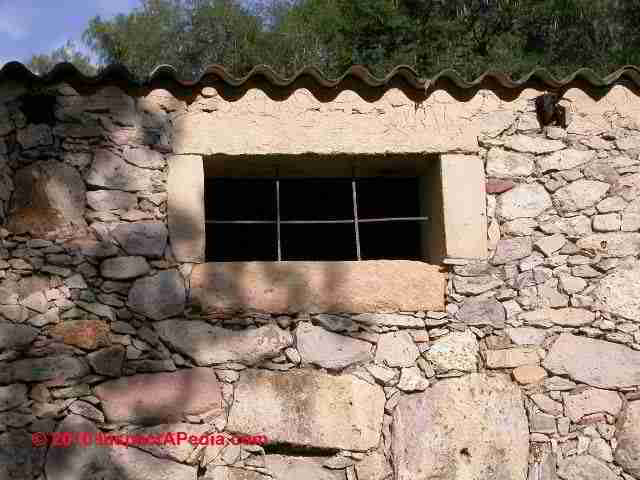
For centuries, even before glass was used for glazing, windows were framed with wood set into building walls. Our photo (left) shows an antique wood-framed window in Rugat, Spain (DF).
Earliest wood framed windows were left open (such as this example from Xotolar, Mexico). Later in areas of more hostile climate windows were glazed with animal skins, then parchment, and finally, glass.
For many years, the material choices for "modern" or new residential windows were limited to wood, clad wood, and aluminum. Wood and clad wood remain the leading materials, accounting for almost 50% of the new and replacement window market. Wood use has been declining, however, with the rapid growth of solid vinyl windows.
Solid vinyl windows made inroads into the replacement window market in the mid-1980s; but they were not widely accepted in new homes until the 1990s, when their use skyrocketed. Solid vinyl windows now account for an estimated 30% of the new-home market and 60% of the replacement market.
Aluminum windows account for about 15% of window sales, with the remaining share of the market spread among fiberglass windows and a variety of hybrids and composites that have entered the fray, making window selection today anything but simple.
Wood and Clad-Wood Windows
Wood is the traditional material of choice for residential windows. It can be milled into highly detailed designs, such as true divided lites, and easily fashioned into just about any custom configuration.
In addition to its aesthetic appeal, wood has excellent insulation value, and if well maintained can last indefinitely. Our photo (left) of a wood-built casement window set into this stone wall in Barcelona, Spain, shows a window that is more than 100 years old.
On the downside, wood must be stained or painted and well-maintained or, over time, it will be vulnerable to peeling paint and decay. Windows with wood exposed directly to the weather, such as open casements, are particularly vulnerable.
Although wood is dimensionally stable with temperature changes, it does swell and shrink with changes in relative humidity, causing tight-fitting windows to stick in humid summer weather.
When selecting a wood window, look for materials that are factory-treated with a water-repellant preservative, which will help prevent decay and also improve paint retention and dimensional stability.
The vast majority of
wood windows made today have a vinyl- or aluminumclad
exterior. A clad exterior is the most practical choice,
providing a maintenance-free exterior with the look of a
wood window on the interior. The only downside is a limited
color choice.
Construction Details for Wood Windows
Some very high-end wood windows are manufactured from rot-resistant species, such as mahogany, but most use clear pine for the sash and visible portions of the frame. The hidden portions of most wood windows use some combination of solid wood, finger jointed lumber, and various types of engineered lumber, including laminated-strand lumber (similar to oriented strand board, or OSB).
Watch out: Leaks into wood window or door components can cause severe rot even on newer products, as our photo (left) illustrates.
And where finger-jointed wood is used for window or other wood parts exposed to the weather, if the wood is not kept painted and sealed, we find that finger joints may swell, separate, and invite rot or insect damage - DF.
Composite windows are beginning to be used as well, such as Fibrex, a proprietary wood-vinyl composite used in the subsills of some of Andersen’s replacement windows and patio doors.
In general, wood windows are sufficiently strong and rigid for most residential applications. However, it is always best to use windows approved by one of the three agencies that certify windows and doors (see Window Certification).
In coastal areas or other areas prone to high winds or hurricanes, look for products with a suitable pressure rating from the American Architectural Manufacturers Association (AAMA) or the Window and Door Manufacturer’s Association (WDMA).
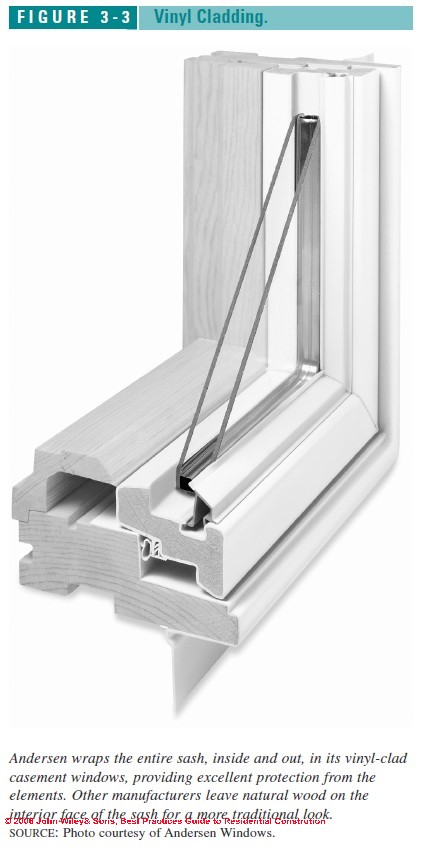
Vinyl Cladding on Wood Windows
While vinyl cladding is only offered by a few manufacturers, one of them is Andersen Windows, by far the largest supplier of residential windows in the United States. Andersen’s clad windows’ strong record of durability, reliability, and moderate cost has helped make vinyl-clad windows one the most popular options today.
Good quality vinyl-clad windows have a heavy-gauge covering, and heat-welded corners to provide a durable seal against water entry. Vinyl cladding is also more energy efficient than aluminum and is preferred by some in coastal environments subject to salt spray.
Watch out: on some older versions of vinyl clad windows that leave wood exposed (typically at the ends of sills projecting outdoors) or where vinyl cladding over wood has been damaged, broken, or cracked, we often find rot as well.
On the downside, vinyl comes in only a few colors, typically white and beige, and cannot be painted.
Some manufacturers, such as Andersen, now offer a limited number of dark tones as well, using newer technologies that resist the fading and heat problems characteristic of dark colored vinyl.
Vinyl is also vulnerable to cracking in cold weather if struck by an errant baseball or hammer.
While all manufacturers cover the exterior frame and exterior face of the sash, some also protect the top of the sash, which is important in casement windows.
Andersen wraps the entire sash inside and out, providing excellent protection (see Figure 3-3 at left).
But for those seeking the look of wood on the interior of the sash, consider windows with exterior-only cladding, such as those from Weathershield and MW Manufacturing.
Aluminum Cladding on Wood Windows
A number of manufacturers offer aluminum cladding, using either relatively thin roll formed aluminum or heavier-gauge extruded aluminum. The advantage of extruded aluminum is that it adds strength and rigidity to the window and resists denting better than thinner stock.
Also, aluminum can be formed to crisper profiles than vinyl, creating a less bulky appearance. Other advantages of aluminum include a wider choice of colors and the ability to be painted if desired. One downside to aluminum cladding is a slight reduction in energy-efficiency compared to vinyl-clad windows. On average, a vinyl-clad unit has an R-value about 10% higher than for a comparable aluminum-clad window.
Properties of Fiberglass Clad Windows
A few manufacturers, including Marvin and Milgard, offer wood windows clad on the exterior with a tough fiberglass composite manufactured in a process called pultrusion (see Fiberglass Clad Windows).
Pultruded fiberglass is an ideal cladding material due to its durability, energy efficiency, and very low rate of thermal expansion. Unaffected by heat, cold, and moisture, manufacturers claim that pultruded fiberglass will never crack, peel, or warp. Fiberglass-clad windows come prepainted with a factory finish and can be repainted on site if desired.
Windows, Vinyl Guide
Details are at Windows, Vinyl Guide. Excerpts are below.
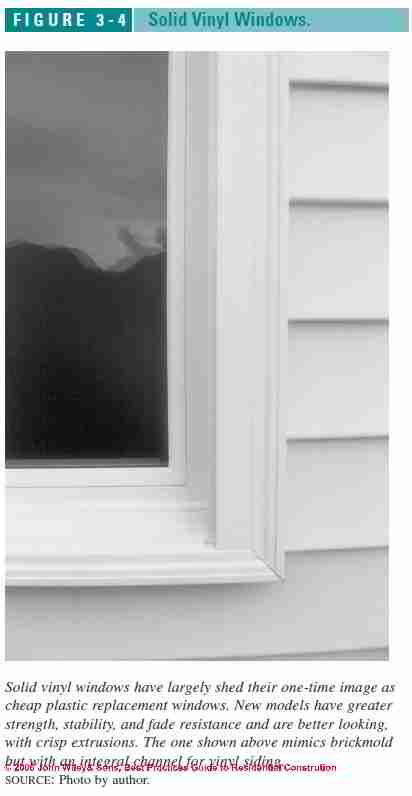
Solid vinyl windows can attribute their surge in popularity over the past decade to the fact that they have delivered a high-quality, maintenance-free product for about a third less cost than a clad window of comparable quality.
Contractors like the fact that the interior window sashes do not need painting, and homeowners like the notion that the frame and sill cannot rot (although vinyl windows do not live forever).
Solid vinyl windows have shed their image as cheap plastic replacement windows by continually improving to the point where premium quality vinyl windows are stronger and more dimensionally stable, more fade resistant, and better looking with crisper extrusions and better hardware (Figure 3-4).
As an added benefit, vinyl window manufacturers claim that their products can match the energy performance of wood windows.
While improvements in extrusions have made vinyl windows less bulky looking, they still do not have the crisp lines of a wood window, particularly on the interior, and vinyl window sash are unmistakably white plastic.
Still, vinyl windows have shed their stigma as a low-end product and are finding their way into more and more new homes across the spectrum from spec to upper-end custom.
Construction of Solid Vinyl Windows
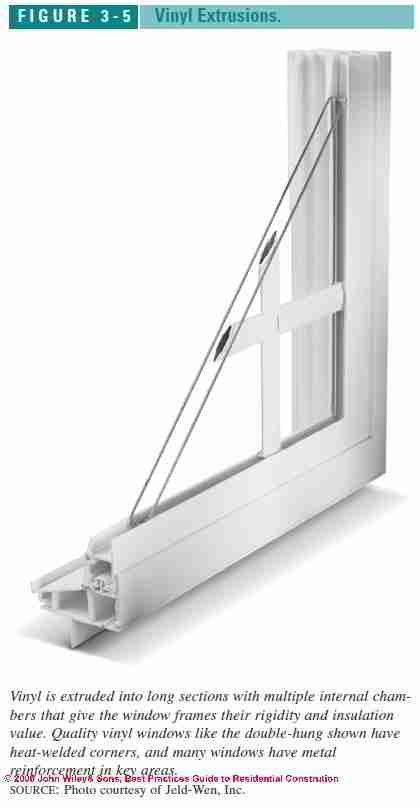
Vinyl window quality starts with the chemistry.
\A number of additives are blended into the raw vinyl to make it more dimensionally stable and more resistant to UV radiation, which otherwise can cause the vinyl to fade, chalk, and become brittle over time.
The vinyl is then extruded into long sections with multiple internal chambers that give the material its rigidity and insulation value from the trapped air (see Figure 3-5 at left).
The thin-walled plastic ranges in thickness from about .065 to .085 inch. All other things being equal, the thicker the plastic, the stronger the window component. However, extrusions can gain strength from having a well-engineered profile, as well (many European windows use much heavier .125-inch plastic, but U.S. manufacturers feel this would make them less competitive).
The extrusions are then cut and joined to create frames and sash. Nowadays, most corners are heat-welded, producing the strongest joints, although some corners are still mechanically fastened.
Some manufacturers add steel or aluminum reinforcing, particularly to larger windows, to stiffen them and help them meet structural load requirements. Typical places for reinforcing are sills, which have a tendency to sag in hot weather, lock rails, and mullions between mulled units.
Vinyl Window Options
All vinyl windows have an integral nailing flange, simplifying watertight installations (see Window Flashing & Sealing Guide).
All standard window types, including tilt-turn, are available in solid vinyl today. All glazing types, except for true divided lites, are also available. For the look of divided lites, the options are either snap-in grilles or between-the-glass grills.
Typical exterior trims include brickmold or nominal 4-inch flat casings with either an integral or snap-on J-channel to receive the ends of wood, vinyl, or fiber cement siding.
Window trims designed for stucco are widely available in the western states and Florida. Colors are generally limited to white and beige, since dark colors absorb heat and raise vinyl temperatures to near 165°F, where it begins to soften and sag. On the interior, most vinyl windows will accept either wood extension jambs or drywall returns.
Quality Issues with Vinyl Windows
As with any building products, not all vinyl windows are created equal. Many early models were poorly made and subject to excessive thermal movement, often opening at corners, fading prematurely, and losing structural integrity from UV exposure, particularly in hot climates.
Most window manufacturers today have overcome these problems with better vinyl formulations, improved extrusion design, and heat welding at corners. Many also use metal reinforcing at strategic points, such as meeting rails, sills of large units, and between mulled units.
Since the chemistry, extrusion design, metal reinforcing, and other determinants of quality are hidden from view, however, the best approach is to stick with an established manufacturer and to look for a certification label from the American Architectural Manufacturers Association (AAMA).
AAMA established a separate standard for vinyl windows in 1997, which includes tests for strength, dimensional stability, strength of corner welds, heat and impact resistance, and weathering. The main features to look for include:
- Heat-welded corners
- Metal reinforcing, particularly on larger units
- Solid, heavy extrusions with little obvious flex
- Good quality hardware
Installation Procedure for Vinyl Windows
Details are at Installation Procedure for Vinyl Windows Excerpts are below.
High Rate of Thermal Expansion in Vinyl Windows
In general, vinyl windows install the same as other flange-type windows, although the installer must take into account vinyl’s high rate of thermal expansion.
A 6-foot-wide window can expand as much as 5/16 inch from 0°F to 100°F. To prevent problems, It is best to leave a 1/8 - to 1/4 -inch gap between the window and siding or wood trim (more in cold weather, less in hot). Good detailing of this joint is especially important with stucco, which can crack if set too tightly against the window or leak if the caulk joint fails.
Thermal expansion can also cause window sash to bind in hot weather if the rough opening is too small to accommodate the movement. And in very cold weather, some vinyl windows can bow inward due to temperature differences on either side of the window.
Sturdy extrusion profiles with metal reinforcing can help prevent this. A related concern is sagging of the sill during hot weather— vinyl starts to soften and distort at about 165°F, a temperature easily reached on the surface of a dark building in direct sun. To prevent sagging, some manufacturers reinforce the sill, and all recommend specific shim spacing under the sill.
Some vinyl window installations require continuous support along the length of the sill, which is easiest to achieve by using a double 2x sill with leveling shims in between.
Vinyl Window Nailing Recommendations
Nailing recommendations for vinyl windows also vary among manufacturers. Some recommend driving nails tight; some suggest leaving the nail heads proud. Some recommend against nailing the head flange or corners; others require it. To avoid warranty problems, it is always best to closely follow the manufacturer’s instructions regarding the rough opening, shimming, nailing, and other installation details. Other general recommendations that apply to all windows include:
- In hot weather, do not store vinyl windows in a container, such as a trailer, or lean them against a wall, as they can permanently deform.
- Seal around openings with flexible flashing before installing the window (see Window Flashing & Sealing Guide).
- Set the nailing fin in a bead of high-quality caulking.
- Before nailing, make sure the side jambs are plumb and do not bow in or out in the center. Some installers use a wood spacer to hold the two side jambs parallel.
- Do not puncture the nailing fin when installing trim or siding.
- Do not use expanding foam to seal around the window frame on the interior.
Windows, Fiberglass, Guide
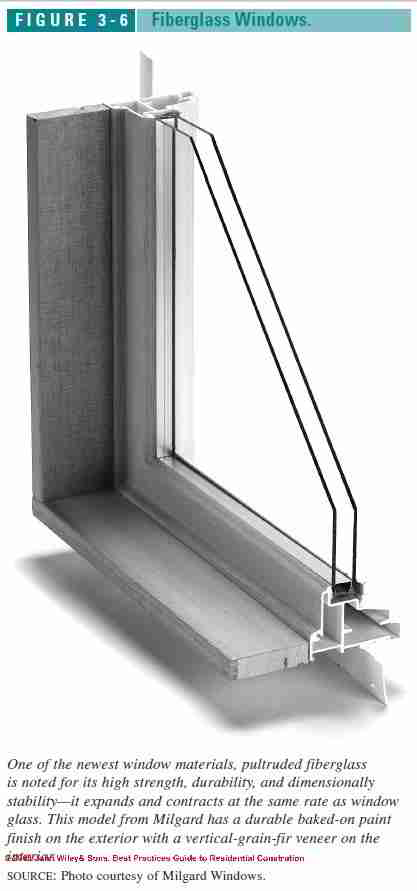
Introduced in the early 1990s, a few manufacturers now offer windows built entirely of a tough composite called pultruded fiberglass.
Unlike the layers of fiberglass cloth and resin used in boat and car construction, fiberglass window components are made from continuous glass fibers saturated with a thermoset resin and pulled through a heated die in a process called pultrusion. The result is a thin, strong composite that can be formed into detailed shapes and is used in a variety of high-tech applications.
Pultruded fiberglass is noted for its high strength, durability, and corrosion resistance. It is unaffected by temperatures up to 350°F and has an extremely low rate of thermal expansion—about the same as window glass.
Because the frame and glass move at the same rate, temperature changes place less stress on the window frame and glass edge seals. Manufactures claim that pultruded fiberglass will not crack, peel, or warp and is impervious to moisture, insects, salt-air, and UV exposure (Figure 3-6 at left).
Depending on the manufacturer, fiberglass frame components are either hollow or filled with foam or fiberglass insulation. The insulated frames are the most energy efficient on the market.
Most fiberglass frames are shipped with a high-performance baked-on factory finish, and they can be repainted on-site if desired. Installation is the same as for vinyl and other flange-style windows but without concerns related to sagging or thermal movement.
Manufacturers currently offering fiberglass windows include Milgard Windows and several Canadian manufacturers, including Fibertec and Thermotech Windows.
Windows, Aluminum, Guide
While aluminum is strong, light, and durable, with an anodized or baked-on finish, it has been steadily losing market share since the early 1990s due to its poor energy performance. Fewer than 15% of windows sold today are aluminum, and these are mainly in lower-end housing in cooling-dominated climates.
The poor insulating qualities of aluminum have less of an impact on cooling than they do on heating since the indoor and outdoor temperature difference is generally much smaller in cooling climates. Adding a thermal break can improve the energy performance of an aluminum window, but it still lags considerably behind wood and vinyl components.
Window Certification
It is always best to choose windows with third-party certification from American Association for Window Manufacturers (AAMA) or the Window and Door Manufacturers Association (WDMA, formerly the National Wood Window and Door Association, NWWDA).
Both the AAMA and WDMA are trade associations representing manufacturers of windows, doors, and skylights. The WDMA is limited to wood windows and doors, while the AAMA encompasses a wide range of materials, from wood, aluminum, vinyl, and fiberglass to the newest composites.
Voluntary Standards for Window Manufacturers
In 1997, the two groups joined forces to establish a unified standard for evaluating fenestration products, known as AAMA/NWWDA 101/I.S. 2-97 “Voluntary Specification for Aluminum, Vinyl and Wood Windows and Glass Doors.” It establishes four performance requirements for a completed window or door.
- Structural ability to resist wind loads
- Resistance to air leakage
- Resistance to air infiltration
- Resistance to forced entry
Products that are certified under 101/I.S. 2-97 are designated by a four-part code that denotes the type of window, the performance class, and performance grade. For example, the code C-R15 indicates a casement window (C) recommended for residential applications (R), with a performance grade of 15.
Performance Grade and Design Pressure for Windows
How well a window performs when subjected to heavy rains and high winds is indicated by its performance grade and design pressure. The design pressure is a structural rating only, while the performance grade also indicates that a window has met the water resistance and air infiltration standards for that grade (see Table 3-2 below).
The minimum recommended design pressure for residential doors and windows is 15 psf. A design pressure of 15 means a window has been tested to withstand sustained wind pressures of 22.5 psf, roughly equivalent to a 95-mph wind, applied to either side of the window, simulating both positive and negative wind pressures.
The test pressure is always 150% of the rated design pressure to provide a safety factor. To earn a performance grade of 15, a window must also pass a water pressure test of 2.86 psf, which simulates rainfall of 8 inches per hour with a wind speed of 34 mph. In coastal areas or other areas prone to heavy winds or hurricanes, higher grade windows are recommended and may be required by code.
Also see WINDOW TYPES - Photo Guide.
Guide to Hurricane, Wind, & Storm-Resistant Windows
As detailed in Best Practices Guide to Residential Construction (Steve Bliss, J Wiley & Sons) Chapter 3, BEST PRACTICES GUIDE: WINDOWS & DOORS:
In response to the devastating impact of Hurricane Andrew in 1992, Florida enacted stringent codes to protect homes from severe storms. Other coastal states have followed suit in recent years, and now similar provisions in the International Residential Code (IRC) apply to coastal areas from Texas to Maine.
Protect the Window Openings
Researchers attributed much of Andrew’s destruction to wind penetration into homes through broken doors and windows, leading to extensive water damage and, in many cases, roofs blown off and houses destroyed.
Our photo (left) shows storm-exposed beach-front hotel windows at Boca Raton, FL.
The keys to preventing these problems were strengthening roofs and protecting windows and doors from wind and wind-borne debris. To protect windows, the new code allows three options:
- code-approved storm shutters,
- 9/16-inch plywood panels screwed over windows at 8 inches on-center, or
- impact-resistant windows.
The trend in new home construction is toward impact-resistant windows, sometimes marketed as “storm resistant” or “hurricane-rated.”
Miami-Dade County Standards for Storm-Resistant Windows
Miami-Dade County enacted the most stringent standard and test protocols, subjecting windows (and storm shutters) to a test in which a 9-pound 2x4 is hurled into the glass at 50 feet per second, followed by 4,500 cycles of positive and negative wind loads equivalent to a 146-mph wind.
Miami-Dade also conducts AAMA/NWWDA testing for design pressure and water intrusion, but it conducts the water intrusion test after the structural test is completed rather than on a new window. Windows and doors that pass the Miami-Dade Product Control Standards are required throughout Miami-Dade County and most other coastal areas in Florida.
International Residential Code for Impact-Resistant Windows
The International Residential Code (IRC) requires impact-resistant windows in all hurricane-prone regions along the Gulf and Atlantic coasts from Texas to Maine. Depending on the wind-speed zones established in the IRC, windows need to meet design pressures ranging from 30 to 80 psf, and they must meet impact-resistance standards under ASTM E1886 or E1996.
The design pressure required depends on both an area’s design wind speed, found on IRC maps, and the building’s exposure rating from A to D. Most buildings are rated Exposure B for “urban and suburban areas or wooded areas” or Exposure C for flat, open terrain with scattered obstructions of less than 30 feet. Waterfront buildings exposed to winds flowing over open water for at least a mile are rated Exposure D, the most severe.
Storm-Resistant Window Construction
Under pressure from both the building codes and insurance industry, most major window manufacturers have developed impact-resistant windows for residential applications that feature laminated glass along with heavier frames and hardware. The glass is similar to auto windshields with a plastic interlayer, but it is significantly heavier. Double-glazed units get a second layer of tempered glass either on the interior or exterior.
Vinyl-framed windows are heavily reinforced with aluminum, and all windows use metal mullion bars anchored to the framing between mulled units. Window-to framing attachment methods are also beefed up to comply with the new codes, and in some cases, metal clips are used to anchor the window to the frame.
Storm-resistant windows cost from two to four times as much as standard windows; but under pressure from code agencies and insurance companies, these windows will soon become standard fare in coastal construction and other storm-prone areas.
Performance Grade and Design Pressure for Windows
How well a window performs when subjected to heavy rains and high winds is indicated by its performance grade and design pressure. The design pressure is a structural rating only, while the performance grade also indicates that a window has met the water resistance and air infiltration standards for that grade (see Table 3-2 below).
The minimum recommended design pressure for residential doors and windows is 15 psf. A design pressure of 15 means a window has been tested to withstand sustained wind pressures of 22.5 psf, roughly equivalent to a 95-mph wind, applied to either side of the window, simulating both positive and negative wind pressures.
The test pressure is always 150% of the rated design pressure to provide a safety factor. To earn a performance grade of 15, a window must also pass a water pressure test of 2.86 psf, which simulates rainfall of 8 inches per hour with a wind speed of 34 mph. In coastal areas or other areas prone to heavy winds or hurricanes, higher grade windows are recommended and may be required by code.
Also see WINDOW TYPES - Photo Guide.
Guide to Window Efficiency Features & Ratings
According to Best Practices Guide to Residential Construction (Steve Bliss, J Wiley & Sons) Chapter 3, BEST PRACTICES GUIDE: WINDOWS & DOORS:
Windows have a large impact on a home’s energy consumption, accounting for up to 25% of a typical home’s heating bills in cold climates and up to 50% of cooling bills in hot climates, according to the Environmental Protection Agency’s (EPA) Energy Star program.
Even the best windows, with an R-value of 3 to 4, are thermal holes compared to today’s average R-19 wall. In addition to conductive heat losses, older windows add substantially to a home’s air leakage.
Beyond fuel bills, windows can also have a dramatic effect on occupant comfort. Sitting next to a leaky single glazed window in winter will make an occupant feel cold regardless of the thermostat setting, due to both cold drafts and to radiant heat losses from his or her body to the window surface.
Cold window surfaces also cause condensation, potentially leading to mold, peeling paint, and wood decay of window components.
(Also see CONDENSATION or SWEATING PIPES, TANKS
and DEW POINT TABLE - CONDENSATION POINT GUIDE
as well as HUMIDITY LEVEL TARGET.)
Energy Certification for Windows
Evaluating a window’s energy performance is a complex task that has been made a lot simpler by two programs developed in a collaborative effort between government and industry. The groups have developed standardized testing procedures and ratings, and provide simple recommendations based on climate zone.
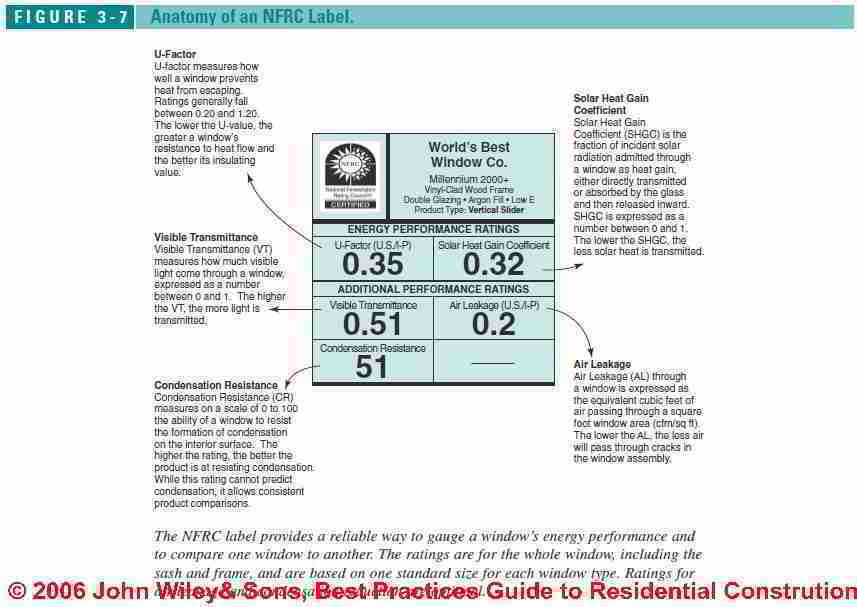
The NFRC Label for Windows
The National Fenestration Rating Council (NFRC), with support from the U.S. Department of Energy, created test procedures and rating systems for the energy performance of windows, glazed doors, and skylights. Any window making energy claims without an NFRC label should be avoided.
For every window, the NFRC label rates the U-factor, Solar-Heat-Gain Coefficient (SHGC), and Visible Transmittance (VT). Air Leakage (AL) and Condensation Resistance (CR) are optional ratings. The ratings are explained briefly in Figure 3-7 and in more detail in the following sections. Ratings should appear on the window label when delivered but can also be found on the NFRC website at www.nfrc.org.
Whole Window Energy Ratings
It is important to note that NFRC ratings apply to the entire window, including the sash and the frame. NFRC uses a single standard size to simplify testing and to make it easier for consumers to make apples-to-apples comparisons between windows.
The actual energy performance of windows significantly larger or smaller than the standard test size will vary somewhat from the label since the relative effect of the glass edge and frame is greater on smaller windows.
Glass-Only Ratings on Window Energy
Where glass-only ratings are needed, for example, for passive solar design, these can usually be obtained from the window manufacturer or the manufacturer of the insulated glass unit (IGU) installed in the window or door.
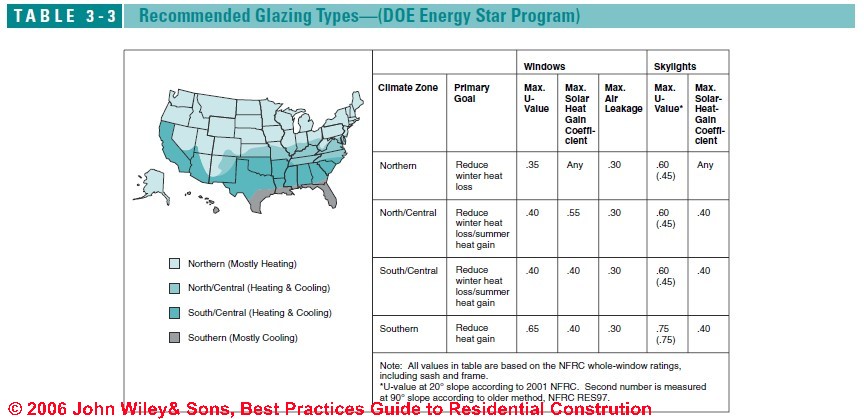
Energy Star Label for Windows
Launched by the U.S. EPA to promote the use of energy-efficient appliances and equipment, the Energy Star label was added to doors, windows, and skylights in 1998. An Energy Star Label certifies that the window or skylight meets the U.S. Department of Energy’s (DOE) energy guidelines for the climate zones listed on the label (see Table 3-3 below).
For windows without the label, you can still use the Energy Star guidelines in Table 3-3 (above) as a selection guide. Remember that these guidelines are based on NFRC whole-window ratings, not just the glass. For cold-climate buildings designed to use passive-solar heating, look for a whole-window SHGC of .55 or above.
Window U-Factor
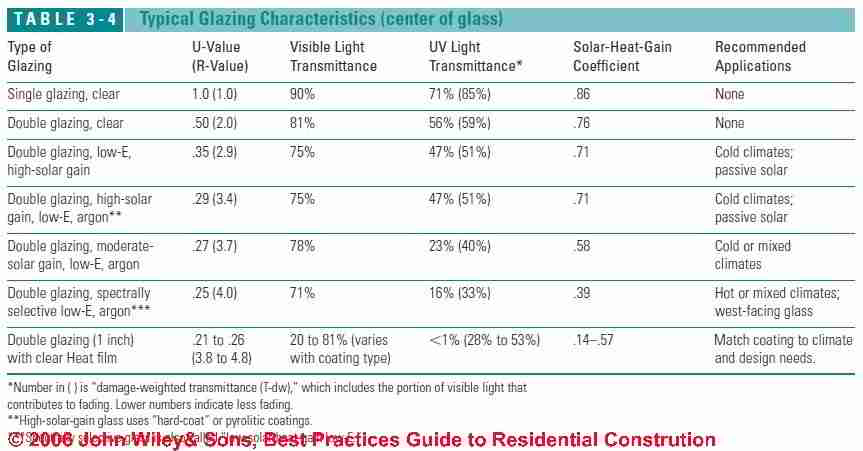
A window’s ability to conduct heat (not including solar effects) is usually given as a U-factor or U-value. The lower the U-value, the more insulation value a window provides. Low U-values have the biggest impact in heating dominated climates but help reduce cooling loads as well. For climates with substantial heating or cooling loads, choose a total window U-value of .35 or less. The U-value is the inverse of the more familiar R-value.
For example, standard double glazing has a center- of-glass U-value of about .5, which equals an R-value of 2 (1/0.5). Typical glazing U-values are shown in Table 3-4 (below). U-values for the entire window, however, must take into account the edge spacers, sash, and frame, as discussed below.
Gas Filled Window Glazings
Filling low-E coated glass with the inert gas argon or krypton will reduce heat loss through the glass by 10 to 15%. Krypton outperforms argon somewhat, but it is usually not enough to justify the higher cost.
Since argon fill is now available on most low-E windows for little or no cost, getting the boost in R-value is always a good idea. In addition to reducing heat loss, it increases the temperature of the inside surface of the window, improving comfort and reducing condensation.
Studies indicate that about 10% of the gas will leak out of a well-built sealed glass unit in about 20 years.
Also see SUNGAIN, FILMS, LOW-E GLASS.
(Also see CONDENSATION or SWEATING PIPES, TANKS
and DEW POINT TABLE - CONDENSATION POINT GUIDE
as well as HUMIDITY LEVEL TARGET.)
Sash and Frame Effects on Window Energy Ratings & U-Value
The U-value of the entire window, as reported on NFRC labels, includes the effects of the glass edge, sash, and frame.With high-R glass, standard edge and frame materials often lower than the overall R-value compared to the center-of-glass measure.
Aluminum sash and frames without thermal breaks are the worst, contributing to both thermal losses and condensation in cold climates.
Thermally broken metal frames are better but should still be avoided in cold climates.Wood and hollow vinyl or fiberglass components all have moderately good thermal properties. Insulated vinyl and fiberglass frames offer the best thermal performance (Table 3-5).
Warm-Edge Spacers Effect on Window Energy Ratings
Because of their high thermal conductivity, standard aluminum edge spacers lower the insulating value of insulated glass units (IGUs) and often cause condensation along the bottom of the window. The loss of insulation value is more pronounced in very high R-value windows and small windows where the window edge accounts for a larger proportion of the window area.
Starting in the mid-1980s, manufacturers have responded with a variety of innovative solutions that are now used in about half of all new IGUs.
Solutions include using less conductive metals with an improved shape (PPG’s Intercept Spacer) or switching to a plastic or synthetic rubber spacer with little or no metal content (TruSeal’s Swiggle Seal or EdgeTech’s Super Spacer). Warm-edge windows can raise the glass temperature at the perimeter of the window by 6°F to 8°F, significantly reducing the condensation potential.
The biggest risk in using a new edge technology is that the seal will fail prematurely, resulting in a fogged unit. To guard against this, it is best to stick with a technology that has proven itself in the marketplace and is backed by a good warranty and a reliable window manufacturer.
(Also see CONDENSATION or SWEATING PIPES, TANKS
and DEW POINT TABLE - CONDENSATION POINT GUIDE
as well as HUMIDITY LEVEL TARGET.)
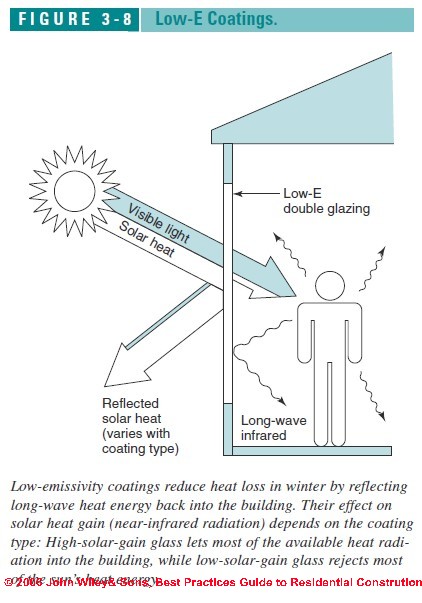
What are Low Emissivity (Low-E) Coatings for Windows?
Low-emissivity, or “low-E,” coatings are microscopically thin metallic coatings applied to a glass surface, which reflect back radiant heat.
Different low-E coatings transmit different amounts of visible light, short-wave and longwave infrared, and ultraviolet radiation (Figure 3-8 at left).
The most common type, called “soft coat” low-E, is applied to one of the inner surfaces of sealed insulated glass units (Figure 3-9 at left).
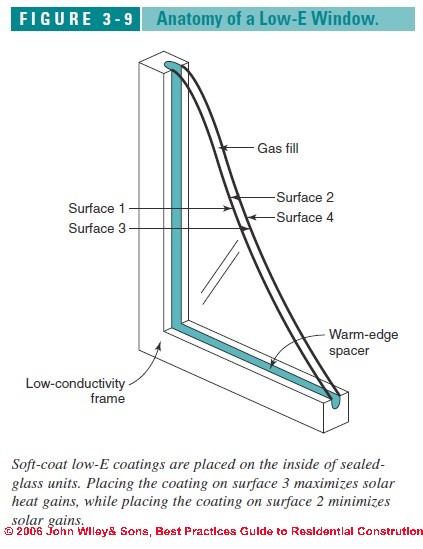
Hard-coat, or “pyrolitic,” low-E, which has a slightly lower R-value, is used in high-solar-gain glass and can also be used on storm windows and other removable glass panels exposed to the air.
Low-E window glass coatings can also be applied to a clear polyester film, called Heat Mirror, which is suspended between two panes of sealed glass, yielding insulation values as high as R-5 with one layer of film or R-8 with two layers.
Also see SUNGAIN, FILMS, LOW-E GLASS.
Spectrally Selective Low-E Windows
The newest generation of low-E glazing, often referred to as “spectrally selective,” provides an ideal combination of high R-values, low heat gain, and high-visible-light transmittance.
Spectrally selective windows generally outperform all other window types in mixed and hot climates, but they reap the greatest benefit in homes with significant cooling loads.
Because of their high insulation value, spectrally selective windows even perform well in cold climates, particularly in homes with significant air-conditioning loads or large amounts of west facing glass (see Window Orientation).
One exception is a house designed to use passive solar gain in winter, which would perform better with high-solar-gain glass.
See SUNGAIN, FILMS, LOW-E GLASS.
Choosing Window Glazing Based on Climate
As detailed in Best Practices Guide to Residential Construction (Steve Bliss, J Wiley & Sons) Chapter 3, BEST PRACTICES GUIDE: WINDOWS & DOORS:
Due to its significantly lower U-value, low-E glass outperforms standard double glazing in all climates. However, which type of low-E glazing is optimal for a building depends on several factors, including the heating load, cooling load, and orientation of the glass. In general, the windows with the lowest U-values will yield the greatest savings in cold climates, while windows with the lowest solar heat gain will yield the greatest savings in hot climates.
Performance comparisons of different window types in different climates, based on computer modeling, are shown in Figure 3-10. Also see SUNGAIN, FILMS, LOW-E GLASS.
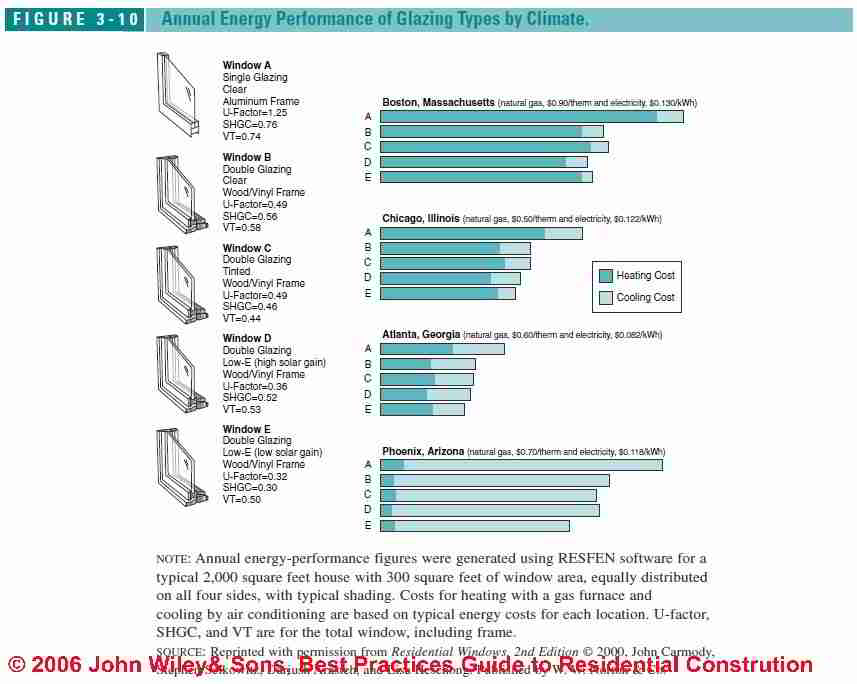
Some window manufacturers market different glazing types in different parts of the country and may be able to provide different glazing types by special order. General recommendations from the EPA’s Energy Star program are shown in Table 3-3 below.
- Window Glazing Recommendations for Cold climates. In climates dominated by heating
loads, select a window with a low U-value (high
R-value). Windows with high solar gain will slightly
favor winter performance and windows with low solar
gain will slightly favor summer performance, but
annual energy costs are determined primarily by the
U-value.
Two exceptions to this are passive solar homes, which should use high-solar-gain glass, and homes with a lot of west-facing glass, which should use low-solar-gain spectrally-selective
(Spectrally Selective Window Glazing) glass. - Window Glazing Recommendations for Mixed climates. Spectrally selective glass or low-E glass
(SUNGAIN, FILMS, LOW-E GLASS) with moderate solar gains are good choices in mixed climates.
The greater the cooling load, the more important a low solar-heat-gain factor will be. However, the differences in annual fuel bills between using high, low, or moderate solar-heat gain glass in these climates will usually be small. Other issues like overall U-value, UV light transmission, cost, and durability might be the more important factors in choosing a window.
- Window Glazing Recommendations for Hot climates. In climates dominated by cooling
loads, choose a glazing type with low solar-heat gain.
Spectrally selective coatings provide an ideal combination of high R-values, high visible-light transmission, and low solar-heat gain. UV radiation, which causes fading, is also cut significantly.
Spectrally selective glass is a big improvement over tinted glass, which blocks solar gains, but also obscures views and creates glare and reflections when viewed from outside.
Our photo of a warm-climate window (above, left) is in Rabat, Morocco, a climate that ranges from warm to hot (-DF).
Solar-Heat-Gain Coefficient Rating for Windows: SHGC
A window with an SHGC of .70 captures about 70% of the available solar energy falling on the window. Clear double glazing has an SHGC of about .75 versus .60 to .70 for standard low-E and about .40 for spectrally selective low- E. Which type of glazing is optimal for a given project depends on the climate, summer and winter fuels costs, and how glass is used in the house design.
- Low SHGC. Low-solar-gain glass blocks unwanted
solar gain and provides significant savings in both
peak and annual cooling loads in hot climates. For
example, switching from clear double glass to low-
SHGC glazing can reduce air-conditioning bills by
15 to 20% in a typical home in Phoenix or Miami (see Figure 3-10 above).
Spectrally selective glass , introduced in the 1990s, combines very low solar gains with high visible light transmittance and high R-values (up to R-4 with gas fill). While this yields the greatest savings in hot climates, it is also a good choice in any climate with significant cooling loads or large amounts of un shaded west-facing glass.
(see Spectrally Selective Window Glazing). - Moderate SHGC. In northern cities like Boston or Chicago or mixed climates with more-or-less equal heating and cooling costs, moderate-gain glass is a reasonable choice, balancing moderate solar gains in winter with moderate blocking of solar gains in summer.
- High SHGC. High solar-heat-gain glass is a good
choice in cold climate homes with enough south glass
to take advantage of passive solar gain, called “sun
tempering.” Savings on winter heating bills will be
partially offset by the increased cooling load in
summer, however.
To avoid overheating, south-facing glass should range from 4 to 7% of the total floor area (avoid sloped glass, which tends to overheat in summer and fall).With south glass in excess of 7% of floor area, thermal mass may be needed to prevent daytime overheating and to store heat for nighttime use. A designer with expertise in passive solar can help determine the right amounts of glass and thermal mass.
Visible Transmittance Ratings for Windows
People install windows primarily for daylighting and
views, so the higher the percentage of visible light
transmitted (VT), the better. Clear double-glazing has a
VT of about 80% (see Table 3-4, below). With hard-coat
low-E, that figure drops to 75%, and down to about 70%
with the new spectrally selective coatings
(Spectrally Selective Low-E Windows).
All low-E coatings reduce visible light transmittance to some extent and some may appear slightly tinted or more reflective under certain light conditions. The new spectrally selective glazings are fairly color-neutral, but they may appear slightly darker compared to clear glass.
In general, most people do not notice tinting until the VT of the glazing falls below about 60%. The visible light transmittance ratings listed on NFRC window labels can be confusing since they include the sash and frame, not just the glass.
The VT for the glass only should be available from the window or glazing manufacturer upon request. Beyond the numbers, it is always a good idea to examine a sample of the glass before purchasing. View the glass from both outdoors and indoors under different light conditions to check for tint and glare.
Also see SUNGAIN, FILMS, LOW-E GLASS.
Window Air Leakage
In older homes, leaky windows contributed significantly to heating loads (less to cooling loads), and the drafts made occupants feel cold despite the thermostat setting. While windows built today are, in general, much tighter, the effect of air leakage can still be significant on cold, windy days, particularly on windows with direct wind exposure.
Most windows today are built with a leakage rate of .30 cfm/sq ft of glass area or less, the minimum allowed under the AAMA/NWWDA standard. The best windows have leakage rates near .10 cfm/sq ft.
Windows with compression seals, such as casements and awnings, tend to be tighter than windows with sliding seals, such as double-hungs and sliders. Also slide-by weather-stripping is more prone to wear out over time and more likely to be breached by high winds that cause the window to flex.
With any weather-stripping system, look for long-lasting materials such as EPDM and silicone and heavy-duty construction that can withstand years of use and exposure to water, freezing and burning temperatures, and UV radiation.
Fading of Interior Carpets & Furnishings due to UV Light
Most interior materials, including fabrics, carpeting, paint, and artworks, fade from exposure to sunlight. Although the most potent effect is from ultraviolet (UV) radiation, research has shown that the shorter wavelengths of the visible light spectrum also cause fading.
To account for the relative effects of both UV and visible light on typical materials, researchers have developed an approach called “damage-weighted transmittance” (T-dw), which was recently standardized by the International Standards Association (ISO/CIE 89/3).
Typical T-dw numbers range from about 60% for clear
double glazing to about 30% for spectrally selective glazing
(see “UV Light Transmittance,” Table 3-4 above and
see Spectrally Selective Low-E Windows.
Lower ratings are available with triple glazing or tinted glass, primarily used in commercial construction. Low numbers for UV transmittance and T-dw indicate less fading potential, but some fading will still occur. The best approach with valuable rugs, artworks, and other light sensitive furnishings is to place them in areas with minimal exposure to windows or to use shades or draperies that substantially cut light transmission.
Also see SOLAR SHADES & SUNSCREENS.
Condensation Resistance Ratings for Windows: Window Condensation or "Sweating"
To rate a window’s resistance to condensation, NFRC recently developed a method that evaluates the window’s frame, glass, and glass edge at a standardized set of temperature and humidity conditions.
Based on the coldest part of the window assembly, it is assigned a rating from 1 to 100.
The higher the rating, the better the window is at resisting condensation, but the rating doesn’t predict condensation under specific conditions. The voluntary minimum for a “thermally improved window” under the AAMA/NWWDA standard is 35.
The best protection against condensation is low-E glass with gas fill, combined with warm-edge spacers and a nonmetallic window frame, such as wood, vinyl, fiberglass, or one of the newer composites. Table 3-6 (below) provides a general guide to when condensation is likely to form on different types of glazing. Without warm-edge spacers, condensation will occur at window edges first.
(Also see CONDENSATION or SWEATING PIPES, TANKS
and DEW POINT TABLE - CONDENSATION POINT GUIDE
as well as HUMIDITY LEVEL TARGET.)
Window Orientation - Which Way a Window Faces
Which way a window faces has a big impact on its contribution to comfort, heating and cooling loads, and daylighting.
- West-facing glass is the most problematic, because in
summer the afternoon sun shines directly on the glass,
causing glare and overheating the house already
warmed by increasing afternoon temperatures. Provide
shade with plantings or light-colored shades (exterior
shades are most effective). Overhangs do not help
much due to the low angle of the sun.
Also see SOLAR SHADES & SUNSCREENS. - South-facing glass (within 30 degrees of true south) gets direct sun exposure in the winter when it is desirable, at least in climates with significant winter heating loads. In summer, the sun is high on the south side, moderating the solar gain. Also, it is easier to block the high summer sun with appropriately sized overhangs or awnings. South-facing glass should not exceed 7% of the building floor area, unless thermal mass is used.
- East-facing glass provides desirable morning light and modest solar gains on cold winter mornings. Too much un shaded east glass, however, can cause overheating in summer.
- North-facing glass provides diffused light that is free of glare and solar gains, which is ideal for daylighting and is sought after by artists for its consistent color and intensity.
In most cases, one type of glazing can work on all sides of the house. In houses with large amounts of west glass, however, it makes sense to use tinted or spectrally selective glass at least on the west face to reject the summer sun. This will dramatically improve comfort and reduce both peak and annual cooling loads.
If the house is also designed to take advantage of passive solar heating, high-heat-gain windows are preferable on the south face. Mixing glazing types can get tricky, however, and should be handled by an experienced solar designer. One caution, also, is that the slightly different tints of the two glazing types might be objectionable to some clients.
Window Shading to Reduce Solar Gain
As described in Best Practices Guide to Residential Construction (Steve Bliss, J Wiley & Sons) Chapter 3, BEST PRACTICES GUIDE: WINDOWS & DOORS:
Shading of glass with overhangs, plantings, or shades will reduce cooling loads and increase comfort in any climate with significant cooling loads.
Shading of windows will also reduce glare (Figure 3-19, below), fading of furnishings, and localized overheating in rooms with south- or west-facing glass. Window overhangs, plantings, or exterior shades that block the sun before it strikes the glass are the most effective approach since the heat never gets into the building. But light-colored interior shades can also substantially reduce heat gains.
Spectrally Selective Window Glazing
From a shading standpoint, using spectrally selective glass (SHGC below .40) is like having shades or blinds on standard low-E glass.
However, adding good shading to spectrally selective glass can reduce cooling costs by another 10 to 15%. This would make sense in very hot climates or on houses with large expanses of glass on the south or west side. In many cases, the shading adds no cost or serves other design needs. For example, a porch on the east or west side of a house provides effective shading as well as outdoor living space.
Plantings for Window Shading
Deciduous trees can provide very effective summer shade on the south side but, depending on the type of tree, may block 20% or more of the solar radiation in winter. Because trees follow the local seasons rather than the calendar, the shading tends to occur when needed most.
For example, leaves appear earlier in the spring and last longer in the fall in warmer climates, which need spring and fall shading. Trees also cool the area around them by their natural evaporative cooling—as water evaporates from the leaves.
Other options for shading south-facing windows include trellises with dense foliage or evergreen trees. Evergreens should be tall enough to block the summer sun but trimmed so their canopies allow the low winter sun to reach the windows.
On the east and west sides of the house, trees or large shrubs can provide very effective shading, since the problem times are morning and afternoon when the sun is low in the sky and easily blocked by a well-placed planting, either deciduous or coniferous. Fixed Overhangs.
These are commonly used on the south side of homes with clear glass or high-solar-gain glass. To be effective, the overhangs must be sized correctly to reject the high summer sun but allow in the low winter sun. In most temperate climates, a 1 1/2 - to 2-footwide overhang is adequate for average size windows. However, to provide full shading from March to September in hot climates may require a 3-foot or wider overhang.
One limitation of fixed overhangs is that the shading will be the same on March 21 and September 21, although the heating and cooling needs at these times may be very different. The following guidelines for shading south facing glass strike a balance between summer and winter performance:
- Cold climates: Above 6,000 heating-degree days (HDD), locate the shadow line at mid window, based on the June 21 noon–sun angle (see Figure 3-11 below). This will shade the window 50% in mid-summer and provide full sun penetration from late September to late March. If more shading is required in summer, locate the shadow line closer to the window sill.
- Moderate climates: In climates with less than 6,000 HDD and less than 2,600 cooling-degree days (CDD), locate the shadow line at the window sill based on the June 21 sun angle at noon. This will allow full sun exposure from late October to mid-February.
- Hot climates: Above 2,600 CDD, locate the shadow line at the window sill using the March 21 sun angle at noon. This will provide full shading from late March to late September and about one-third shading in mid-winter.
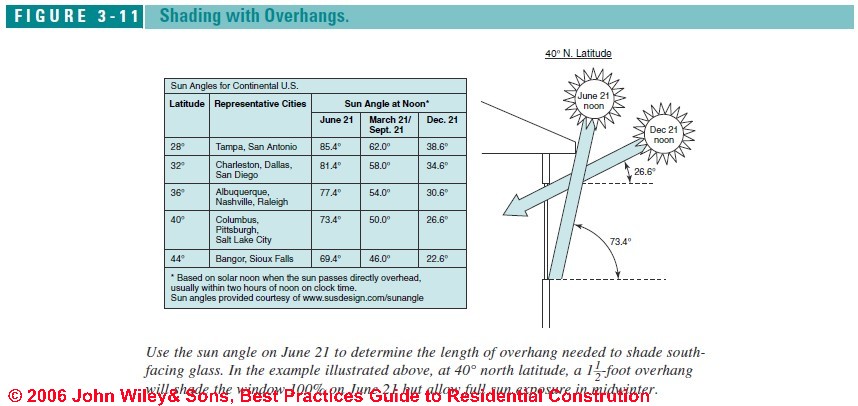
Guide to Window Awnings and Shutters
Old-fashioned awnings are very effective at blocking solar gain—up to 65% on south facing windows and up to 80% on east and west windows.
Light-colored awnings are more effective, since they will reflect more solar radiation.
To be most effective, the awning’s “drop” should cover 65 to 75% of an east or west window and 45 to 60% of a south-facing window (see Figure 3-12 at left).
Other low-tech, but very effective exterior options for windows that are difficult to shade include wooden shutters, bamboo shades, and rolling shutters.
- Light-colored interior shades can reduce heat gain by 15 to 20%, depending on the density and reflectivity of the material.
- Interior blinds typically reduce heat gain by 10 to 15%, depending on reflectivity.
- See SOLAR SHADES & SUNSCREENS for details.
Solar Screening for Windows
This dark plastic or fiberglass screening is mounted on the exterior of the window in a frame or retractable roller or, in some cases, applied directly to the glass. Depending on the weave, it can reduce a window’s solar heat gain by 40 to 70%. Solar screening reduces glare and fading, but it also reduces daylight and obscures views.
Solar screens are best used on difficult to shade areas, such as west-facing glass or skylights. Some are designed to also serve as insect screens.
See SOLAR SHADES & SUNSCREENS for details.
Interior Shades for Windows
Though not generally as effective as exterior shading, light-colored drapes, shades, or blinds can reduce solar gain by 10 to 50% (for typical curtains or blinds) to as high as 70% for an insulated, reflective shade that seals tightly around the window perimeter.
The performance of an interior shade depends on the reflectivity of its outer face, the density and R-value of the material, and whether it seals around the window. Between-the-glass pleated shades or mini blinds, available from Pella and some smaller manufacturers, are more effective in blocking solar gain than interior shades, because they block the heat before it enters the building interior.
Installation Guide to Window Flashing & Sealing
As discussed in Best Practices Guide to Residential Construction (Steve Bliss, J Wiley & Sons) Chapter 3, BEST PRACTICES GUIDE: WINDOWS & DOORS:
While modern flange-type window frames appear to simplify window installation, how best to integrate the nailing flanges with the sheathing wrap and siding has been a subject of debate, and recommendations vary among different window manufacturers, sheathing wrap manufacturers, and contractors.
The approaches shown below represent a broad consensus of leading manufacturers and experienced contractors, but other approaches that follow the same basic principles can also work. These are:
- Always lap higher flashings over lower to shed water.
- Do not rely on caulking as a waterproof barrier, as it is likely to fail over time. see CAULKS & SEALANTS, EXTERIOR
- With heavy exposure to wind-driven rain and snow, use pan flashing to protect the sill and use flashing tape to seal the head flashing to the sheathing.
- Leave horizontal joints unsealed at the top and bottom of the window frame to allow trapped water to escape.
Window Installation, Flange-Type
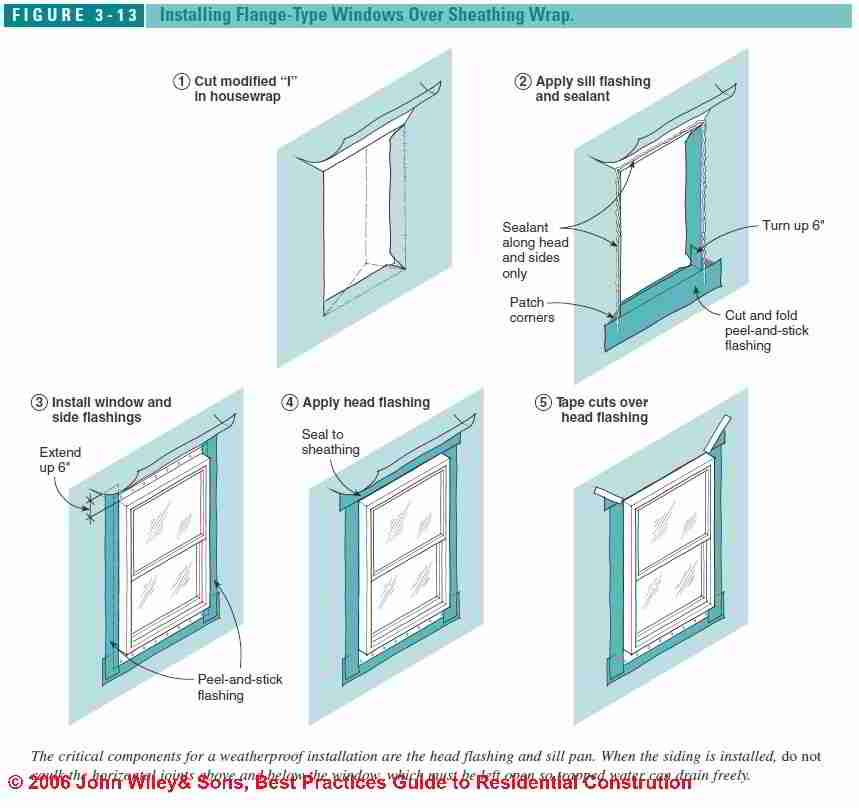
All clad and solid-vinyl windows come with an integral nailing flange or one that is friction-fit into a slot in the frame. In addition to simplifying the nailing, the flange helps to create a weather-tight seal at the head and sides of the window.
The most critical details are the head flashing, which should seal to the sheathing to pick up any dripping water from above, and the sill or pan flashing, which should freely drain to the exterior. The following approaches take advantage of the newer peel-and-stick flashing tapes, which have simplified the flashing of flange type windows.
Watch out: as our window photos above demonstrate, installing any window without proper flashing and sealing is likely to result in leaks into the building interior. The owner of this new home was very unhappy that each time it rained water ran down the inside of her walls at this window.
Installing Housewrap at Window Openings Before Installing the Windows
Figure 3-13 above shows how to flash a window installed after the plastic housewrap is in place. After cutting a modified “I” in the plastic housewrap, fold in the flaps, staple every 6 inches, and trim the excess.
- Pan flashing. The next step, the pan flashing, is often
omitted but is critical for leak-free performance in
harsh weather exposures.
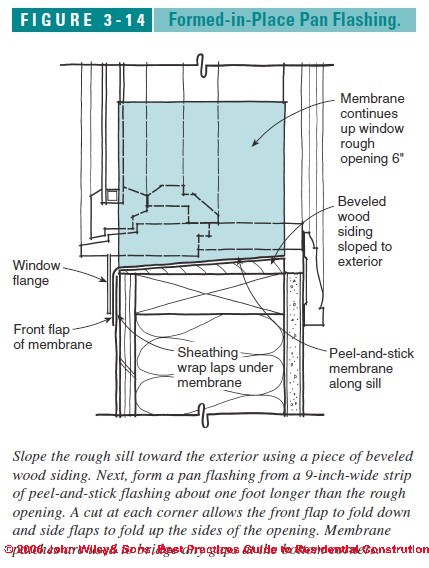
The pan flashing can either be a custom metal pan, an adjustable plastic pan, or one formed in place from flexible flashing tape, as shown (Figure 3-14 below). If using flashing tape, first add a piece of beveled wood siding to the rough sill, sloping to the exterior.
Remember to increase the rough opening height by 1/2 inch. Add patches of flashing tape to bridge the gap at the cut corners. - Install window. Next install the window, slipping the
top flange under the housewrap.
Most manufacturers recommend bedding the side and top flanges in a bead of high-quality sealant to create a backup seal, a good idea in harsh weather exposures.
Watch out: Do not caulk the bottom flange, however, which must be left unsealed so any trapped water can freely drain. To facilitate drainage at the sill, set the window on shims. - Side and head splines. Side splines of peel-and-stick
flashing tape go on next, sealing from the window
flanges to the sheathing wrap, extending 6 inches
above the top of the window opening and lapping over
the pan flashing.
Finally, the head spline is slipped under the housewrap, sealing the window’s top flange to the sheathing. Patches of tape seal the diagonal slits in the housewrap. - Drip cap. If the window is trimmed on the exterior
with wood casings, use a metal drip cap on top of the
head casing and seal the drip cap to the sheathing tape
with peel-and-stick flashing tape.
When the siding is installed, do not caulk the horizontal joints above or below the window, which would create a water dam. Leave all horizontal joints unsealed to drain away any trapped water.Figure 3-14: Formed-in-Place Pan Flashing for Windows or Doors.
As we note above, the pan flashing can either be a custom metal pan, an adjustable plastic pan, or one formed in place from flexible flashing tape, as shown (Figure 3-14 below).
If using flashing tape, first add a piece of beveled wood siding to the rough sill, sloping to the exterior. Remember to increase the rough opening height by 1/2 inch.
Add patches of flashing tape to bridge the gap at the cut corners.
Installing Windows Before Housewrap
When windows are installed before the building is wrapped, the key is to detail the pan flashing so it can properly lap over the housewrap. One approach is to leave the paper facing on the outer flap of the pan flashing so it can layer over the housewrap when installed.
Another approach, shown in Figure 3-15 below, is to seal the pan flashing to a flap of sheathing wrap that will be layered over the housewrap when installed.
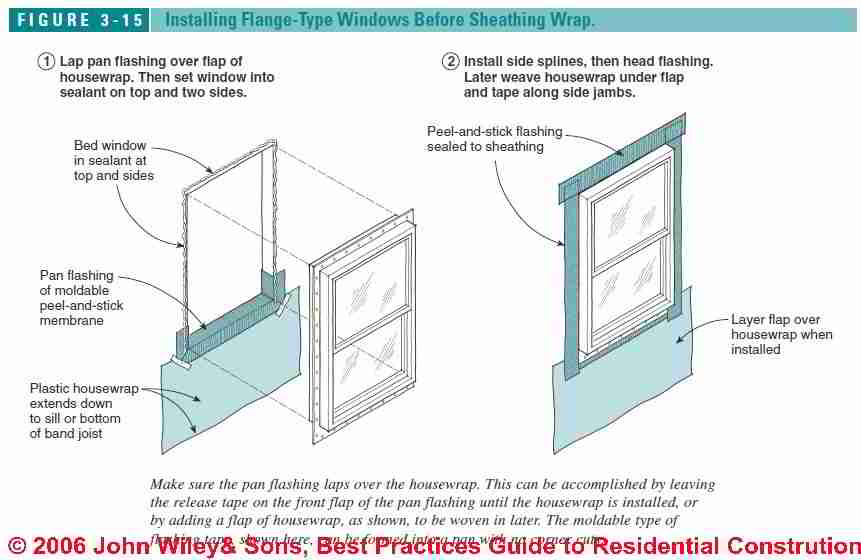
Whether to seal the side window flanges directly to the sheathing or the housewrap is a matter of personal preference. Since few leaks originate at the sides of windows, either detail can work well as the flashings are detailed so each sheds water to the layer below.
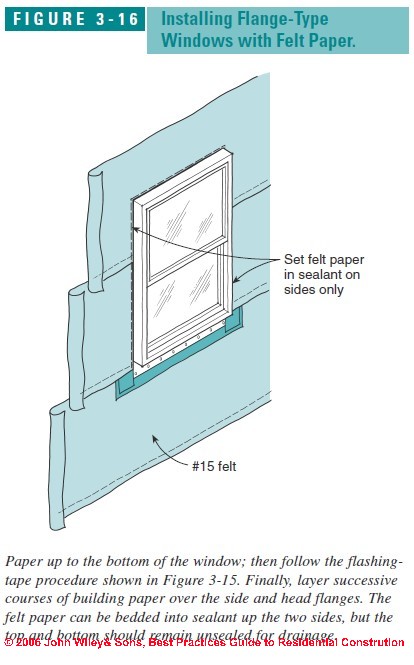
Felt Paper Flashing or as Housewrap Around Windows
When using felt paper, paper up to the bottom of the window. Then install the pan flashing, window, and side and head flashings as shown in Figure 3-15 just above. When installing the building paper later, layer successive courses over the side and head flanges, setting them into a bed of sealant at the sides of the window (see Figure 3-16 at left).
Leave the building paper unsealed at the head flashing, however, to allow any trapped water from above to escape.
Head Flashing Details for Round-Top Windows
To create a head flashing on round-top windows, one approach is to patch together several short pieces of flashing tape, making sure to start at the bottom and lap each upper piece over the preceding lower piece.
Another option is to use a flexible membrane such as DuPont’s Flexwrap® tape, which can be bent to conform to the curve without cutting.
Sealing Details ford Mulled Windows
Where multiple windows are mulled together in the field, treat the space between the windows like a small section of sidewall. Make sure horizontal mullions are lapped properly so the sill flashing above laps over the cap flashing below.
Use peel-and-stick flashing tape on vertical mullions, overlapping the vertical tape onto any horizontal mullions that intersect.
Window Installation, w/ Integral Brickmold
As reported in Best Practices Guide to Residential Construction (Steve Bliss, J Wiley & Sons) Chapter 3, BEST PRACTICES GUIDE: WINDOWS & DOORS:
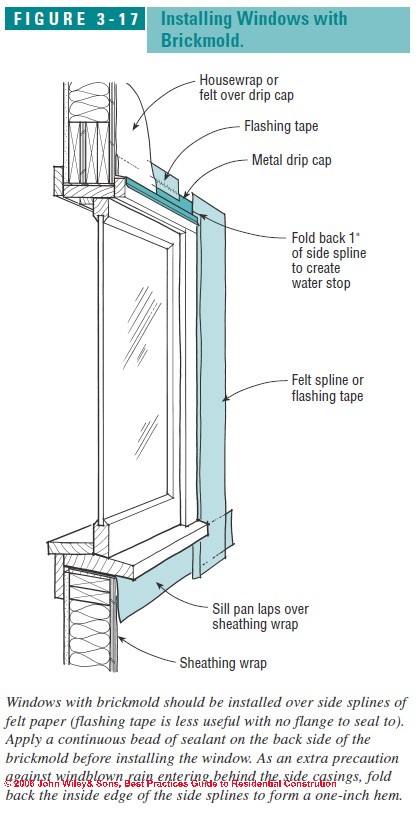
If installing windows with integral brickmold, proceed the same way as shown for flange-type windows above.
However, since there are no side flanges on the window, the brickmold goes over the side splines, which can be either felt paper or flashing tape.
Flashing tape is of less value with brickmold since the windows have no flange to seal to.
Apply a continuous bead of sealant on the backside of the brickmold before installing the window (Figure 3-17 at left)..
As an extra precaution against wind-blown rain entering behind the side casings, you can fold back the inside edge of the spline to form a one-inch hem, a detail developed by Pennsylvania contractor Carl Hagstrom.
At the head casing, a metal drip cap is required to protect the brickmold and provide a watertight seal. Slip the metal drip cap under the sheathing wrap and seal it to the sheathing with flashing tape.
SKYLIGHTS, Guide to Choosing & Installing
As detailed in Best Practices Guide to Residential Construction (Steve Bliss, J Wiley & Sons) Chapter 3, BEST PRACTICES GUIDE: WINDOWS & DOORS:
 A well-positioned skylight can help transform a dreary interior
room into a pleasing sunlit space with a feeling of
connection to the outdoors.
A well-positioned skylight can help transform a dreary interior
room into a pleasing sunlit space with a feeling of
connection to the outdoors.
Our photo (left) shows how even a small skylight can bring light into a tight space, in this case, in a roof in Molde, Norway -DF.
In addition, venting skylights can play a significant role in exhausting hot, moist air from kitchens and bathrooms, and can enhance ventilation in any room with limited cross ventilation.
However, skylights can also be a source of problems, such as roof leaks in winter and overheating in summer, if the installer does not pay attention to glazing type, installation, and flashing details.
Skylight Options
Like windows, skylights come in a wide variety of shapes, sizes, frame materials, and glazing options. In addition, they have an ever increasing variety of screens, shades, and motorized, automated, and computerized controls, providing convenience and good energy performance in almost any situation.
Skylight Glazing Types
Many lower-cost skylights use acrylic or polycarbonate glazing in single or double layers instead of glass. In general, plastic glazings resist breakage, but they can become scratched or brittle over time and are prone to yellowing. Unless specially coated to block UV transmission, plastic glazings allow high levels of UV radiation, which causes fading with many interior furnishings and finishes.
Most higher-end units use sealed insulated glass. Codes require the glass to be either tempered or laminated safety glass. When laminated glass is broken, the plastic interlayer holds the pane together. Tempered glass is harder to break, but it breaks into small, rounded fragments rather than dangerous shards.
Double-glazed skylights with safety glass typically have the safety glass on the interior and tempered glass on the outside, combining high impact resistance on the exterior with protection from falling glass below.
Skylight Window Sizes
Most manufacturers offer a wide variety of sizes, including narrow models designed to fit 24-inch rafter spaces. At least two manufacturers, Roto and Pella, make a 14-inch-wide model designed to fit between 16-inch on center framing. Many standard widths are designed to fit in a double 16- or 24-inch bay.
For narrow spaces, such as a short section of attic roof above a knee wall, Andersen offers several units wider than they are tall, measuring either 16 or 24 inches high by 38 to 72 inches wide. Some manufacturers are tooled up to offer custom sizes for a moderate up-charge.
Skylight Window Controls
Operable skylights use either metal arms that swing out or a concealed chain that unrolls and stiffens as the sash is cranked open. How many turns it takes to open the sash and how wide it opens vary considerably among units. For out-of-reach skylights, all manufacturers offer either extension poles or motorized controls. Some extension poles can be challenging to engage in the crank mechanism, making it a chore to open and close the skylight.
Motorized controls simplify the task, and manufacturers have been refining their offerings in this area. Some need hard wiring from the controller to skylight, while others need only a power connection and are controlled by a convenient hand-held remote. Other options include a battery backup, which could be useful during a power outage, and a rain sensor that automatically closes the skylights at the first drops of rain.
Guide to Skylight Shades and Screens
The tendency of south- and
west-facing skylights to cause summer overheating can be
greatly moderated with the new spectrally selective glazing
(SHGC below .40)
(Spectrally Selective Low-E Windows).
Still, shades and screens can be used to further reduce heat gains and UV radiation and to provide more diffused light with less glare. Numbers vary from one manufacturer to another, but typical shading effectiveness is as follows:
- Exterior solar screens can reduce heat gain by 40% or more.
- Light-colored interior shades can reduce heat gain by 15 to 20%, depending on the density and reflectivity of the material.
- Interior blinds reduce heat gain typically by 10 to 15%, depending on reflectivity.
In a bedroom, a client might also want shades for room darkening. Manufacturers offer a wide variety of shades, mini blinds, and solar screens, most of which can be controlled by the same motors that control the skylights. Pella’s between-the-glass shades and blinds offer better energy performance than interior shades and never need cleaning, a big advantage with out-of-reach units.
Also see SOLAR SHADES & SUNSCREENS.
Skylight Light Tubes
ntroduced in the early 1990s, light tubes consist of a small plastic rooftop dome that conducts light to the interior through a rigid or flexible tube with a reflective interior.
On a sunny day, the diffuser at ceiling level provides about as much light as a bright electrical ceiling fixture (see Figure 3-18 at left)
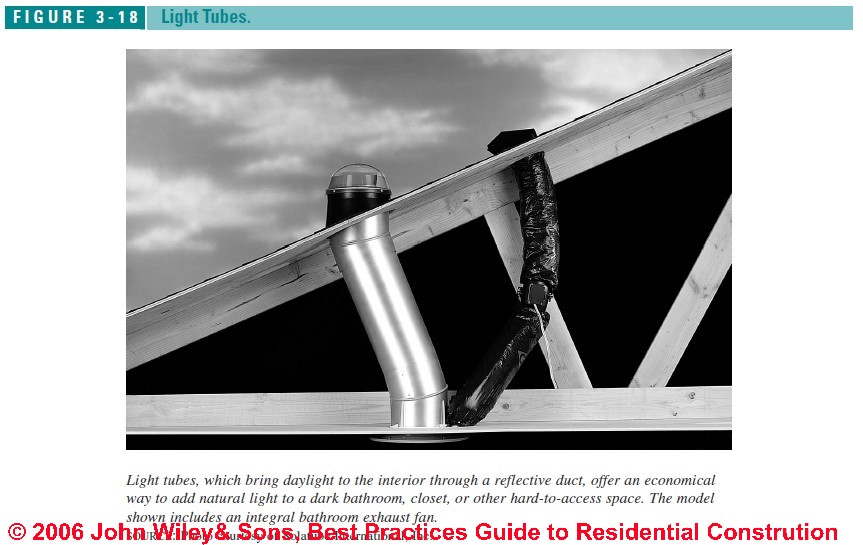
Skylight Light Tubes range from 10 to 22 inches in diameter, and one manufacturer, Sun-Tek, offers a multi tube model that supplies up to four tubes from a more conventional looking skylight panel.
Used primarily in remodeling where it is too difficult or expensive to install a skylight, light tubes offer an economical way to bring daylight into bathrooms, walk-in closets, and other small interior spaces.
For details about skylights see
Skylight Window Design Issues
As stated in Best Practices Guide to Residential Construction (Steve Bliss, J Wiley & Sons) Chapter 3, BEST PRACTICES GUIDE: WINDOWS & DOORS:
Skylights can add a dramatic element to any room in addition to providing high levels of pleasing natural daylight. In the case of operable skylights, they can provide effective ventilation as well. On the other hand, too many skylights can produce uncomfortable glare and significant summertime overheating. A few simple guidelines can ensure a successful installation.
Sizing Advice for Skylights
A small skylight can go a long way toward brightening a space. However, too much direct sunlight can produce very uneven room lighting, excessive glare, and localized overheating.
A rule of thumb developed by the Florida Solar Energy Center recommends that a skylight should be 4 to 6% of the illuminated floor area. This will provide a reasonable level of illumination (about 600 lux) during the morning and afternoon, and on days with overcast skies.
So, for example, 5 to 7 square feet of rooftop glazing (measured horizontally) will provide a reasonable level of illumination to a 10x12 kitchen. For skylights with frosted lenses or high up in cathedral ceilings, use a larger skylight; in regions with predominantly sunny skies, a smaller skylight should suffice.
Glare Problems at Skylights
Glare can be caused by a bright light source bouncing off a work surface into your eyes, or from a bright source directly striking your eyes from straight ahead or from an angle (Figure 3-19 below).
The best way to reduce glare from skylights is to provide diffused, even lighting over a larger area. This can be accomplished with frosted glazing or interior shades.
However, both of these block views of the sky, and interior shades require maintenance. Another approach is to use a light-colored skylight well to reflect and diffuse the light over a larger area.
Deep skylight wells can also reduce unwanted solar gains by as much as 25% by absorbing heat into the walls of the well area.
Splayed Skylight Openings
To maximize the daylighting potential of a skylight, it is best to paint the light well (see Skylight Window Well) a light color and angle at least the top side of the well. Splaying the skylight well enlarges the opening at the bottom and brings the light deeper into the interior space, particularly in the winter when sun angles are lower.
Typically, the top side of the well runs at 90 degrees to the roof slope, and the bottom side, if splayed, is framed plumb (see Figure 3-20).
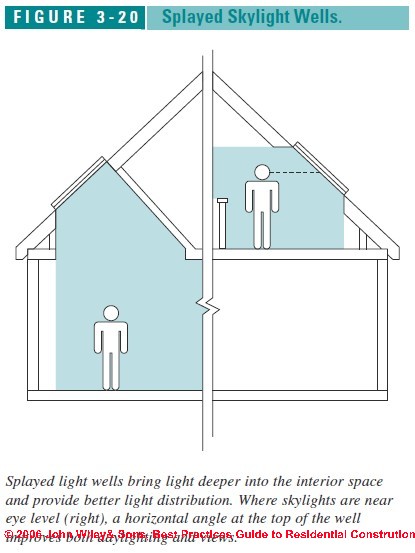
On very steep roofs where the top of the skylight is near eye level, a horizontal angle works well for the top side of the well. The sides are usually left plumb to simplify the framing.
See the "light well" at The Skylight Window Well.
Also see Skylight Light Tubes.
Ventilation Through Skylights
Ventilating through a skylight takes advantage of natural convection currents in a room that bring warm air toward the ceiling.
As the air is exhausted out the skylight, cooler air is drawn in through windows or other rooms. In rooms that generate a lot of moisture, such as kitchens and bathrooms, a venting skylight helps to control moisture levels as well. Some skylights are equipped with flap-style vents that can remain open during rain without leaking.
Also see SKYLIGHT LEAK DIAGNOSIS & REPAIR
Skylight Energy Efficiency
As noted in Best Practices Guide to Residential Construction (Steve Bliss, J Wiley & Sons)
Over glazing with skylights [putting in too many skylights] can increase heat loss in cold, cloudy climates, but the biggest impact of excessive roof glass in most climates is overheating, increasing both peak and annual cooling loads and making people uncomfortably hot.
Solar Heat Gain at Skylights
Because the sun is high in summer and low in winter, skylights tend to capture solar gains at just the wrong time. For example, an unvented skylight set at a 30- to 40-degree slope captures four times as much solar-heat gain in midsummer as a similarly sized vertical window.
To put this in perspective, at noontime on June 21, two single-glazed, 6-square-foot skylights facing south produce nearly as much heat as a 1,000-watt electric space heater. West-facing skylights produce almost as much heat in summer.
Low-E Glazing Solutions for Skylights
Fortunately, the new spectrally selective coatings (see Spectrally Selective Low-E Windows), cut solar gains by nearly 50% compared with clear double glazing, greatly reducing the cooling penalty of skylights.
Still, there is no sense in using more skylights than is needed to produce comfortable light levels, typically 5 to 7% of the floor area being lit. Where overheating is a possibility, use a venting skylight to change the glass angle and exhaust any heat buildup.
Also see SUNGAIN, FILMS, LOW-E GLASS.
Skylight Orientation
While high-tech glass can significantly reduce solar gains, it is still possible to over glaze and overheat a room. For that reason, south- and west-facing skylights should be kept to a minimum.
Also, south-facing skylights produce a lot of glare from direct summer sun. North-facing skylights consistently provide even, diffused lighting with little heat gain. East-facing skylights generate moderate heat gain on summer mornings, which could pose a problem in hot climates if overused.
Skylight U-Values
The same double-glazing has a higher U-value (lower R-value) when used in a skylight than in a vertical window. Increased convection between the two panes of glass in a horizontal or low-slope orientation causes the greater heat loss in skylights.
Starting in mid 2004, all skylight manufacturers using NFRC labels started reporting U-values measured at a slope of 20 degrees. For older skylights rated at a 90-degree angle, multiply the U-value by 1.2 to get the 20-degree equivalent. This results in a 20% higher U-value.
Avoid Condensation Problems on Skylight Windows
Because warm moist air is carried upward by convection currents, skylights are often one of the first places to develop condensation. This can lead to dripping and staining of the frame, well, or furnishings below.
The best defense against skylight condensation is to choose high R-value glazing with warm-edge spacers. Good insulation of the skylight well also helps by keeping the surrounding area warmer. Several manufacturers offer skylights with integral condensation gutters, a helpful feature in cold climates.
Also see CONDENSATION or SWEATING PIPES, TANKS
and DEW POINT TABLE - CONDENSATION POINT GUIDE
as well as HUMIDITY LEVEL TARGET
and see SKYLIGHT LEAK DIAGNOSIS & REPAIR
Skylight Installation Procedures
According to Best Practices Guide to Residential Construction (Steve Bliss, J Wiley & Sons) Chapter 3, BEST PRACTICES GUIDE: WINDOWS & DOORS:
Skylight Opening Framing
Take care when framing skylight openings to make the opening as accurate and square as possible. T
his will simplify both the installation and trim, since most skylight designs leave little margin for error where the interior finish meets the frame. Unless using a skylight designed to fit between 16- or 24-inch on-center framing, you will need to head off the opening and use double trimmers on either side.
For truss roofs, consult the truss designer or an engineer before modifying the truss plan or cutting an existing truss. In new construction, trusses are typically doubled on either side of the opening with 2x cross pieces framed in “ladder” fashion.
The Skylight Window Well: the Light Well
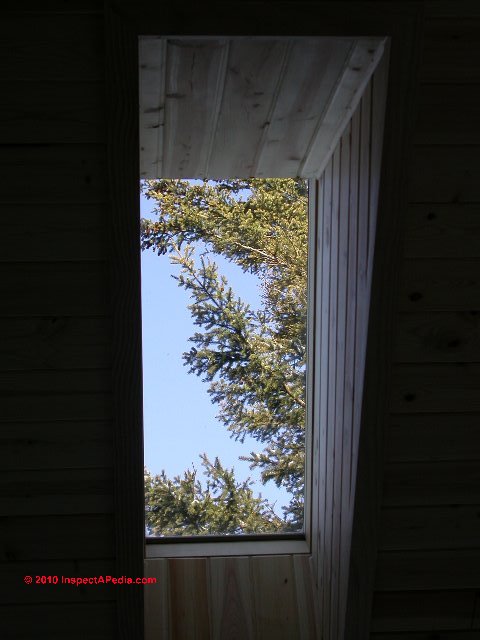 There are many ways to frame a light
well or "skylight chute" as some builders call them. In a cathedral ceiling, the rafters and headers create
the well. Framing the upper header square and lower
header plumb splays the opening.
There are many ways to frame a light
well or "skylight chute" as some builders call them. In a cathedral ceiling, the rafters and headers create
the well. Framing the upper header square and lower
header plumb splays the opening.
Our photo (left) shows a wood-framed skylight well (the builder called them "shoots", meaning "chutes") in a truss-framed roof in Minnesota -DF. To frame a perfect skylight well the builder actually constructed the shell on the floor below then lifted and nailed it into place below the skylight. We took care to assure that the sides of the skylight well were insulated.
With an attic, the top side of the well is typically framed perpendicular to the roof plane and the bottom and sides are framed plumb.
For small skylight wells, the opening can be created with 3/4-inch plywood while larger openings are typically built like stud walls. Make sure the well is sealed tightly against air infiltration and well-insulated to guard against condensation on the skylight or sides of the well.
It is also possible to splay the two sides of a skylight well in addition to the top and bottom sides, although the framing and drywall are a lot more complicated.
To keep the four sides of the skylight window well flat, the bottom of the opening must be shaped like a trapezoid, wider on the high side of the opening. You can just see that feature in our skylight photo above.
To keep the opening rectangular at the ceiling plane, the two sides become curved like twisted strips of plastic. This requires framing with angled struts and bending the drywall. Either approach makes for a complicated framing job.
Also see Skylight Light Tubes.
Sealing the Underlayment at Skylights
To ensure a leak-free installation with any type of roofing, use peel-and-stick membrane to seal the skylight to the sheathing and underlayment, creating a primary barrier to water entry below the finished roofing.
Any water that manages to penetrate the flashing will be stopped by the membrane. Hold the roofing felt back about 6 inches from the opening so the peel-and stick membrane can bond directly to the roof sheathing.
After the skylight frame is in place, install 9- to 12-inch-wide strips of membrane around all four sides of the curb, starting with the bottom, and working uphill so the upper pieces always overlap the lower pieces (Figure 3-21).
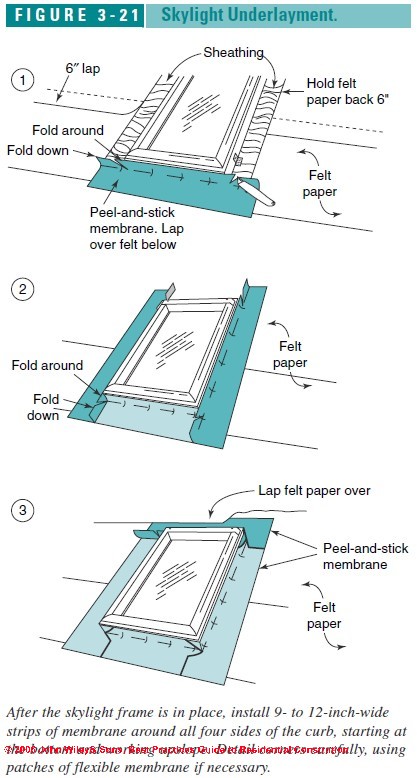
Detail corners carefully using patches of moldable
flashing
(see FLASHING MEMBRANES PEEL & STICK) if necessary.
Tuck the top piece of membrane under the roofing felt
above, and lap the lower piece over the roofing felt below.
With ganged window units, use a single strip of membrane between each unit, running down one skylight frame, across the mullion, and up the next skylight frame.
Ice Dam Protection for Skylights
Snow can build up above skylights and ice can build up below them as snowmelt from the glass area refreezes.
As extra protection against leaks in areas subject to heavy snow and ice damming, some contractors run a wide band of the peel-and-stick membrane around the sides and top of the skylight and all the way down to the roof eaves (see Figure 2-5 at left.)
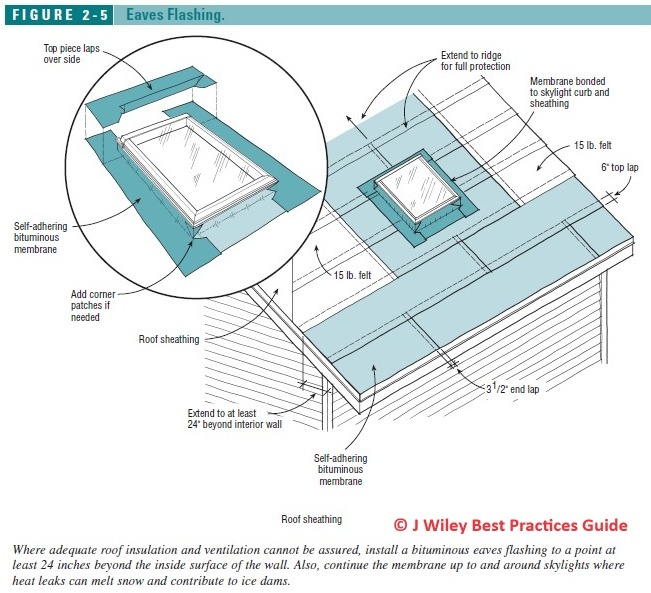
On low-slope roofs, the membrane often covers the entire roof surface and continues up and around any skylight curbs for complete protection.
Extensive details about ice dam prevention are
at ROOF ICE DAM LEAKS.
Also see SKYLIGHT VENTILATION DETAILS.
Skylight Flashing Details
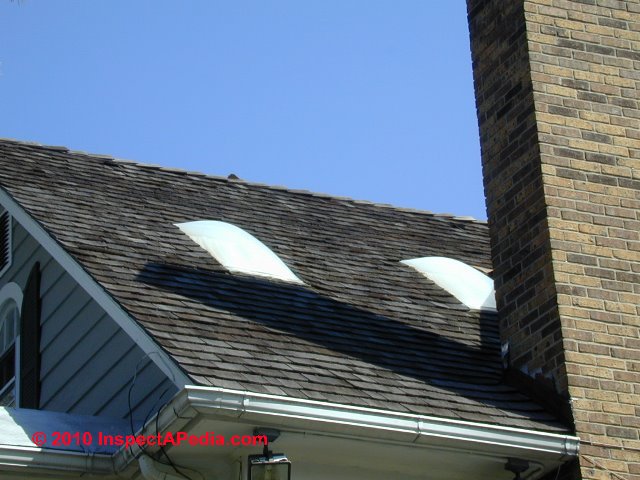 Older-style skylights (photo at left) were notorious
for leaking
Older-style skylights (photo at left) were notorious
for leaking
See SKYLIGHT LEAK DIAGNOSIS & REPAIR, but today’s pre-formed skylight flashing kits combined with bituminous peel-and-stick membranes have made leaky skylights mostly a thing of the past
See also FLASHING MEMBRANES PEEL & STICK.
Most major skylight manufacturers provide flashing kits for asphalt shingles as well as specialty flashings for tile and metal roofing, typically with a wraparound head flashing and moldable apron flashing that conforms to the roofing profile.
With asphalt shingles, avoid skylights that provide only a continuous side flashing, which relies on roofing cement for a waterproof seal. Step flashing is much more reliable.
With metal roofing, use the manufacturer supplied kit or have the roofing contractor fabricate a matching flashing from the metal roofing material. While a custom flashing can create a more attractive installation, make sure the corners of the head flashing are properly sealed with solder or a high-performance caulk.
Also see SKYLIGHT LEAK DIAGNOSIS & REPAIR
Skylight Installation on Low Slope RoofsFor roof slopes between 2:12 and 4:12, most skylight manufacturers will not guarantee a waterproof installation unless the skylight angle is raised with a built-up curb or a special inclined flashing kit (Figure 3-22).
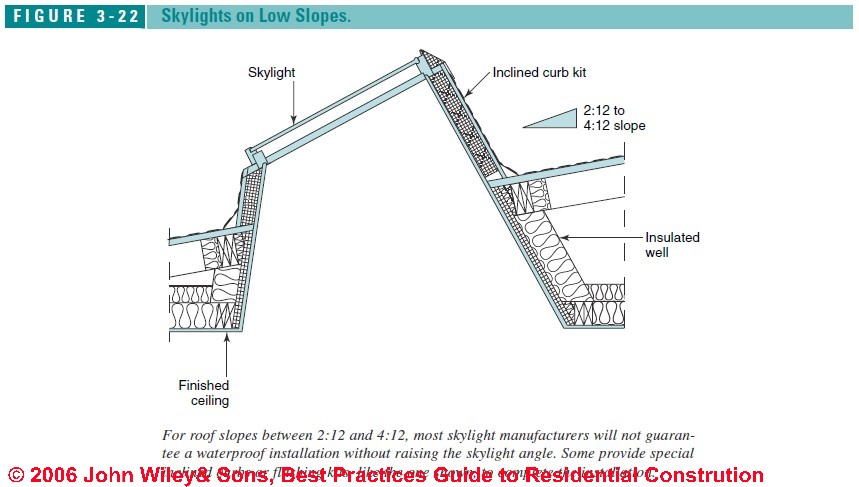
The raised skylight curb should be sealed on all sides with peel-and-stick membrane carefully sealed at all corners, as in Figure 3-21.
Skylight Installations on Steep Slopes
For very steep slopes, such as mansards, skylight manufactures typically recommend a water deflector or Z-flashing to safely divert water around the unit. Check with the manufacturer for steep-slope requirements.
DOORS, EXTERIOR, Selecting & Installing
As described in Best Practices Guide to Residential Construction (Steve Bliss, J Wiley & Sons) Chapter 3, BEST PRACTICES GUIDE: WINDOWS & DOORS:
While some entry doors are well-protected from the elements by porches or recessed entries, many face harsh weather exposures in addition to the usual bumps and bruises from children, furniture movers, and others.
In addition, doors must resist warping, shrinking, and swelling across a wide range of temperatures and moisture conditions in order to close tightly and to operate smoothly—all in all, a tall order met with an increasing degree of sophistication by manufacturers.
For new construction, most entry doors are purchased pre hung as an “entry system,” which, in addition to the frame, hardware, weather-seals, and any sidelites, may also include integrated security systems, lighting, and keyless entry systems.
Note: Interior doors are covered under “Interior Finish,” starting on page 186 in the Best Construction text.
Exterior Door Materials
While solid-wood entry doors can last for decades and grace the fronts of many older homes, they are rapidly giving way to a host of hybrid and composite products, some of which are difficult to categorize. While most budget-oriented projects use steel-faced doors, fiberglass and composite doors are the fastest growing market segment, promising greater durability at a price still well below solid wood.
Exterior doors are typically classified by their facing material, but their performance and durability is more a function of their internal construction (Table 3-7).
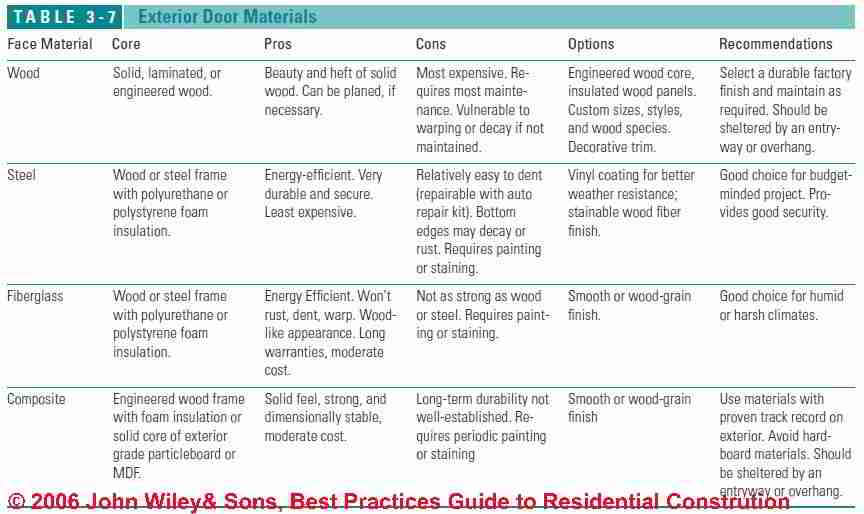
Wooden Exterior Doors
Traditional frame-and-panel solid wood doors, once standard fare for residential entries, have become primarily a high-end specialty item.
A few larger exterior door manufacturers,
such as Jeld-Wen and Kolbe and Kolbe Millworks,
still manufacture stock designs in solid wood, but many
who have stayed in the business are niche suppliers of
high-end custom doors in an endless variety of wood
species, shapes, and styles from Shaker simplicity to
14-foot castle doors
(see Window & Door Sources).
To improve strength and stability in wood doors, Kolbe and Kolbe uses laminated-veneer lumber (LVL) for locking rails, and custom door makers Lamson-Taylor and Simpson build up their rails, stiles, and panels from two or more layers of wood.
Lamson-Taylor laminates foam insulation between two solid wood faces to create a unique insulated wood door that the company says is immune to problems with temperature and humidity differences across the door.
To keep costs down and improve stability, many manufacturers offer simulated panel doors with a real wood veneer over an engineered wood core. These are sturdy and offer good value, but the veneered face is more vulnerable to damage than a solid wood model.
If well maintained and periodically repainted or stained, a high-quality wood door can last indefinitely. However, they are best suited to temperate climates and should be protected from direct weather exposure with a suitable overhang or inset.
Steel Exterior Doors
A premium residential steel door has a 24-gauge or heavier galvanized steel skin over a wood or steel frame filled with foam insulation. This creates an extremely strong and durable product with an effective insulation rating of about R-8 for polyurethane insulation versus about R-5 for polystyrene.
Our photo (left) shows a steel exterior door retrofit to a 1920's home in Poughkeepsie, NY, adding security and weather-resistance to the structure.
Most steel and other hollow-core doors contain a wood or composite lock-block for mounting the lockset, and may use wood, engineered lumber, or steel for the stiles and rails.
Bottom rails, which get the greatest exposure to water, are sometimes made of waterproof composites.
Steel is the strongest edge material but requires a thermal break to prevent condensation around the door’s interior perimeter.
Wood forms a natural thermal break, but it is prone to decay along the door bottom if not kept well painted (Figure 3-23).
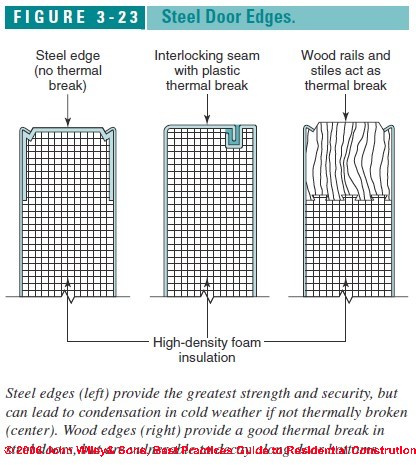
Here is a closeup photo of a rotted bottom rail in a vinyl-covered storm door.
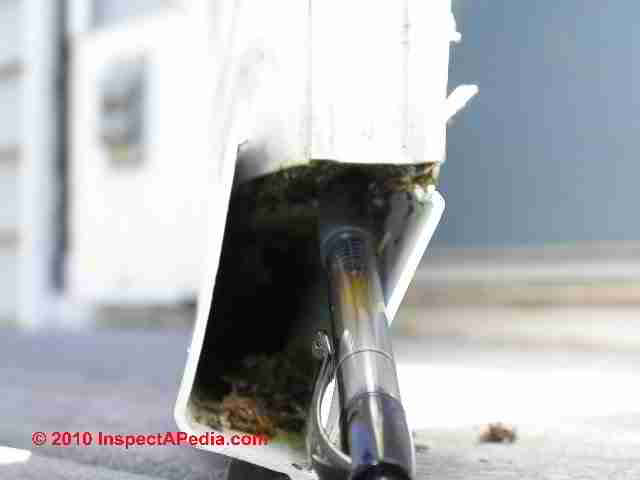
Most steel doors come embossed with a wood-grain pattern and preprimed with a baked-on polyester finish, although smooth metal finishes are also available.
For better protection, some manufacturers apply a vinyl coating with wood grain, which can be stained with a high solids stain. The vinyl is fairly durable, but deep scratches are difficult to conceal. For a more realistic wood look, some manufacturers apply a stainable wood-fiber finish. Follow manufacturers’ recommendations regarding prep work and finishing.
In general, premium steel doors are very strong and durable, although they require regular painting and over time will likely acquire a dent or two. Rust is generally not a problem with galvanized or stainless-steel facings, but condensation can damage finishes on doors without thermal breaks.
Also see CONDENSATION or SWEATING PIPES, TANKS
and DEW POINT TABLE - CONDENSATION POINT GUIDE as well
Fiberglass Exterior Doors
Fiberglass doors, first introduced by Therma-Tru in the early 1980s, are built internally the same as a steel door with internal wood rails and stiles and a rigid foam core.
The fiberglass facing is typically embossed with a stainable wood grain, but is also available with a smooth finish that when painted is hard to distinguish from a painted wood door. Fiberglass doors generally price midway between a steel and wood door and carry long-term warranties.
Fiberglass, while not as strong as steel, is very durable, stable, and energy-efficient. It will not warp, crack, or swell like wood and will not dent like steel, making it a good choice in harsh weather exposures.
While fiberglass can be gouged or cracked if hit hard enough, repairs are no more difficult than for steel doors. Scratches, however, are difficult to sand out without destroying the wood-grain pattern on embossed panels.
Composite Exterior Doors
A new breed of engineered wood doors are built of a variety of engineered wood materials, including laminated-veneer lumber (LVL), exterior-grade medium-density-fiberboard (MDF), and exterior-grade particleboard. Some are built with an engineered-wood skin over a foam or particleboard core, while others are milled from a single slab of MDF. Most come with either smooth or embossed wood-grain finishes ready to paint or stain.
Composite doors tend to price between steel and fiberglass and carry warranties up to 10 years. While many wood composites have established a good track record in exterior use, others, such as hardboard, have had problems with swelling and delamination if exposed to the weather and not protected by a good coat of paint.
As with real wood, it would be prudent to use these products in a sheltered entryway and keep them well painted. Until long term durability has been established, their use remains an open question.
Also see WINDOW / DOOR ENERGY EFFICIENT, DOE
Doors, Exterior, Frames
As discussed in Best Practices Guide to Residential Construction (Steve Bliss, J Wiley & Sons) Chapter 3, BEST PRACTICES GUIDE: WINDOWS & DOORS:
In new construction, most exterior doors are purchased pre hung in a frame complete with adjustable thresholds, sidelites or transoms, and, in some cases, high-tech electronics, such as motion-sensor lighting and keyless ignition systems. The frames come in a variety of materials from basic finger-jointed pine to low-maintenance frames clad in vinyl or aluminum.
The most critical piece of the frame is the sill and threshold. Most today are extruded aluminum, often with a treated wood or composite subsill (Figure 3-24).
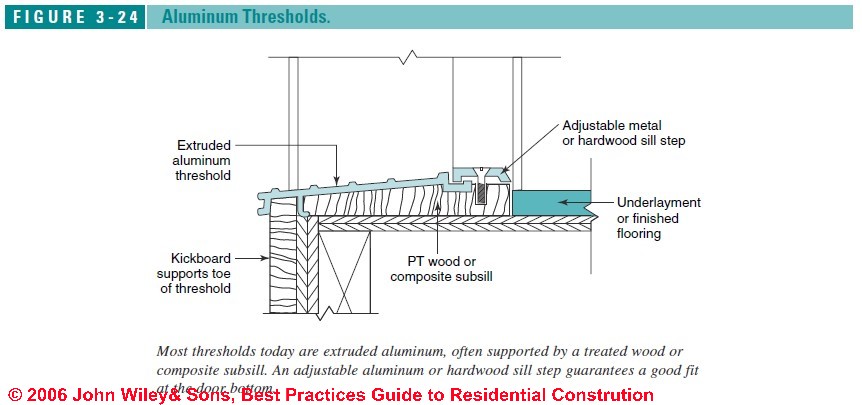
Some have built-in channels with weeps to safely drain away water and many have an adjustable sill step, a helpful option since few of today’s doors can be planed or easily adjusted.
When purchasing a complete entry system, make sure that the components all come from the same manufacturer, since many distributors mix and match door slabs from one company with more economical frames, hardware, or glazing systems from another, potentially voiding the warranty should some components fail.
Doors, Exterior, Energy Efficiency Guide
As reported in Best Practices Guide to Residential Construction (Steve Bliss, J Wiley & Sons) Chapter 3, BEST PRACTICES GUIDE: WINDOWS & DOORS:
Insulation values for entry doors range from about R-2 for solid wood to about R-5 for a fiberglass or steel door filled with polystyrene foam. Doors with polyurethane foam average about R-8. The values are lower than for a solid slab of foam insulation due to internal blocking and frame materials. In doors with glazing, the numbers drop considerably.
However, because of a door’s relatively small area, conductive heat loss has little effect on annual fuel bills. Thermal breaks are important with steel doors since they help eliminate condensation around the door’s perimeter. Air leakage has the biggest energy impact since it can contribute to condensation, increased fuel bills, and discomfort due to drafts.
Weather-Stripping Advice for Exterior Doors
Look for air tightness ratings similar to windows, preferably below .10 cfm/sq ft. Equally important as the rating, however, is how the weather stripping holds up over time. Magnetic weather-stripping generally performs well but is only available on steel doors.
Compression bulbs form a tight seal, but some materials lose flexibility in the cold or take on a permanent “compression set.” Silicone and EPDM both resist compression set and stay flexible in the cold. Neoprene and vinyl are less durable and less flexible in the cold.
Another widely used weather-stripping material with a proven track record is Schlegel’s proprietary Q-Lon, a thermoset plastic that outperforms thermoplastics, such as vinyl, TPE, and urethane foam.
Exterior Door Sweeps
Also look for a durable seal at the door bottom.
There are many approaches to sealing at the threshold, including bulbs, sweeps, and interlocks that work in conjunction with the threshold to seal out water and air leakage (Figure 3-25).
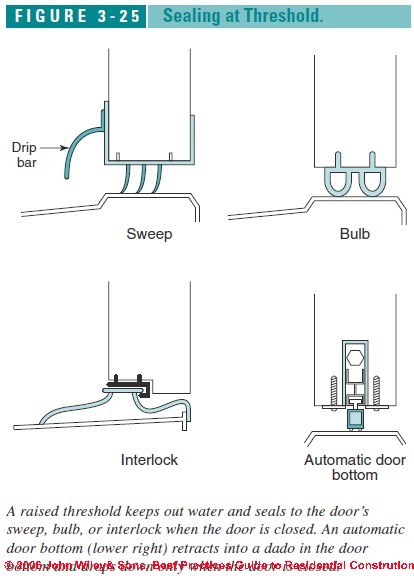
One of the most effective approaches is an automatic sweep that retracts into a dado cut in the bottom of the door and drops down only when the door is closed. These are available as retrofits for wood doors and will even work without a threshold.
Also see WINDOW / DOOR ENERGY EFFICIENT, DOE
Doors, Exterior Flashing Details
As detailed in Best Practices Guide to Residential Construction Chapter 3, BEST PRACTICES GUIDE: WINDOWS & DOORS:
Doors are flashed the same as windows on the sides and top, and similarly at the sill. Clad door frames are flashed like clad windows (see our window flashing illustrations below, Figures 3-13, Figure 3-15, Figure 3-16) and solid wood frames are flashed like traditional windows with brickmold (Figures 3-17 also below).
Unless a door is well-protected by a porch or large overhang, good pan flashing at the sill is critical to prevent water from seeping into the floor framing. Doors leading to patios and decks are particularly vulnerable to wetting around the sill from splashback and, in cold climates, from snow buildup.
Pan Flashing for Exterior Doors
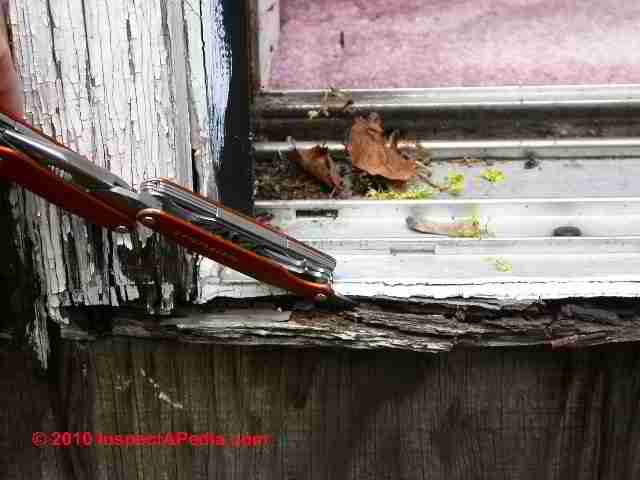 Prefab plastic door pans typically come
in three sections that are fused together at the required
length with solvent-based cement. Metal pans require a
brake to form and should be caulked or, preferably, soldered
at corners.
Prefab plastic door pans typically come
in three sections that are fused together at the required
length with solvent-based cement. Metal pans require a
brake to form and should be caulked or, preferably, soldered
at corners.
In fact the absence of effective flashing at this 20-year-old sliding glass door led to the need for a complete door, door jamb, and trim replacement on this Poughkeepsie home. When the new door was installed we included a sit-built pan flashing and membrane flashing around the door for a more durable replacement.
Peel-and-stick membranes have become increasingly popular due to their ease of use and flexibility. Whether to use a metal pan, plastic pan, or peel-and stick membranes is a matter of personal preference as all work well (see Figure 3-26 below).
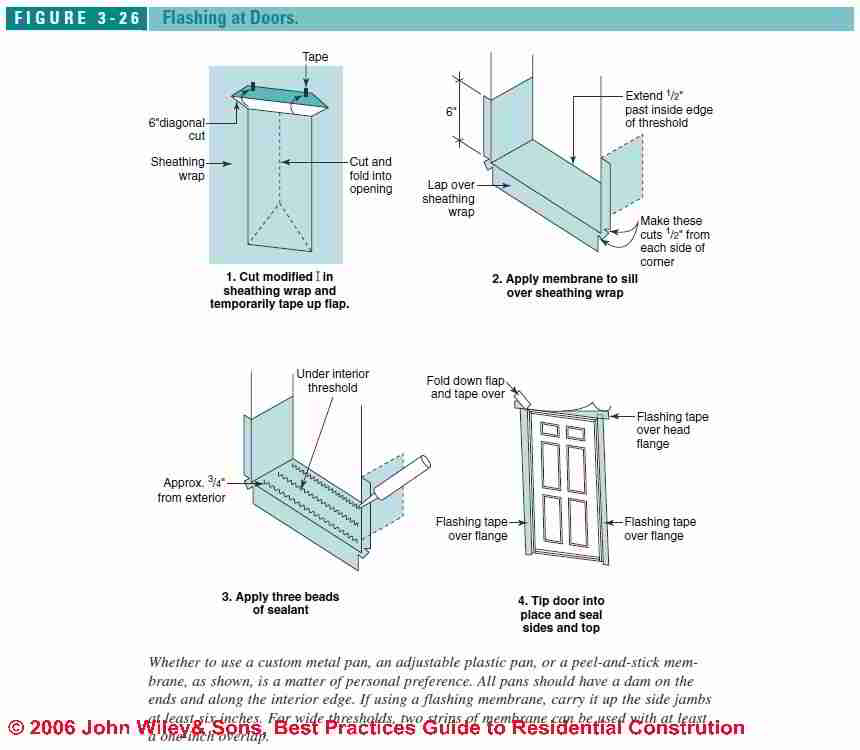
Whatever material is used, all pans should have a dam on the ends and along the inside edge. On the exterior, the pan flashing should lap over the deck or masonry flashing below. If forming a pan with peel-and-stick membrane, carry it up the sides at least 6 inches, and turn up the inside edge so it is held in place by the underlayment or finish flooring (Figure 3-27 above).
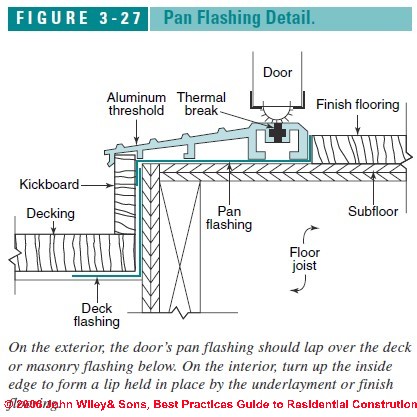
Also see
Window and Door Resources: where to buy window and door products
As noted in Best Practices Guide to Residential Construction (Steve Bliss, J Wiley & Sons) Chapter 3, BEST PRACTICES GUIDE: WINDOWS & DOORS:
Manufacturers of Windows & Doors
Windows and Patio Doors
- Andersen Windows and Doors www.andersenwindows.com Vinyl-clad windows and patio doors, including storm resistant models
- Atrium Companies Inc. www.atriumcompanies.com Vinyl and aluminum windows and patio doors
- Certainteed Corp. www.certainteed.com Vinyl windows and patio doors
- Crestline Windows and Doors www.crestlinewindows.com Wood, vinyl, and aluminum-clad windows and patio doors
- Eagle Windows and Doors www.eaglewindow.com Extruded-aluminum-clad windows and sliders with LVL frames and steel entry doors
- Fibertec Windows and Door Manufacturing www.fibertec.com Pultruded fiberglass windows and doors
- Hurd Windows and Doors www.hurd.com Wood, vinyl, and aluminum clad windows and patio doors
- Jeld-Wen Windows and Doors www.jeld-wen.com Wood, vinyl, aluminum-clad, and aluminum windows and patio doors
- Kolbe Windows and Doors www.kolbe-kolbe.com Wood, vinyl, and aluminum-clad windows and patio doors
- Marvin Window and Doors www.marvin.com Wood and extruded-aluminum-clad windows and patio doors, including true divided lites and storm-resistant models
- Milgard Windows and Doors www.milgard.com Wood, aluminum, vinyl, and fiberglass-clad windows and patio doors
- MW Windows www.mwwindows.com Wood, vinyl, and vinyl-clad windows and patio doors
- Peachtree Doors and Windows www.peach99.com Vinyl-clad and aluminum-clad windows with optional hardwood interior; aluminum-clad, steel, and fiberglass patio doors with optional hardwood interior
- Pella Windows and Doors www.pella.com Wood and aluminum-clad windows and patio doors with optional between-the-glass shades and blinds, including storm-resistant models
- Thermotech Windows Ltd. www.thermotechwindows.com Complete line of fiberglass pultruded windows
- Weather Shield Windows and Doors www.weathershield.com Wood, vinyl, vinyl-clad, and aluminum-clad windows and patio doors, including historic replacement windows and storm-resistant models
- WindsorWindows and Doors www.windsorwindows.com Wood and vinyl windows and patio doors, including a line of wood windows with a cellular-PVC exterior
Door Manufacturers & Products Guide
- Benchmark Entry Systems (division of Therma-Tru Doors) www.benchmarkdoors.com Steel and fiberglass entry doors
- Jeld-Wen Windows and Doors www.jeld-wen.com Wood, wood composite wood, fiberglass, and steel entry doors
- Kolbe Windows and Doors www.kolbe-kolbe.com Wood, steel, and fiberglass entry doors with LVL core and optional extruded-aluminum cladding on frame
- Lamson-Taylor Custom Doors and Millwork www.lamsontaylor.com Custom pine and hardwood entry doors with foam insulation core
- Masonite Corp. www.masonite.com Steel, wood-edged steel, and fiberglass entry doors
- Peachtree Doors and Windows www.peach99.com Steel and smooth and textured fiberglass entry doors
- Pella Windows and Doors www.pella.com Fiberglass and steel entry doors
- Phoenix Door Manufacturing Company www.phoenixdoor.com Softwood and hardwood entry doors up to 8 ft. high and custom designs
- Simpson Door Company www.simpsondoor.com Douglas-fir, hemlock, oak, and mahogany entrance doors, including custom doors; also primed MDF, particleboard, and composite wood doors
- Stanley Door Systems (division of Masonite) www.stanleyworks.com Steel and fiberglass entry doors
- Weathershield Windows and Doors www.weathershield.com Wood and steel entry doors, with wood, vinyl, aluminumclad, and vinyl-clad frames
- Taylor Building Products www.taylordoor.com Steel (stainable finish) and fiberglass entry doors
- Therma-Tru Doors www.thermatru.com Steel and fiberglass entry doors with optional vinyl-clad jambs
Skylight Manufacturers & Product Sources
- Andersen Windows and Doors www.andersenwindows.com Skylights and roof windows with exterior sash clad with glass-fiber-reinforced material
- Milgard Windows and Doors www.milgard.com Skylights with aluminum frames (thermal break optional) with vinyl subframes on operable models; optional motorized controls with rain sensor
- Pella Windows and Doors www.pella.com Wood interior, aluminum exterior, optional motorized controls, and manual or motorized fabric-pleated shades
- Roto Frank of America www.roofwindows.com Wood interior, aluminum exterior, optional motorized controls, and manual or motorized fabric-pleated shades; Sweet16 model fits 16 in. o.c. framing
- Velux America Inc. www.velux.com Skylights and roof windows with wood interior and aluminum-clad exterior. Options include insect screens, blinds, motorized controls and shades with rain sensor, electrochromatic glass, and flashing kits for metal and tile roofs and mulled units
- Skylight Light Tube Manufacturers & Sources
- SolaTube www.solatube.com Light tubes from 10 to 21 in. in diameter; options include electrical lighting, daylight dimmer, and integral bath fan
- Sun-Tek Skylights www.sun-tek.com Light tubes from 10 to 21 in. in diameter; options include electrical lighting and multitube Spyder skylight
- Velux America Inc. www.velux.com Sun Tunnel light tubes from 14 to 22 in. in diameter with flexible or rigid tubes
Industry Associations for Windows & Doors
- American Architectural Manufacturers Association (AAMA) www.aamanet.org
- Efficient Windows Collaborative www.efficientwindows.org
- National Fenestration Rating Council (NFRC) www.nfrc.org Sustainable by Design www.susdesign.com
- Shareware calculators for sun angles, solar heat gain, and shading
- Window and Door Manufacturers Association (WDMA) www.wdma.com
- - Adapted and paraphrased, edited, and supplemented, with permission from Best Practices Guide to Residential Construction (Steve Bliss, J Wiley & Sons) .
Reader Comments, Questions & Answers About The Article Above
Below you will find questions and answers previously posted on this page at its page bottom reader comment box.
Reader Q&A - also see RECOMMENDED ARTICLES & FAQs
Question:
(July 12, 2014) Laura said:
Should I choose stainless steel spacers (Superset) or Super Spacer (foam rubber) spacers in Hawaii for sliding windows? Stainless steel is stronger but your article advises agains any spacers with metal content? Foam or rubber will break down over time with daily sun exposure. Which would work best for the longterm?
Reply:
Thank you for the question, Laura.
For your climate where thermal break properties are less critical (there is no risk of frost damage) I'd use the stainless steel as more resistant to sun exposure just as you pointed out.
Question:
(Sept 9, 2014) Chelan said:
Is there somewhere to mention that windows in living areas, especially bedrooms, must comply with relevant Life Safety Code as to location and sizing for "second means of escape"? I just inspected a garage being converted to a two-bedroom dwelling that had no windows meeting NFPA 101(2009):24.2.2.3.3, i.e., not large enough and too high from the floor. Escape windows cannot be less than 20 inches wide, 24 inches high, clear opening of 5.7 square feet, nor more than 44 inches from the floor to the sill. They must also be operable from the inside without use of tools, keys or special effort.
Reply:
Thanks for the important suggestion, Chelan.
We discuss the requirement for emergency exit windows as a secondary building egress for mobile homes and trailers at
inspectapedia.com/structure/Mobile_Home_Exteriors.htm
and in this article above inspectapedia.com/BestPractices/Definitions_of_Window_Types.php
in response to your comment I will add one or more photos of & specifications for basement exit windows.
Qt inspectapedia.com/exterior/Basement_Walkout_Stair_Covers.php
we discuss more usual basement exit points.
But I agree that this topic needs a more clear description. I'm working on your suggestion and will post a related link in this article above.
Chelan
Please see the new article on emeregency egress / rescue windows at
inspectapedia.com/interiors/Emergency_Egress_Rescue_Windows.php
We'd welcome your comments and of course if you want to be named as a contributor just give me that information by email.
Question:
(Oct 23, 2014) Ryan said:
Hi, Would like to know about double glazing thickness. I'm looking at having double glazing with 5-15-6mm (Planitherm) air filled gap. I'd like to have a high SHGC. Is this too thick or pretty standard? Thanks.
...
Continue reading at WINDOW TYPES - Photo Guide or select a topic from the closely-related articles below, or see the complete ARTICLE INDEX.
Or see these
Recommended Articles
- AIR LEAK DETECTION TOOLS
- BEST PRACTICES, WINDOWS & DOORS
- CAULKS & SEALANTS, EXTERIOR
- CONDENSATION on WINDOWS, SKYLIGHTS
- DOORS, ENERGY EFFICIENCY
- DOORS, EXTERIOR FIBERGLASS vs STEEL
- DOORS, EXTERIOR, Selecting & Installing
- DOOR FLASHING DETAILS
- DOORS, INTERIOR
- DOOR SOURCES
- EMERGENCY EGRESS WINDOWS
- ENERGY EFFICIENT DOORS & WINDOWS
- FIRE ESCAPES & FIRE STAIRS
- FLASHING, DOOR DETAILS
- FLASHING, WINDOW DETAILS
- GLASS vs HEAT MIRROR SOLAR GAIN-LOSS
- SOUND CONTROL for DOORS
- SOURCES for DOORS & WINDOWS
- WINDOWS & DOORS - home
Suggested citation for this web page
BEST PRACTICES GUIDE: WINDOWS & DOORS at InspectApedia.com - online encyclopedia of building & environmental inspection, testing, diagnosis, repair, & problem prevention advice.
Or see this
INDEX to RELATED ARTICLES: ARTICLE INDEX to DOORS & WINDOWS
Or use the SEARCH BOX found below to Ask a Question or Search InspectApedia
Ask a Question or Search InspectApedia
Try the search box just below, or if you prefer, post a question or comment in the Comments box below and we will respond promptly.
Search the InspectApedia website
Note: appearance of your Comment below may be delayed: if your comment contains an image, photograph, web link, or text that looks to the software as if it might be a web link, your posting will appear after it has been approved by a moderator. Apologies for the delay.
Only one image can be added per comment but you can post as many comments, and therefore images, as you like.
You will not receive a notification when a response to your question has been posted.
Please bookmark this page to make it easy for you to check back for our response.
Our Comment Box is provided by Countable Web Productions countable.ca
Citations & References
In addition to any citations in the article above, a full list is available on request.
- Basic Housing Inspection, US DHEW, S 352.75 U48, p.144, out of print, but is available in most state libraries; New York State version, ca 1955, source of our window parts and window repair sketches.
- Best Practices Guide to Residential Construction, by Steven Bliss. John Wiley & Sons, 2006. ISBN-10: 0471648361, ISBN-13: 978-0471648369, Hardcover: 320 pages, available from Amazon.com and also Wiley.com. See our book review of this publication.
- Our recommended books about building & mechanical systems design, inspection, problem diagnosis, and repair, and about indoor environment and IAQ testing, diagnosis, and cleanup are at the InspectAPedia Bookstore. Also see our Book Reviews - InspectAPedia.
- In addition to citations & references found in this article, see the research citations given at the end of the related articles found at our suggested
CONTINUE READING or RECOMMENDED ARTICLES.
- Carson, Dunlop & Associates Ltd., 120 Carlton Street Suite 407, Toronto ON M5A 4K2. Tel: (416) 964-9415 1-800-268-7070 Email: info@carsondunlop.com. Alan Carson is a past president of ASHI, the American Society of Home Inspectors.
Thanks to Alan Carson and Bob Dunlop, for permission for InspectAPedia to use text excerpts from The HOME REFERENCE BOOK - the Encyclopedia of Homes and to use illustrations from The ILLUSTRATED HOME .
Carson Dunlop Associates provides extensive home inspection education and report writing material. In gratitude we provide links to tsome Carson Dunlop Associates products and services.
 | HOME | ABOUT | ASK a QUESTION | CONTACT | CONTENT USE POLICY | DESCRIPTION | POLICIES | PRIVACY | |
| © 2024 - 1985 Publisher InspectApedia.com - Daniel Friedman | |||||||||