
InspectAPedia® FREE Encyclopedia of Building & Environmental Construction, Diagnosis, Maintenance & Repair |
Question? Just ask us! InspectAPedia
|
 How to Install Tile over Concrete Slab Floors
Types of ceramic tile failures on concrete slabs,
How to use a crack isolation membrane
- POST a QUESTION or COMMENT about how to install ceramic tile on concrete surfaces
How to install ceramic tile over a concrete slab:
This article discusses and compares the properties of ceramic floor tile, granite tile, marble tile, natural stone and agglomerate floor tiles. We address the installation details for each of these tile types.
This article series discusses current best design practices for kitchens and bathrooms, including layout, clearances, work space, and accessible kitchen and bathroom layout, clearances, turning space, grab bars, controls, etc.
InspectAPedia tolerates no conflicts of interest. We have no relationship with advertisers, products, or services discussed at this website.
Guide to Installing Tile Over Concrete Slabs
 Tiles can be applied directly to a clean,
smooth concrete slab with a latex Portland cement mortar.
The concrete should be properly cured, be level to 1/4 inch in
10 feet, and have a steel trowel or fine broom finish.
Tiles can be applied directly to a clean,
smooth concrete slab with a latex Portland cement mortar.
The concrete should be properly cured, be level to 1/4 inch in
10 feet, and have a steel trowel or fine broom finish.
Curing compounds or old adhesives used for carpeting or resilient flooring will act as bond breakers, so they need to be removed before installing the tile.
[Click to enlarge any image]
Either a power-blast cleaning machine or a rotary sander with a coarse carborundum sanding sheet can be used. If the slab has cracks or control joints, a crack isolation membrane should be used.
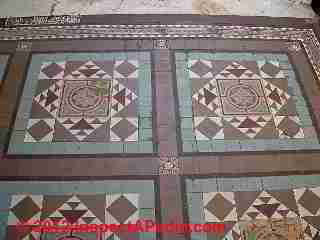
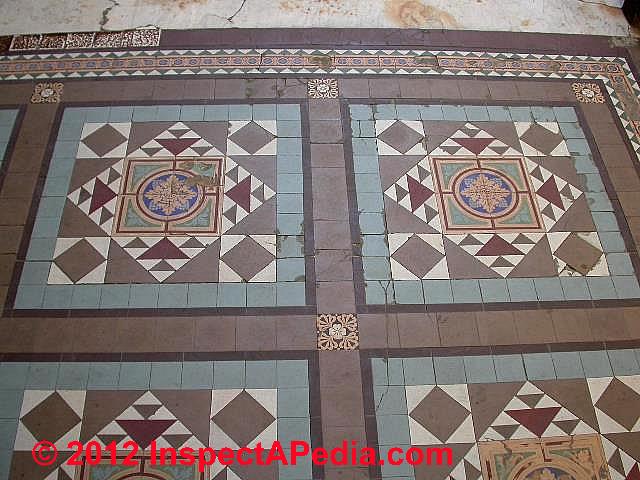
Our page top photo illustrates ceramic tiles set on concrete in an antique floor we observed in Buenos Aires, Argentina. At left is another ceramic tile on concrete installation in the same city, with some interesting repairs. This floor was installed around 1920.
We include advice on choosing and installing kitchen countertops, cabinets, and kitchen or bathroom flooring, sinks, and other plumbing fixtures and fixture controls such as faucets. A list of kitchen and bath product manufactures and sources is included.
This article includes excerpts or adaptations from Best Practices Guide to Residential Construction (Steve Bliss, J Wiley & Sons) , by Steven Bliss, courtesy of Wiley & Sons.
Other Tile Substrates Used in Remodeling
 In remodeling, tiles can be successfully
installed over existing ceramic tile, plastic laminate,
or resilient flooring (except the cushioned type) that
is well bonded.
In remodeling, tiles can be successfully
installed over existing ceramic tile, plastic laminate,
or resilient flooring (except the cushioned type) that
is well bonded.
These must be stripped of any sealers or waxes and scarified with a coarse sander before applying the new adhesive. Wood floors must first be covered with plywood or a cementitious backerboard.
Unsuitable substrates that should not be used under tile include oriented-strand board (OSB), lower grades of plywood with voids, and interior grade plywoods such as luan.
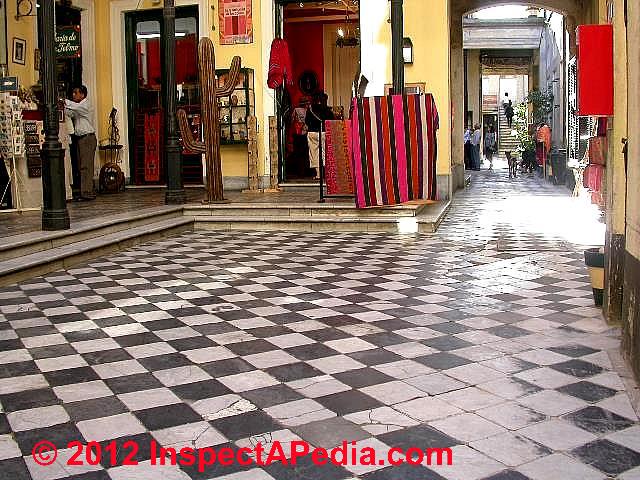
The ceramic tile floors shown at left were installed atop of an existing ceramic tile floor (lower right) and over both concrete and solid core plywood (the upper floor level).
The curved floor edge trim and facing were site-built by the editor (DF).
Guide to Using Floor Leveling Compounds For Setting Tile
If a wood floor or slab needs leveling, you can use special cement leveling compounds formulated for use as a substrate for ceramic tile or stone tile. These are either site-mixed from a bag or installed by a specialty subcontractor. Some are self-leveling and others require screeding.
Gypsum-based underlayments are generally not suitable for tile. Most self-leveling compounds can be installed up to about an inch thick.
For thicker applications, let the first layer dry before adding more, or fill lower areas with plywood shims before adding the compound. Use exterior-grade plywood with no voids.
Guide to Moisture and Water Barriers for Kitchen or Bath Tile
 Although glazed ceramic tile is waterproof, neither the
grout joints nor the cement backerboard behind the tile are
water barriers. To prevent moisture from passing through
the tile and substrate to the plywood or wood framing, a
moisture barrier is required in areas subject to high moisture
levels or occasional wetting, such as tub surrounds
and kitchen counters.
Although glazed ceramic tile is waterproof, neither the
grout joints nor the cement backerboard behind the tile are
water barriers. To prevent moisture from passing through
the tile and substrate to the plywood or wood framing, a
moisture barrier is required in areas subject to high moisture
levels or occasional wetting, such as tub surrounds
and kitchen counters.
In areas subject to heavy wetting, such as shower pans and some bathroom floors and counters, a sheet membrane or trowel-on membrane should be used to provide full waterproofing.
The tile job shown at left is discussed
at FLOOR TILE SEALERS, CERAMIC, STONE.
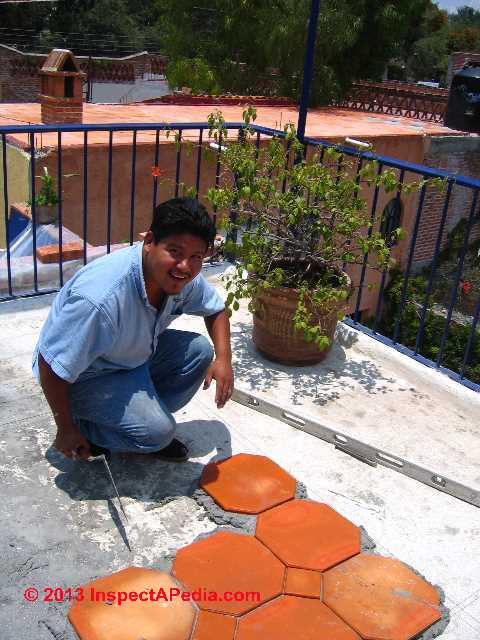
We needed to seal this concrete roof as part of the tile floor installation in order to stop leaks into the room below.
In 2015 this roof tile job had its tenth birthday of years with no leaks through this floor into the space below.
Moisture Barriers for Kitchen or Bath Tile
On tiled walls, protect the wood framing from water intrusion, using either 6-mil poly or 15-pound asphalt-impregnated felt lapped to shed water. The barrier should go between the tile substrate and the framing.
On outside walls, this material can also served as the air and vapor barrier if the joints are sealed with tape or a compatible sealant.
Tile Membranes for Wet Areas, Bathrooms, Showers
 Full waterproofing is required in construction
that must retain water, such as shower pans and tiled
tubs. It is also recommended in areas subject to frequent
wetting, such as raised tub surrounds, bathroom floors, and
counters with sinks. There are two types of membranes:
thermoplastic sheet materials and trowel-on membranes.
Full waterproofing is required in construction
that must retain water, such as shower pans and tiled
tubs. It is also recommended in areas subject to frequent
wetting, such as raised tub surrounds, bathroom floors, and
counters with sinks. There are two types of membranes:
thermoplastic sheet materials and trowel-on membranes.
Sheet membranes can be applied to most tile substrates
with either thinset mortar or a proprietary adhesive, and
tiles are bonded directly to the membrane. With any membrane,
check the label for compatibility with the substrate
and adhesives. Most waterproofing membranes also serve
as isolation membranes.
Figure 6-36 - elastomeric adhesive sheet membrane used below tile in wet areas.
[Click any image or table to see an enlarged version with additional detail, commentary & source citation.]
Watch out: TCNA specifies that a crack isolating membrane shall be installed on above-ground concrete slabs or floors when an ANSI A118.4 thinset tile mortar is being used to install large-format tile.
Tile isolation membranes are optional in (and we recommend their use in) many other situations. You can use a liquid membrane (after allowing dry and cure time), a peel-and stick isolating membrane, or a sheet-applied crack isolation membrane that is cut and glued to the slab before the tile is applied
In our OPINON an isolating membrane is the most-effective choice when installing tile on a new slab because we don't know where shrinkage cracks will appear. - Ed.
- Sheet membranes for use over concrete:
These single-layer elastomerics, such as chlorinated polyethylene (CPE), are bonded to the substrate—typically cement backerboard, plywood, or a mortar bed—with a compatible thinset mortar or proprietary adhesive (Figure 6-36 above).
After the adhesive cures, tiles are set onto the membrane with a second layer of thinset.
For watertight performance, joints in the membrane are caulked with a proprietary sealant or are solvent-welded. In addition to stopping water, CPE membranes act as an isolation membrane, protecting the tile and grout from movement in the substrate.
See TILE ISOLATION MEMBRANES.
Examples are Noble-Seal TS (Noble Company) and Dal-Seal TS (Dal-Tile Corp.), both 30-mil thick CPE. Special heavier membranes are designed for shower pans, tubs, and other details that must contain standing water.
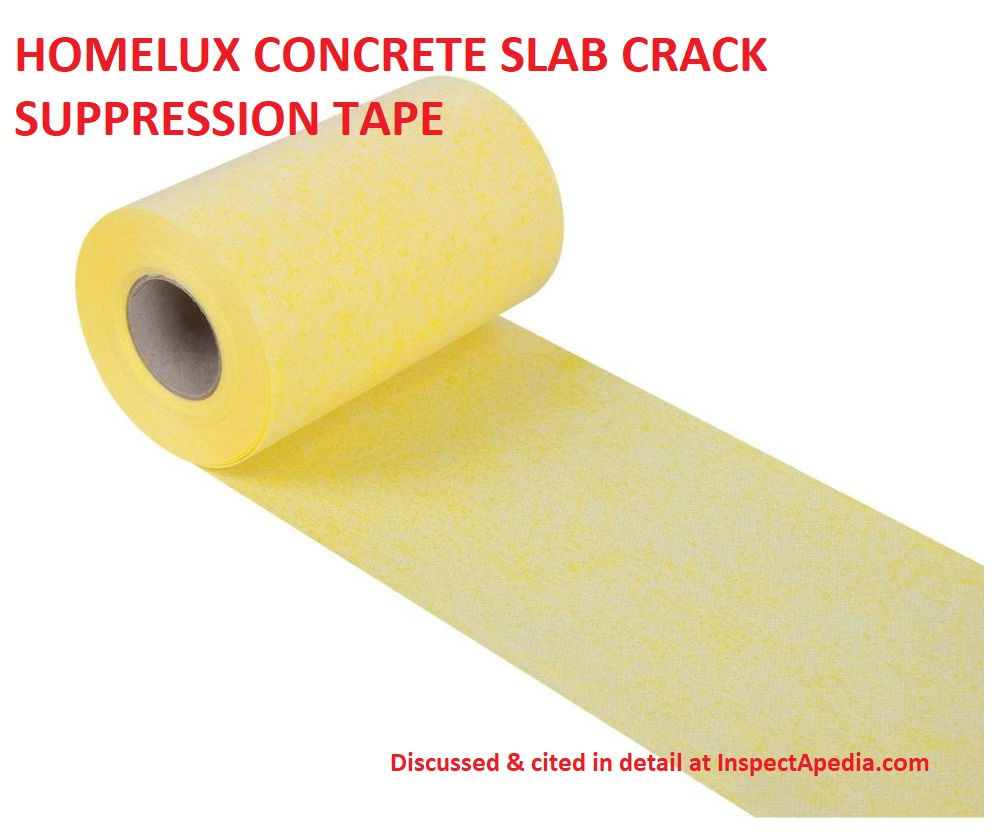
- Tape membranes: Concrete Slab Crack Suppression and Isolation Joint Tape
Crack suppression tapes or joint isolation tapes, often installed before underlayment, can prevent minor slab cracks from telegraphing up through finished flooring such as a ceramic tile job.
Typically the crack isolation tape works by sacrificing a portion of its thickness to permit tearing within the tape rather than telegraphing the crack to the finished-flooring above.
Concrete crack suppression tape for use under finish flooring is sold in various widths from 4" to about 3.25 ft. and in lengths from 15 t0 33 ft. or more.
Examples of Concrete Slab Crack Suppression Tape:
Homelux crack suppression tape:
The example crack suppression and isolation tape shown in the photo above is sold by building suppliers and is produced by Homelux and is sold in rolls of 4.5" (115mm) wide x 33 ft. (10m) long meeting or exceeding ANSI 118.10 and 118.12 standards.
The felt crack suppression tape is 0.33 mils in thickness, and is also described by the manufacturer as flooring tape.
Here is how Homelux describes their product:
The Homelux Crack Suppression and Isolation Joint Tape works in conjunction with the Homelux Underlayment to provide a waterproof barrier. By installing Homelux Crack Suppression and Isolation Underlayment, most cracks in the foundation are prevented from affecting your tile installation.
The tile flooring is isolated from the foundation and thus remains undamaged.
Tile can therefore even be laid on old or problematic foundations with no difficulty. Proven performance that is fully ANSI approved with a manufacturer's limited lifetime warranty.
Works in conjunction with the Homelux crack suppression and isolation underlayment to provide a waterproof barrier
In conjunction with the underlayment, prevents tile surface cracks caused by substrate movement
Rapid expansion and contraction makes it perfect for use with under floor heating systems - source: Home Depot Stores, 2019/02/03
RedGuard Uncoupling Mat & Uncoupling Crack Isolation Seam Tape
RedGuard uncoupling mat or tape, produced by Custom Tile Installation Systems and also sold at Home Depot and other building suppliers is used similarly to the crack suppression tape described above.
For waterproof installations use RedGuard Seam Tape (shown below), sold in 5-inch x 16.5 ft. rolls and used for uncoupling mat underlayments from cracks in a concrete slab or for uncoupling plywood subfloor joints from the finished flooring above.
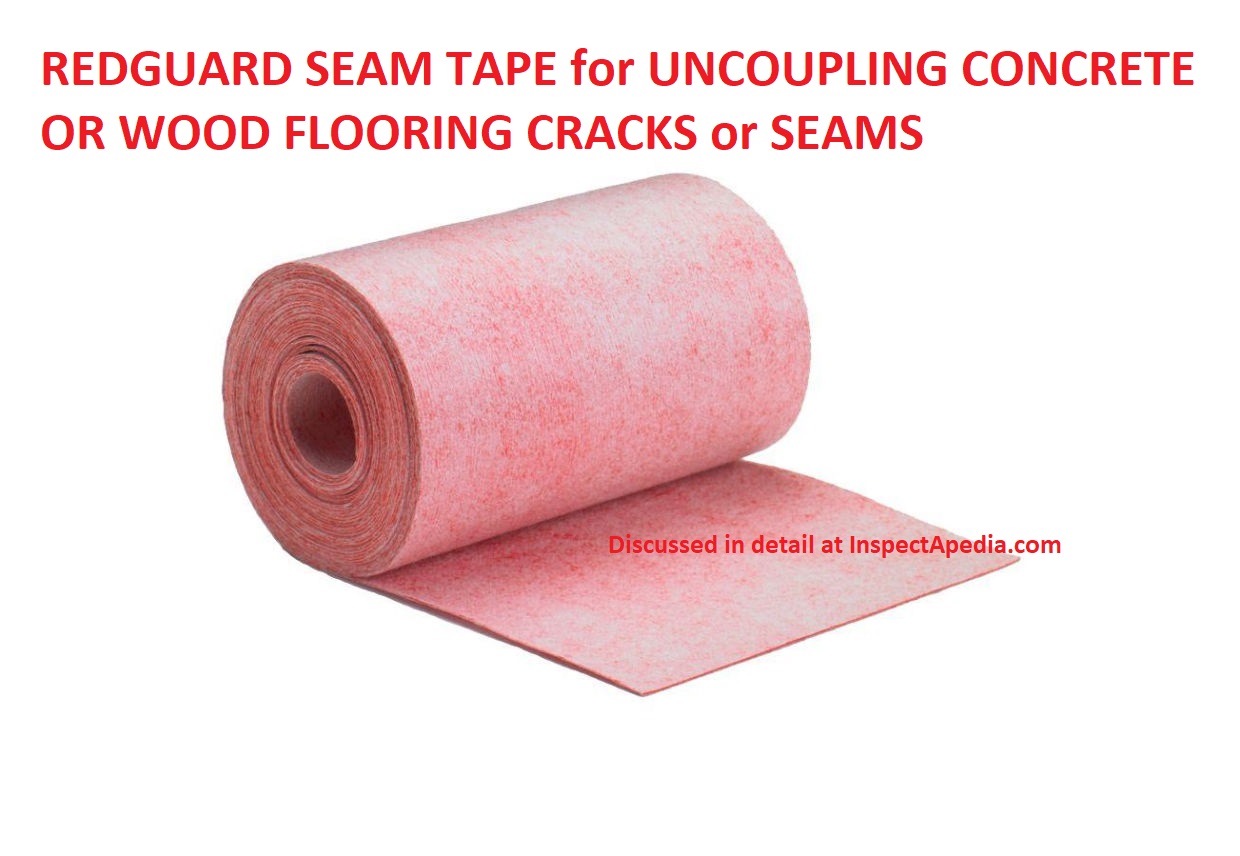 Custom Building Products description of RedGuard Seam Tape used on indoor floors:
RedGard Seam Tape is a membrane fabric that is used for the seams between RedGard mat installations.
RedGard Mat is designed differently than bonded membranes, with a sacrificial layer of fleece reinforced fabric that shears away or uncouples, when exposed to excessive substrate movement, absorbing stress and preserving the surface and integrity of the tile.
RedGard Mat’s bonding layers have reinforced fleece which locks mortar into the mat, ensuring strong, reliable installations.
Required for waterproof RedGard uncoupling mat
Used for seams and change of plane
Part of a waterproof/vapor control system for floors
Refer to RedGard mat installation instructions for proper installation of seam tape
- Home Depot Stores, retrieved 2019/02//03 https://www.homedepot.com
- Trowel-on membranes for use over concrete:
These one-part or two-part liquids are troweled or brushed on, some with a reinforcing fiberglass fabric. Trowel-on membranes for crack suppression are good for less critical areas that are only occasionally wetted, such as countertops, tub surrounds, and some floors.
They also provide limited protection against cracking due to movement in the substrate when used in conjunction with a reinforcing fabric.
Examples of one-part membranes include Laticrete 9235 (Laticrete International, Inc.) and Mapelastic HPG (Mapei Corp.).
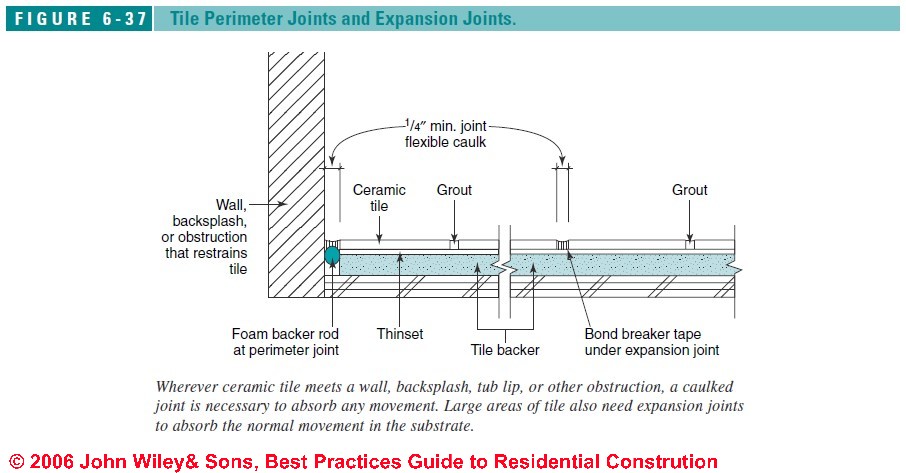
Expansion Joint Requirements in Tile Surfaces
Tile and grout are fairly unforgiving of movement in the substrate. To protect against cracking of the tile or grout joints, expansion joints are recommended by the Tile Council of America in the following places:
- Every 24 to 36 feet each direction; or every 8 to 12 feet in each direction if the tiled surface is exposed to moisture or direct sunlight.
- Around the perimeter of a room or wherever tile meets a different material or abuts restraining surfaces, such as curbs, columns, or pipes.
- At inside corners, such as where a countertop meets the backsplash.
- Wherever changes occur in the backing material, for example, from wood to masonry.
- Directly over any expansion, control, construction, or cold joint
Expansion joints should be at least 1/4 inch wide and free of grout, backerboard, or tile adhesive.
Use an elastomeric caulk with a backer rod or bond-breaker tape to prevent three-sided bonding of the caulk (Figure 6-37 below).
Most tile suppliers now carry colored caulks designed to match standard grout colors, or colored caulks can be ordered from Color Caulk
(see Kitchen & Bath Associations, Product Sources).
[Click any image or table to see an enlarged version with additional detail, commentary & source citation.]
Guide to Using Isolation Membranes to Avoid Cracks in Tile Surfaces
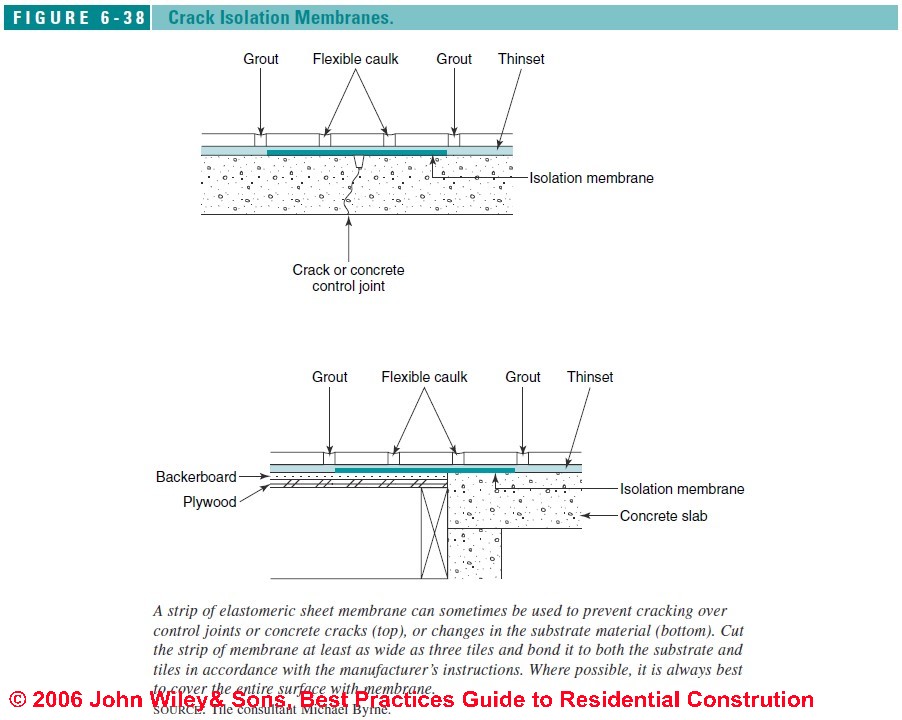 Polymer-modified thinset can
absorb small amounts of movement, but where more
significant movement is expected, a crack isolation membrane
is the safest approach.
Polymer-modified thinset can
absorb small amounts of movement, but where more
significant movement is expected, a crack isolation membrane
is the safest approach.
Examples include tiling over concrete with control joints or shrinkage cracks, over radiant slabs, or over existing tile or other problematic remodeling surfaces.
Wood-framed floors with long joist spans of 16 feet or more are also good candidates for isolation membranes.
Tile contractors typically use the same type of elastomeric membrane used for waterproofing, such as Noble- Seal TS (Noble Company) or Dal-Seal TS (Dal Tile).
It is applied as described above under “Membranes”, although joints between sheets do not need to be solvent welded unless waterproofing is also required.
Slab Crack Isolation Membrane Installation Instructions & Research
- ANSI A118.12 American National Standards For The Installation Of Ceramic Tile, available from webstore.ansi.org/
This publication is a compilation of voluntary standards for the installation of ceramic tile. American national standard specifications A108.01, .02, .1A, .1B, .1C, .4, .5, .6, .8, .9, .10, .11, .12, .13, .14, .15, .16, and .17 define the installation of ceramic tile. A118.1, .3, .4, .5, .6, .7, .8, .9, .10, .11, .12, and A136.1 define the test methods and physical properties for ceramic tile installation materials.
The A108/A118/A136.1 Specification includes editorial updates to standards:
General Requirements: Materials, Environmental, and Workmanship (A108.02).
American National Standard Specifications for Load Bearing, Bonded, Waterproof Membranes for Thin-set Ceramic Tile and Dimension Stone Installation (A118.10).
American National Standard Specifications for Crack Isolation Membranes for Thin-set Ceramic Tile and Dimension Stone Installation (A118.12).
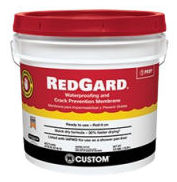
American National Standard Specifications for Organic Adhesives for Installation of Ceramic Tile (A136.1). - CBP, RedGard® WATERPROOFING AND CRACK PREVENTION MEMBRANE [PDF] (2021) Custom building Products, 10422 Pioneer Blvd.,
Santa Fe Springs, CA 90670 USA, Tel: 800-272-8786 - retrieved 2022/08/08, original source: https://www.custombuildingproducts.com/TDS/TDS-104.pdf
Excerpt:
RedGard® has tested and complies with Uniform Plumbing Code and International Plumbing Code standards for use as a shower pan liner per IAPMO Research and Testing, Inc., File No. 4244. - TCC Materials, TechPro, WATERPROOFING & CRACK ISOLATION MEMBRANE [PDF] Premixed highly flexible anti-fracture liquid membrane, TCC Materials, 2025 Centre Pointe Blvd., Suite 300 Mendota Heights, MN 55120 USA Phone: 1.651.688.9116 Web: techmixpro.com/techpro - retrieved 2022/08/08, original source: https://www.tccmaterials.com/wp-content/uploads/2020/07/data_-TP-Waterproofing-Crack-Islolation-19.01.23.pdf
- TCNA, CRACK ISOLATION MEMBRANE [PDF] Tile Council of North America, - retrieved 2022/08/08, original source: https://www.tcnatile.com/faqs/24-crack-isolation-membrane.html
Excerpt:
Due to a lack of consensus in the industry regarding competing anti-fracture products and the standards of performance for such, TCNA does not, at present, recommend a method or tiling over control joints with an anti-fracture membrane.
This is not to say this process will not work - it can if the right products and methods are used and the slab does not continue to curl. If the slab does curl at the control joint (which is not uncommon), any curling that occurs after tiling may damage the tile.
Really? Slab curling? Sounds like some confusing writing. Concrete may heave, settle, crack, or move but "curling" would occur in a flexible material, not concrete. I suspect the writer is trying to find a euphamism. - Ed.
- ISO / TC 189, Ceramic Tile
- Laticrete, 170.5 SOUND & CRACK ISOLATION MAT [PDF] Laticrete offers both liquid and mat underlayments. Laticrete, International, One Laticrete Park North, Bethany CT 06254-3423 USA, Tel: 1.800.243.4788 Web https://laticrete.com - in Canada, https://cdn.laticrete.com/
Excerpt:
170.5 Sound & Crack Isolation Mat is a high performance anti-fracture / sound and crack isolation membrane designed to be used under thin-bed adhesive for interior floor installations of ceramic tile, marble, stone and brick to reduce the transmission of impact noise and help provide soundproofing between floors and isolate cracks in the substrate. - Laticrete, CRACK SUPPRESSION KIT [PDF] Op. Cit.,
Excerpt:
Crack Suppression Kit consists of liquid rubber and reinforcing fabric packaged for convenient individual treatment of substrate cracks. When cured, it forms a highly flexible membrane that reduces or eliminates crack transmission in tile or stone work. - Laticrete, DIRECT ADHERED CERAMIC TILE, STONE, MASONRY VENEER, AND THIN BRICK FACADES TECHNICAL DESIGN MANUAL [PDF] (2020) Op. Cit.
Excerpt:
It is also recommended to consider using a crack suppression membrane to bridge the surface of this intersection and dissipate the shrinkage stress as added protection from future shrinkage. These techniques, together with the use of flexible adhesives and flexible additives to cement plasters/renders, will eliminate the need for placing movement joints at all these locations to prevent shrinkage cracks or stress on the cladding adhesive interface. - Laticrete, FRACTURE BAN [PDF] Op. Cit.,
Excerpt:
FRACTURE BAN SC is a thin, load bearing, self-curing liquid rubber polymer that can be easily applied in a single coat to form a flexible seamless anti-fracture membrane. FRACTURE BAN SC can be used on interior and exterior, horizontal applications.
FRACTURE BAN SC meets ANSI A118.12 requirements and prevents nonstructural, in-plane floor cracks up to1/8" (3 mm) from transferring through grout, ceramic tile and stone. Equipped with Microban Anti-Microbial Protection - Laticrete, WATERPROOF / ANTI-FRACTURE FABRIC [PDF] Op. Cit.,
Excerpt:
Waterproofing/Anti-Fracture Fabric is a thin, flexible non-woven fabric designed for use specifically with latex based membranes.
The Waterproofing/ Anti-Fracture Fabric adds strength to load-bearing waterproofing membranes specifically for the special requirements of ceramic tile, stone and brick installations.
A self-curing liquid rubber polymer and the Waterproofing/Anti-Fracture Fabric are quickly applied to form a flexible, seamless membrane that bonds to a wide variety of substrates. - Mapei, CRACK ISOLATION BASICS [PDF] (2018), Mapei Tech Talk, Mapei, 1144 E. Newport Center Drive, Deerfield Beach, Florida 33442
Technical Services at 1-800-992-6273 • Customer Service at 1-800-426-2734 (1-800-42-MAPEI retrieved 2022/08/08, original source: https://www.mapei.com/us/en-us/training-and-technical-service/tech-talk-blog/detail/mapei-blog/2018/08/20/crack-isolation-basics
Excerpts:
In general, three categories of crack-isolation products exist on the market today. They are the following:
Sheet-applied membranes:
Sheet-applied crack-isolation membranes typically come in rolls and feature a “peel-and-stick” application. The positives of sheet-applied membranes are that they can be immediately tiled over after they are placed and often will provide superior protection from wider cracks.
For example, MAPEGUARD 2 [PDF] can protect from in-plane cracks up to 3/8" (10 mm) in width. Most sheet-applied membranes do require a primer, such as MAPEI SM Primer Fast, to develop a proper bond with the substrate.
Liquid-applied membranes:
Liquid-applied crack-isolation membranes, such as MAPELASTIC CI [PDF] have become quite popular in recent years.
These membranes are typically applied with a roller to a certain thickness (a wet-film gauge should be used) and allowed to dry. Once they are dried, liquid-applied membranes will adhere to the substrate and stretch if cracks develop. In some cases, these membranes are used to treat existing cracks.
Uncoupling and multi-purpose membranes:
Unlike sheet- and liquid-applied crack-isolation membranes, uncoupling membranes work differently. Instead of a reliance on the product stretching, these membranes (such as MAPEGUARD UM [PDF] ) typically have a fabric layer that allows some movement before shearing from the upper plastic mat.
A variety of multi-purpose membranes that combine crack isolation with waterproofing such as Mapelastic AquaDefense (ANSI A118.10), or sound control such as Mapesonic 2 (ANSI A118.13), are also available.
- North American Adhesives, CRACK ISOLATION MEMBRANE NA1550 [PDF] Peel-and-Stick Flexible Fabric for Crack Isolation and Soiund Reduction, North American Adhesives, - retrieved 2022/08/08 original source: http://www.na-adhesives.com/wp-content/uploads/2016/08/NA_1550_EN.pdf
Excerpt:
NA 1550 Crack-Isolation Membrane is a flexible, thin, lightweight, load-bearing, “self-adhered” membrane over which ceramic tile and natural stone can be installed immediately with any polymer-modified cement mortar.
NA 1550 can be used to prevent in-plane floor cracks (up to 3/8" [10 mm] wide) from transferring through tile, stone and grout, and to help prevent gaps in wood-floor installations due to subfloor movement. NA 1550 is also excellent for use in multi-story buildings to reduce airborne and impact sound transmission between floors. - Carrothers, Scott, WHAT ARE CRACK ISOLATION MEMBRANES AND HOW ARE THEY USED? [PDF] (2018) Tile Magazine, August 2018, retrieved 2022/08/08 original source: https://www.tile-magazine.com/articles/88229-what-are-crack-isolation-membranes-and-how-are-they-used,
Methods for Slab Crack Isolation When Installing Tile Surfaces
In repair work or other jobs where covering an entire floor with isolation membrane is not feasible, a strip of membrane can be installed over just a crack, change of materials, or control joint where minor movement is expected. In general, this will work where cracks are less than 1/8 inch wide, and there is no vertical movement.
Also, with some types of membrane, the contractor can offset the sealant-filled “soft joints” in the tile, so they do not have to fall directly over the crack or control joint in a concrete slab
. In this case, create soft joints on both sides of the crack or joint (Figure 6-38), using a flexible sealant instead of grout. If a crack in the concrete substrate runs diagonal to the grout joints, the soft joint must run in a zigzag pattern on each side of the crack.
[Click any image or table to see an enlarged version with additional detail, commentary & source citation.]
According to tile expert Michael Byrne, crack-isolation membranes used this way should be three times the width of the tile, but he cautions that the preferred approach is to cover the entire floor with membrane.
This provides better protection against cracking and eliminates the soft joints and the slight bump in the tile surface, which may be unacceptable visually.
Ceramic Tile-Setting Material Manufacturer List
- Bonsal American www.bonsal.com Setting compounds, grouts, preformed shower pans, curbs, and niches. Also, distributor of backerboards, isolation membranes, and other tile-setting products
- Color Caulk, div. of Roanoke Companies Group www.colorcaulk.com Color-matched caulking
- Custom Building Products www.custombuildingproducts.com Elastomeric and liquid-applied membranes, self-leveling underlayments, setting compounds, and grouts
- Laticrete International www.laticrete.com Trowel-on membranes, self-leveling underlayments, setting compounds, grouts, and sealants
- Noble Company www.noblecompany.com CPE sheet membranes, trowel-on membranes, clamping ring drains, and preformed slopes, niches, and curbs
- Mapei www.mapei.com Trowel-on and sheet membranes, self-leveling underlayments, setting compounds, grouts, and color-matched sanded caulks
Ceramic Tile Backerboard Producers
- Custom Building Products www.custombuildingproducts.com Wonderboard cement backerboard, Easyboard cement and polystyrene lightweight backerboard, and Rhinoboard fiber-cement backerboard
- Georgia-Pacific Gypsum www.gp.com/build Denshield gypboard backer with glass-matt facing
- James Hardie Building Products www.jameshardie.com Fiber-cement backerboard
- National Gypsum www.nationalgypsum.com Permabase lightweight cement and polystyrene backerboard
- Schluter Systems www.schluter.com Kerdi tile membrane goes directly over drywall or other substrates
- T. Clear Corp./Fin Pan Inc. www.finpan.com Util-A-Crete lightweight concrete backerboard
- U.S. Gypsum www.usg.com Durock cement backerboard
- W. R. Bonsal www.bonsal.com Extruded polystyrene backerboard with fiberglassreinforced cement facing
-- Adapted with permission from Best Practices Guide to Residential Construction.
- Steve Bliss's Building Advisor at buildingadvisor.com helps homeowners & contractors plan & complete successful building & remodeling projects: buying land, site work, building design, cost estimating, materials & components, & project management through complete construction. Email: info@buildingadvisor.com
Steven Bliss served as editorial director and co-publisher of The Journal of Light Construction for 16 years and previously as building technology editor for Progressive Builder and Solar Age magazines. He worked in the building trades as a carpenter and design/build contractor for more than ten years and holds a masters degree from the Harvard Graduate School of Education.
Excerpts from his recent book, Best Practices Guide to Residential Construction, Wiley (November 18, 2005) ISBN-10: 0471648361, ISBN-13: 978-0471648369, appear throughout this website, with permission and courtesy of Wiley & Sons. Best Practices Guide is available from the publisher, J. Wiley & Sons, and also at Amazon.com
Mr. Bliss is a regular contributor of content at InspectApedia.com Also see our BOOK REVIEW of this publication. - Mark Cramer Inspection Services Mark Cramer, Tampa Florida, Mr. Cramer is a past president of ASHI, the American Society of Home Inspectors and is a Florida home inspector and home inspection educator. Mr. Cramer serves on the ASHI Home Inspection Standards. Contact Mark Cramer at: 727-595-4211 mark@BestTampaInspector.com
...
Continue reading at CERAMIC TILE DAMAGE REPAIR or select a topic from the closely-related articles below, or see the complete ARTICLE INDEX.
Or see these
Recommended Articles
- CERAMIC TILE FLOOR, WALL - home
- CERAMIC TILE, ASBESTOS / LEAD?
- CERAMIC TILE DAMAGE REPAIR
- CERAMIC TILE FLOOR & WALL
- CERAMIC TILE GROUT INSTALLATION
- CERAMIC TILE SETTING COMPOUNDS
- CERAMIC WALL TILE INSTALLATION
- CONTROL JOINT CRACKS in CONCRETE
- FLOOR DAMAGE DIAGNOSIS
- FLOOR, STONE, GRANITE, MARBLE, AGGLOMERATE
- FLOOR TILE, CERAMIC
- FLOOR TILE HISTORY & INGREDIENTS
- FLOOR TILE INSTALL on CONCRETE
- FLOOR TILE SEALERS, CERAMIC, STONE
- FLOOR TILE SETTING COMPOUNDS
- GROUT INSTALLATION, TILE
- TILED WALKING SURFACE SLIP HAZARDS
Suggested citation for this web page
FLOOR TILE INSTALL on CONCRETE at InspectApedia.com - online encyclopedia of building & environmental inspection, testing, diagnosis, repair, & problem prevention advice.
Or see this
INDEX to RELATED ARTICLES: ARTICLE INDEX to BATH & KITCHEN
Or use the SEARCH BOX found below to Ask a Question or Search InspectApedia
Ask a Question or Search InspectApedia
Questions & answers or comments about how to install ceramic tile on concrete surfaces.
Try the search box just below, or if you prefer, post a question or comment in the Comments box below and we will respond promptly.
Search the InspectApedia website
Note: appearance of your Comment below may be delayed: if your comment contains an image, photograph, web link, or text that looks to the software as if it might be a web link, your posting will appear after it has been approved by a moderator. Apologies for the delay.
Only one image can be added per comment but you can post as many comments, and therefore images, as you like.
You will not receive a notification when a response to your question has been posted.
Please bookmark this page to make it easy for you to check back for our response.
Our Comment Box is provided by Countable Web Productions countable.ca
Citations & References
In addition to any citations in the article above, a full list is available on request.
- Best Practices Guide to Residential Construction, by Steven Bliss. John Wiley & Sons, 2006. ISBN-10: 0471648361, ISBN-13: 978-0471648369, Hardcover: 320 pages, available from Amazon.com and also Wiley.com. See our book review of this publication.
- In addition to citations & references found in this article, see the research citations given at the end of the related articles found at our suggested
CONTINUE READING or RECOMMENDED ARTICLES.
- Carson, Dunlop & Associates Ltd., 120 Carlton Street Suite 407, Toronto ON M5A 4K2. Tel: (416) 964-9415 1-800-268-7070 Email: info@carsondunlop.com. Alan Carson is a past president of ASHI, the American Society of Home Inspectors.
Thanks to Alan Carson and Bob Dunlop, for permission for InspectAPedia to use text excerpts from The HOME REFERENCE BOOK - the Encyclopedia of Homes and to use illustrations from The ILLUSTRATED HOME .
Carson Dunlop Associates provides extensive home inspection education and report writing material. In gratitude we provide links to tsome Carson Dunlop Associates products and services.
 | HOME | ABOUT | ASK a QUESTION | CONTACT | CONTENT USE POLICY | DESCRIPTION | POLICIES | PRIVACY | |
| © 2024 - 1985 Publisher InspectApedia.com - Daniel Friedman | |||||||||