
InspectAPedia® FREE Encyclopedia of Building & Environmental Construction, Diagnosis, Maintenance & Repair |
Question? Just ask us! InspectAPedia
|
 How to Install a Gas CooktopStep by step details
- POST a QUESTION or COMMENT about gas cooktop installation procedures
Gas cooktop installation steps:
This article series explains the steps in installing & testing gas appliances and includes a detailed procedure for converting from LP gas or "bottled gas" to natural gas or "piped in gas" at a building.
InspectAPedia tolerates no conflicts of interest. We have no relationship with advertisers, products, or services discussed at this website.
Gas Stovetop or Cooktop Installation Details
 This article provides a step by step instructions show how to prepare the countertop opening, how to make gas & electrical connections, how to position and how to test the glass cooktop.
The article also illustrates how to clear obstructions that get in the way of fitting the cooktop into the countertop.
We also discuss gas piping & how to test for gas leaks in the cooktop piping & where to locate gas shutoff valves.
[Click to enlarge any image]
Gas Cooktop Installation Starting Point: Turn off the Gas Supply
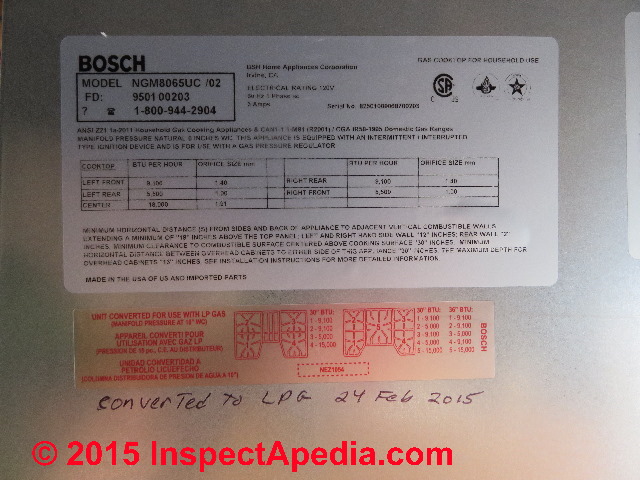
Watch out: before even starting a gas-cooktop installation, confirm that the new gas appliance has been properly set-up for the type of gas fuel to be used.
The photo at left shows the red sticker indicating that this gas cooktop has been converted for use with propane - LP gas. Never connect an appliance set up for natural gas to an LP gas supply or vice versa. The appliance will not work properly and it will be unsafe.
Watch out: Most manufacturers require that installation and fuel conversions shall be performed by a trained and qualified service technician and local building regulations may require gas appliance installation by a licensed professional.
The appliance installation technician should be sure to correctly identify the model number of your gas appliance so that s/he can follow the correct details of the manufacturer's instructions.
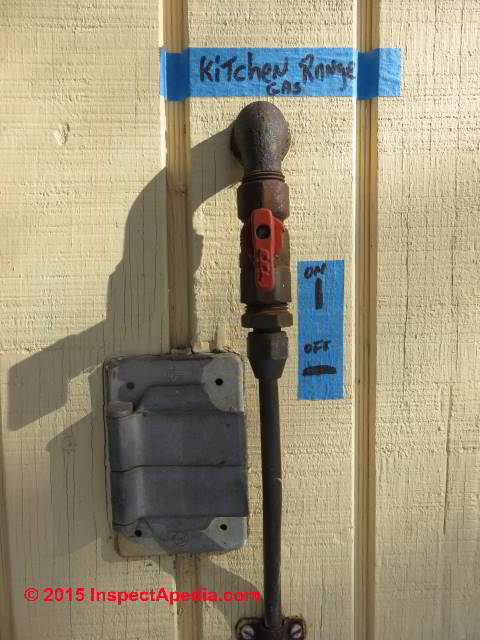
Here we show the outdoor gas shut-off valve for the gas cooktop in its OFF position - the red handle is at right angles to the gas piping direction.
Watch out: it would be smart to locate not only the local shut-off valves at the gas appliance but also the main gas shut-off valve for the building.
Should there be a leak or other problem at the local gas supply shut-off valve(s) you will be glad that you also shut down the gas supply at the building main.
Remove the Old Gas Cooktop
Watch out: be sure that the gas supply has been turned off before beginning this step.
 ...
... 
At above left is the fifteen-year-old Jennair glass cooktop that is being replaced in this procedure.
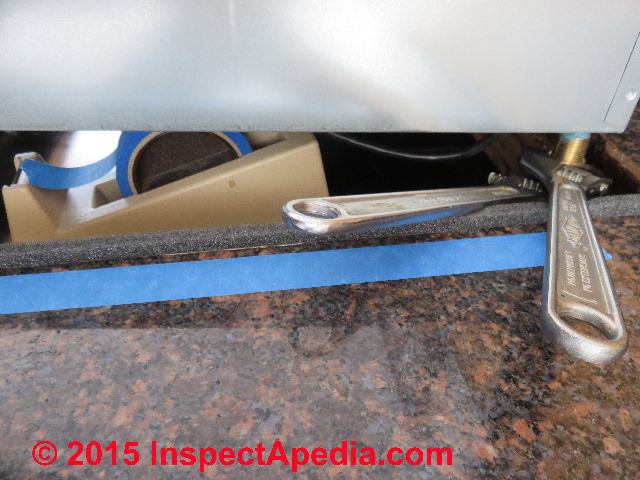
You'll need a pair of wrenches that fit the flexible gas line and the brass adapter that has been screwed to the cooktop's gas pipe nipple: turn these wrenches in opposite directions to loosen the gas line and remove it from the cooktop.
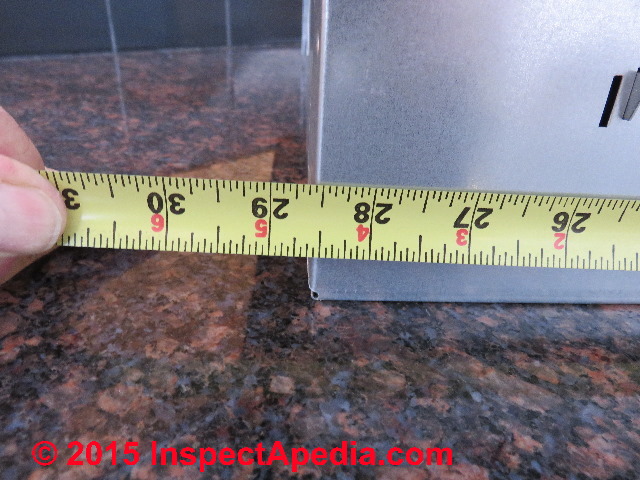
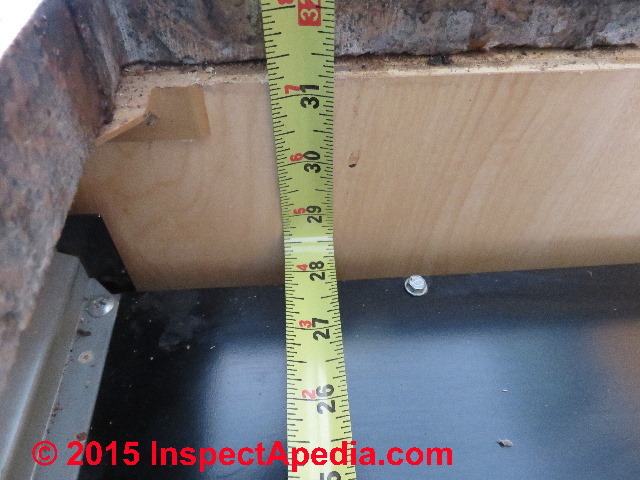
Measure Before Ordering & Again Before Installing a Gas Cooktop
You will need a measuring tape and should have already used it to make triple sure that the new gas cook top will fit into the countertop opening.
Measure the countertop opening length and width and the depth between the countertop surface and any obstructions below such as a built-in oven or other piping or cabinet components.
For complete details on making countertop measurements before buying & installing a cooktop,
see GAS COOK TOP & COUNTERTOP MEASUREMENTS
Watch out: After you have removed the old gas cooktop (if one is installed) test-fit the new one in the opening before proceeding to hook up gas piping or electrical wiring.
Clean and prepare the countertop surface & the appliance enclosure
 ...
... 
At above left we are removing old grease and silicone sealant that had marked the edges of the old cook-top that was removed.
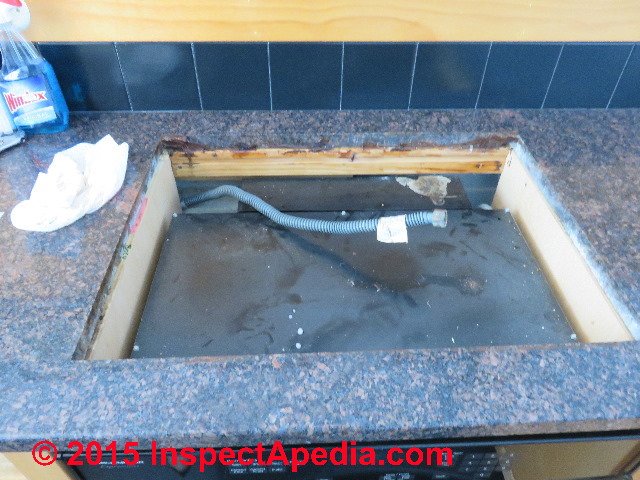
At above right you can see the flexible gas piping and the black top of the built-in oven installed below this cook top.
The presence of the built-in oven means that we will have to work carefully in locating and routing the gas connections and regulator and wiring as space is limited.
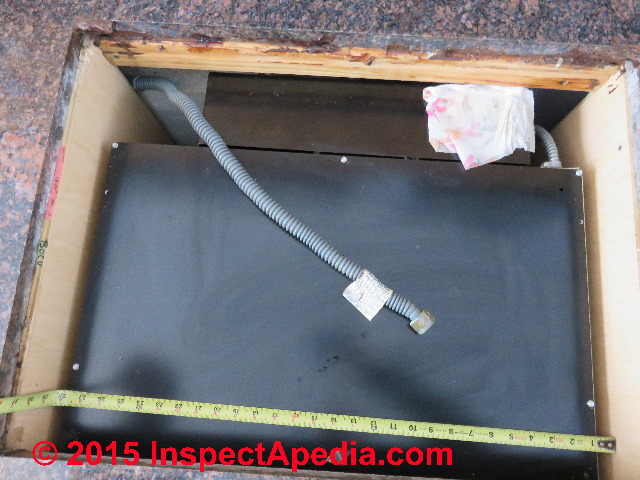
Test that the new cooktop fits into the countertop
If you don't do this, including checking for gas piping and electrical wiring clearances before hooking things up you'll be sorry.
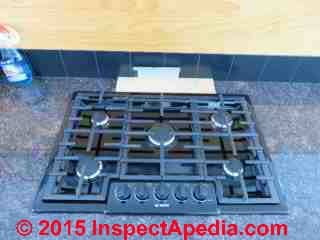
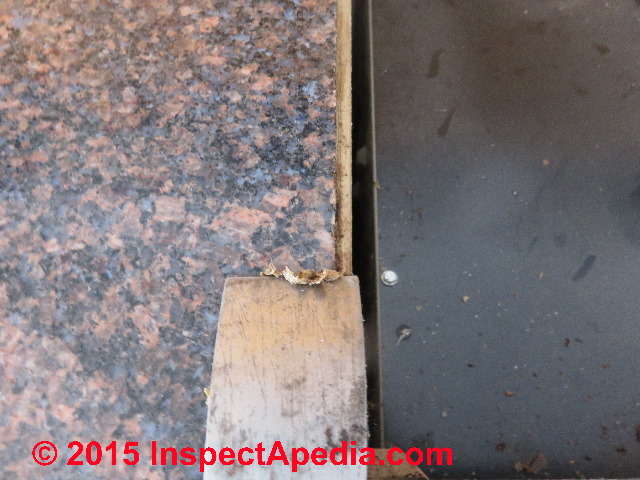
I told you so! The countertop opening through the granite countertop was properly sized to accept the Bosch gas cooktop, but still the unit did not fit down into the opening! The photo at above left shows our new cook top resting on something - a ledge of plywood that extends into the opening below the countertop.
What the heck? The cut-out in the granite counter top was big enough but as you can see in the two photos below, a ledge of plywood from a cabinet side and a piece of plastic cabinet bracket extend into the space wanted by the body of the new gas cooktop.
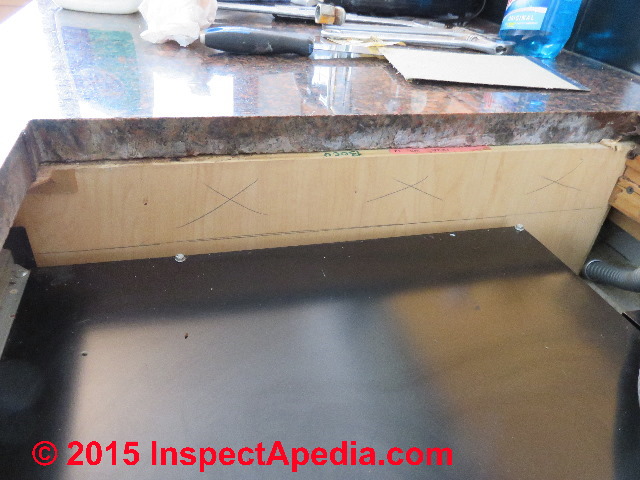
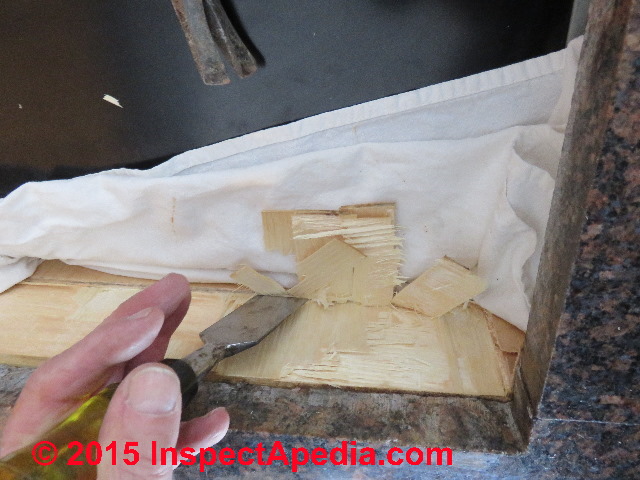
Remove Obstructions to Make the Cooktop Fit Properly
Adjust or remove any gas cooktop clearance obstructions in the countertop opening if needed. Here is where the professionals earn their big bucks.
My mom would maybe have sent the whole cooktop back and waited two years for the production of a custom unit to fit this funny opening. There is just no nice neat way to run a power saw in this opening to cut away the intruding material.
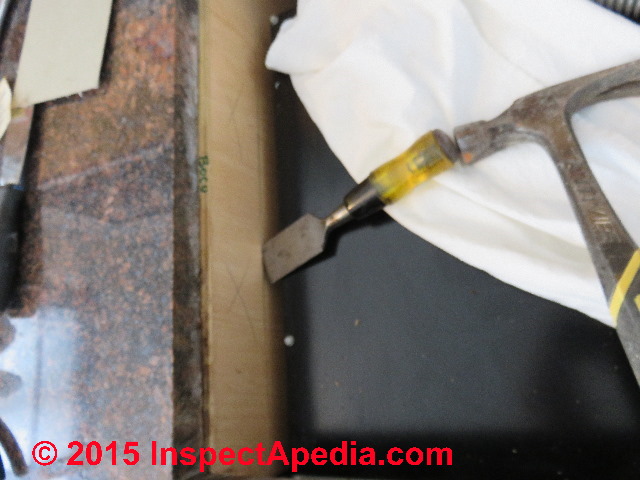
Above, we mark the depth of material to be removed and draw a straight cut line. At above right the hammer and chisel get to work. The drop cloth is both to help protect the top of the built-in oven below and chiefly to avoid dropping a lot of wood chips down into an opening where I'd rather not leave fire-kindling.

But as a retired carpenter I have a chisel and a hammer.
Having made a chiseled horizontal cut on our cut line it's easy to slice away a couple of plies of the plywood cabinet side that intruded into the cooktop's space.
As with most kitchens, the cabinets are assembled from several cases screwed together so each partition wall between cases is actually two thicknesses of plywood in dimension.
Losing half or even 3/4 of one of them does no harm to the structural strength of the cabinets.
At above right we're finishing off a few chips of plywood and at below left, removing the last few intruders into the cooktop's below-counter space.
I wanted to remove enough material to have working space to align the cook top precisely as desired on the countertop near the end of the installation process, and I didn't want any wood in direct contact with the cooktop's body.
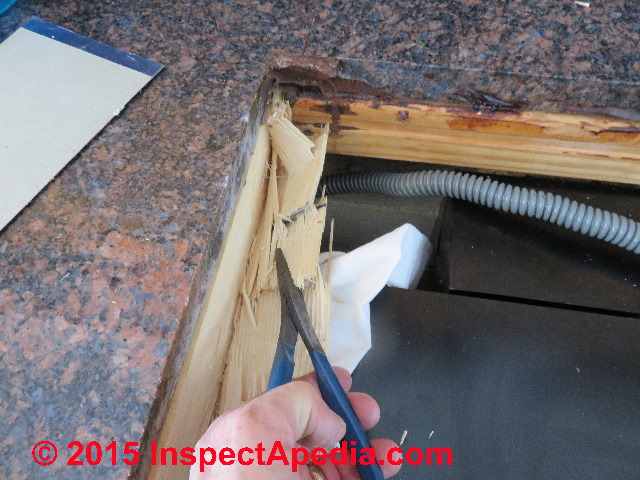
At above right you can see the cleaned-up space; we took care to vacuum up any sawdust and wood chips as well as to retrieve a roll of electrical tape someone had dropped into the opening behind the built-in oven years before.

Connect the cooktop's electrical power supply
You probably want to do this before hooking up the gas piping as the electrical wire and plug are simply plugged into a suitable grounded electrical receptacle (typically below the countertop and located there for this purpose).
The power cord should be routed where it will not rub on any sharp edges nor obstruct piping nor obstruct the final lowering of the cooktop into its countertop opening.
Watch out: most likely the manufacturer of your gas cooktop will specify that the electrical cord must be connected to a properly-wired and grounded electrical receptacle. Do not modify the cord and no-cheating on the grounding connections.
Connect gas regulator & gas supply piping to the cooktop
Now it's time to check clearances and routing for the flexible gas connector tubing and to locate the gas regulator.
There was not room to mount the appliance gas regulator directly to the pipe nipple on the bottom of the new gas cooktop nor to install it on a street ell connected to the cooktop's gas input nipple.
Either of those approaches ran into inadequate clearance from the top of the built-in oven below. Had there been no oven there'd have been no trouble.
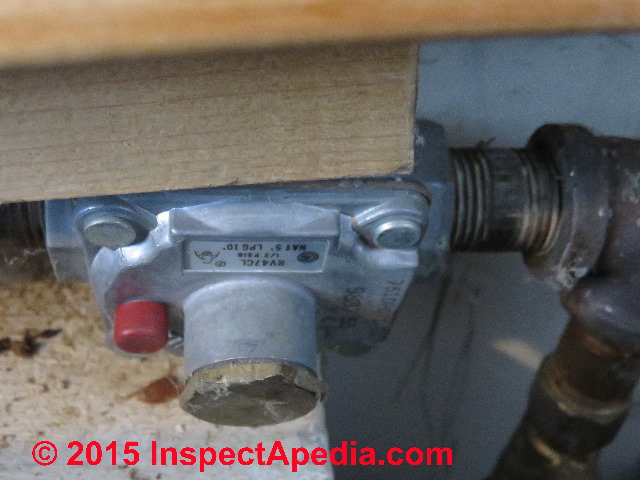
The installer of the old gas cooktop had run into the same problem.
Oh Joy! Look here: a gas regulator, already converted to LP gas and of the identical part number as our new gas regulator was already installed and connected atop the foundation wall in a niche where it just fit. (Photo above).
Not shown was another gas shut-off valve installed lower on the interior of the foundation wall, but as this shutoff is inaccessible thanks to the built-in oven, it's the outdoor shut-off that is actually used in this cooktop installation.
At above right we are preparing the pipe nipple on the new gas cooktop to receive the flare adapter that will permit connection of the flexible gas connector tubing.
One end of the tubing will connect to the cooktop's gas inlet via flare adapter and the other end of the tubing has to connect to the gas regulator shown at above left.
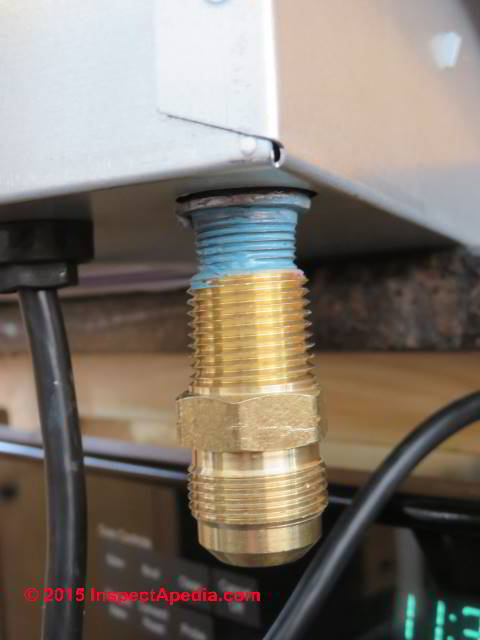
Above you can see the new flare adapter being screwed onto the cooktop's gas inlet nipple. In this particular installation the flexible gas connector will be routed from the gas regulator to this flare adapter.
In other installations the regulator might be connected to the gas inlet nipple and the flexible gas connector routed between the regulator's inlet end and the incoming gas piping.
Watch out: Be sure that the gas-rated pipe thread sealant covers all of the threads of the pipe nipple and fitting but do not use too much - we don't want to block the gas line with a blob of sealant.
Tighten this fitting taking care not to over-tighten and twist components up inside the cooktop itself.
At above right you can see that during connection of the flexible gas tubing to the flare adapter working space gets a bit tight. That's because we did not want to have to completely remove and later re-install the built-in gas oven below the cooktop. If we couldn't have made and tested the gas connections for leaks in the approach shown, we'd have had to remove the oven below to gain working space.
If needed
see FLEXIBLE GAS CONNECTOR INSTALL
Tip: also inspect the flare fitting with care before installing it. A scratch on the flare fitting's mating face can result in a hard-to-find gas leak. For an example of just this sort of defect
see GAS LEAK DETECTION, LP / NG
Check the cooktop & piping for gas leaks
Check for gas leaks then turn gas supply back off (so if you break something during the rest of installation you may live to tell about it) At below left you can see the simple gas leak test used by most gas appliance installers: a spray soap solution.
Watch out: Be sure to spray this solution to thoroughly wet every gas connection. Be sure to inspect every gas connection for bubbles - those mean there is a gas leak to be repaired.
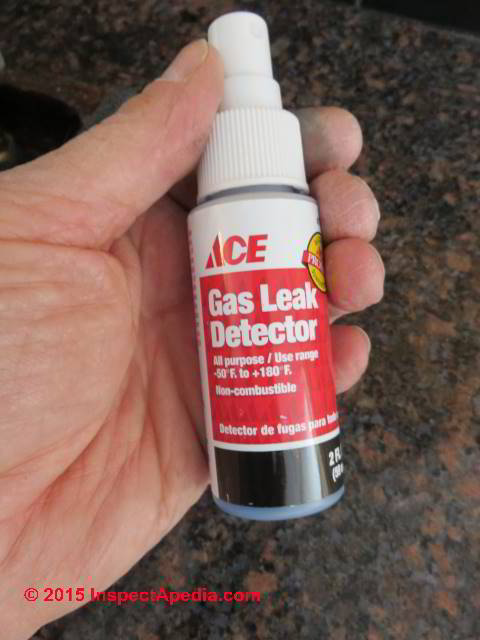
At above right you can see the spray solution around the flare connection and in shadow, the threaded connection of the flare adapter to the gas inlet nipple.

These connections and all of the gas piping connections must be tested for leaks. Use a flashlight, a mirror and an assistant to help hold parts out of the way as needed to be sure that your inspection is complete.
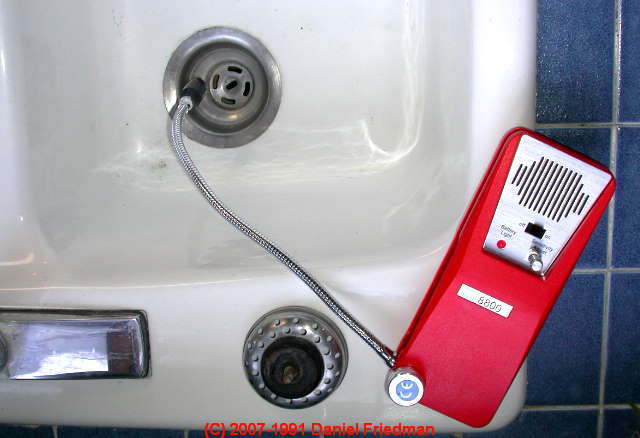
You might use a combustible gas detector to check for gas leaks also, but if that tool find a leak you may still have to go back this method to isolate it.
See TIF 8800 GAS DETECTOR
See more details about how to look for gas leaks
at GAS LEAK DETECTION, LP / NG
Watch out: improper installation and even improper inspection and testing methods involving natural or "LP" gas can involve dangerous conditions and risk fire or explosion.
If you smell gas you should leave the building immediately and should do so without doing anything that could create a spark such as operating a light switch or telephone. If the installing technician is unable to completely and immediately shut off the gas supply then from a safe location, call your gas company's emergency line and/or your fire department.
Install Cooktop Seals or Gaskets
Gaskets: Install any manufacturer-specified (and usually provided) gaskets or seals between cooktop and countertop surface. Bosch provides a thin foam gasket that is to be set about 1/4" in from the cooktop's upper surface outer edges before the cooktop is lowed in place.
If you are using clamps or supports that secure the cooktop to the countertop surface you may install them at this time. Keep in mind that if you detect a gas leak later you may need to remove these clamps to get access to piping for inspection or repairs.
Turn Cooktop gas supply back on
A quick trip back outside and a rapid dash back inside to check for leaks are your next exciting steps.
Final Test for Gas Leaks at the Gas Appliance
 Before securing the cooktop in place look, sniff, bubble test, or detector test again to satisfy yourself that there are absolutely no gas leaks.
Watch out: leaving even a small gas leak at any gas appliance installation risks a fire or explosion and fatal injury.
Shown at left: the TIF 8800 combustible gas analyzer, sniffing at a sink drain. This instrument is very sensitive. In fact a problem with using it to detect a gas leak at new gas piping installations is that it may be responding to the volatile organics emitted by the gas pipe thread sealant compound rather than to a gas leak.
That's probably why (other than being too poor to buy one) most gas appliance installers carry a bottle of gas leak detection fluid as we illustrated above.
See TIF 8800 GAS DETECTOR
and
also see GAS DETECTOR WARNINGS
Install the gas cooktop burner caps and grilles
You need the burner caps in place to perform the next step. If you like you can wait to install the grilles until after the final securing in place of the cooktop (shown later, below).
Final Check Gas Flame Quality & Igniters
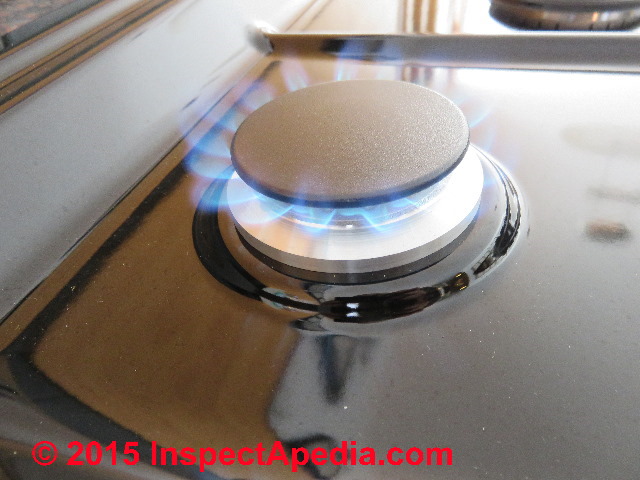
Turn on each burner one at a time and check gas flame quality and uniformity.
Don't let the burners run too long as you don't want to get burned on hot parts while finishing the last few steps in the job. The reason we make this test now before final securing of the cooktop in place is that if we find we need to change or fix something now is an easier time than after the cooktop is finally secured.
If you have trouble with uneven flame or igniter clicking check first for burner caps that are not properly seated. Gas burner caps askew or water or spillage into the burner are two chief causes of gas burner igniter trouble. If necessary
see GAS COOKTOP or STOVE IGNITER REPAIR
If the gas flame is uneven or color significantly off the air adjustment at the burner controls may be incorrect or worse, you did not install the proper gas orifice or spud.
See GAS FLAME COLOR CHECK if you need more deatils about checking the gas burner flame and the air mix.
Final Secure the Cooktop In Place
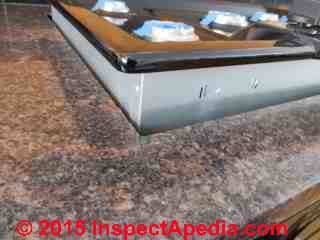
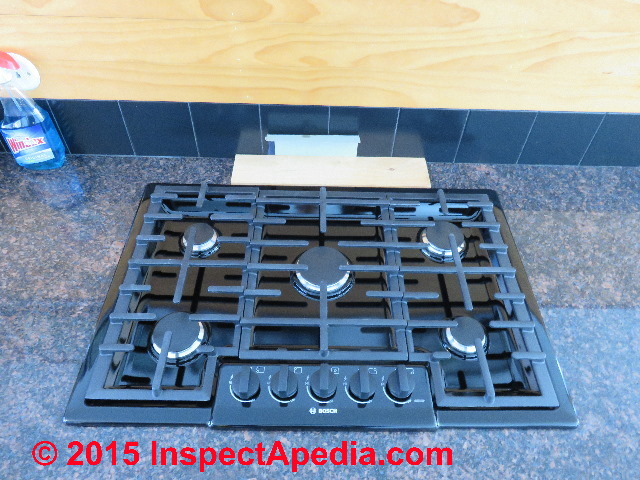 Set final cooktop exact final position and seal or secure of the cooktop in place on the countertop.
For this cooktop Bosch also provides screws and clamps that are used to secure the cooktop to the countertop from below, though fitting them in place can be difficult when space is very limited by a built-in oven below the cooktop.
Contrary to the manufacturer's recommendations and because we were precision-fitting the cooktop to just barely cover a too-large cutout (in the front to rear dimension) made by the countertop installer years ago, we added a small bead of clear silicone sealant around the edge of the cooktop where it meets the countertop surface.
This sealant, neatly done is not too ugly and it provided insurance against spills leaking beneath the cooktop where the too-large countertop opening meant that we could only use the Bosch gaskets on the two sides of the appliance.
In our photo above the board and cardboard shim at the rear of the cooktop are holding it precisely aligned in place so that our final steps at securing the cooktop will not have to be done over again. Obviously this board and shim are removed before the cook top is to be used.
Gas Cooktop & Gas Range Installation References
- Anconia COOKTOP USER MANUAL & INSTALLATION INSTRUCTIONS [PDF] (2016) 30" & 34" Gas Cooktops
- Bosch, "Gas Cooktops Installation Manual, NGM Gas Cooktops (NGM30, NGM50, NGM 56, NGM80, NGM86, NGMP65)", (2013), Bosch, 1901 Main St., Suite 600, Irvine CA 92614, Tel: 800-944-2904, Website: www.bosch-home.com
- Bosch, "LP Gas Conversion Kit Installation Manual , NGM Gas Cooktops (NGM30, NGM50, NGM 56, NGM80, NGM86, NGMP65)", (2014), Bosch, 1901 Main St., Suite 600, Irvine CA 92614, Tel: 800-944-2904, Website: www.bosch-home.com
- Bosch GAS NGM NGMP COOKTOP INSTALLATION MANUAL [PDF] Models NGM5056UC, NGM5656UC, NGM8056UC, NGM8656UC, NGMP056UC, NGMP656UC
- Bosch, "Gas Cooktops Use and Care Manual, NGM5055, NGM8055, NGM8065, NGMPO55, NGM5655, NGM8655, NGM8665, NGMP655", (11/13), Bosch, 1901 Main St., Suite 600, Irvine CA 92614, Tel: 800-944-2904, Website: www.bosch-home.com
- Bosch 36" 500-Series GAS COOKTOP INSTALLATION GUIDE [PDF] - https://media3.bosch-home.com/Documents/ MCDOC02268326_NGM5656UC.pdf
- Dacor HERITAGE GAS COOKTOP INSTALLATION INSTRUCTIONS [PDF] (2018) Models HPCT466GB, HPCT466GS, Dacor 14425 Clark Avenue, City of Industry, CA 91745 USA Tel: (800) 793-0093 Web: www.dacor.com
- Dacor HERITAGE DUAL COOKTOP INSTALLATION INSTRUCTIONS [PDF] Models HDCT304, HDCT365, Dacor (Op. Cit.)
- Fisher U& Paykel GAS COOKTOP INSTALLATION INSTRUCTIONS [PDF] (2018) https://producthelp.fisherpaykel.com/
- GE GAS COOKTOP INSTALLATION INSTRUCTIONS [PDF] 30" Sealed Gas Cooktop Models JGP336, JGP930, JGP326 - retrieved 2022/08/20, original source: https://products.geappliances.com/ MarketingObjectRetrieval/ Dispatcher?RequestType= PDF&Name=003679165.PDF
- Generic GAS COOKTOP INSTALLATION INSTRUCTIONS [PDF] 30" & 36" gas cooktop models - Electrolux, (China)
- IKEA GAS COOKTOP INSTALLATION GUIDE [PDF]
- KitchenAid GAS COOKTOP INSTALLATION GUIDE [PDF] Kitcheaid - retrieved 2022/08/20, original source: https://www.kitchenaid.com/pinch-of-help/major-appliances/how-to-install-a-cooktop.html
- LG LGC GAS COOKTOP INSTALLATION MANUAL [PDF] Models LCG3691ST LCG3091ST
- LG NGM- GAS COOKTOP INSTALLATION GUIDE [PDF] Models NGM5056 NGM5656 NGM8056 NGM8656 NGMP056 NGMP656
- Miele GAS COOKTOP OPERATING & INSTALLATION INSTRUCTIONS [PDF] Miele - retrieved 2022/08/20, original source: https://www.mieleusa.com/pmedia/ ZGA/TX3587/9596090-000-00_9596090-00.pdf
- Samsung GAS COOKTOP INSTALLATION MANUAL [PDF] Models NA30" 5310F & NA36" 5310F - Samsung corp., U.S. & Canada, at Lowes Building Supply Stores.
- Whirlpool GAS BUILT-IN COOKTOP INSTALLATION INSTRUCTIONS [PDF] 30" & 36" Models, - retrieved 2022/08/20, original source: https://www.whirlpool.com/content/ dam/global/documents/201905/ installation-instructions-w11116971-rev-c.pdf
- See additional citations and gas cooktop installation instructions found
atReferences or Citations
Reader Comments, Questions & Answers About The Article Above
Below you will find questions and answers previously posted on this page at its page bottom reader comment box.
Reader Q&A - also see RECOMMENDED ARTICLES & FAQs
On 2020-10-26 - by (mod) -
If by no fire you mean no fuel is being delivered at the burner then that's most likely just what you said
On 2020-10-25 by mike
So, I am not getting fire at the burners, hence no propane or bad regulator, correct?
On 2020-10-25 - by (mod) -
Mike you need both regulators.
On 2020-10-25 by mike
my cooktop came with a Maxtrol regulator converted to LP, and I have a 2 stage regulator coming off the 100lb propane tank , 1/2" line to the cooktop about 18ft. Do I need both regulators, just for the cooktop?
On 2020-02-14 - by (mod) -
Dean
The electrical codes don't give a required horizontal distance from a range or cooktop in a kitchen to the electrical receptacle, however even though some electric ranges actually were sold with an 120V receptacle built right into the range's upright back panel, in my OPINION it is safer to avoid putting an electrical receptacle right over the stove as well as where its cord is likely to get cooked.
You'll want tor review several clearance distances given at
ELECTRICAL RECEPTACLE HEIGHT & CLEARANCES
On 2020-02-14 by dean snyder
how close can I put a countertop receptacle to a gas cooktop
On 2019-07-26 - by (mod) -
Re-posting from Private Email:
PM wrote:
How much larger should the mounting hole for the gas cook top be from the lower pan?
Do I need a little space between the cook top lower pan and the counter edge?
Moderator reply:
Just enough larger to insert the cooktop body. In the installation instructions you'll see the cutout dimensions.
I don't like the edges of the cooktop underside to actually contact anything combustible such as wood cabinet facing or framing, even when the manufacturer says zero clearance is OK; I like 1/4"
But don't make the cutout hole too big.
Basically you don't want the cutout any bigger than necessary as a too-big hole reduces support for the stovetop whose lip needs to rest on the countertop.
Also think about distance from the front and rear of the counter when locating the hole as you have to clear the inside surface of the base cabinet front facing at the front of the cutout, and at the rear of the cutout opening you don't want to be closer to the wall than necessary.
After the unit is installed I use a small bead of clear silicone sealant to be sure it doesn't wiggle around (which is unsafe).
On 2019-04-10 - by (mod) -
Jim
The pipe diameter you need depends on the distance you have to run the line as well as the flow rate or input BTUH of the appliance. A generic OK or NOT OK just wouldn't make sense. Take a look in the IO manual for your stove top: typically they'll give pipe sizes and distances.
Then see our gas pipe sizing guides at GAS PIPING SIZE & MATERIAL https://inspectapedia.com/plumbing/Gas_Pipe_Specifications.php
On 2019-04-09 by Jim
Do I need a 1" gas line to supply a stove top or will 1/2" suffice?
On 2017-10-31 by Anonymous
Can I tap into my water heater gas line for the gas line to a Gas cook top. What is the minumun size gas pipe required?
On 2016-11-14 by Anonymous
What do you do if the cut out in the counter top is too big for the cook top?
...
Continue reading at GAS REGULATORS & APPLIANCE / HEATER CONTROLS or select a topic from the closely-related articles below, or see the complete ARTICLE INDEX.
Or see these
Recommended Articles
- FLEXIBLE GAS CONNECTOR INSTALL
- GAS APPLIANCE CONVERT LP-to-NATURAL GAS
- GAS COOKTOP INSTALLATION - home
- GAS COOKTOP INSTALLATION DETAILS
- GAS REGULATORS & APPLIANCE / HEATER CONTROLS
- GAS STOVETOP INSTALLATION TOOLS
- FLEXIBLE GAS CONNECTOR INSTALL
Suggested citation for this web page
GAS COOKTOP INSTALLATION DETAILS at InspectApedia.com - online encyclopedia of building & environmental inspection, testing, diagnosis, repair, & problem prevention advice.
Or see this
INDEX to RELATED ARTICLES: ARTICLE INDEX to GAS APPLIANCES, PIPING, CONTROLS
Or use the SEARCH BOX found below to Ask a Question or Search InspectApedia
Ask a Question or Search InspectApedia
Questions & answers or comments about gas fuel conversions: LP or "bottled gas" to piped-in natural gas service.
Try the search box just below, or if you prefer, post a question or comment in the Comments box below and we will respond promptly.
Search the InspectApedia website
Note: appearance of your Comment below may be delayed: if your comment contains an image, photograph, web link, or text that looks to the software as if it might be a web link, your posting will appear after it has been approved by a moderator. Apologies for the delay.
Only one image can be added per comment but you can post as many comments, and therefore images, as you like.
You will not receive a notification when a response to your question has been posted.
Please bookmark this page to make it easy for you to check back for our response.
Our Comment Box is provided by Countable Web Productions countable.ca
Citations & References
In addition to any citations in the article above, a full list is available on request.
- Bosch, "Gas Cooktops Installation Manual, NGM Gas Cooktops (NGM30, NGM50, NGM 56, NGM80, NGM86, NGMP65)", (2013), Bosch, 1901 Main St., Suite 600, Irvine CA 92614, Tel: 800-944-2904, Website: www.bosch-home.com
- Bosch, "LP Gas Conversion Kit Installation Manual , NGM Gas Cooktops (NGM30, NGM50, NGM 56, NGM80, NGM86, NGMP65)", (2014), Bosch, 1901 Main St., Suite 600, Irvine CA 92614, Tel: 800-944-2904, Website: www.bosch-home.com
- Bosch, "Gas Cooktops Use and Care Manual, NGM5055, NGM8055, NGM8065, NGMPO55, NGM5655, NGM8655, NGM8665, NGMP655", (11/13), Bosch, 1901 Main St., Suite 600, Irvine CA 92614, Tel: 800-944-2904, Website: www.bosch-home.com
- Venera Brinzea, Maria Mitu, Codina Movileanu, Adina Musuc and Domnina Razus, "Expansion Coefficients And Normal Burning Velocities Of Propane-air Mixtures By The Closed Vessel Technique", University of Bucharrest, (2010), Analele Universatati Bucuresti, Department of Physical Chemistry 4-12 Regina Elisabeta Blvd, District 3, Bucharest phone: +40'21'3143508; fax: +40-21-3159249 p ISSN: 1220-871X e ISSN: 1844-0401, ARS DOCENDI PUBLISHING HOUSE Sos. Panduri 90, District 5 Bucharest phone/fax: +40'21'4102575 e'mail: arsdocendi@yahoo.com
- Whirlpool Corporation, "Propane Conversion Kit Safety", retrieved 4/28/14, original source: http://www.whirlpoolcomfort.com/Upload/20562901.pdf
- PropaneCarbs.com, "Tri Fuel Natural Gas & Propane Conversion Kits, More Information About Conversion Kits ... for Generators, Welders, Concrete Sws, Floor Cleaners, Man Lifts", Tel: 1-877-425-8383, Email: info@propanecarbs.com, Website: http://www.propanecarbs.com, retrieed 4/28/14, original source: http://www.propanecarbs.com/tri_fuel_kits.html
- Propane101.com, "Converting Gas Appliances", Email: webmaster@propane101.com, website: http://www.propane101.com, retrieved 4/28/2014, original source: http://www.propane101.com/lpgasapplianceconversions.htm
Notice: as of the retrieval date, and regarding authority, the "Propane 101" website does not name authors, provides no contact information, no address. - Rheem Corporation, "Conversion Instructions, Natural Gas to LP Gas", FaxBack 1506 These fuel conversion instructions are limited to Manufactured Housing products only. Retrived 4/28/14, original source: http://www.rheem.com/docs /FetchDocument.aspx?ID=1c3868ba-1cdc-4e3f-8aec-b7c7a4a1d137
- U.S. Energy Information Administration - eia.doe.gov/
- U.S. Environmental Protection Agency - epa.gov/solar/energy-and-you/affect/natural-gas.html
- At Natural Gas.Org www.naturalgas.org/environment/naturalgas.asp#emission you’ll find a table of combustion products
- At geocities.com/rainforest/6847/report1.html is an interesting and detailed though not “neutral” report on the components and contaminants in the combustion of natural gas. You’ll see a long long list of emissions products, but look again – most of the contaminant levels listed are in the picograms.
- apvgn.pt/documentacao/iangv_rep_part1.pdf lists the components in natural gas exhaust from vehicles
- The Need Project, Manassas, VA: need.org/needpdf/infobook_activities/SecInfo/NGasS.pdf
- Kroschwitz, Jacqueline I., and Mary Howe-Grant (eds.). "Gas, Natural." In Encyclopedia of Chemical Technology. 4th ed., vol. 12. New York: John Wiley and Sons, Inc., 1993.
- Tussing, Arlon R., & Bob Tippee. The Natural Gas Industry: Evolution, Structure, and Economics. 2nd ed. Tulsa, OK: PennWell Publishing, 1995.
- Thanks to reader E Leal for suggesting the addition of details about how to convert gas burning appliances from propane to natural gas or from natural gas to propane. 8/4/09
- Thanks to reader JR for discussing LP and natural gas operating pressures and leak detection safety, October 2010.
- Glenwood Range Company, Customer Service, 435 Park Ave., Delaware OH 43105, 614-363-1381, Glenwood-Sunray Service Center: 215-682-4211.
- Our recommended books about building & mechanical systems design, inspection, problem diagnosis, and repair, and about indoor environment and IAQ testing, diagnosis, and cleanup are at the InspectAPedia Bookstore. Also see our Book Reviews - InspectAPedia.
- In addition to citations & references found in this article, see the research citations given at the end of the related articles found at our suggested
CONTINUE READING or RECOMMENDED ARTICLES.
- Carson, Dunlop & Associates Ltd., 120 Carlton Street Suite 407, Toronto ON M5A 4K2. Tel: (416) 964-9415 1-800-268-7070 Email: info@carsondunlop.com. Alan Carson is a past president of ASHI, the American Society of Home Inspectors.
Thanks to Alan Carson and Bob Dunlop, for permission for InspectAPedia to use text excerpts from The HOME REFERENCE BOOK - the Encyclopedia of Homes and to use illustrations from The ILLUSTRATED HOME .
Carson Dunlop Associates provides extensive home inspection education and report writing material. In gratitude we provide links to tsome Carson Dunlop Associates products and services.
 | HOME | ABOUT | ASK a QUESTION | CONTACT | CONTENT USE POLICY | DESCRIPTION | POLICIES | PRIVACY | |
| © 2024 - 1985 Publisher InspectApedia.com - Daniel Friedman | |||||||||